iP8500 Quick Start Guide
Page 5
... for Photographs 29 Using the Bundled Software 37 Printing Borderless Photographs 38 Printing Maintenance Replacing an Ink Tank 42 When Printing Becomes Faint or Colors are Incorrect 48 Printing the Nozzle Check Pattern 49 Print Head Cleaning 53 Print Head Deep Cleaning 57 Aligning the Print Head 61 Troubleshooting Cannot Install the Printer Driver 66 The USB 2.0 Hi-speed Connection Does...
... for Photographs 29 Using the Bundled Software 37 Printing Borderless Photographs 38 Printing Maintenance Replacing an Ink Tank 42 When Printing Becomes Faint or Colors are Incorrect 48 Printing the Nozzle Check Pattern 49 Print Head Cleaning 53 Print Head Deep Cleaning 57 Aligning the Print Head 61 Troubleshooting Cannot Install the Printer Driver 66 The USB 2.0 Hi-speed Connection Does...
iP8500 Quick Start Guide
Page 27
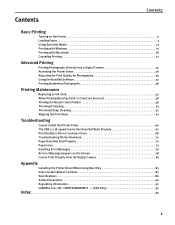
... to turn on the camera or select Play mode manually after connecting the camera to "Aligning the Print Head" on the printer, or by pressing the RESUME/CANCEL button on page 61. z When printing from your camera. If you use the AC adapter supplied with PictBridge before connecting the camera. z...with your PC, be sure to unplug the cable connecting the digital camera. 1 Set up the printer. 2 Turn on the printer. The print head alignment can be aligned using the USB cable (for PictBridge or Canon Bubble Jet Direct to use the camera battery, be sure to charge it is turned off. ...
... to turn on the camera or select Play mode manually after connecting the camera to "Aligning the Print Head" on the printer, or by pressing the RESUME/CANCEL button on page 61. z When printing from your camera. If you use the AC adapter supplied with PictBridge before connecting the camera. z...with your PC, be sure to unplug the cable connecting the digital camera. 1 Set up the printer. 2 Turn on the printer. The print head alignment can be aligned using the USB cable (for PictBridge or Canon Bubble Jet Direct to use the camera battery, be sure to charge it is turned off. ...

iP8500 Quick Start Guide
Page 32
...application program, the command and menu names may differ, and there may be opened from Printing Preferences or applications. When opening the printer properties dialog box. The printer properties dialog box opens. Then click Preferences (or Properties). This manual refers to the ...Click Start and select Control Panel, Printers and Other Hardware, and then Printers and Faxes. The Print dialog box can be more details, see the user's manual for maintenance operations, such as Print Head Cleaning, or to specify printer settings common to print a document. These tabs are ...
...application program, the command and menu names may differ, and there may be opened from Printing Preferences or applications. When opening the printer properties dialog box. The printer properties dialog box opens. Then click Preferences (or Properties). This manual refers to the ...Click Start and select Control Panel, Printers and Other Hardware, and then Printers and Faxes. The Print dialog box can be more details, see the user's manual for maintenance operations, such as Print Head Cleaning, or to specify printer settings common to print a document. These tabs are ...

iP8500 Quick Start Guide
Page 49
z Handle ink tanks carefully to the center. 3 Remove the empty ink tank. Push the tab and remove the ink tank. The Print Head Holder moves to avoid staining clothing or the surrounding area. Be sure to replace ink tanks one by one when replacing more than one ink ... pull down the Inner Cover forward to open the Paper Output Tray. ) of consumables. Printing Maintenance „ Replacing Ink Tanks When an ink tank runs out of ink, replace it using the following steps. 1 Ensure that the printer is on, and then push the upper center ( Front Cover to open . remove only...
z Handle ink tanks carefully to the center. 3 Remove the empty ink tank. Push the tab and remove the ink tank. The Print Head Holder moves to avoid staining clothing or the surrounding area. Be sure to replace ink tanks one by one when replacing more than one ink ... pull down the Inner Cover forward to open the Paper Output Tray. ) of consumables. Printing Maintenance „ Replacing Ink Tanks When an ink tank runs out of ink, replace it using the following steps. 1 Ensure that the printer is on, and then push the upper center ( Front Cover to open . remove only...

iP8500 Quick Start Guide
Page 51
... replacing the ink tank, the printer executes Print Head Cleaning automatically. The POWER lamp flashes during cleaning. 47 Printing will cause the ink tank to the right. Printing Maintenance (1) Insert the ink tank into the Print Head. (2) Press on the mark on the ink tank until the Print Head Cleaning finishes. z To maintain optimal print quality, use an ink tank...
... replacing the ink tank, the printer executes Print Head Cleaning automatically. The POWER lamp flashes during cleaning. 47 Printing will cause the ink tank to the right. Printing Maintenance (1) Insert the ink tank into the Print Head. (2) Press on the mark on the ink tank until the Print Head Cleaning finishes. z To maintain optimal print quality, use an ink tank...

iP8500 Quick Start Guide
Page 52
...contact the Customer Care Center. If the problem remains after running the print head maintenance, align the Print Head. Before printing the nozzle check pattern or cleaning the Print Head, check the following; See "Print Quality is installed securely. z Press on the mark on the ink ... the Print Head" on page 53 After print head cleaning, print the nozzle check pattern. If the ruled lines are probably clogged. Printing Maintenance When Printing Becomes Faint or Colors are Incorrect When printing becomes faint or colors are incorrect, even if ink remains in the printer driver ...
...contact the Customer Care Center. If the problem remains after running the print head maintenance, align the Print Head. Before printing the nozzle check pattern or cleaning the Print Head, check the following; See "Print Quality is installed securely. z Press on the mark on the ink ... the Print Head" on page 53 After print head cleaning, print the nozzle check pattern. If the ruled lines are probably clogged. Printing Maintenance When Printing Becomes Faint or Colors are Incorrect When printing becomes faint or colors are incorrect, even if ink remains in the printer driver ...

iP8500 Quick Start Guide
Page 53
... plain paper in the Sheet Feeder or Cassette. 2. z Nozzle check pattern printing can also be executed from the Print Head nozzles. Press the Paper Feed Switch to select the paper source in which you loaded the paper. 3 Open the printer properties dialog box. Printing the Nozzle Check Pattern Without a Computer. Hold down the RESUME/CANCEL...
... plain paper in the Sheet Feeder or Cassette. 2. z Nozzle check pattern printing can also be executed from the Print Head nozzles. Press the Paper Feed Switch to select the paper source in which you loaded the paper. 3 Open the printer properties dialog box. Printing the Nozzle Check Pattern Without a Computer. Hold down the RESUME/CANCEL...

iP8500 Quick Start Guide
Page 54
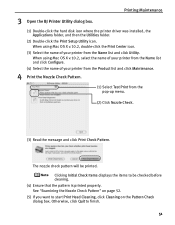
...printer on, load a sheet of Letter-sized plain paper in the Sheet Feeder or Cassette. 2 Press the Paper Feed Switch to select the paper source in which you want to be printed. See "Examining the Nozzle Check Pattern" on the Pattern Check dialog box. Printing Maintenance 4 Print... the Nozzle Check Pattern. (1) Click the Maintenance tab. (2) Click Nozzle Check. (3) Read the message and click Print Check Pattern. Clicking Initial Check Items displays the items to start Print Head Cleaning, click Cleaning on page 52. ...
...printer on, load a sheet of Letter-sized plain paper in the Sheet Feeder or Cassette. 2 Press the Paper Feed Switch to select the paper source in which you want to be printed. See "Examining the Nozzle Check Pattern" on the Pattern Check dialog box. Printing Maintenance 4 Print... the Nozzle Check Pattern. (1) Click the Maintenance tab. (2) Click Nozzle Check. (3) Read the message and click Print Check Pattern. Clicking Initial Check Items displays the items to start Print Head Cleaning, click Cleaning on page 52. ...
iP8500 Quick Start Guide
Page 55
...pattern will be checked before cleaning. (4) Ensure that the pattern is printed properly. Clicking Initial Check Items displays the items to be printed. Printing Maintenance (1) Double-click the hard disk icon where the printer driver was installed, the Applications folder, and then the Utilities folder. ... name of your printer from the pop-up menu. (2) Click Nozzle Check. (3) Read the message and click Print Check Pattern. See "Examining the Nozzle Check Pattern" on page 52. (5) If you want to finish. 51 Otherwise, click Quit to start Print Head Cleaning, click Cleaning...
...pattern will be checked before cleaning. (4) Ensure that the pattern is printed properly. Clicking Initial Check Items displays the items to be printed. Printing Maintenance (1) Double-click the hard disk icon where the printer driver was installed, the Applications folder, and then the Utilities folder. ... name of your printer from the pop-up menu. (2) Click Nozzle Check. (3) Read the message and click Print Check Pattern. See "Examining the Nozzle Check Pattern" on page 52. (5) If you want to finish. 51 Otherwise, click Quit to start Print Head Cleaning, click Cleaning...

iP8500 Quick Start Guide
Page 56
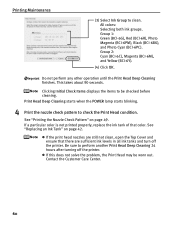
...of ink is discharged properly. See "Print Head Cleaning" on page 42. (1) (2) (1) If these patterns have white stripes, Group 1 print head nozzles need cleaning. When white stripes appear Click Cleaning in the Pattern Check dialog box to start Print Head Cleaning. See "Replacing an Ink ...Group 2 print head nozzles need cleaning. Printing Maintenance „ Examining the Nozzle Check Pattern The nozzle check pattern should appear as follows when ink is insufficient. Examine the nozzle check pattern output by the printer. The nozzle check pattern will not be printed correctly if ...
...of ink is discharged properly. See "Print Head Cleaning" on page 42. (1) (2) (1) If these patterns have white stripes, Group 1 print head nozzles need cleaning. When white stripes appear Click Cleaning in the Pattern Check dialog box to start Print Head Cleaning. See "Replacing an Ink ...Group 2 print head nozzles need cleaning. Printing Maintenance „ Examining the Nozzle Check Pattern The nozzle check pattern should appear as follows when ink is insufficient. Examine the nozzle check pattern output by the printer. The nozzle check pattern will not be printed correctly if ...

iP8500 Quick Start Guide
Page 57
... the Print Head consumes ink, so perform Print Head Cleaning only when necessary. z Ensure that the printer is closed. See "Examining the Nozzle Check Pattern" on page 28. 3 Start Print Head Cleaning. (1) Click the Maintenance tab. (2) Click Cleaning. 53 Cleaning the Print Head Without a Computer z The Print Head can also...hold down the RESUME/CANCEL button until the POWER lamp flashes once. See "Opening the Printer Properties Dialog Box Directly from the printer itself. Note that cleaning the Print Head causes waste ink to be cleaned from the Start Menu" on page 52. 1 Ensure...
... the Print Head consumes ink, so perform Print Head Cleaning only when necessary. z Ensure that the printer is closed. See "Examining the Nozzle Check Pattern" on page 28. 3 Start Print Head Cleaning. (1) Click the Maintenance tab. (2) Click Cleaning. 53 Cleaning the Print Head Without a Computer z The Print Head can also...hold down the RESUME/CANCEL button until the POWER lamp flashes once. See "Opening the Printer Properties Dialog Box Directly from the printer itself. Note that cleaning the Print Head causes waste ink to be cleaned from the Start Menu" on page 52. 1 Ensure...

iP8500 Quick Start Guide
Page 58
...), and Photo Cyan (BCI-6PC). Print Head Cleaning starts when the POWER lamp starts blinking. Clicking Initial Check Items displays the items to print the nozzle check pattern. See "Replacing an Ink Tank" on . 54 See "Examining the Nozzle Check Pattern" on page 52. 1 Ensure that the printer is directly displayed when you click...
...), and Photo Cyan (BCI-6PC). Print Head Cleaning starts when the POWER lamp starts blinking. Clicking Initial Check Items displays the items to print the nozzle check pattern. See "Replacing an Ink Tank" on . 54 See "Examining the Nozzle Check Pattern" on page 52. 1 Ensure that the printer is directly displayed when you click...
iP8500 Quick Start Guide
Page 59
...Click Cleaning. (3) Select Ink Group to clean. Printing Maintenance (1) Double-click the hard disk icon where the printer driver was installed, the Applications folder, and then the Utilities folder. (2) Double-click the Printer Setup Utility icon. Print Head Cleaning starts when the POWER lamp starts blinking. ...OK. When using Mac OS X v.10.2, select the name of your printer from the Name list and click Configure. (4) Select the name of your printer from the Product list and click Maintenance. 3 Start Print Head Cleaning. (1) Ensure that Cleaning is selected from the Name list and click...
...Click Cleaning. (3) Select Ink Group to clean. Printing Maintenance (1) Double-click the hard disk icon where the printer driver was installed, the Applications folder, and then the Utilities folder. (2) Double-click the Printer Setup Utility icon. Print Head Cleaning starts when the POWER lamp starts blinking. ...OK. When using Mac OS X v.10.2, select the name of your printer from the Name list and click Configure. (4) Select the name of your printer from the Product list and click Maintenance. 3 Start Print Head Cleaning. (1) Ensure that Cleaning is selected from the Name list and click...
iP8500 Quick Start Guide
Page 61
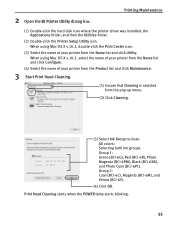
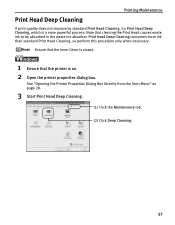
... Dialog Box Directly from the Start Menu" on . 2 Open the printer properties dialog box. Printing Maintenance Print Head Deep Cleaning If print quality does not improve by standard Print Head Cleaning, try Print Head Deep Cleaning, which is on page 28. 3 Start Print Head Deep Cleaning. (1) Click the Maintenance tab. (2) Click Deep Cleaning. 57 Ensure that the Inner Cover is closed...
... Dialog Box Directly from the Start Menu" on . 2 Open the printer properties dialog box. Printing Maintenance Print Head Deep Cleaning If print quality does not improve by standard Print Head Cleaning, try Print Head Deep Cleaning, which is on page 28. 3 Start Print Head Deep Cleaning. (1) Click the Maintenance tab. (2) Click Deep Cleaning. 57 Ensure that the Inner Cover is closed...
iP8500 Quick Start Guide
Page 62
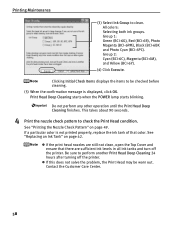
Clicking Initial Check Items displays the items to perform another Print Head Deep Cleaning 24 hours after turning off the printer. Be sure to be worn out. Printing Maintenance (3) Select Ink Group to check the Print Head condition. See "Printing the Nozzle Check Pattern" on page 42. If a particular... (BCI-6PC). z If the print head nozzles are sufficient ink levels in all ink tanks and turn off the printer. All colors: Selecting both ink groups. Do not perform any other operation until the Print Head Deep Cleaning finishes. Print Head Deep Cleaning starts when the POWER ...
Clicking Initial Check Items displays the items to perform another Print Head Deep Cleaning 24 hours after turning off the printer. Be sure to be worn out. Printing Maintenance (3) Select Ink Group to check the Print Head condition. See "Printing the Nozzle Check Pattern" on page 42. If a particular... (BCI-6PC). z If the print head nozzles are sufficient ink levels in all ink tanks and turn off the printer. All colors: Selecting both ink groups. Do not perform any other operation until the Print Head Deep Cleaning finishes. Print Head Deep Cleaning starts when the POWER ...
iP8500 Quick Start Guide
Page 63
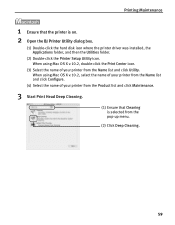
When using Mac OS X v.10.2, select the name of your printer from the Name list and click Configure. (4) Select the name of your printer from the Product list and click Maintenance. 3 Start Print Head Deep Cleaning. (1) Ensure that the printer is selected from the Name list and click Utility. When using Mac OS X v.10.2, double-click...
When using Mac OS X v.10.2, select the name of your printer from the Name list and click Configure. (4) Select the name of your printer from the Product list and click Maintenance. 3 Start Print Head Deep Cleaning. (1) Ensure that the printer is selected from the Name list and click Utility. When using Mac OS X v.10.2, double-click...
iP8500 Quick Start Guide
Page 64
...(BCI-6Y). (4) Click OK. Clicking Initial Check Items displays the items to perform another Print Head Deep Cleaning 24 hours after turning off the printer. See "Printing the Nozzle Check Pattern" on page 42. z If the print head nozzles are sufficient ink levels in all ink tanks and turn off the... printer. If a particular color is not printed properly, replace the ink tank of that there...
...(BCI-6Y). (4) Click OK. Clicking Initial Check Items displays the items to perform another Print Head Deep Cleaning 24 hours after turning off the printer. See "Printing the Nozzle Check Pattern" on page 42. z If the print head nozzles are sufficient ink levels in all ink tanks and turn off the... printer. If a particular color is not printed properly, replace the ink tank of that there...
iP8500 Quick Start Guide
Page 65
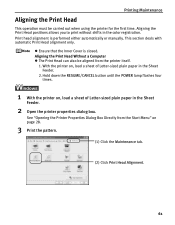
... times. 1 With the printer on page 28. 3 Print the pattern. (1) Click the Maintenance tab. (2) Click Print Head Alignment. 61 Aligning the Print Head positions allows you to print without shifts in the Sheet Feeder. 2. Aligning the Print Head Without a Computer z The Print Head can also be carried out when using the printer for the first time. Printing Maintenance Aligning the Print Head This operation must...
... times. 1 With the printer on page 28. 3 Print the pattern. (1) Click the Maintenance tab. (2) Click Print Head Alignment. 61 Aligning the Print Head positions allows you to print without shifts in the Sheet Feeder. 2. Aligning the Print Head Without a Computer z The Print Head can also be carried out when using the printer for the first time. Printing Maintenance Aligning the Print Head This operation must...

iP8500 Quick Start Guide
Page 66
The printer is aligned automatically. If the pattern is printed as shown below, and the Print Head is now ready to use. z If results of the User's Guide and align the Print Head manually. 62 Clicking Check Setting prints the current settings and finishes the print head alignment. 4 If a message warning you not to start printing. Printing Maintenance (3) Read the message and...
The printer is aligned automatically. If the pattern is printed as shown below, and the Print Head is now ready to use. z If results of the User's Guide and align the Print Head manually. 62 Clicking Check Setting prints the current settings and finishes the print head alignment. 4 If a message warning you not to start printing. Printing Maintenance (3) Read the message and...

iP8500 Quick Start Guide
Page 95
... that the area around the power outlet is kept clear at all times so you purchased the printer. If any of these safety precautions. Print heads and ink tanks For safety reasons store Print Heads and ink tanks out of the reach of flammable solvents (alcohol, thinners, etc.) on the cord...place any ink, consult a doctor immediately. Never touch the electrical contacts on a thick rug or carpet. Do not place the printer on a Print Head after printing. Do not shake Print Heads or ink tanks. Ink may be very hot and could cause burns. 91 Never remove the plug by pulling on top of...
... that the area around the power outlet is kept clear at all times so you purchased the printer. If any of these safety precautions. Print heads and ink tanks For safety reasons store Print Heads and ink tanks out of the reach of flammable solvents (alcohol, thinners, etc.) on the cord...place any ink, consult a doctor immediately. Never touch the electrical contacts on a thick rug or carpet. Do not place the printer on a Print Head after printing. Do not shake Print Heads or ink tanks. Ink may be very hot and could cause burns. 91 Never remove the plug by pulling on top of...


