
iP8500 Quick Start Guide
Page 6
... about each setting. in the printer's properties window, press the F1 key, or click ? Clicking ? Turning on the Setup Software & User's Guide CD-ROM, or use them. in the Page Setup dialog box or Print dialog box, click ? Then click the feature you want to know more information, view the iP8500 User...
... about each setting. in the printer's properties window, press the F1 key, or click ? Clicking ? Turning on the Setup Software & User's Guide CD-ROM, or use them. in the Page Setup dialog box or Print dialog box, click ? Then click the feature you want to know more information, view the iP8500 User...

iP8500 Quick Start Guide
Page 8
For information on the printer driver settings, refer to "Changing the Paper Source" in the User's Guide. • Continuous printing on the media loadable in the Sheet Feeder and the Cassette, refer ... also specify the type/size of paper you to the location of paper without reloading paper for each job. For information on the printer driver settings, refer to "Changing the Paper Source" in the User's Guide. 4 You can use just the Sheet Feeder or Cassette according to print on various sizes...
For information on the printer driver settings, refer to "Changing the Paper Source" in the User's Guide. • Continuous printing on the media loadable in the Sheet Feeder and the Cassette, refer ... also specify the type/size of paper you to the location of paper without reloading paper for each job. For information on the printer driver settings, refer to "Changing the Paper Source" in the User's Guide. 4 You can use just the Sheet Feeder or Cassette according to print on various sizes...

iP8500 Quick Start Guide
Page 11
...loading it. When paper is curled, hold the opposing curled corners and gently bend them in the Cassette z For detailed information on the specialty media Canon provides for detailed instructions on page 13. z See "Printing Media" in the User's Guide for use with its various printers, refer to "... of the direction of the paper stack. (4) Select 4" x 6" from Paper Size in the printer driver. For a detailed description of the printer driver settings, refer to "Printing with Windows" on page 15, or "Printing with the print side facing UP and align the paper stack against the left side...
...loading it. When paper is curled, hold the opposing curled corners and gently bend them in the Cassette z For detailed information on the specialty media Canon provides for detailed instructions on page 13. z See "Printing Media" in the User's Guide for use with its various printers, refer to "... of the direction of the paper stack. (4) Select 4" x 6" from Paper Size in the printer driver. For a detailed description of the printer driver settings, refer to "Printing with Windows" on page 15, or "Printing with the print side facing UP and align the paper stack against the left side...

iP8500 Quick Start Guide
Page 14
If the Cassette has been extended to accommodate paper sizes larger than 5" x 7", the front edge of the cassette will extend beyond the front of the printer. 10 Push the Cassette all the way into the printer. Basic Printing 4 Insert the Cassette into the printer. (1) Set the Cover on the Cassette. (2) Insert the Cassette into the printer.
If the Cassette has been extended to accommodate paper sizes larger than 5" x 7", the front edge of the cassette will extend beyond the front of the printer. 10 Push the Cassette all the way into the printer. Basic Printing 4 Insert the Cassette into the printer. (1) Set the Cover on the Cassette. (2) Insert the Cassette into the printer.

iP8500 Quick Start Guide
Page 16
... paper discoloration due to natural aging. (1) Load the paper into the Cassette with Macintosh" on page 18. 12 For a detailed description of the printer driver settings, refer to "Printing with Windows" on page 15, or "Printing with the print side facing DOWN. • Do not extend the Cassette. • Load the...
... paper discoloration due to natural aging. (1) Load the paper into the Cassette with Macintosh" on page 18. 12 For a detailed description of the printer driver settings, refer to "Printing with Windows" on page 15, or "Printing with the print side facing DOWN. • Do not extend the Cassette. • Load the...

iP8500 Quick Start Guide
Page 18
...Paper Up to 80 sheets Up to 80 sheets T-Shirt Transfers 1 sheet 1 sheet Transparencies Up to 30 sheets Up to 30 sheets Printer Driver Setting for Media Type Plain Paper Photo Paper Pro Photo Paper Plus Glossy Photo Paper Plus Double Sided Photo Paper Plus Glossy Matte Photo Paper Glossy...Transfer Transparency * If paper does not feed properly, fan the paper to prevent sticking together. Then, load one sheet at a time. Basic Printing „ Canon Specialty Media Media Type Paper Support Load Limit Sheet Feeder Cassette Super White Paper Up to 13 mm or 0.52 inches Up to 13 mm...
...Paper Up to 80 sheets Up to 80 sheets T-Shirt Transfers 1 sheet 1 sheet Transparencies Up to 30 sheets Up to 30 sheets Printer Driver Setting for Media Type Plain Paper Photo Paper Pro Photo Paper Plus Glossy Photo Paper Plus Double Sided Photo Paper Plus Glossy Matte Photo Paper Glossy...Transfer Transparency * If paper does not feed properly, fan the paper to prevent sticking together. Then, load one sheet at a time. Basic Printing „ Canon Specialty Media Media Type Paper Support Load Limit Sheet Feeder Cassette Super White Paper Up to 13 mm or 0.52 inches Up to 13 mm...
iP8500 Quick Start Guide
Page 20
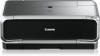
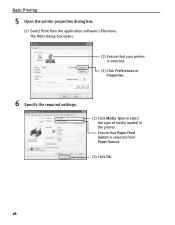
Ensure that your printer is selected from the application software's File menu. The Print dialog box opens. (2) Ensure that Paper Feed Switch is selected. (3) Click Preferences or Properties. 6 Specify the required settings. (1) Click Media Type to select the type of media loaded in the printer. Basic Printing 5 Open the printer properties dialog box. (1) Select Print from Paper Source. (2) Click OK. 16
Ensure that your printer is selected from the application software's File menu. The Print dialog box opens. (2) Ensure that Paper Feed Switch is selected. (3) Click Preferences or Properties. 6 Specify the required settings. (1) Click Media Type to select the type of media loaded in the printer. Basic Printing 5 Open the printer properties dialog box. (1) Select Print from Paper Source. (2) Click OK. 16

iP8500 Quick Start Guide
Page 21
...Canon PIXMA iP8500 on the Main tab. See "Canceling Printing" on the printer. z For details about other printer driver functions, refer to confirm the selected printing effects and how your document will look when printed. BJ Status Monitor opens automatically when a printer error occurs. 17 z You can control the print quality in the Set... Print Quality dialog box. For a detailed description of the Paper Source settings, refer to be printed. Basic Printing z From the Page Setup tab, select the ...
...Canon PIXMA iP8500 on the Main tab. See "Canceling Printing" on the printer. z For details about other printer driver functions, refer to confirm the selected printing effects and how your document will look when printed. BJ Status Monitor opens automatically when a printer error occurs. 17 z You can control the print quality in the Set... Print Quality dialog box. For a detailed description of the Paper Source settings, refer to be printed. Basic Printing z From the Page Setup tab, select the ...
iP8500 Quick Start Guide
Page 23
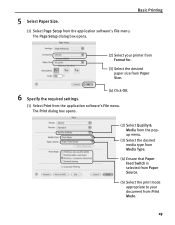
... from Paper Source. (5) Select the print mode appropriate to your printer from Format for. (3) Select the desired paper size from Paper Size. 6 Specify the required settings. (4) Click OK. (1) Select Print from the application software's File menu. 5 Select Paper Size.
... from Paper Source. (5) Select the print mode appropriate to your printer from Format for. (3) Select the desired paper size from Paper Size. 6 Specify the required settings. (4) Click OK. (1) Select Print from the application software's File menu. 5 Select Paper Size.
iP8500 Quick Start Guide
Page 24
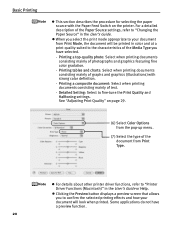
...Color Options from Print Type. z For details about other printer driver functions, refer to fine-tune the Print Quality and Halftoning settings. z Clicking the Preview button displays a preview screen that allows you have a preview function. 20 Basic Printing z This section ...describes the procedure for selecting the paper source with strong color definition. - Detailed Setting: Select to "Printer Driver Functions (Macintosh)" in the User's Guide. For a detailed description of the document from the pop-...
...Color Options from Print Type. z For details about other printer driver functions, refer to fine-tune the Print Quality and Halftoning settings. z Clicking the Preview button displays a preview screen that allows you have a preview function. 20 Basic Printing z This section ...describes the procedure for selecting the paper source with strong color definition. - Detailed Setting: Select to "Printer Driver Functions (Macintosh)" in the User's Guide. For a detailed description of the document from the pop-...
iP8500 Quick Start Guide
Page 27
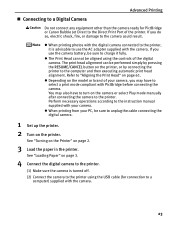
... with the camera. 23 The print head alignment can be sure to use the camera battery, be aligned using the USB cable (for PictBridge or Canon Bubble Jet Direct to "Aligning the Print Head" on page 61. z When printing from your camera. See "Loading Paper" on page 3. 4 Connect the ...digital camera to the printer. (1) Make sure the camera is advisable to unplug the cable connecting the digital camera. 1 Set up the printer. 2 Turn on the printer. z The Print Head cannot be sure to the camera could result. If you do so, electric shock, fire...
... with the camera. 23 The print head alignment can be sure to use the camera battery, be aligned using the USB cable (for PictBridge or Canon Bubble Jet Direct to "Aligning the Print Head" on page 61. z When printing from your camera. See "Loading Paper" on page 3. 4 Connect the ...digital camera to the printer. (1) Make sure the camera is advisable to unplug the cable connecting the digital camera. 1 Set up the printer. 2 Turn on the printer. z The Print Head cannot be sure to the camera could result. If you do so, electric shock, fire...

iP8500 Quick Start Guide
Page 28
... operates based on the following icons will display on and set up the camera for direct printing. A PictBridge-compliant digital camera. Advanced Printing (3) Turn on the LCD display of the camera. A Canon Bubble Jet Direct compatible digital camera. „ Direct Printing... from PictBridge-compatible Digital Cameras Default Camera Settings When a PictBridge-compatible camera is connected and printing is correctly connected. Either of...
... operates based on the following icons will display on and set up the camera for direct printing. A PictBridge-compliant digital camera. Advanced Printing (3) Turn on the LCD display of the camera. A Canon Bubble Jet Direct compatible digital camera. „ Direct Printing... from PictBridge-compatible Digital Cameras Default Camera Settings When a PictBridge-compatible camera is connected and printing is correctly connected. Either of...

iP8500 Quick Start Guide
Page 29
... camera to your camera depending on your camera's instruction manual. If using a Canon PictBridge-compatible camera, you can be displayed on the brand or model. If any setting cannot be available in Layout. 25 Different names may be made on Canon PictBridge-compatible cameras are used . By default, 4" x 6" is selected from Paper size...
... camera to your camera depending on your camera's instruction manual. If using a Canon PictBridge-compatible camera, you can be displayed on the brand or model. If any setting cannot be available in Layout. 25 Different names may be made on Canon PictBridge-compatible cameras are used . By default, 4" x 6" is selected from Paper size...

iP8500 Quick Start Guide
Page 30
..."NR", or "VIVID+NR." (Note that these options cannot be used for some models.) z When "VIVID" is selected, functions of Camera. Print quality setting - z When "VIVID+NR" is selected, green and blue portions of each photo. z Never disconnect the USB cable during printing. z When disconnecting the ...Print Properly from the Digital Camera" on the lower-right corner of photos are performed. Advanced Printing About "Image optimize" If you use a Canon PictBridge-compatible camera, you can handle only Exif/JPEG image data to your digital camera manual. About "Date print" If "On" is selected...
..."NR", or "VIVID+NR." (Note that these options cannot be used for some models.) z When "VIVID" is selected, functions of Camera. Print quality setting - z When "VIVID+NR" is selected, green and blue portions of each photo. z Never disconnect the USB cable during printing. z When disconnecting the ...Print Properly from the Digital Camera" on the lower-right corner of photos are performed. Advanced Printing About "Image optimize" If you use a Canon PictBridge-compatible camera, you can handle only Exif/JPEG image data to your digital camera manual. About "Date print" If "On" is selected...

iP8500 Quick Start Guide
Page 31
... digital camera, the Photo Optimizer PRO function can be index-printed. 27 Advanced Printing „ Printing Photographs Directly from a Canon Bubble Jet Direct Compatible Digital Camera Media Types for Digital Camera When you connect a digital camera, you can make the following media...see "Cannot Print Properly from the Digital Camera" on the printer. You can make an index print by editing the DPOF. - Print quality setting - Images will be printed (excluding the index print). - z The digital camera does not support the following functions: - Printer maintenance z Images...
... digital camera, the Photo Optimizer PRO function can be index-printed. 27 Advanced Printing „ Printing Photographs Directly from a Canon Bubble Jet Direct Compatible Digital Camera Media Types for Digital Camera When you connect a digital camera, you can make the following media...see "Cannot Print Properly from the Digital Camera" on the printer. You can make an index print by editing the DPOF. - Print quality setting - Images will be printed (excluding the index print). - z The digital camera does not support the following functions: - Printer maintenance z Images...

iP8500 Quick Start Guide
Page 32
...dialog box opens. The operations may be more details, see the user's manual for maintenance operations, such as Print Head Cleaning, or to specify printer settings common to print a document. For details about these tabs, refer to Windows XP operation. For non-Windows XP, click Start, select... Settings, and then Printers. 2 Double-click the icon of your application program, the command and menu names may differ, and there may vary depending on ...
...dialog box opens. The operations may be more details, see the user's manual for maintenance operations, such as Print Head Cleaning, or to specify printer settings common to print a document. For details about these tabs, refer to Windows XP operation. For non-Windows XP, click Start, select... Settings, and then Printers. 2 Double-click the icon of your application program, the command and menu names may differ, and there may vary depending on ...

iP8500 Quick Start Guide
Page 33
... Photo Paper Pro, and so on your printed images can be controlled with the printer driver. You can also customize the Print Quality settings if desired. 29 You can also access the online help in this printer. See inside the back cover for a list of these ...settings that affect the appearance and quality of your operating system: In Windows z Press the F1 key. Advanced Printing Adjusting the Print Quality for Photographs „ Improving the Quality of Printed Images Two important factors control the quality and output of your printed images: Paper and Ink Using recommended Canon...
... Photo Paper Pro, and so on your printed images can be controlled with the printer driver. You can also customize the Print Quality settings if desired. 29 You can also access the online help in this printer. See inside the back cover for a list of these ...settings that affect the appearance and quality of your operating system: In Windows z Press the F1 key. Advanced Printing Adjusting the Print Quality for Photographs „ Improving the Quality of Printed Images Two important factors control the quality and output of your printed images: Paper and Ink Using recommended Canon...

iP8500 Quick Start Guide
Page 34
... the Printer Properties Dialog Box from Your Application Program" on page 28. 2 On the Main tab, select Custom from Print Quality, then click Set to open the Set Print Quality dialog box. 3 Move the slide bar to adjust the print quality. 4 When the process is complete, click OK. 5 Click ...OK on page 18. 2 Select Quality & Media from the pop-up menu, and then click Detailed Setting. 30 Advanced Printing To manually adjust Print Quality settings: 1 Open the printer properties dialog box. See "Printing with Macintosh" on the Main tab. 6 Click Print or OK. 1 Open...
... the Printer Properties Dialog Box from Your Application Program" on page 28. 2 On the Main tab, select Custom from Print Quality, then click Set to open the Set Print Quality dialog box. 3 Move the slide bar to adjust the print quality. 4 When the process is complete, click OK. 5 Click ...OK on page 18. 2 Select Quality & Media from the pop-up menu, and then click Detailed Setting. 30 Advanced Printing To manually adjust Print Quality settings: 1 Open the printer properties dialog box. See "Printing with Macintosh" on the Main tab. 6 Click Print or OK. 1 Open...

iP8500 Quick Start Guide
Page 39
... See "Opening the Printer Properties Dialog Box from Your Application Program" on page 28. 2 In each tab, set all necessary items. 3 Click the Profiles tab. 4 Register new printer driver settings. (1) Click Add to Profiles dialog box opens. (2) Enter a name of profile for future use on the... Profiles tab. Advanced Printing „ Saving and Recalling Printer Driver Settings When you change printer driver settings for a specific print job, such as printing black and white photos, or printing documents with a special background, you can save...
... See "Opening the Printer Properties Dialog Box from Your Application Program" on page 28. 2 In each tab, set all necessary items. 3 Click the Profiles tab. 4 Register new printer driver settings. (1) Click Add to Profiles dialog box opens. (2) Enter a name of profile for future use on the... Profiles tab. Advanced Printing „ Saving and Recalling Printer Driver Settings When you change printer driver settings for a specific print job, such as printing black and white photos, or printing documents with a special background, you can save...

iP8500 Quick Start Guide
Page 40
... Presets in the Print dialog box. The Save Preset dialog box opens. (2) Enter a name for your printer driver settings. You can retrieve or delete the print settings profile at any time. z Retrieving the registered driver settings: Select the name of this function. 1 Open the Print dialog box. z Deleting unwanted profile: Select the desired...
... Presets in the Print dialog box. The Save Preset dialog box opens. (2) Enter a name for your printer driver settings. You can retrieve or delete the print settings profile at any time. z Retrieving the registered driver settings: Select the name of this function. 1 Open the Print dialog box. z Deleting unwanted profile: Select the desired...


