iP4500 series Quick Start Guide
Page 5
... Changing the Paper Source 10 Loading Paper 11 Loading Envelopes 17 Loading Small-Sized Paper 20 Printing from Your Computer 22 Printing with Windows 22 Printing with Macintosh 23 Printing Photographs Directly from a Compliant Device 24 Printing Photographs Directly from a Compliant Device 24 About PictBridge... 38 Print Head Deep Cleaning 41 Aligning the Print Head 43 Cleaning Your Printer 57 Troubleshooting 63 Cannot Install the Printer Driver 64 Cannot Connect to Computer Properly.........65 Print Results Not Satisfactory 66 Printer Does Not Start 70 Printer Moves But Ink Is...
... Changing the Paper Source 10 Loading Paper 11 Loading Envelopes 17 Loading Small-Sized Paper 20 Printing from Your Computer 22 Printing with Windows 22 Printing with Macintosh 23 Printing Photographs Directly from a Compliant Device 24 Printing Photographs Directly from a Compliant Device 24 About PictBridge... 38 Print Head Deep Cleaning 41 Aligning the Print Head 43 Cleaning Your Printer 57 Troubleshooting 63 Cannot Install the Printer Driver 64 Cannot Connect to Computer Properly.........65 Print Results Not Satisfactory 66 Printer Does Not Start 70 Printer Moves But Ink Is...
iP4500 series Quick Start Guide
Page 6
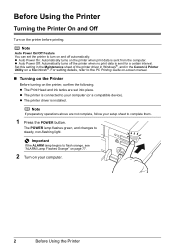
...sheet to steady, non-flashing light. Important If the ALARM lamp begins to turn on your computer (or a compatible device). z The printer driver is connected to the PC Printing Guide on-screen manual. „ Turning on the Printer Before turning on a Macintosh®. The POWER lamp ... green, and changes to complete them. 1 Press the POWER button. Set this setting in the Maintenance sheet of the printer driver in Windows®, and in the Canon IJ Printer Utility on the printer, confirm the following. z Auto Power Off: Automatically turns off automatically. For setting details, ...
...sheet to steady, non-flashing light. Important If the ALARM lamp begins to turn on your computer (or a compatible device). z The printer driver is connected to the PC Printing Guide on-screen manual. „ Turning on the Printer Before turning on a Macintosh®. The POWER lamp ... green, and changes to complete them. 1 Press the POWER button. Set this setting in the Maintenance sheet of the printer driver in Windows®, and in the Canon IJ Printer Utility on the printer, confirm the following. z Auto Power Off: Automatically turns off automatically. For setting details, ...
iP4500 series Quick Start Guide
Page 14
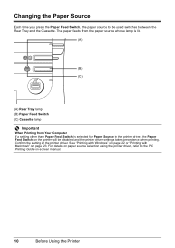
... Paper Feed Switch on page 23. For details on paper source selection using the printer driver, refer to be disabled and the printer driver settings takes precedence when printing. The paper feeds from the paper source whose lamp is lit. (A) (B) (C) (A) Rear Tray lamp (B) Paper Feed Switch ...Cassette lamp Important When Printing from Your Computer If a setting other than Paper Feed Switch is selected for Paper Source in the printer driver. See "Printing with Windows" on page 22 or "Printing with Macintosh" on the printer will be used switches between the Rear Tray and the Cassette. ...
... Paper Feed Switch on page 23. For details on paper source selection using the printer driver, refer to be disabled and the printer driver settings takes precedence when printing. The paper feeds from the paper source whose lamp is lit. (A) (B) (C) (A) Rear Tray lamp (B) Paper Feed Switch ...Cassette lamp Important When Printing from Your Computer If a setting other than Paper Feed Switch is selected for Paper Source in the printer driver. See "Printing with Windows" on page 22 or "Printing with Macintosh" on the printer will be used switches between the Rear Tray and the Cassette. ...
iP4500 series Quick Start Guide
Page 17
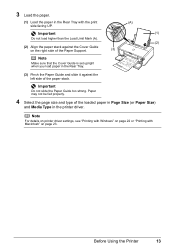
...Mark (A). (2) (2) Align the paper stack against the left side of the loaded paper in Page Size (or Paper Size) and Media Type in the printer driver. Paper may not be fed properly. 4 Select the page size and type of the paper stack. . Before Using the Printer 13 Note For details on... printer driver settings, see "Printing with Windows" on page 22 or "Printing with the print (A) side facing UP. . 3 Load the paper. (1) Load the paper in the Rear Tray with ...
...Mark (A). (2) (2) Align the paper stack against the left side of the loaded paper in Page Size (or Paper Size) and Media Type in the printer driver. Paper may not be fed properly. 4 Select the page size and type of the paper stack. . Before Using the Printer 13 Note For details on... printer driver settings, see "Printing with Windows" on page 22 or "Printing with the print (A) side facing UP. . 3 Load the paper. (1) Load the paper in the Rear Tray with ...

iP4500 series Quick Start Guide
Page 20
For details, refer to the PC Printing Guide on page 23. Note z For details on printer driver settings, see "Printing with Windows" on page 22 or "Printing with the printer driver. z You can also select the paper source with Macintosh" on -screen manual. 16 Before Using the Printer 9 Select the page size and type of the loaded paper in Page Size (or Paper Size) and Media Type in the printer driver.
For details, refer to the PC Printing Guide on page 23. Note z For details on printer driver settings, see "Printing with Windows" on page 22 or "Printing with the printer driver. z You can also select the paper source with Macintosh" on -screen manual. 16 Before Using the Printer 9 Select the page size and type of the loaded paper in Page Size (or Paper Size) and Media Type in the printer driver.
iP4500 series Quick Start Guide
Page 22
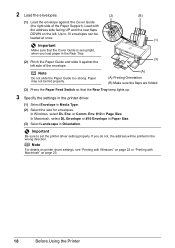
...sure the flaps are folded. (3) Press the Paper Feed Switch so that the Cover Guide is set the printer driver setting properly. Note For details on printer driver settings, see "Printing with Windows" on page 22 or "Printing with the address side facing UP and the rear flaps DOWN on page 23... in Media Type. (2) Select the size for envelopes. Important Make sure that the Rear Tray lamp lights up. 3 Specify the settings in the printer driver. (1) Select Envelope in the wrong direction. If you load paper in the Rear Tray. (3) (2) Pinch the Paper Guide and slide it against the ...
...sure the flaps are folded. (3) Press the Paper Feed Switch so that the Cover Guide is set the printer driver setting properly. Note For details on printer driver settings, see "Printing with Windows" on page 22 or "Printing with the address side facing UP and the rear flaps DOWN on page 23... in Media Type. (2) Select the size for envelopes. Important Make sure that the Rear Tray lamp lights up. 3 Specify the settings in the printer driver. (1) Select Envelope in the wrong direction. If you load paper in the Rear Tray. (3) (2) Pinch the Paper Guide and slide it against the ...
iP4500 series Quick Start Guide
Page 23
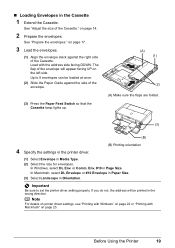
...up. (A) (1) (2) (A) Make sure the flaps are folded. (3) (B) 4 Specify the settings in the printer driver. (B) Printing orientation (1) Select Envelope in the Cassette 1 Extend the Cassette. In Windows, select DL Env. or Comm. Before Using the Printer 19 The flap of the envelope will be loaded at... once. (2) Slide the Paper Guide against the right side of the Cassette." Note For details on printer driver settings, see "Printing with Windows" on page 22 or "Printing with the address side facing DOWN. „ Loading Envelopes in Media Type. (2) Select the...
...up. (A) (1) (2) (A) Make sure the flaps are folded. (3) (B) 4 Specify the settings in the printer driver. (B) Printing orientation (1) Select Envelope in the Cassette 1 Extend the Cassette. In Windows, select DL Env. or Comm. Before Using the Printer 19 The flap of the envelope will be loaded at... once. (2) Slide the Paper Guide against the right side of the Cassette." Note For details on printer driver settings, see "Printing with Windows" on page 22 or "Printing with the address side facing DOWN. „ Loading Envelopes in Media Type. (2) Select the...
iP4500 series Quick Start Guide
Page 24
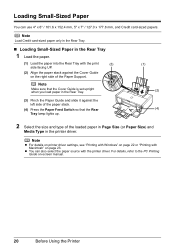
Note z For details on printer driver settings, see "Printing with Windows" on page 22 or "Printing with the printer driver. Loading Small-Sized Paper You can also select the paper source with Macintosh" on page 23. z You can use 4" x 6" / 101.6 x 152.4 mm, 5" x 7" / 127.0 x 177.8 mm, ... and type of the Paper Support. . Note Load Credit card-sized paper only in the Rear Tray. „ Loading Small-Sized Paper in the printer driver. .
Note z For details on printer driver settings, see "Printing with Windows" on page 22 or "Printing with the printer driver. Loading Small-Sized Paper You can also select the paper source with Macintosh" on page 23. z You can use 4" x 6" / 101.6 x 152.4 mm, 5" x 7" / 127.0 x 177.8 mm, ... and type of the Paper Support. . Note Load Credit card-sized paper only in the Rear Tray. „ Loading Small-Sized Paper in the printer driver. .

iP4500 series Quick Start Guide
Page 25
on page 23. Note z For details on printer driver settings, see "Printing with Windows" on page 22 or "Printing with Macintosh" on page 14. (2) Align the paper stack against the sides of the paper stack. (4) Press the Paper Feed ... source with the print side facing DOWN. (3) Slide the Paper Guide against the right side of the Cassette with the printer driver. „ Loading Small-Sized Paper in the printer driver. . For details, refer to the PC Printing Guide on-screen manual. See "Adjust the size of the loaded paper in Page...
on page 23. Note z For details on printer driver settings, see "Printing with Windows" on page 22 or "Printing with Macintosh" on page 14. (2) Align the paper stack against the sides of the paper stack. (4) Press the Paper Feed ... source with the print side facing DOWN. (3) Slide the Paper Guide against the right side of the Cassette with the printer driver. „ Loading Small-Sized Paper in the printer driver. . For details, refer to the PC Printing Guide on-screen manual. See "Adjust the size of the loaded paper in Page...

iP4500 series Quick Start Guide
Page 26
...the Printer On and Off" on page 2 and "Loading Printing Paper" on the printer and load the paper in the printer. Printing with the printer driver. See "Changing the Paper Source" on page 10. 3 Create a document or open a file to "Changing the Paper Source" in Select Printer, ...from Your Computer This section describes the procedure for basic printing. Note For details on other printer driver functions, click Help or Instructions to be used with Windows 1 Turn on page 4. 2 Make sure that Canon XXX (where "XXX" is your printer's name) is only displayed when the on -screen ...
...the Printer On and Off" on page 2 and "Loading Printing Paper" on the printer and load the paper in the printer. Printing with the printer driver. See "Changing the Paper Source" on page 10. 3 Create a document or open a file to "Changing the Paper Source" in Select Printer, ...from Your Computer This section describes the procedure for basic printing. Note For details on other printer driver functions, click Help or Instructions to be used with Windows 1 Turn on page 4. 2 Make sure that Canon XXX (where "XXX" is your printer's name) is only displayed when the on -screen ...
iP4500 series Quick Start Guide
Page 67
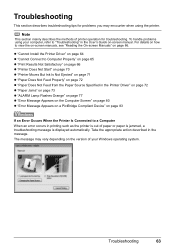
...troubleshooting. For details on how to "Troubleshooting" in the User's Guide on page 86. Troubleshooting 63 z "Cannot Install the Printer Driver" on page 64 z "Cannot Connect to Computer Properly" on page 65 z "Print Results Not Satisfactory" on page 66 z...z "Paper Does Not Feed Properly" on page 72 z "Paper Does Not Feed from the Paper Source Specified in the Printer Driver" on page 72 z "Paper Jams" on page 73 z "ALARM Lamp Flashes Orange" on page 77 z "Error Message .... To handle problems using the printer. The message may encounter when using your Windows operating system.
...troubleshooting. For details on how to "Troubleshooting" in the User's Guide on page 86. Troubleshooting 63 z "Cannot Install the Printer Driver" on page 64 z "Cannot Connect to Computer Properly" on page 65 z "Print Results Not Satisfactory" on page 66 z...z "Paper Does Not Feed Properly" on page 72 z "Paper Does Not Feed from the Paper Source Specified in the Printer Driver" on page 72 z "Paper Jams" on page 73 z "ALARM Lamp Flashes Orange" on page 77 z "Error Message .... To handle problems using the printer. The message may encounter when using your Windows operating system.
iP4500 series Quick Start Guide
Page 68
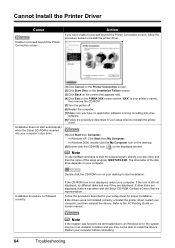
.... Refer to start the setup program, specify your disc drive and then the name of the disc drive depends on the PIXMA XXX screen (where "XXX" is inserted into your computer's disc drive. (1)Click Cancel on the Printer Connection screen. (2)Click... Windows error, the system may be in an unstable condition and you were unable to proceed beyond the Printer Connection screen. Installation procedure not followed correctly. If the drivers were not installed correctly, uninstall the printer driver, restart your computer before reinstalling. 64 Troubleshooting Contact a Canon...
.... Refer to start the setup program, specify your disc drive and then the name of the disc drive depends on the PIXMA XXX screen (where "XXX" is inserted into your computer's disc drive. (1)Click Cancel on the Printer Connection screen. (2)Click... Windows error, the system may be in an unstable condition and you were unable to proceed beyond the Printer Connection screen. Installation procedure not followed correctly. If the drivers were not installed correctly, uninstall the printer driver, restart your computer before reinstalling. 64 Troubleshooting Contact a Canon...

iP4500 series Quick Start Guide
Page 72
...are printing on -screen manual. Make sure that the paper you are using the printer driver. * Deactivate the Prevent paper abrasion setting once printing is suitable for all subsequent print jobs. To open the Canon IJ Printer Utility (Macintosh), refer to "Printing Area" in the User's Guide on ... of the printer. For details on page 59. Inside of the printer from stains, set the printer to "Opening the Printer Properties Dialog Box (Windows)" in the User's Guide on page 57. For details, see "Cleaning the Paper Feed Roller (Roller Cleaning)" on -screen manual. „ ...
...are printing on -screen manual. Make sure that the paper you are using the printer driver. * Deactivate the Prevent paper abrasion setting once printing is suitable for all subsequent print jobs. To open the Canon IJ Printer Utility (Macintosh), refer to "Printing Area" in the User's Guide on ... of the printer. For details on page 59. Inside of the printer from stains, set the printer to "Opening the Printer Properties Dialog Box (Windows)" in the User's Guide on page 57. For details, see "Cleaning the Paper Feed Roller (Roller Cleaning)" on -screen manual. „ ...
iP4500 series Quick Start Guide
Page 84
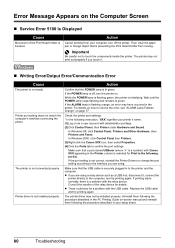
...touch it , connect the printer directly to the computer, and try printing again. Replace the USB cable and try printing again. The printer driver may not be a problem with the relay device. If the ALARM lamp is blocked. Uninstall them following port(s). Printer...printer and the computer. z There could also be installed properly. The printer may have occurred in the printer. In Windows 2000, click Control Panel then Printers. (3)Right-click the Canon XXX icon, then select Properties. (4)Click the Ports tab to touch the components inside the printer. Action Confirm that the...
...touch it , connect the printer directly to the computer, and try printing again. Replace the USB cable and try printing again. The printer driver may not be a problem with the relay device. If the ALARM lamp is blocked. Uninstall them following port(s). Printer...printer and the computer. z There could also be installed properly. The printer may have occurred in the printer. In Windows 2000, click Control Panel then Printers. (3)Right-click the Canon XXX icon, then select Properties. (4)Click the Ports tab to touch the components inside the printer. Action Confirm that the...
iP4500 series Quick Start Guide
Page 85
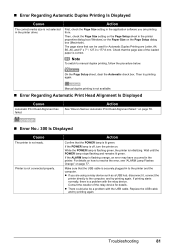
... "Eleven flashes: Automatic Print Head Alignment failed." Consult the reseller of the loaded paper is lit green. on the Page Setup sheet in the printer driver. Action First, check the Page Size setting in the printer. Printer is off, turn the printer on how to manual duplex printing, follow the procedure... "ALARM Lamp Flashes Orange" on the Page Setup dialog box (Macintosh). If printing starts normally, there is not selected in the printer properties dialog box (Windows) or the Paper Size on page 77. z There could also be used for details.
... "Eleven flashes: Automatic Print Head Alignment failed." Consult the reseller of the loaded paper is lit green. on the Page Setup sheet in the printer driver. Action First, check the Page Size setting in the printer. Printer is off, turn the printer on how to manual duplex printing, follow the procedure... "ALARM Lamp Flashes Orange" on the Page Setup dialog box (Macintosh). If printing starts normally, there is not selected in the printer properties dialog box (Windows) or the Paper Size on page 77. z There could also be used for details.

iP4500 series Quick Start Guide
Page 89
... User's Guide that can be installed from your computer and a PictBridge compliant device. PC Photo Printing Guide (Windows only) Refer to this guide for instructions on using the various application software included on printer driver setting. If the Quick Start Guide does not provide you read this sheet first. Appendix 85 This...
... User's Guide that can be installed from your computer and a PictBridge compliant device. PC Photo Printing Guide (Windows only) Refer to this guide for instructions on using the various application software included on printer driver setting. If the Quick Start Guide does not provide you read this sheet first. Appendix 85 This...
iP4500 series Easy Setup Instructions
Page 2
... click Easy Install. The printer driver, On-screen Manuals, and application software are not supported, do not connect the printer to these. • The screens below refer to Windows Vista™ operating system Ultimate Edition (hereafter referred to display explanations of Canon printers. Note • The ...register your Mac and insert the Setup CD-ROM. Do not start Windows. Serial Number n When the PIXMA Extended Survey Program screen appears, confirm the message. If you cannot go to the printer. In Windows XP and Windows 2000, go to the next procedure after 2 minutes, refer to...
... click Easy Install. The printer driver, On-screen Manuals, and application software are not supported, do not connect the printer to these. • The screens below refer to Windows Vista™ operating system Ultimate Edition (hereafter referred to display explanations of Canon printers. Note • The ...register your Mac and insert the Setup CD-ROM. Do not start Windows. Serial Number n When the PIXMA Extended Survey Program screen appears, confirm the message. If you cannot go to the printer. In Windows XP and Windows 2000, go to the next procedure after 2 minutes, refer to...


