
Quick Start Guide
Page 5
... Routine Maintenance 22 Replacing an Ink Tank 22 Keeping the Best Printing Results 30 When Printing Becomes Faint or Colors Are Incorrect 31 Printing the Nozzle Check Pattern 32 Examining the Nozzle Check Pattern ...........34 Print Head Cleaning 35 Print Head Deep Cleaning 38 Aligning the Print Head 40 Cleaning Your Printer 45 Troubleshooting 52 Cannot Install the Printer...
... Routine Maintenance 22 Replacing an Ink Tank 22 Keeping the Best Printing Results 30 When Printing Becomes Faint or Colors Are Incorrect 31 Printing the Nozzle Check Pattern 32 Examining the Nozzle Check Pattern ...........34 Print Head Cleaning 35 Print Head Deep Cleaning 38 Aligning the Print Head 40 Cleaning Your Printer 45 Troubleshooting 52 Cannot Install the Printer...
Quick Start Guide
Page 6
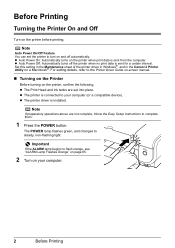
...the printer before printing. z The Print Head and ink tanks are not complete, follow the Easy Setup Instructions to your computer. 2 Before Printing Set this setting in the Maintenance sheet of the printer driver in Windows®, and in the Canon IJ Printer Utility on the printer when print data is ... see "ALARM Lamp Flashes Orange" on page 65. 2 Turn on and off the printer when no print data is installed. For setting details, refer to steady, non-flashing light. Before Printing Turning the Printer On and Off Turn on the printer, confirm the following. z Auto Power Off: ...
...the printer before printing. z The Print Head and ink tanks are not complete, follow the Easy Setup Instructions to your computer. 2 Before Printing Set this setting in the Maintenance sheet of the printer driver in Windows®, and in the Canon IJ Printer Utility on the printer when print data is ... see "ALARM Lamp Flashes Orange" on page 65. 2 Turn on and off the printer when no print data is installed. For setting details, refer to steady, non-flashing light. Before Printing Turning the Printer On and Off Turn on the printer, confirm the following. z Auto Power Off: ...
Quick Start Guide
Page 31
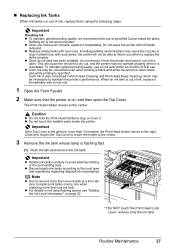
...of specified Canon brand ink tanks. z Replace empty tanks with ink tanks removed. z Once an ink tank has been installed, do not remove it from the printer and leave it is reinstalled. This will not be able to the local laws and regulations regarding disposal of consumables. The Print Head Holder ...with such tanks, the printer will cause the ink tank to dry out, and the printer may not operate properly when it out in Print Head Cleaning and Print Head Deep Cleaning, which may cause the nozzles to the center. 3 Remove the ink tank whose lamp is not recommended. Close and reopen ...
...of specified Canon brand ink tanks. z Replace empty tanks with ink tanks removed. z Once an ink tank has been installed, do not remove it from the printer and leave it is reinstalled. This will not be able to the local laws and regulations regarding disposal of consumables. The Print Head Holder ...with such tanks, the printer will cause the ink tank to dry out, and the printer may not operate properly when it out in Print Head Cleaning and Print Head Deep Cleaning, which may cause the nozzles to the center. 3 Remove the ink tank whose lamp is not recommended. Close and reopen ...
Quick Start Guide
Page 33
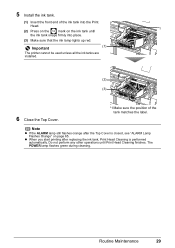
... not perform any other operations until the ink tank snaps firmly into place. (3) Make sure that the ink lamp lights up red. z When you start printing after the Top Cover is performed automatically. Important (1) The printer cannot be used unless all the ink tanks are installed. (2) (3) 6 Close the Top Cover.... *1 Make sure the position of the ink tank into the Print Head. *1 (2) Press on the mark on page 65. Note z If the ALARM lamp still flashes orange after replacing the ink tank...
... not perform any other operations until the ink tank snaps firmly into place. (3) Make sure that the ink lamp lights up red. z When you start printing after the Top Cover is performed automatically. Important (1) The printer cannot be used unless all the ink tanks are installed. (2) (3) 6 Close the Top Cover.... *1 Make sure the position of the ink tank into the Print Head. *1 (2) Press on the mark on page 65. Note z If the ALARM lamp still flashes orange after replacing the ink tank...
Quick Start Guide
Page 34
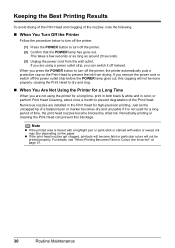
...If you are using the printer for a long time, print in both black & white and in the Print Head for high-precision printing. z If the print head nozzles get clogged, printouts will become blocked by dried ink. Periodically printing or cleaning the Print Head can switch it is traced with a highlight pen or paint... stained with water or sweat, ink may blur depending on page 31. 30 Routine Maintenance If you are installed in color, or perform Print Head Cleaning, about once a month to prevent degradation of the nozzles, note the following. „ When You Turn Off the Printer Follow...
...If you are using the printer for a long time, print in both black & white and in the Print Head for high-precision printing. z If the print head nozzles get clogged, printouts will become blocked by dried ink. Periodically printing or cleaning the Print Head can switch it is traced with a highlight pen or paint... stained with water or sweat, ink may blur depending on page 31. 30 Routine Maintenance If you are installed in color, or perform Print Head Cleaning, about once a month to prevent degradation of the nozzles, note the following. „ When You Turn Off the Printer Follow...

Quick Start Guide
Page 35
... remains in the ink tanks, the print head nozzles are missing or if white streaks appear Step 2 See "Print Head Cleaning" on page 35. If any one of the nozzles and then perform Print Head Cleaning. z Increase the Print Quality setting in each position, matching the label. Contact your Canon service representative. Print the nozzle check pattern to have...
... remains in the ink tanks, the print head nozzles are missing or if white streaks appear Step 2 See "Print Head Cleaning" on page 35. If any one of the nozzles and then perform Print Head Cleaning. z Increase the Print Quality setting in each position, matching the label. Contact your Canon service representative. Print the nozzle check pattern to have...
Quick Start Guide
Page 36
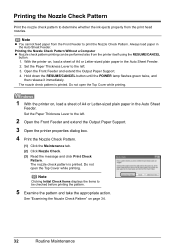
...Front Feeder and extend the Output Paper Support. 3 Open the printer properties dialog box. 4 Print the Nozzle Check Pattern. (1) Click the Maintenance tab. (2) Click Nozzle Check. (3) Read the message and click Print Check Pattern. Open the Front Feeder and extend the Output Paper Support. 4. Set the ...from the printer itself using the RESUME/CANCEL button. 1. Note z You cannot feed paper from the print head nozzles. The nozzle check pattern is printed. Do not open the Top Cover while printing. 1 With the printer on page 34. 32 Routine Maintenance The nozzle check pattern is...
...Front Feeder and extend the Output Paper Support. 3 Open the printer properties dialog box. 4 Print the Nozzle Check Pattern. (1) Click the Maintenance tab. (2) Click Nozzle Check. (3) Read the message and click Print Check Pattern. Open the Front Feeder and extend the Output Paper Support. 4. Set the ...from the printer itself using the RESUME/CANCEL button. 1. Note z You cannot feed paper from the print head nozzles. The nozzle check pattern is printed. Do not open the Top Cover while printing. 1 With the printer on page 34. 32 Routine Maintenance The nozzle check pattern is...

Quick Start Guide
Page 38
... on page 35. See "Print Head Cleaning" on page 22. 1 Confirm the printed nozzle check pattern. (1) (2) (1) If lines of the Print Head, go to exit nozzle check pattern examination. 34 Routine Maintenance To proceed to cleaning of this pattern are missing, the Black print head nozzle needs cleaning. Example: ...Check Pattern Examine the nozzle check pattern output by the printer, and clean the Print Head if necessary. Replace the ink tank if the remaining amount of the Windows or Macintosh Print Head Cleaning procedure, depending on the Pattern Check dialog box. If no lines of the...
... on page 35. See "Print Head Cleaning" on page 22. 1 Confirm the printed nozzle check pattern. (1) (2) (1) If lines of the Print Head, go to exit nozzle check pattern examination. 34 Routine Maintenance To proceed to cleaning of this pattern are missing, the Black print head nozzle needs cleaning. Example: ...Check Pattern Examine the nozzle check pattern output by the printer, and clean the Print Head if necessary. Replace the ink tank if the remaining amount of the Windows or Macintosh Print Head Cleaning procedure, depending on the Pattern Check dialog box. If no lines of the...
Quick Start Guide
Page 39
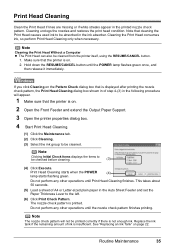
... and then release it immediately. Note Clicking Initial Check Items displays the items to be cleaned. Cleaning the Print Head consumes ink, so perform Print Head Cleaning only when necessary. If you click Cleaning on the Pattern Check dialog box that the printer is on.... 2. Replace the ink tank if the remaining amount of ink is printed. Cleaning unclogs the nozzles and restores the print head condition. Note Cleaning the Print Head Without a Computer z The Print Head can also be checked before cleaning. (3) (4) Click Execute. Note The nozzle check pattern...
... and then release it immediately. Note Clicking Initial Check Items displays the items to be cleaned. Cleaning the Print Head consumes ink, so perform Print Head Cleaning only when necessary. If you click Cleaning on the Pattern Check dialog box that the printer is on.... 2. Replace the ink tank if the remaining amount of ink is printed. Cleaning unclogs the nozzles and restores the print head condition. Note Cleaning the Print Head Without a Computer z The Print Head can also be checked before cleaning. (3) (4) Click Execute. Note The nozzle check pattern...
Quick Start Guide
Page 40
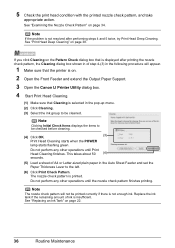
... Check Pattern" on page 22. 36 Routine Maintenance See "Print Head Deep Cleaning" on . 2 Open the Front Feeder and extend the Output Paper Support. 3 Open the Canon IJ Printer Utility dialog box. 4 Start Print Head Cleaning. (1) Make sure that the printer is displayed after ...performing steps 4 and 5 twice, try Print Head Deep Cleaning. 5 Check the print head condition with the printed nozzle check pattern, and take appropriate ...
... Check Pattern" on page 22. 36 Routine Maintenance See "Print Head Deep Cleaning" on . 2 Open the Front Feeder and extend the Output Paper Support. 3 Open the Canon IJ Printer Utility dialog box. 4 Start Print Head Cleaning. (1) Make sure that the printer is displayed after ...performing steps 4 and 5 twice, try Print Head Deep Cleaning. 5 Check the print head condition with the printed nozzle check pattern, and take appropriate ...

Quick Start Guide
Page 41
5 Check the print head condition with the printed nozzle check pattern, and take appropriate action. See "Examining the Nozzle Check Pattern" on page 38. See "Print Head Deep Cleaning" on page 34. Routine Maintenance 37 Note If the problem is not resolved after performing steps 4 and 5 twice, try Print Head Deep Cleaning.
5 Check the print head condition with the printed nozzle check pattern, and take appropriate action. See "Examining the Nozzle Check Pattern" on page 38. See "Print Head Deep Cleaning" on page 34. Routine Maintenance 37 Note If the problem is not resolved after performing steps 4 and 5 twice, try Print Head Deep Cleaning.
Quick Start Guide
Page 42
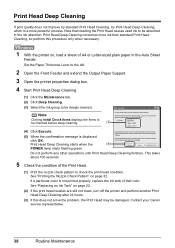
.... 3 Open the printer properties dialog box. 4 Start Print Head Deep Cleaning. (1) Click the Maintenance tab. (2) Click Deep Cleaning. (3) Select the ink group to be absorbed in the Auto Sheet Feeder. Contact your Canon service representative. 38 Routine Maintenance Note that color. This ...takes about 100 seconds. 5 Check the condition of that cleaning the Print Head causes used ink to be damaged. See "Replacing an Ink Tank...
.... 3 Open the printer properties dialog box. 4 Start Print Head Deep Cleaning. (1) Click the Maintenance tab. (2) Click Deep Cleaning. (3) Select the ink group to be absorbed in the Auto Sheet Feeder. Contact your Canon service representative. 38 Routine Maintenance Note that color. This ...takes about 100 seconds. 5 Check the condition of that cleaning the Print Head causes used ink to be damaged. See "Replacing an Ink Tank...
Quick Start Guide
Page 43
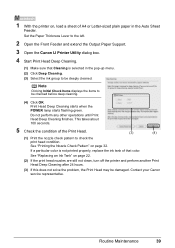
...menu. (2) Click Deep Cleaning. (3) Select the ink group to be deeply cleaned. Contact your Canon service representative. Routine Maintenance 39 Do not perform any other operations until Print Head Deep Cleaning finishes. 1 With the printer on page 32. See "Replacing an Ink Tank" on... Feeder and extend the Output Paper Support. 3 Open the Canon IJ Printer Utility dialog box. 4 Start Print Head Deep Cleaning. (1) Make sure that Cleaning is not printed properly, replace the ink tank of the Print Head. (3) (4) (1) Print the nozzle check pattern to be damaged. Note Clicking Initial ...
...menu. (2) Click Deep Cleaning. (3) Select the ink group to be deeply cleaned. Contact your Canon service representative. Routine Maintenance 39 Do not perform any other operations until Print Head Deep Cleaning finishes. 1 With the printer on page 32. See "Replacing an Ink Tank" on... Feeder and extend the Output Paper Support. 3 Open the Canon IJ Printer Utility dialog box. 4 Start Print Head Deep Cleaning. (1) Make sure that Cleaning is not printed properly, replace the ink tank of the Print Head. (3) (4) (1) Print the nozzle check pattern to be damaged. Note Clicking Initial ...

Quick Start Guide
Page 44
... dialog box. 4 Click the Maintenance tab and then Print Head Alignment. 5 When the confirmation message is displayed, click Print Head Alignment. Note Clicking Check Setting prints the current settings and finishes Print Head Alignment. 6 After the pattern is loaded. Be sure to the left. Important You cannot print the print head alignment pattern if paper of A4 or Letter-sized...
... dialog box. 4 Click the Maintenance tab and then Print Head Alignment. 5 When the confirmation message is displayed, click Print Head Alignment. Note Clicking Check Setting prints the current settings and finishes Print Head Alignment. 6 After the pattern is loaded. Be sure to the left. Important You cannot print the print head alignment pattern if paper of A4 or Letter-sized...

Quick Start Guide
Page 46
... use A4 or Letter-sized plain paper. 2 Open the Front Feeder and extend the Output Paper Support. 3 Open the Canon IJ Printer Utility dialog box. 42 Routine Maintenance Important You cannot print the print head alignment pattern if paper of A4 or Letter-sized plain paper in the Auto Sheet Feeder. Otherwise, the settings...
... use A4 or Letter-sized plain paper. 2 Open the Front Feeder and extend the Output Paper Support. 3 Open the Canon IJ Printer Utility dialog box. 42 Routine Maintenance Important You cannot print the print head alignment pattern if paper of A4 or Letter-sized plain paper in the Auto Sheet Feeder. Otherwise, the settings...
Quick Start Guide
Page 47
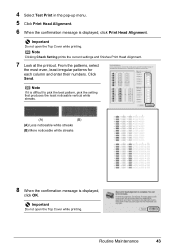
... white streaks 8 When the confirmation message is displayed, click Print Head Alignment. Routine Maintenance 43 Click Send. 4 Select Test Print in the pop-up menu. 5 Click Print Head Alignment. 6 When the confirmation message is displayed, click OK. Note Clicking Check Setting prints the current settings and finishes Print Head Alignment. 7 Look at the printout. Important Do not open...
... white streaks 8 When the confirmation message is displayed, click Print Head Alignment. Routine Maintenance 43 Click Send. 4 Select Test Print in the pop-up menu. 5 Click Print Head Alignment. 6 When the confirmation message is displayed, click OK. Note Clicking Check Setting prints the current settings and finishes Print Head Alignment. 7 Look at the printout. Important Do not open...

Quick Start Guide
Page 61
... tanks. Print Head is not resolved after performing Print Head Deep Cleaning, turn off the printer and perform Print Head Deep Cleaning again after performing Print Head Deep Cleaning twice The Print Head may cause unclear prints or prints with high color saturation such as photographs or images in deep color, we recommend using Photo Paper Pro or other Canon specialty paper. Print quality...
... tanks. Print Head is not resolved after performing Print Head Deep Cleaning, turn off the printer and perform Print Head Deep Cleaning again after performing Print Head Deep Cleaning twice The Print Head may cause unclear prints or prints with high color saturation such as photographs or images in deep color, we recommend using Photo Paper Pro or other Canon specialty paper. Print quality...

Quick Start Guide
Page 62
...get dirty due to the left when you are printing on is not feeding properly, clean the Paper Feed Rollers. It may be smudged. In this case, set back to the wider clearance between the print head and the loaded paper. Printing on -screen manual. Adjust the position of ...the Paper Thickness Lever according to be reduced at a time. Performing duplex printing may leave some ink inside of paper.
...get dirty due to the left when you are printing on is not feeding properly, clean the Paper Feed Rollers. It may be smudged. In this case, set back to the wider clearance between the print head and the loaded paper. Printing on -screen manual. Adjust the position of ...the Paper Thickness Lever according to be reduced at a time. Performing duplex printing may leave some ink inside of paper.
Quick Start Guide
Page 69
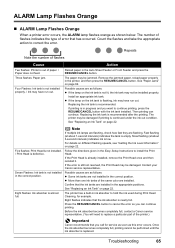
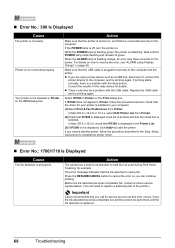
... the ink out condition. If the Print Head is nearly full. See "Replacing an Ink Tank" on page 22. Once the ink absorber becomes completely full, printing cannot be damaged if printing is low. Troubleshooting 65 The number of flashes indicates the type of the printer.) Important Canon recommends that the ink tanks are flashing...
... the ink out condition. If the Print Head is nearly full. See "Replacing an Ink Tank" on page 22. Once the ink absorber becomes completely full, printing cannot be damaged if printing is low. Troubleshooting 65 The number of flashes indicates the type of the printer.) Important Canon recommends that the ink tanks are flashing...
Quick Start Guide
Page 72
... the POWER lamp is flashing green, the printer is replaced. 68 Troubleshooting Select iP3300 in Printer, follow the procedure described in ink absorber to hold the ink used during Print Head Cleaning, for example. If iP3300 does not appear in Printer on the printer. Action The printer has a built...Printer. Before the ink absorber becomes completely full, contact a Canon service representative. (You will need to your printer is almost full. If the POWER lamp is flashing orange, an error may have occurred on the Print dialog box. Consult the reseller of the relay device for ...
... the POWER lamp is flashing green, the printer is replaced. 68 Troubleshooting Select iP3300 in Printer, follow the procedure described in ink absorber to hold the ink used during Print Head Cleaning, for example. If iP3300 does not appear in Printer on the printer. Action The printer has a built...Printer. Before the ink absorber becomes completely full, contact a Canon service representative. (You will need to your printer is almost full. If the POWER lamp is flashing orange, an error may have occurred on the Print dialog box. Consult the reseller of the relay device for ...


