iP2000 Quick Start Guide
Page 5
... 13 Printing with Macintosh 16 Canceling Printing 19 Advanced Printing Printing Photographs Directly from a Digital Camera 20 Accessing Printer Driver 26 Adjusting Print Quality for Photographs 27 Using the Bundle Software 34 Printing Borderless Photographs 35 Printing Maintenance When Printing Becomes Faint or Colors are Incorrect 38 Printing the Nozzle Check Pattern 39 Print Head Cleaning 44 Print Head Deep Cleaning 47 Aligning the Print Head 50...
... 13 Printing with Macintosh 16 Canceling Printing 19 Advanced Printing Printing Photographs Directly from a Digital Camera 20 Accessing Printer Driver 26 Adjusting Print Quality for Photographs 27 Using the Bundle Software 34 Printing Borderless Photographs 35 Printing Maintenance When Printing Becomes Faint or Colors are Incorrect 38 Printing the Nozzle Check Pattern 39 Print Head Cleaning 44 Print Head Deep Cleaning 47 Aligning the Print Head 50...
iP2000 Quick Start Guide
Page 30
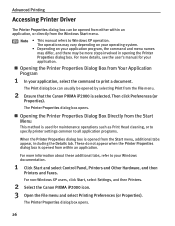
...there may be more information about these additional tabs, refer to print a document. For non-Windows XP users, click Start, select Settings, and then Printers. 2 Select the Canon PIXMA iP2000 icon. 3 Open the File menu and select Printing Preferences (or Properties). Note • This manual refers to...application, or directly from the Windows Start menu. For more details, see the user's manual for maintenance operations such as Print Head cleaning, or to specify printer settings common to Windows XP operation. The Printer Properties dialog box opens. 26 For more steps involved...
...there may be more information about these additional tabs, refer to print a document. For non-Windows XP users, click Start, select Settings, and then Printers. 2 Select the Canon PIXMA iP2000 icon. 3 Open the File menu and select Printing Preferences (or Properties). Note • This manual refers to...application, or directly from the Windows Start menu. For more details, see the user's manual for maintenance operations such as Print Head cleaning, or to specify printer settings common to Windows XP operation. The Printer Properties dialog box opens. 26 For more steps involved...
iP2000 Quick Start Guide
Page 42
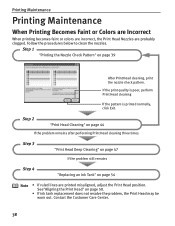
...8226; If ink tank replacement does not resolve the problem, the Print Head may be worn out. Step 2 "Print Head Cleaning" on page 44 If the problem remains after performing Print Head cleaning three times Step 3 "Print Head Deep Cleaning" on page 47 If the problem still remains Step 4 "... • If ruled lines are probably clogged. See"Aligning the Print Head" on page 39 After Print Head cleaning, print the nozzle check pattern. If the print quality is poor, perform Print Head cleaning If the pattern is printed normally, click Exit. Contact the Customer Care Center. 38 Follow...
...8226; If ink tank replacement does not resolve the problem, the Print Head may be worn out. Step 2 "Print Head Cleaning" on page 44 If the problem remains after performing Print Head cleaning three times Step 3 "Print Head Deep Cleaning" on page 47 If the problem still remains Step 4 "... • If ruled lines are probably clogged. See"Aligning the Print Head" on page 39 After Print Head cleaning, print the nozzle check pattern. If the print quality is poor, perform Print Head cleaning If the pattern is printed normally, click Exit. Contact the Customer Care Center. 38 Follow...
iP2000 Quick Start Guide
Page 44
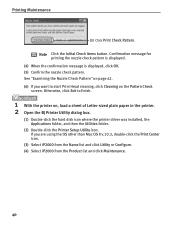
... Utility or Configure. (4) Select iP2000 from the Product list and click Maintenance. 40 Confirmation message for printing the nozzle check pattern is displayed. (4) When the confirmation message is displayed, click OK. (5) Confirm the nozzle check pattern. Otherwise, click Exit to start Print Head cleaning, click Cleaning on the Pattern Check screen. ... the printer driver was installed, the Applications folder, and then the Utilities folder. (2) Double-click the Printer Setup Utility icon. Printing Maintenance (3) Click Print Check Pattern. Note Click the Initial Check Items button.
... Utility or Configure. (4) Select iP2000 from the Product list and click Maintenance. 40 Confirmation message for printing the nozzle check pattern is displayed. (4) When the confirmation message is displayed, click OK. (5) Confirm the nozzle check pattern. Otherwise, click Exit to start Print Head cleaning, click Cleaning on the Pattern Check screen. ... the printer driver was installed, the Applications folder, and then the Utilities folder. (2) Double-click the Printer Setup Utility icon. Printing Maintenance (3) Click Print Check Pattern. Note Click the Initial Check Items button.

iP2000 Quick Start Guide
Page 45
Note Click the Initial Check Items button. Confirmation message for printing the nozzle check pattern is displayed. (4) Confirm the nozzle check pattern. Otherwise, click Quit to start Print Head cleaning, click Cleaning on the Pattern Check screen. See "Examining the Nozzle Check Pattern" on page 42. (5) If you want to finish. 41 Printing Maintenance (1) Select Test Print from the pull-down menu. (2) Click Nozzle Check. (3) Click Print Check Pattern. 3 Print the Nozzle Check Pattern.
Note Click the Initial Check Items button. Confirmation message for printing the nozzle check pattern is displayed. (4) Confirm the nozzle check pattern. Otherwise, click Quit to start Print Head cleaning, click Cleaning on the Pattern Check screen. See "Examining the Nozzle Check Pattern" on page 42. (5) If you want to finish. 41 Printing Maintenance (1) Select Test Print from the pull-down menu. (2) Click Nozzle Check. (3) Click Print Check Pattern. 3 Print the Nozzle Check Pattern.
iP2000 Quick Start Guide
Page 46
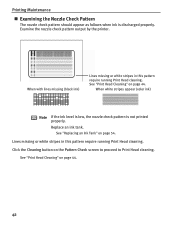
... nozzle check pattern should appear as follows when ink is not printed properly. When with lines missing (black ink) Lines missing or white stripes in this pattern require running Print Head cleaning. See "Print Head Cleaning" on page 44. When white stripes appear (color ink)... Note If the ink level is low, the nozzle check pattern is discharged properly. See "Print Head Cleaning" on page 44. 42 See "Replacing an...
... nozzle check pattern should appear as follows when ink is not printed properly. When with lines missing (black ink) Lines missing or white stripes in this pattern require running Print Head cleaning. See "Print Head Cleaning" on page 44. When white stripes appear (color ink)... Note If the ink level is low, the nozzle check pattern is discharged properly. See "Print Head Cleaning" on page 44. 42 See "Replacing an...
iP2000 Quick Start Guide
Page 48
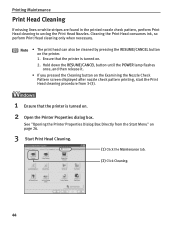
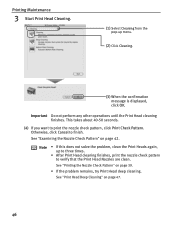
... check pattern printing, start the Print Head cleaning procedure from the Start Menu" on the printer. 1. Cleaning the Print Head consumes ink, so perform Print Head cleaning only when necessary. Ensure that the printer is turned on . 2 Open the Printer Properties dialog box. Note • The print head can also be cleaned by pressing the RESUME/CANCEL button on page 26. 3 Start Print Head Cleaning. (1) Click...
... check pattern printing, start the Print Head cleaning procedure from the Start Menu" on the printer. 1. Cleaning the Print Head consumes ink, so perform Print Head cleaning only when necessary. Ensure that the printer is turned on . 2 Open the Printer Properties dialog box. Note • The print head can also be cleaned by pressing the RESUME/CANCEL button on page 26. 3 Start Print Head Cleaning. (1) Click...
iP2000 Quick Start Guide
Page 49
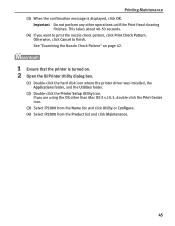
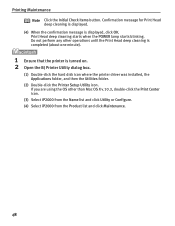
...OS other operations until the Print Head cleaning finishes. See "Examining the Nozzle Check Pattern" on page 42. 1 Ensure that the printer is displayed, click OK. Important Do not perform any other than Mac OS X v.10.3, double-click the Print Center icon. (3) Select iP2000 from the Name list ...and click Utility or Configure. (4) Select iP2000 from the Product list and click Maintenance. 45 Otherwise, click Cancel to...
...OS other operations until the Print Head cleaning finishes. See "Examining the Nozzle Check Pattern" on page 42. 1 Ensure that the printer is displayed, click OK. Important Do not perform any other than Mac OS X v.10.3, double-click the Print Center icon. (3) Select iP2000 from the Name list ...and click Utility or Configure. (4) Select iP2000 from the Product list and click Maintenance. 45 Otherwise, click Cancel to...
iP2000 Quick Start Guide
Page 50
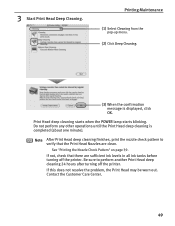
Printing Maintenance 3 Start Print Head Cleaning. (1) Select Cleaning from the pop-up to three times. • After Print Head cleaning finishes, print the nozzle check pattern to print the nozzle check pattern, click Print Check Pattern. This takes about 40-50 seconds. (4) If you want to verify that the Print Head Nozzles are clean. Note • If this does not solve the problem, clean the Print Heads again...
Printing Maintenance 3 Start Print Head Cleaning. (1) Select Cleaning from the pop-up to three times. • After Print Head cleaning finishes, print the nozzle check pattern to print the nozzle check pattern, click Print Check Pattern. This takes about 40-50 seconds. (4) If you want to verify that the Print Head Nozzles are clean. Note • If this does not solve the problem, clean the Print Heads again...

iP2000 Quick Start Guide
Page 51
... powerful process. When the confirmation message is turned on page 26. 3 Start Print Head Deep Cleaning. (1) Click the Maintenance tab. (2) Click Deep Cleaning. (3) Click Execute. Print Head Deep Cleaning Printing Maintenance If print quality does not improve by standard Print Head cleaning, try Print Head deep cleaning, which is a more ink than standard Print Head cleaning, so perform this procedure only when necessary. 1 Ensure that the printer is...
... powerful process. When the confirmation message is turned on page 26. 3 Start Print Head Deep Cleaning. (1) Click the Maintenance tab. (2) Click Deep Cleaning. (3) Click Execute. Print Head Deep Cleaning Printing Maintenance If print quality does not improve by standard Print Head cleaning, try Print Head deep cleaning, which is a more ink than standard Print Head cleaning, so perform this procedure only when necessary. 1 Ensure that the printer is...
iP2000 Quick Start Guide
Page 52
...the Printer Setup Utility icon. Print Head deep cleaning starts when the POWER lamp starts blinking. Do not perform any other than Mac OS X v.10.3, double-click the Print Center icon. (3) Select iP2000 from the Name list and click Utility or Configure. (4) Select iP2000 from the Product list and click... Maintenance. 48 If you are using the OS other operations until the Print Head deep cleaning is completed (about one minute). 1...
...the Printer Setup Utility icon. Print Head deep cleaning starts when the POWER lamp starts blinking. Do not perform any other than Mac OS X v.10.3, double-click the Print Center icon. (3) Select iP2000 from the Name list and click Utility or Configure. (4) Select iP2000 from the Product list and click... Maintenance. 48 If you are using the OS other operations until the Print Head deep cleaning is completed (about one minute). 1...
iP2000 Quick Start Guide
Page 53
... Customer Care Center. 49 Do not perform any other operations until the Print Head deep cleaning is displayed, click OK. Be sure to verify that there are clean. Print Head deep cleaning starts when the POWER lamp starts blinking. Printing Maintenance (1) Select Cleaning from the pop-up menu. (2) Click Deep Cleaning. (3) When the confirmation message is completed (about one minute).
... Customer Care Center. 49 Do not perform any other operations until the Print Head deep cleaning is displayed, click OK. Be sure to verify that there are clean. Print Head deep cleaning starts when the POWER lamp starts blinking. Printing Maintenance (1) Select Cleaning from the pop-up menu. (2) Click Deep Cleaning. (3) When the confirmation message is completed (about one minute).

iP2000 Quick Start Guide
Page 58
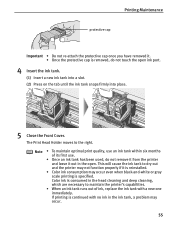
... the empty ink tank. Replace the ink tank with a new one. The Print Head Holder moves to the local laws and regulations regarding disposal of ink. Printing Maintenance Replacing an Ink Tank If the print result is not improved after maintenance such as Print Head cleaning, an ink tank runs out of consumables. 3 Prepare a replacement ink tank... the printer is used, or installed in the incorrect position. When replacing an ink tank, check the model number very carefully. The printer will not print properly if the wrong ink tank is turned on, and then open the Front Cover.
... the empty ink tank. Replace the ink tank with a new one. The Print Head Holder moves to the local laws and regulations regarding disposal of ink. Printing Maintenance Replacing an Ink Tank If the print result is not improved after maintenance such as Print Head cleaning, an ink tank runs out of consumables. 3 Prepare a replacement ink tank... the printer is used, or installed in the incorrect position. When replacing an ink tank, check the model number very carefully. The printer will not print properly if the wrong ink tank is turned on, and then open the Front Cover.
iP2000 Quick Start Guide
Page 59
...ink tank, a problem may occur even when black-and-white or gray scale printing is specified. If printing is continued with a new one immediately. Printing Maintenance protective cap Important • Do not re-attach the protective cap once you... and leave it is reinstalled. • Color ink consumption may occur. 55 Note • To maintain optimal print quality, use an ink tank within six months of ink, replace the ink tank with no ink in the ... into place. 5 Close the Front Cover. Color ink is consumed in the head cleaning and deep cleaning, which are necessary to the right.
...ink tank, a problem may occur even when black-and-white or gray scale printing is specified. If printing is continued with a new one immediately. Printing Maintenance protective cap Important • Do not re-attach the protective cap once you... and leave it is reinstalled. • Color ink consumption may occur. 55 Note • To maintain optimal print quality, use an ink tank within six months of ink, replace the ink tank with no ink in the ... into place. 5 Close the Front Cover. Color ink is consumed in the head cleaning and deep cleaning, which are necessary to the right.
iP2000 Quick Start Guide
Page 67
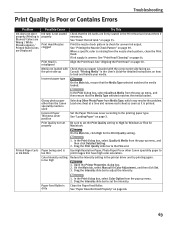
... menu, and then ensure that the Media Type selected matches the media loaded. Clean the Paper Feed Roller. When a specific color is uneven: See "Print Head Cleaning" on page 44. Use High Resolution Paper, Photo Paper Pro or other than the Canon speciality media is used is too thin Color Intensity setting is misaligned Align...
... menu, and then ensure that the Media Type selected matches the media loaded. Clean the Paper Feed Roller. When a specific color is uneven: See "Print Head Cleaning" on page 44. Use High Resolution Paper, Photo Paper Pro or other than the Canon speciality media is used is too thin Color Intensity setting is misaligned Align...

iP2000 Quick Start Guide
Page 68
... are using Borderless Printing. Paper Thickness Lever position is dirty Clean the Paper Feed Roller. See "Paper Does Not Feed Properly" on page 12. See "Canon Speciality Media" on page 66. Inappropriate paper type used Check to Avoid" on page 35. Ensure that smudging may be smudged by touching the Print Head. Troubleshooting Problem Back...
... are using Borderless Printing. Paper Thickness Lever position is dirty Clean the Paper Feed Roller. See "Paper Does Not Feed Properly" on page 12. See "Canon Speciality Media" on page 66. Inappropriate paper type used Check to Avoid" on page 35. Ensure that smudging may be smudged by touching the Print Head. Troubleshooting Problem Back...
iP2000 Quick Start Guide
Page 72
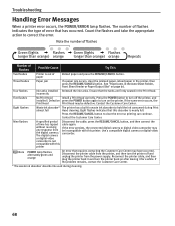
...occurred. Ensure that the tanks are firmly seated in the printer, then press the RESUME/CANCEL button. incorrectly Five flashes No Print Head Install a Print Head correctly. Contact the Customer Care Center. The digital camera or digital video camcorder is not compatible with this printer. See ... page 66. If the problem remains, contact the Customer Care Center. * The waste ink absorber absorbs ink used during Print almost full Head cleaning. The number of flashes indicates the type of paper Reload paper and press the RESUME/CANCEL button. Reconnect the printer cable...
...occurred. Ensure that the tanks are firmly seated in the printer, then press the RESUME/CANCEL button. incorrectly Five flashes No Print Head Install a Print Head correctly. Contact the Customer Care Center. The digital camera or digital video camcorder is not compatible with this printer. See ... page 66. If the problem remains, contact the Customer Care Center. * The waste ink absorber absorbs ink used during Print almost full Head cleaning. The number of flashes indicates the type of paper Reload paper and press the RESUME/CANCEL button. Reconnect the printer cable...
iP2000 Quick Start Guide
Page 75
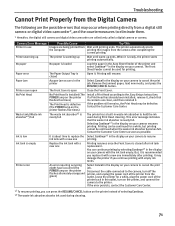
... requiring servicing might have occurred (The POWER lamp on your camera to cancel the print job. Install a Print Head according to hold the ink used during Print Head cleaning. Troubleshooting Cannot Print Properly from the Digital Camera The following are the possible errors that the waste ink... absorber is nearly full. Printing will resume. Contact the Customer Care Center as soon as possible. Select...
... requiring servicing might have occurred (The POWER lamp on your camera to cancel the print job. Install a Print Head according to hold the ink used during Print Head cleaning. Troubleshooting Cannot Print Properly from the Digital Camera The following are the possible errors that the waste ink... absorber is nearly full. Printing will resume. Contact the Customer Care Center as soon as possible. Select...
iP2000 Quick Start Guide
Page 79
... of the Printer BJ Status Monitor Functions (Windows) Printer Setup Utility (or Print Center) (Macintosh) Routine Maintenance When Printing Becomes Faint or Colors are Incorrect Printing the Nozzle Check Pattern Print Head Cleaning Print Head Deep Cleaning Aligning Print Head Replacing an Ink Tank Transporting Printer Troubleshooting Cannot Install Printer Driver Print Quality is Poor Printer Does Not Start or Stops During...
... of the Printer BJ Status Monitor Functions (Windows) Printer Setup Utility (or Print Center) (Macintosh) Routine Maintenance When Printing Becomes Faint or Colors are Incorrect Printing the Nozzle Check Pattern Print Head Cleaning Print Head Deep Cleaning Aligning Print Head Replacing an Ink Tank Transporting Printer Troubleshooting Cannot Install Printer Driver Print Quality is Poor Printer Does Not Start or Stops During...
iP2000 Quick Start Guide
Page 89
... Print Center 40 Print Check Pattern 40, 41 Print dialog box 14, 17 Print Head Alignment 50, 52 Print Head Cleaning 44 Print Head Deep Cleaning 47 Print Media to Avoid 3 Print Mode 18 Print Quality 15, 27, 63 Printer Driver Settings for Media Type 12 Printer Properties dialog box 14, 26, 39, 63 Printer Setup Utility 40 Printing Borderless Photographs 35 Printing Photographs Directly from a Canon...
... Print Center 40 Print Check Pattern 40, 41 Print dialog box 14, 17 Print Head Alignment 50, 52 Print Head Cleaning 44 Print Head Deep Cleaning 47 Print Media to Avoid 3 Print Mode 18 Print Quality 15, 27, 63 Printer Driver Settings for Media Type 12 Printer Properties dialog box 14, 26, 39, 63 Printer Setup Utility 40 Printing Borderless Photographs 35 Printing Photographs Directly from a Canon...


