Quick Start Guide
Page 4
... in Windows Vista™ operating system Ultimate Edition (hereafter referred to your Canon PIXMA iP100 series Photo Printer. and other countries. z "Macintosh" and "Mac" are available for energy efficiency. z "Bluetooth" is a registered trademark of Apple Inc., registered in the U.S. About Consumables Consumables (ink tanks / FINE Cartridges) are trademarks of Microsoft Corporation. Trademarks z "Microsoft" is a trademark...
... in Windows Vista™ operating system Ultimate Edition (hereafter referred to your Canon PIXMA iP100 series Photo Printer. and other countries. z "Macintosh" and "Mac" are available for energy efficiency. z "Bluetooth" is a registered trademark of Apple Inc., registered in the U.S. About Consumables Consumables (ink tanks / FINE Cartridges) are trademarks of Microsoft Corporation. Trademarks z "Microsoft" is a trademark...
Quick Start Guide
Page 5
... 33 Replacing an Ink Tank 43 Keeping the Best Printing Results 49 Cleaning Your Printer 50 Troubleshooting 57 Cannot Install the Printer Driver 58 Cannot Connect to Computer Properly.........60 Print Results Not Satisfactory 61 Printer Does Not Start 64 Printer Moves But Ink Is Not Ejected ...74 Cannot Print Properly through Infrared Communication 75 Cannot Print Properly via Bluetooth Communication 75 Appendix 76 Carrying the Printer 76 Traveling Abroad with the Printer 76 How to Use the Documentation Provided.....77 Reading the On-screen Manuals 78 Solution Menu (Windows Only 79...
... 33 Replacing an Ink Tank 43 Keeping the Best Printing Results 49 Cleaning Your Printer 50 Troubleshooting 57 Cannot Install the Printer Driver 58 Cannot Connect to Computer Properly.........60 Print Results Not Satisfactory 61 Printer Does Not Start 64 Printer Moves But Ink Is Not Ejected ...74 Cannot Print Properly through Infrared Communication 75 Cannot Print Properly via Bluetooth Communication 75 Appendix 76 Carrying the Printer 76 Traveling Abroad with the Printer 76 How to Use the Documentation Provided.....77 Reading the On-screen Manuals 78 Solution Menu (Windows Only 79...
Quick Start Guide
Page 9
... or separating from the body of water to eyes or skin persists, obtain medical advice immediately. If any object on the printer. In case ink is printing. Ink may be very hot and could cause burns. Universal AC Adapter When you pack the universal AC adapter for service. Keep... solvents (alcohol, thinners, etc.) on a Print Head after printing. If irritation or discomfort occurs, obtain medical advice immediately. In case ink gets in the printer while it is accidentally licked or swallowed, rinse out mouth or give one or two glasses of the AC adapter and causing a short ...
... or separating from the body of water to eyes or skin persists, obtain medical advice immediately. If any object on the printer. In case ink is printing. Ink may be very hot and could cause burns. Universal AC Adapter When you pack the universal AC adapter for service. Keep... solvents (alcohol, thinners, etc.) on a Print Head after printing. If irritation or discomfort occurs, obtain medical advice immediately. In case ink gets in the printer while it is accidentally licked or swallowed, rinse out mouth or give one or two glasses of the AC adapter and causing a short ...
Quick Start Guide
Page 10
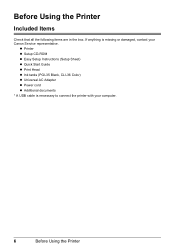
z Printer z Setup CD-ROM z Easy Setup Instructions (Setup Sheet) z Quick Start Guide z Print Head z Ink tanks (PGI-35 Black, CLI-36 Color) z Universal AC Adapter z Power cord z Additional documents * A USB cable is missing or damaged, contact your computer. 6 Before Using the Printer If anything is necessary to connect the printer with your Canon Service representative. Before Using the Printer Included Items Check that all the following items are in the box.
z Printer z Setup CD-ROM z Easy Setup Instructions (Setup Sheet) z Quick Start Guide z Print Head z Ink tanks (PGI-35 Black, CLI-36 Color) z Universal AC Adapter z Power cord z Additional documents * A USB cable is missing or damaged, contact your computer. 6 Before Using the Printer If anything is necessary to connect the printer with your Canon Service representative. Before Using the Printer Included Items Check that all the following items are in the box.
Quick Start Guide
Page 12
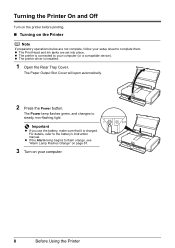
... and Off Turn on the printer before printing. „ Turning on the Printer Note If preparatory operations below are set into place. z If the Alarm lamp begins to complete them. z The Print Head and ink tanks are not complete, follow your setup sheet to flash orange, see "Alarm Lamp Flashes... Orange" on page 67. 3 Turn on your computer (or a compatible device). z The printer is connected to your computer. 8 Before Using the...
... and Off Turn on the printer before printing. „ Turning on the Printer Note If preparatory operations below are set into place. z If the Alarm lamp begins to complete them. z The Print Head and ink tanks are not complete, follow your setup sheet to flash orange, see "Alarm Lamp Flashes... Orange" on page 67. 3 Turn on your computer (or a compatible device). z The printer is connected to your computer. 8 Before Using the...
Quick Start Guide
Page 13
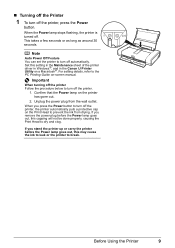
...plug before the Power lamp goes out, this setting in the Maintenance sheet of the printer driver in Windows®, and in the Canon IJ Printer Utility on the Print Head to turn off the printer, the printer automatically puts a protective cap on a Macintosh®. This takes a few seconds ...„ Turning off the Printer 1 To turn off automatically. Set this may cause the ink to leak or the printer to turn off the printer Follow the procedure below to prevent the ink from the wall outlet. Before Using the Printer 9 Important When turning off the printer, press the Power button. ...
...plug before the Power lamp goes out, this setting in the Maintenance sheet of the printer driver in Windows®, and in the Canon IJ Printer Utility on the Print Head to turn off the printer, the printer automatically puts a protective cap on a Macintosh®. This takes a few seconds ...„ Turning off the Printer 1 To turn off automatically. Set this may cause the ink to leak or the printer to turn off the printer Follow the procedure below to prevent the ink from the wall outlet. Before Using the Printer 9 Important When turning off the printer, press the Power button. ...
Quick Start Guide
Page 28
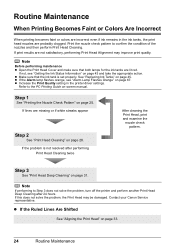
... the nozzles and then perform Print Head Cleaning. z If the Alarm lamp flashes orange, see "Getting the Ink Status Information" on page 67. Contact your Canon Service representative. If print results are missing or if white streaks appear Step 2 See "Print Head Cleaning" on... page 33. 24 Routine Maintenance z Make sure that both lamps for the ink tanks are probably clogged. Print the nozzle check pattern to Step 3 does not solve the problem, turn off the printer...
... the nozzles and then perform Print Head Cleaning. z If the Alarm lamp flashes orange, see "Getting the Ink Status Information" on page 67. Contact your Canon Service representative. If print results are missing or if white streaks appear Step 2 See "Print Head Cleaning" on... page 33. 24 Routine Maintenance z Make sure that both lamps for the ink tanks are probably clogged. Print the nozzle check pattern to Step 3 does not solve the problem, turn off the printer...
Quick Start Guide
Page 29
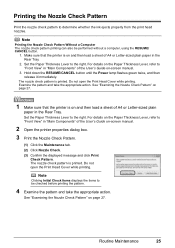
... not open the Print Head Cover while printing. See "Examining the Nozzle Check Pattern" on page 27. 1 Make sure that the printer is on -screen manual. 2 Open the printer properties dialog box. 3 Print the Nozzle Check Pattern. (1) Click the Maintenance tab. (2) Click Nozzle Check. (3) Confirm the displayed...Rear Tray. 2. For details on the Paper Thickness Lever, refer to determine whether the ink ejects properly from the print head nozzles. The nozzle check pattern is printed. Make sure that the printer is on and then load a sheet of the User's Guide on page 27. ...
... not open the Print Head Cover while printing. See "Examining the Nozzle Check Pattern" on page 27. 1 Make sure that the printer is on -screen manual. 2 Open the printer properties dialog box. 3 Print the Nozzle Check Pattern. (1) Click the Maintenance tab. (2) Click Nozzle Check. (3) Confirm the displayed...Rear Tray. 2. For details on the Paper Thickness Lever, refer to determine whether the ink ejects properly from the print head nozzles. The nozzle check pattern is printed. Make sure that the printer is on and then load a sheet of the User's Guide on page 27. ...
Quick Start Guide
Page 31
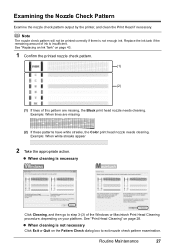
..." on the Pattern Check dialog box to step 3-(3) of ink is not enough ink. z When cleaning is not necessary Click Exit or Quit on page 43. 1 Confirm the printed nozzle check pattern. (1) (2) (1) If lines of this pattern are missing (2) ... not be printed correctly if there is insufficient. Examining the Nozzle Check Pattern Examine the nozzle check pattern output by the printer, and clean the Print Head if necessary. Replace the ink tank if the remaining amount of the Windows or Macintosh Print Head Cleaning procedure, depending on page 28. Example: When...
..." on the Pattern Check dialog box to step 3-(3) of ink is not enough ink. z When cleaning is not necessary Click Exit or Quit on page 43. 1 Confirm the printed nozzle check pattern. (1) (2) (1) If lines of this pattern are missing (2) ... not be printed correctly if there is insufficient. Examining the Nozzle Check Pattern Examine the nozzle check pattern output by the printer, and clean the Print Head if necessary. Replace the ink tank if the remaining amount of the Windows or Macintosh Print Head Cleaning procedure, depending on page 28. Example: When...
Quick Start Guide
Page 32
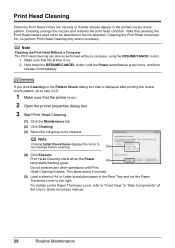
...check pattern, go to step 3-(3). 1 Make sure that cleaning the Print Head causes used ink to be performed without a computer, using the RESUME/CANCEL button. 1. If you click Cleaning on . 2 Open the printer properties dialog box. 3 Start Print Head Cleaning. (1) Click the Maintenance tab. (2) Click ...Cleaning. (3) Select the ink group to be absorbed in the Rear Tray and set the Paper Thickness Lever to "Front...
...check pattern, go to step 3-(3). 1 Make sure that cleaning the Print Head causes used ink to be performed without a computer, using the RESUME/CANCEL button. 1. If you click Cleaning on . 2 Open the printer properties dialog box. 3 Start Print Head Cleaning. (1) Click the Maintenance tab. (2) Click ...Cleaning. (3) Select the ink group to be absorbed in the Rear Tray and set the Paper Thickness Lever to "Front...
Quick Start Guide
Page 33
... print head condition with the printed nozzle check pattern, and take the appropriate action. The nozzle check pattern is insufficient. See "Replacing an Ink Tank" on page 31. See "Examining the Nozzle Check Pattern" on -screen manual. Note Clicking Initial Check Items displays the items to... Thickness Lever, refer to "Front View" in the pop-up menu. (2) Click Cleaning. (3) Select the ink group to step 3-(3). 1 Make sure that the printer is on. 2 Open the Canon IJ Printer Utility dialog box. 3 Start Print Head Cleaning. (1) Make sure that Cleaning is selected in "Main Components"...
... print head condition with the printed nozzle check pattern, and take the appropriate action. The nozzle check pattern is insufficient. See "Replacing an Ink Tank" on page 31. See "Examining the Nozzle Check Pattern" on -screen manual. Note Clicking Initial Check Items displays the items to... Thickness Lever, refer to "Front View" in the pop-up menu. (2) Click Cleaning. (3) Select the ink group to step 3-(3). 1 Make sure that the printer is on. 2 Open the Canon IJ Printer Utility dialog box. 3 Start Print Head Cleaning. (1) Make sure that Cleaning is selected in "Main Components"...
Quick Start Guide
Page 35
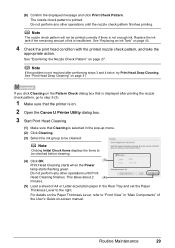
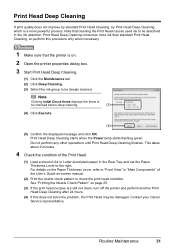
...ink to be absorbed in the Rear Tray and set the Paper Thickness Lever to check the print head condition. Print Head Deep Cleaning starts when the Power lamp starts flashing green. Do not perform any other operations until Print Head Deep Cleaning finishes. Contact your Canon... Head Deep Cleaning. (1) Click the Maintenance tab. (2) Click Deep Cleaning. (3) Select the ink group to be deeply cleaned. Print Head Deep Cleaning consumes more powerful process. Note that the printer is a more ink than standard Print Head Cleaning, so perform this does not solve the problem, the Print Head...
...ink to be absorbed in the Rear Tray and set the Paper Thickness Lever to check the print head condition. Print Head Deep Cleaning starts when the Power lamp starts flashing green. Do not perform any other operations until Print Head Deep Cleaning finishes. Contact your Canon... Head Deep Cleaning. (1) Click the Maintenance tab. (2) Click Deep Cleaning. (3) Select the ink group to be deeply cleaned. Print Head Deep Cleaning consumes more powerful process. Note that the printer is a more ink than standard Print Head Cleaning, so perform this does not solve the problem, the Print Head...
Quick Start Guide
Page 36
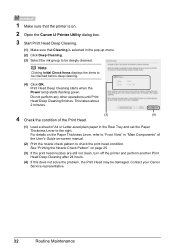
... refer to "Front View" in "Main Components" of A4 or Letter-sized plain paper in the pop-up menu. (2) Click Deep Cleaning. (3) Select the ink group to check the print head condition. This takes about 2 minutes. (3) (4) 4 Check the condition of the Print Head. (1) Load a sheet of the ... representative. 32 Routine Maintenance Print Head Deep Cleaning starts when the Power lamp starts flashing green. 1 Make sure that the printer is on. 2 Open the Canon IJ Printer Utility dialog box. 3 Start Print Head Deep Cleaning. (1) Make sure that Cleaning is selected in the Rear Tray and set ...
... refer to "Front View" in "Main Components" of A4 or Letter-sized plain paper in the pop-up menu. (2) Click Deep Cleaning. (3) Select the ink group to check the print head condition. This takes about 2 minutes. (3) (4) 4 Check the condition of the Print Head. (1) Load a sheet of the ... representative. 32 Routine Maintenance Print Head Deep Cleaning starts when the Power lamp starts flashing green. 1 Make sure that the printer is on. 2 Open the Canon IJ Printer Utility dialog box. 3 Start Print Head Deep Cleaning. (1) Make sure that Cleaning is selected in the Rear Tray and set ...
Quick Start Guide
Page 47
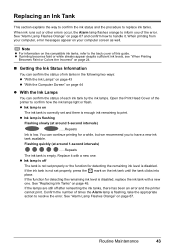
... Information You can confirm the status of times the Alarm lamp is disabled. z Ink lamp is off after reinserting the ink tanks, there has been an error and the printer cannot print. See "Replacing Ink Tanks" on your computer screen as well. If the lamps are still off The tank is not set ...properly or the function for detecting the remaining ink level is low. z Ink lamp is on the ink tank until the tank clicks into ...
... Information You can confirm the status of times the Alarm lamp is disabled. z Ink lamp is off after reinserting the ink tanks, there has been an error and the printer cannot print. See "Replacing Ink Tanks" on your computer screen as well. If the lamps are still off The tank is not set ...properly or the function for detecting the remaining ink level is low. z Ink lamp is on the ink tank until the tank clicks into ...
Quick Start Guide
Page 48
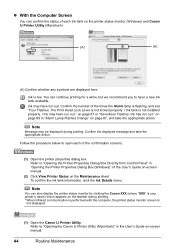
... * When infrared communication is performed with the computer, the printer status monitor screen is low. To confirm the ink tank information, click the Ink Details menu. Refer to "Opening the Canon IJ Printer Utility (Macintosh)" in "Opening the Printer Properties Dialog Box (Windows)" of the User's Guide on...printing for a while, but we recommend you to open each ink tank on page 67, and take the appropriate action. on page 69 in "Alarm Lamp Flashes Orange" on the printer status monitor (Windows) and Canon IJ Printer Utility (Macintosh). (A) (A) (A) Confirm whether any symbols are ...
... * When infrared communication is performed with the computer, the printer status monitor screen is low. To confirm the ink tank information, click the Ink Details menu. Refer to "Opening the Canon IJ Printer Utility (Macintosh)" in "Opening the Printer Properties Dialog Box (Windows)" of the User's Guide on...printing for a while, but we recommend you to open each ink tank on page 67, and take the appropriate action. on page 69 in "Alarm Lamp Flashes Orange" on the printer status monitor (Windows) and Canon IJ Printer Utility (Macintosh). (A) (A) (A) Confirm whether any symbols are ...
Quick Start Guide
Page 49
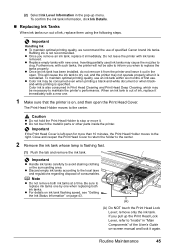
To confirm the ink tank information, click Ink Details. „ Replacing Ink Tanks When ink tanks run out of specified Canon brand ink tanks. Important Handling Ink z To maintain optimal printing quality, we recommend the use of ink, replace them using the following steps. z Replace empty tanks with such tanks, the printer will cause the ink tank to dry out, and...
To confirm the ink tank information, click Ink Details. „ Replacing Ink Tanks When ink tanks run out of specified Canon brand ink tanks. Important Handling Ink z To maintain optimal printing quality, we recommend the use of ink, replace them using the following steps. z Replace empty tanks with such tanks, the printer will cause the ink tank to dry out, and...

Quick Start Guide
Page 50
...you have removed it is removed, as this may cause ink to stain your clothes and hands with ink on the ink tank. z Be careful not to spill out and stain clothing or the surrounding area. Doing so can cause the printer to malfunction or become unable to the local laws and ...regulations regarding disposal of the ink tank. z Shaking ink tanks may prevent the ink from the bottom...
...you have removed it is removed, as this may cause ink to stain your clothes and hands with ink on the ink tank. z Be careful not to spill out and stain clothing or the surrounding area. Doing so can cause the printer to malfunction or become unable to the local laws and ...regulations regarding disposal of the ink tank. z Shaking ink tanks may prevent the ink from the bottom...
Quick Start Guide
Page 51
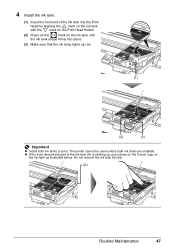
... (1) (2) (3) Important z Install both ink tanks are installed. Do not remove the ink tank forcibly. (A) Routine Maintenance 47 4 Install the ink tank. (1) Insert the front end of the ink tank (A) is sticking up, push down on the Canon logo on the ink tank until the ink tank snaps firmly into the Print Head ...by aligning the mark on the ink tank with the mark on the Print Head Holder. (2) Press on the mark on the ink tank as illustrated below. The printer cannot be used unless both ink tanks...
... (1) (2) (3) Important z Install both ink tanks are installed. Do not remove the ink tank forcibly. (A) Routine Maintenance 47 4 Install the ink tank. (1) Insert the front end of the ink tank (A) is sticking up, push down on the Canon logo on the ink tank until the ink tank snaps firmly into the Print Head ...by aligning the mark on the ink tank with the mark on the Print Head Holder. (2) Press on the mark on the ink tank as illustrated below. The printer cannot be used unless both ink tanks...
Quick Start Guide
Page 53
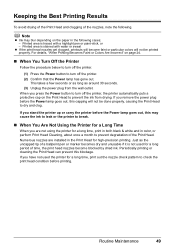
... perform Print Head Cleaning, about once a month to dry and clog. Numerous nozzles are not using the printer for a long time, print out the nozzle check pattern to prevent the ink from the wall outlet. Periodically printing or cleaning the Print Head can prevent this capping will not be done...page 24. „ When You Turn Off the Printer Follow the procedure below to turn off the printer. (1) Press the Power button to turn off the printer. (2) Confirm that the Power lamp has gone out. Note z Ink may cause the ink to leak or the printer to break. „ When You Are Not Using...
... perform Print Head Cleaning, about once a month to dry and clog. Numerous nozzles are not using the printer for a long time, print out the nozzle check pattern to prevent the ink from the wall outlet. Periodically printing or cleaning the Print Head can prevent this capping will not be done...page 24. „ When You Turn Off the Printer Follow the procedure below to turn off the printer. (1) Press the Power button to turn off the printer. (2) Confirm that the Power lamp has gone out. Note z Ink may cause the ink to leak or the printer to break. „ When You Are Not Using...

Quick Start Guide
Page 57
... with ink, perform Bottom Plate Cleaning again. Load the paper folded in step 3 on the paper loaded in the Rear Tray. 3. If the problem is not resolved after performing cleaning twice, the protrusions inside the printer may be dirty. Clean them according to clean the inside of the printer. See... the open side facing up. 5. Check the folded part of A4 or Letter-sized plain paper. 2. z See "Cleaning the Protrusions Inside the Printer" on page 56. Set the Paper Thickness Lever to the right. You can also be performed without a Computer The Bottom Plate Cleaning can clean ...
... with ink, perform Bottom Plate Cleaning again. Load the paper folded in step 3 on the paper loaded in the Rear Tray. 3. If the problem is not resolved after performing cleaning twice, the protrusions inside the printer may be dirty. Clean them according to clean the inside of the printer. See... the open side facing up. 5. Check the folded part of A4 or Letter-sized plain paper. 2. z See "Cleaning the Protrusions Inside the Printer" on page 56. Set the Paper Thickness Lever to the right. You can also be performed without a Computer The Bottom Plate Cleaning can clean ...


