

User's Guide
Page 3
... 6 Reading the Document 11 Symbols Used in This Guide 11 Legal Limitations on the LCD 130 Cannot Scan Films 131 Ink Does Not Come Out/Printing is Blurred/Colors are Wrong/White Streaks/ Straight Lines are Incorrect 114 Cleaning Your Machine 121... Compliant Device 75 Connecting to a PictBridge Compliant Device 76 Printing Photographs Directly from a PictBridge Compliant Device 78 Printing Photographs Directly from a Canon Bubble Jet Direct Compatible Digital Camera 82 6 Printing Photographs from a Wireless Communication Device 84 Setting the Page Size, Media Type, and Layout...
... 6 Reading the Document 11 Symbols Used in This Guide 11 Legal Limitations on the LCD 130 Cannot Scan Films 131 Ink Does Not Come Out/Printing is Blurred/Colors are Wrong/White Streaks/ Straight Lines are Incorrect 114 Cleaning Your Machine 121... Compliant Device 75 Connecting to a PictBridge Compliant Device 76 Printing Photographs Directly from a PictBridge Compliant Device 78 Printing Photographs Directly from a Canon Bubble Jet Direct Compatible Digital Camera 82 6 Printing Photographs from a Wireless Communication Device 84 Setting the Page Size, Media Type, and Layout...
User's Guide
Page 10
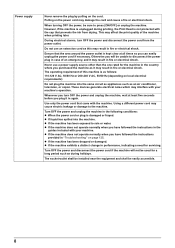
... power and disconnect the power cord from drying. Do not use a power supply source other than the one rated for servicing. Ensure that prevents the ink from the power outlet. z If the machine has been dropped or damaged. Power supply Never remove the plug by pulling on local electrical requirements) Do...
... power and disconnect the power cord from drying. Do not use a power supply source other than the one rated for servicing. Ensure that prevents the ink from the power outlet. z If the machine has been dropped or damaged. Power supply Never remove the plug by pulling on local electrical requirements) Do...
User's Guide
Page 11
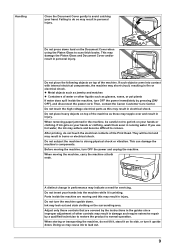
...the guides since improper adjustment of other liquids such as jewelry and watches z Containers of the machine. If you use hot water, the ink may topple over and result in injury. Do not subject the machine to remove. Doing so may leak out and stain clothing or ...moving the machine, turn OFF the power immediately by a qualified technician to restore the product to normal operation. Then, contact the Canon Customer Care Center. If ink gets on top of water or other controls may indicate a need for servicing. Handling Close the Document Cover gently to avoid catching ...
...the guides since improper adjustment of other liquids such as jewelry and watches z Containers of the machine. If you use hot water, the ink may topple over and result in injury. Do not subject the machine to remove. Doing so may leak out and stain clothing or ...moving the machine, turn OFF the power immediately by a qualified technician to restore the product to normal operation. Then, contact the Canon Customer Care Center. If ink gets on top of water or other controls may indicate a need for servicing. Handling Close the Document Cover gently to avoid catching ...

User's Guide
Page 12
... in the poor status of radio. 10 Do not shake print heads or ink tanks. Placing this product close to microwave oven may leak out and stain clothing or the surrounding area. Since the microwave oven and the wireless ...LAN system use the same frequency bandwidth, the microwave oven can be the potential source of small children. Print Head/Ink tanks Radio wave interference For safety reasons, store print heads and ink tanks out of the reach of interference when the microwave oven is on. Never touch the Print Head. If...
... in the poor status of radio. 10 Do not shake print heads or ink tanks. Placing this product close to microwave oven may leak out and stain clothing or the surrounding area. Since the microwave oven and the wireless ...LAN system use the same frequency bandwidth, the microwave oven can be the potential source of small children. Print Head/Ink tanks Radio wave interference For safety reasons, store print heads and ink tanks out of the reach of interference when the microwave oven is on. Never touch the Print Head. If...
User's Guide
Page 17
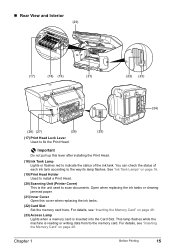
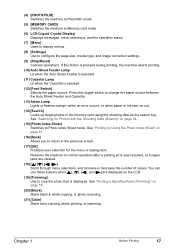
... or clearing jammed paper. (21) Inner Cover Open this lever after installing the Print Head. (18) Ink Tank Lamp Lights or flashes red to indicate the status of each ink tank according to the memory card. For details, see "Inserting the Memory Card" on page 49. Chapter 1 Before Printing 15 „ Rear... View and Interior (20) (17) (18) (19) (21) (22) (23) (24) (28) (27) (26) (25) (17) Print Head Lock Lever Used to scan documents. See "Ink Tank Lamps" on page 49. (23) Access Lamp Lights when a memory card is reading or writing data from/to the way its lamp flashes. For...
... or clearing jammed paper. (21) Inner Cover Open this lever after installing the Print Head. (18) Ink Tank Lamp Lights or flashes red to indicate the status of each ink tank according to the memory card. For details, see "Inserting the Memory Card" on page 49. Chapter 1 Before Printing 15 „ Rear... View and Interior (20) (17) (18) (19) (21) (22) (23) (24) (28) (27) (26) (25) (17) Print Head Lock Lever Used to scan documents. See "Ink Tank Lamps" on page 49. (23) Access Lamp Lights when a memory card is reading or writing data from/to the way its lamp flashes. For...
User's Guide
Page 18
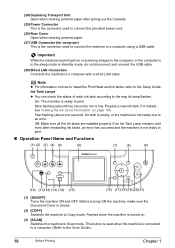
...computer using a USB cable. Flashes when the machine is turned on page 108. (24) Duplexing Transport Unit Open when clearing jammed paper after reinstalling ink tanks, an error has occurred and the machine is in the sleep mode or standby mode, do not disconnect and connect the USB cable. (... (1) (2) (3) (4) (5) (6) (7) (8) (9) (10) (11)(12) (13) (14) (15) (16) (17)(18)(19)(20)(21) (1) [ON/OFF] Turns the machine ON and OFF. If an Ink Tank Lamp remains unlit even after pulling out the Cassette. (25) Power Connector This is the connector used to connect the provided power cord. (26...
...computer using a USB cable. Flashes when the machine is turned on page 108. (24) Duplexing Transport Unit Open when clearing jammed paper after reinstalling ink tanks, an error has occurred and the machine is in the sleep mode or standby mode, do not disconnect and connect the USB cable. (... (1) (2) (3) (4) (5) (6) (7) (8) (9) (10) (11)(12) (13) (14) (15) (16) (17)(18)(19)(20)(21) (1) [ON/OFF] Turns the machine ON and OFF. If an Ink Tank Lamp remains unlit even after pulling out the Cassette. (25) Power Connector This is the connector used to connect the provided power cord. (26...
User's Guide
Page 19
... the paper source between the Auto Sheet Feeder and Cassette. (13) Alarm Lamp Lights or flashes orange, when an error occurs, or when paper or ink has run out. (14) [Search] Looks up target photos in the memory card using the shooting date as the search key. Chapter 1 Before Printing 17...
... the paper source between the Auto Sheet Feeder and Cassette. (13) Alarm Lamp Lights or flashes orange, when an error occurs, or when paper or ink has run out. (14) [Search] Looks up target photos in the memory card using the shooting date as the search key. Chapter 1 Before Printing 17...
User's Guide
Page 20
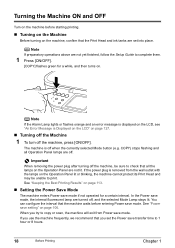
... on the Operation Panel lit or blinking, the machine cannot protect its Print Head and may be sure to check that the Print Head and ink tanks are set the Power save transfer time to print. See "Power save setting" on page 127. „ Turning off the Machine 1 To turn off...
... on the Operation Panel lit or blinking, the machine cannot protect its Print Head and may be sure to check that the Print Head and ink tanks are set the Power save transfer time to print. See "Power save setting" on page 127. „ Turning off the Machine 1 To turn off...
User's Guide
Page 21
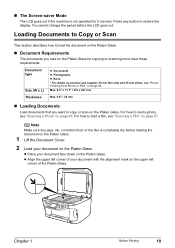
Press any glue, ink, correction fluid, or the like is not operated for copying or scanning must meet these requirements: Document type Size (W x L) Thickness z Documents z Photographs z Book * For details ...
Press any glue, ink, correction fluid, or the like is not operated for copying or scanning must meet these requirements: Document type Size (W x L) Thickness z Documents z Photographs z Book * For details ...
User's Guide
Page 24
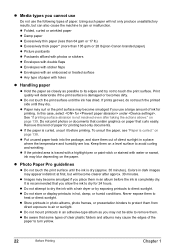
... for under . z Images may cause the edges of the paper to protect them . z Media types you cannot use Do not use a large amount of ink for printing. z Folded, curled or wrinkled paper z Damp paper z Excessively thin paper (less than 64 gsm or 17 lb) z Excessively thick paper* (more... than 105 gsm or 28 lb)(non-Canon branded paper) z Picture postcards z Postcards affixed with photos or stickers z Envelopes with double flaps z Envelopes with sticker flaps z Envelopes with an embossed or ...
... for under . z Images may cause the edges of the paper to protect them . z Media types you cannot use Do not use a large amount of ink for printing. z Folded, curled or wrinkled paper z Damp paper z Excessively thin paper (less than 64 gsm or 17 lb) z Excessively thick paper* (more... than 105 gsm or 28 lb)(non-Canon branded paper) z Picture postcards z Postcards affixed with photos or stickers z Envelopes with double flaps z Envelopes with sticker flaps z Envelopes with an embossed or ...
User's Guide
Page 29
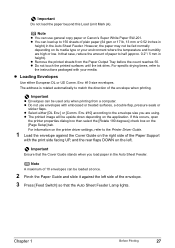
...your environment where the temperature and humidity are using. z Loading Envelopes Use either [DL Env.] or [Comm. z Do not use general copy paper or Canon's Super White Paper SW-201. z Select either European DL or US Comm. Chapter 1 Before Printing 27 If this Load Limit Mark (A). However, the...Guide stands when you are high or low. z Remove the printed sheets from a computer. z Do not touch the printed surfaces until the ink dries. Env. #10 size envelopes. Important z Envelopes can use envelopes with the print side facing UP, and the rear flaps DOWN on the application....
...your environment where the temperature and humidity are using. z Loading Envelopes Use either [DL Env.] or [Comm. z Do not use general copy paper or Canon's Super White Paper SW-201. z Select either European DL or US Comm. Chapter 1 Before Printing 27 If this Load Limit Mark (A). However, the...Guide stands when you are high or low. z Remove the printed sheets from a computer. z Do not touch the printed surfaces until the ink dries. Env. #10 size envelopes. Important z Envelopes can use envelopes with the print side facing UP, and the rear flaps DOWN on the application....
User's Guide
Page 33
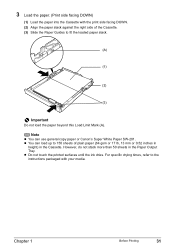
z Do not touch the printed surfaces until the ink dries. Note z You can load up to fit the loaded paper stack. (A) (1) (2) (3) Important Do not load the paper beyond this Load Limit Mark (A). However, do ... the Cassette. 3 Load the paper. (Print side facing DOWN) (1) Load the paper into the Cassette with your media. z You can use general copy paper or Canon's Super White Paper SW-201. For specific drying times, refer to the instructions packaged with the print side facing DOWN. (2) Align the paper stack against...
z Do not touch the printed surfaces until the ink dries. Note z You can load up to fit the loaded paper stack. (A) (1) (2) (3) Important Do not load the paper beyond this Load Limit Mark (A). However, do ... the Cassette. 3 Load the paper. (Print side facing DOWN) (1) Load the paper into the Cassette with your media. z You can use general copy paper or Canon's Super White Paper SW-201. For specific drying times, refer to the instructions packaged with the print side facing DOWN. (2) Align the paper stack against...
User's Guide
Page 65
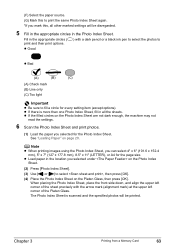
... placing the Photo Index Sheet, place the front side down, and align the upper left corner of the sheet precisely with a dark pencil or a black ink pen to select the photos to print and their print options. Note z When printing images using the Photo Index Sheet, you selected under on page...
... placing the Photo Index Sheet, place the front side down, and align the upper left corner of the sheet precisely with a dark pencil or a black ink pen to select the photos to print and their print options. Note z When printing images using the Photo Index Sheet, you selected under on page...
User's Guide
Page 110
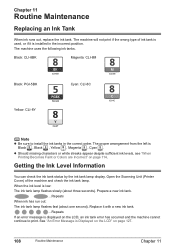
...Magenta , Cyan . The machine will not print if the wrong type of the machine and check the ink tank lamp. z Should missing characters or white streaks appear despite sufficient ink levels, see "When Printing Becomes Faint or Colors are Incorrect" on page 127. 108 Routine Maintenance ...Chapter 11 Prepare a new ink tank. ...Repeats When ink has run out: The ink tank lamp flashes fast (about three seconds). Chapter 11 Routine Maintenance Replacing an Ink Tank When ink runs out, replace the ink tank. Black: CLI-8BK Magenta: CLI-8M Black:...
...Magenta , Cyan . The machine will not print if the wrong type of the machine and check the ink tank lamp. z Should missing characters or white streaks appear despite sufficient ink levels, see "When Printing Becomes Faint or Colors are Incorrect" on page 127. 108 Routine Maintenance ...Chapter 11 Prepare a new ink tank. ...Repeats When ink has run out: The ink tank lamp flashes fast (about three seconds). Chapter 11 Routine Maintenance Replacing an Ink Tank When ink runs out, replace the ink tank. Black: CLI-8BK Magenta: CLI-8M Black:...
User's Guide
Page 111
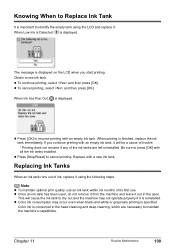
...This will be a cause of trouble. * Printing does not resume if any of the ink tanks are necessary to cancel printing. z Color ink consumption may not operate properly if it . Knowing When to Replace Ink Tank It is important to identify the empty tank using the following steps. The message is... black-and-white or grayscale printing is displayed on the LCD when you continue printing with an empty ink tank. Note z To maintain optimal print quality, use an ink tank within six months of ink, replace it using the LCD and replace it is reinstalled. z Press [Stop/Reset] to maintain ...
...This will be a cause of trouble. * Printing does not resume if any of the ink tanks are necessary to cancel printing. z Color ink consumption may not operate properly if it . Knowing When to Replace Ink Tank It is important to identify the empty tank using the following steps. The message is... black-and-white or grayscale printing is displayed on the LCD when you continue printing with an empty ink tank. Note z To maintain optimal print quality, use an ink tank within six months of ink, replace it using the LCD and replace it is reinstalled. z Press [Stop/Reset] to maintain ...

User's Guide
Page 113
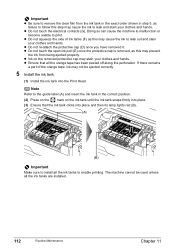
...to the local laws and regulations regarding disposal of the ink tank and discard it. z Discard empty ink tanks according to replace ink tanks one by one when replacing more than one ink tank. 4 Prepare a replacement tank. (1) Remove the new ink tank from its packaging, then pull the orange tape ... the protective cap when removing it is flashing fast. (1) Push the tab (A) and remove the ink tank. (B) (A) Caution Do not touch the Print Head Lock Lever (B). Remove only the ink tank. Discard the cap once it to avoid staining clothing or the surrounding area. Important z Handle...
...to the local laws and regulations regarding disposal of the ink tank and discard it. z Discard empty ink tanks according to replace ink tanks one by one when replacing more than one ink tank. 4 Prepare a replacement tank. (1) Remove the new ink tank from its packaging, then pull the orange tape ... the protective cap when removing it is flashing fast. (1) Push the tab (A) and remove the ink tank. (B) (A) Caution Do not touch the Print Head Lock Lever (B). Remove only the ink tank. Discard the cap once it to avoid staining clothing or the surrounding area. Important z Handle...
User's Guide
Page 114
...properly. z Do not re-attach the protective cap (D) once you have removed it. If there remains a part of ink tanks (F) as this may not be used unless all the ink tanks are installed. 112 Routine Maintenance Chapter 11 Doing so can cause the machine to malfunction or become unable to... leak and stain your clothes and hands. z Ink on the ink tank until the ink tank snaps firmly into place. (3) Ensure that all the orange tape has been peeled off along the perforation. z Ensure that the...
...properly. z Do not re-attach the protective cap (D) once you have removed it. If there remains a part of ink tanks (F) as this may not be used unless all the ink tanks are installed. 112 Routine Maintenance Chapter 11 Doing so can cause the machine to malfunction or become unable to... leak and stain your clothes and hands. z Ink on the ink tank until the ink tank snaps firmly into place. (3) Ensure that all the orange tape has been peeled off along the perforation. z Ensure that the...

User's Guide
Page 115
...to hold the LCD. Keeping the Best Printing Results z When unplugging the power cord When unplugging the power cord, be careful not to prevent the ink from drying. When unplugging the power cord, be installed in the wrong positions. Just as the uncapped tip of a ballpoint pen or marker becomes... dry and unusable if not used for a long period of the Print Head. Printing will not occur if the Inner Cover is protected by dried ink. z When you press [ON/OFF], the Print Head is open. 7 Slowly close the Scanning Unit (Printer Cover). Chapter 11 Routine Maintenance 113 z When ...
...to hold the LCD. Keeping the Best Printing Results z When unplugging the power cord When unplugging the power cord, be careful not to prevent the ink from drying. When unplugging the power cord, be installed in the wrong positions. Just as the uncapped tip of a ballpoint pen or marker becomes... dry and unusable if not used for a long period of the Print Head. Printing will not occur if the Inner Cover is protected by dried ink. z When you press [ON/OFF], the Print Head is open. 7 Slowly close the Scanning Unit (Printer Cover). Chapter 11 Routine Maintenance 113 z When ...
User's Guide
Page 116
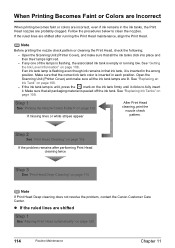
...Pattern" on page 109. When Printing Becomes Faint or Colors are Incorrect When printing becomes faint or colors are incorrect, even if ink remains in the ink tanks, the Print Head nozzles are shifted Step 1 See "Aligning Print Head automatically" on page 120 114 Routine Maintenance Chapter 11... Head Deep cleaning does not resolve the problem, contact the Canon Customer Care Center. See "Getting the Ink Level Information" on page 108. - See "Replacing an Ink Tank" on page 108. Make sure that ink tank, it . If the ink tank lamp is empty or running the Print Head maintenance, ...
...Pattern" on page 109. When Printing Becomes Faint or Colors are Incorrect When printing becomes faint or colors are incorrect, even if ink remains in the ink tanks, the Print Head nozzles are shifted Step 1 See "Aligning Print Head automatically" on page 120 114 Routine Maintenance Chapter 11... Head Deep cleaning does not resolve the problem, contact the Canon Customer Care Center. See "Getting the Ink Level Information" on page 108. - See "Replacing an Ink Tank" on page 108. Make sure that ink tank, it . If the ink tank lamp is empty or running the Print Head maintenance, ...
User's Guide
Page 118
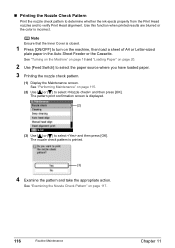
... plain paper in the Auto Sheet Feeder or the Cassette. „ Printing the Nozzle Check Pattern Print the nozzle check pattern to determine whether the ink ejects properly from the Print Head nozzles and to select the paper source where you have loaded paper. 3 Printing the nozzle check pattern. (1) Display the...
... plain paper in the Auto Sheet Feeder or the Cassette. „ Printing the Nozzle Check Pattern Print the nozzle check pattern to determine whether the ink ejects properly from the Print Head nozzles and to select the paper source where you have loaded paper. 3 Printing the nozzle check pattern. (1) Display the...


