User's Guide
Page 4
LIMITED WARRANTY --- (USA Only 176 Users in the U.S.A 174 Regulatory Information 174 Mercury Legislation 175 CANON U.S.A., INC. Cannot Connect to the Computer Properly 148 Problems Scanning 149 Cannot Scan Films 156 An Error Message Appears on the...You Cannot Resolve the Problem ...........163 13 Appendix 164 Printing Area 164 How to Read the On-screen Manuals.........166 Uninstalling the Canon IJ Network Scan Utility 167 Uninstalling the On-screen Manuals...........168 Transporting Machine 168 Specifications 169 Users in Canada 178 Customer Technical Supports 178 Index 179 2
LIMITED WARRANTY --- (USA Only 176 Users in the U.S.A 174 Regulatory Information 174 Mercury Legislation 175 CANON U.S.A., INC. Cannot Connect to the Computer Properly 148 Problems Scanning 149 Cannot Scan Films 156 An Error Message Appears on the...You Cannot Resolve the Problem ...........163 13 Appendix 164 Printing Area 164 How to Read the On-screen Manuals.........166 Uninstalling the Canon IJ Network Scan Utility 167 Uninstalling the On-screen Manuals...........168 Transporting Machine 168 Specifications 169 Users in Canada 178 Customer Technical Supports 178 Index 179 2
User's Guide
Page 5
.... By connecting to be understood to an Exif Print-compliant digital camera, the camera's image data at the time of Canon Inc. © 2006 Canon Inc. Model Name K10266 (PIXMA MP800R) 3 has reviewed this manual thoroughly in order that this product meets the ENERGY STAR guidelines for enhancing the communication between digital cameras and printers...
.... By connecting to be understood to an Exif Print-compliant digital camera, the camera's image data at the time of Canon Inc. © 2006 Canon Inc. Model Name K10266 (PIXMA MP800R) 3 has reviewed this manual thoroughly in order that this product meets the ENERGY STAR guidelines for enhancing the communication between digital cameras and printers...
User's Guide
Page 7
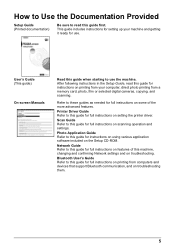
User's Guide (This guide) On-screen Manuals Read this guide for full instructions on scanning operation and settings. Bluetooth User's Guide Refer to this guide for full instructions on printing from computers ...
User's Guide (This guide) On-screen Manuals Read this guide for full instructions on scanning operation and settings. Bluetooth User's Guide Refer to this guide for full instructions on printing from computers ...
User's Guide
Page 48
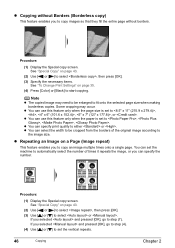
Procedure: (1) Display the Special copy screen. Some cropping may need to be cropped from the borders of times it repeats the image, or you to , , , . z You can select the width to be enlarged to the image size. You can specify the number. See "Special Copy" on page 43. (2) Use [ ] or [ ] to select , then press [OK]. (3) Specify the necessary items. See "To Change Print Settings" on page 35. (4) Press [Color] or [Black] to select or . z Repeating an Image on page 43. (2) Use [ ] or [ ] to select , then press [OK]. (3) Use [ ] or [ ] to start copying. z You can ...
Procedure: (1) Display the Special copy screen. Some cropping may need to be cropped from the borders of times it repeats the image, or you to , , , . z You can select the width to be enlarged to the image size. You can specify the number. See "Special Copy" on page 43. (2) Use [ ] or [ ] to select , then press [OK]. (3) Specify the necessary items. See "To Change Print Settings" on page 35. (4) Press [Color] or [Black] to select or . z Repeating an Image on page 43. (2) Use [ ] or [ ] to select , then press [OK]. (3) Use [ ] or [ ] to start copying. z You can ...
User's Guide
Page 51
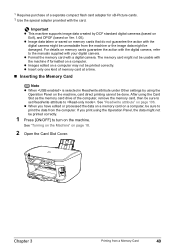
... cannot be printed correctly. If you have edited or processed the data on a memory card on a computer, be printed correctly. 1 Press [ON/OFF] to the manuals supplied with a digital camera. Important z This machine supports image data created by using the Operation Panel, the data might not be damaged. z When you print...
... cannot be printed correctly. If you have edited or processed the data on a memory card on a computer, be printed correctly. 1 Press [ON/OFF] to the manuals supplied with a digital camera. Important z This machine supports image data created by using the Operation Panel, the data might not be damaged. z When you print...
User's Guide
Page 78
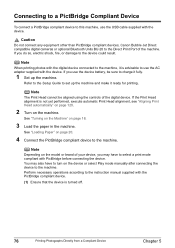
Caution Do not connect any equipment other than PictBridge compliant devices, Canon Bubble Jet Direct compatible digital cameras or optional Bluetooth Units BU-20 to the Direct Print Port of the digital device. If the Print Head ..., use the AC adapter supplied with the device. See "Loading Paper" on the device or select Play mode manually after connecting the device to the machine. Perform necessary operations according to the instruction manual supplied with the device. Note The Print Head cannot be sure to use the USB cable supplied with...
Caution Do not connect any equipment other than PictBridge compliant devices, Canon Bubble Jet Direct compatible digital cameras or optional Bluetooth Units BU-20 to the Direct Print Port of the digital device. If the Print Head ..., use the AC adapter supplied with the device. See "Loading Paper" on the device or select Play mode manually after connecting the device to the machine. Perform necessary operations according to the instruction manual supplied with the device. Note The Print Head cannot be sure to use the USB cable supplied with...
User's Guide
Page 79
... from the Digital Camera" on and set up the device for connection to the machine. A Canon Bubble Jet Direct compatible digital camera. A PictBridge compliant device. Either of the PictBridge compliant devices do not turn it on manually. (3) Turn on page 143. (2) Connect the device to the machine using the USB cable (for...
... from the Digital Camera" on and set up the device for connection to the machine. A Canon Bubble Jet Direct compatible digital camera. A PictBridge compliant device. Either of the PictBridge compliant devices do not turn it on manually. (3) Turn on page 143. (2) Connect the device to the machine using the USB cable (for...
User's Guide
Page 80
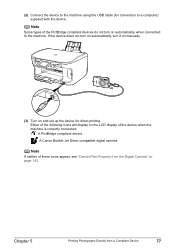
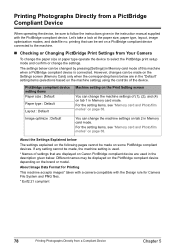
...Layout : Default Machine setting on tab 2 in Memory card mode of this machine when a PictBridge compliant device is used in the instruction manual supplied with the Design rule for Printing This machine accepts images* taken with a camera compatible with the PictBridge compliant device. The settings below.... If any setting cannot be made on page 38. For the setting items, see "Memory card and Photo/film modes" on Canon PictBridge compliant device are in Memory card mode. Printing Photographs Directly from a PictBridge Compliant Device When operating the device, be sure to...
...Layout : Default Machine setting on tab 2 in Memory card mode of this machine when a PictBridge compliant device is used in the instruction manual supplied with the Design rule for Printing This machine accepts images* taken with a camera compatible with the PictBridge compliant device. The settings below.... If any setting cannot be made on page 38. For the setting items, see "Memory card and Photo/film modes" on Canon PictBridge compliant device are in Memory card mode. Printing Photographs Directly from a PictBridge Compliant Device When operating the device, be sure to...
User's Guide
Page 83
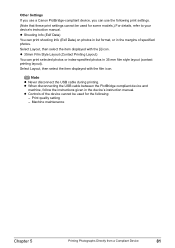
...follow the instructions given in the margins of the device cannot be used for some models.) For details, refer to your device's instruction manual. z Controls of specified photos. Select Layout, then select the item displayed with the film icon. Select Layout, then select the item... displayed with the [i] icon. Note z Never disconnect the USB cable during printing. Other Settings If you use a Canon PictBridge-compliant device, you can use the following print settings. (Note that these print settings cannot be used for the following: - Machine ...
...follow the instructions given in the margins of the device cannot be used for some models.) For details, refer to your device's instruction manual. z Controls of specified photos. Select Layout, then select the item displayed with the film icon. Select Layout, then select the item... displayed with the [i] icon. Note z Never disconnect the USB cable during printing. Other Settings If you use a Canon PictBridge-compliant device, you can use the following print settings. (Note that these print settings cannot be used for the following: - Machine ...
User's Guide
Page 85
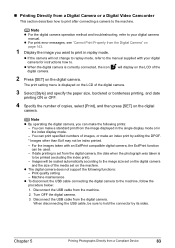
... The digital camera does not support the following prints: - Machine maintenance z To disconnect the USB cable connecting the digital camera to the manual supplied with an ExifPrint compatible digital camera, the ExifPrint function can print specified numbers of the media set from the image displayed in the single...functions: - Turn OFF the digital camera. 3. Disconnect the USB cable from a Compliant Device 83 For the images taken with your digital camera manual. z When the digital camera is to be sure to hold the connector by editing the DPOF. * Images other than Exif may not be...
... The digital camera does not support the following prints: - Machine maintenance z To disconnect the USB cable connecting the digital camera to the manual supplied with an ExifPrint compatible digital camera, the ExifPrint function can print specified numbers of the media set from the image displayed in the single...functions: - Turn OFF the digital camera. 3. Disconnect the USB cable from a Compliant Device 83 For the images taken with your digital camera manual. z When the digital camera is to be sure to hold the connector by editing the DPOF. * Images other than Exif may not be...
User's Guide
Page 88
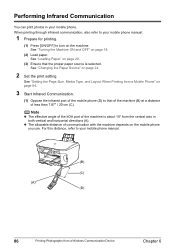
... the IrDA port of less than 7.87" / 20 cm (C). When printing through infrared communication, also refer to your mobile phone manual. 1 Prepare for printing. (1) Press [ON/OFF] to your mobile phone manual. (B) (C) (A) (D) 86 Printing Photographs from the central axis in your mobile phone. Performing Infrared Communication You can print photos in both...
... the IrDA port of less than 7.87" / 20 cm (C). When printing through infrared communication, also refer to your mobile phone manual. 1 Prepare for printing. (1) Press [ON/OFF] to your mobile phone manual. (B) (C) (A) (D) 86 Printing Photographs from the central axis in your mobile phone. Performing Infrared Communication You can print photos in both...
User's Guide
Page 89
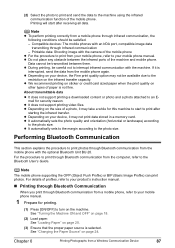
...paper. Compatible devices: The mobile phones with the optional Bluetooth Unit BU-20. z During printing, be satisfied. - z Depending on your mobile phone manual. 1 Prepare for printing. (1) Press [ON/OFF] to print after receiving all data. z Depending on the machine. See "Loading Paper" on the...in a memory card. z We recommend printing on sticker or credit card sized paper when the print quality on your product's instruction manual. „ Printing through Bluetooth Communication When you print through Bluetooth communication from a mobile phone, refer to the restriction on page 20...
...paper. Compatible devices: The mobile phones with the optional Bluetooth Unit BU-20. z During printing, be satisfied. - z Depending on your mobile phone manual. 1 Prepare for printing. (1) Press [ON/OFF] to print after receiving all data. z Depending on the machine. See "Loading Paper" on the...in a memory card. z We recommend printing on sticker or credit card sized paper when the print quality on your product's instruction manual. „ Printing through Bluetooth Communication When you print through Bluetooth communication from a mobile phone, refer to the restriction on page 20...

User's Guide
Page 102
... scan an image from MP Navigator apply when scanning. or WIA-* compliant application software and handle the scanned image in the Scan Guide (On-screen Manual) and change the MP Navigator [Document Type] and [Document Size] to "Selecting the Behavior of the Operation Panel with MP Navigator" in the application software...
... scan an image from MP Navigator apply when scanning. or WIA-* compliant application software and handle the scanned image in the Scan Guide (On-screen Manual) and change the MP Navigator [Document Type] and [Document Size] to "Selecting the Behavior of the Operation Panel with MP Navigator" in the application software...
User's Guide
Page 112
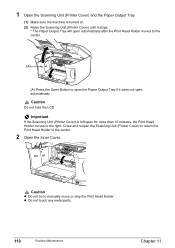
... 10 minutes, the Print Head Holder moves to the right. Close and reopen the Scanning Unit (Printer Cover) to return the Print Head Holder to manually move or stop the Print Head Holder. Caution z Do not try to the center. 2 Open the Inner Cover. z Do not touch any metal parts. 110...
... 10 minutes, the Print Head Holder moves to the right. Close and reopen the Scanning Unit (Printer Cover) to return the Print Head Holder to manually move or stop the Print Head Holder. Caution z Do not try to the center. 2 Open the Inner Cover. z Do not touch any metal parts. 110...
User's Guide
Page 122
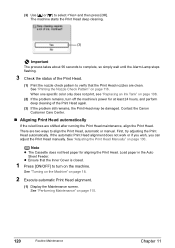
If the automatic Print Head alignment does not work or if you wish, you can adjust the Print Head manually. Load paper in the Auto Sheet Feeder. See "Adjusting the Print Head Manually" on page 18. 2 Execute automatic Print Head alignment. (1) Display the Maintenance screen. Note z The Cassette does... 90 seconds to turn on page 108. (2) If the problem remains, turn off the machine's power for aligning the Print Head. Contact the Canon Customer Care Center. „ Aligning Print Head automatically If the ruled lines are clean. z Ensure that the Print Head nozzles are shifted after...
If the automatic Print Head alignment does not work or if you wish, you can adjust the Print Head manually. Load paper in the Auto Sheet Feeder. See "Adjusting the Print Head Manually" on page 18. 2 Execute automatic Print Head alignment. (1) Display the Maintenance screen. Note z The Cassette does... 90 seconds to turn on page 108. (2) If the problem remains, turn off the machine's power for aligning the Print Head. Contact the Canon Customer Care Center. „ Aligning Print Head automatically If the ruled lines are clean. z Ensure that the Print Head nozzles are shifted after...
User's Guide
Page 127
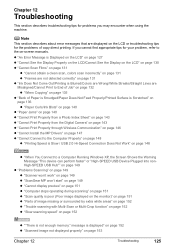
... are not detected correctly" on page 131 z "Ink Does Not Come Out/Printing is displayed" on page 152 z "Scanned image not displayed properly" on -screen manuals.
... are not detected correctly" on page 131 z "Ink Does Not Come Out/Printing is displayed" on page 152 z "Scanned image not displayed properly" on -screen manuals.
User's Guide
Page 130
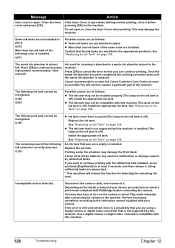
... as follows: z The ink tank may have to the machine. Confirm that the ink tanks are not installed in the appropriate positions. Canon recommends to replace a particular part of your camera. Install the appropriate ink tank. See "Replacing an Ink Tank" on page 108. .... Once the waste ink absorber becomes completely full, printing cannot be installed properly (The lamp on the camera or select Play mode manually after connecting the camera to select a print mode compliant with this machine. 128 Troubleshooting Chapter 12 Install the appropriate ink tank. Printing...
... as follows: z The ink tank may have to the machine. Confirm that the ink tanks are not installed in the appropriate positions. Canon recommends to replace a particular part of your camera. Install the appropriate ink tank. See "Replacing an Ink Tank" on page 108. .... Once the waste ink absorber becomes completely full, printing cannot be installed properly (The lamp on the camera or select Play mode manually after connecting the camera to select a print mode compliant with this machine. 128 Troubleshooting Chapter 12 Install the appropriate ink tank. Printing...
User's Guide
Page 131
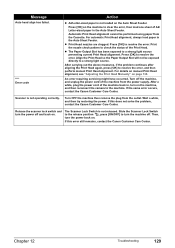
... try restoring the power. Slide the Scanner Lock Switch to the release position , press [ON/OFF] to resolve the error, and then perform manual Print Head alignment. Then, turn the power off and back on the machine, and then reconnect the camera to clear the error, then load one.... z The Paper Output Slot has been exposed to resolve the error. For details on manual Print Head alignment, see "Adjusting the Print Head Manually" on the Auto Sheet Feeder. If the same error occurs, contact the Canon Customer Care Center. Message Auto head align has failed. **** Error code Action z A4/...
... try restoring the power. Slide the Scanner Lock Switch to the release position , press [ON/OFF] to resolve the error, and then perform manual Print Head alignment. Then, turn the power off and back on the machine, and then reconnect the camera to clear the error, then load one.... z The Paper Output Slot has been exposed to resolve the error. For details on manual Print Head alignment, see "Adjusting the Print Head Manually" on the Auto Sheet Feeder. If the same error occurs, contact the Canon Customer Care Center. Message Auto head align has failed. **** Error code Action z A4/...
User's Guide
Page 132
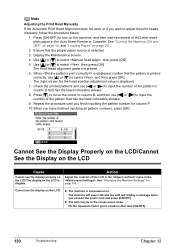
... you have finished inputting all pattern numbers, press [OK]. See "Changing the Machine Settings" on . z The machine is selected. 3. Note Adjusting the Print Head Manually If the Automatic Print Head Alignment does not work or if you connect the power cord and press [ON/OFF]. Use [ ] or [ ] to select , .../Cannot See the Display on the LCD Cause Cannot see the display on the LCD is printed correctly, use [ ] or [ ] to adjust the print heads manually, follow the procedure below. 1. Press [ON/OFF] to select , and then press [OK]. See "Turning the Machine ON and OFF" on page 18, and...
... you have finished inputting all pattern numbers, press [OK]. See "Changing the Machine Settings" on . z The machine is selected. 3. Note Adjusting the Print Head Manually If the Automatic Print Head Alignment does not work or if you connect the power cord and press [ON/OFF]. Use [ ] or [ ] to select , .../Cannot See the Display on the LCD Cause Cannot see the display on the LCD is printed correctly, use [ ] or [ ] to adjust the print heads manually, follow the procedure below. 1. Press [ON/OFF] to select , and then press [OK]. See "Turning the Machine ON and OFF" on page 18, and...
User's Guide
Page 145
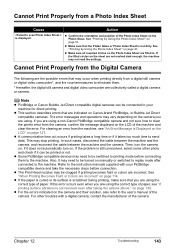
...the camera, confirm the message displayed on the LCD of the Photo Index Sheet on the camera and their solution, also refer to the user's manual of paper. See "Printing by Using the Photo Index Sheet" on the sheet are using the correct type of the camera. z Make sure all... sure that are using . See "Printing by Using the Photo Index Sheet" on the Photo Index Sheet are using a non-Canon PictBridge compatible camera and not sure how to the instruction manuals supplied with a digital camera, contact the manufacturer of paper, see "An Error Message is Displayed on the LCD" on...
...the camera, confirm the message displayed on the LCD of the Photo Index Sheet on the camera and their solution, also refer to the user's manual of paper. See "Printing by Using the Photo Index Sheet" on the sheet are using the correct type of the camera. z Make sure all... sure that are using . See "Printing by Using the Photo Index Sheet" on the Photo Index Sheet are using a non-Canon PictBridge compatible camera and not sure how to the instruction manuals supplied with a digital camera, contact the manufacturer of paper, see "An Error Message is Displayed on the LCD" on...


