

Operation Manual
Page 3
... ratio page 2 6 7 8 9 12 15 16 18 20 22 24 1 How to Make Unique Copies Making two-sided copies 26 Making colorful copies 28 ( Replacing Cartridges Installing a new cartridge 32 Changing the fixing assembly cleaner 34 I Troubleshooting Ej is continuously lit (paper supply/paper feed check) 37 841,, is flashing (paper jam) 38...
... ratio page 2 6 7 8 9 12 15 16 18 20 22 24 1 How to Make Unique Copies Making two-sided copies 26 Making colorful copies 28 ( Replacing Cartridges Installing a new cartridge 32 Changing the fixing assembly cleaner 34 I Troubleshooting Ej is continuously lit (paper supply/paper feed check) 37 841,, is flashing (paper jam) 38...
Operation Manual
Page 4
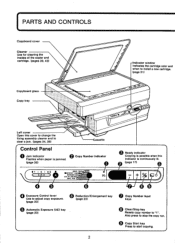
PARTS AND CONTROLS Copyboard cover Cleaner Use for cleaning the insides of the copier and cartridge. (pages 39, 43) Copyboard glass Copy tray -Indicator window Indicates the cartridge color and when to Install a new cartridge. (page 31) Left cover Open this cover to change the fixing assembly cleaner and to clear a jam. (pages 34...
PARTS AND CONTROLS Copyboard cover Cleaner Use for cleaning the insides of the copier and cartridge. (pages 39, 43) Copyboard glass Copy tray -Indicator window Indicates the cartridge color and when to Install a new cartridge. (page 31) Left cover Open this cover to change the fixing assembly cleaner and to clear a jam. (pages 34...

Operation Manual
Page 5
Power switch Power cord connector Right cover Manual feed tray Cartridge status indicator This Indicates when to open the copier. Gray lever Lift this lever to install a new cartridge. • Cartridge color indicator Corona assembly cleaning groove cV„ • Tab 3 Cartridge Manual feed guide Slide the guides to adjust them to the size of the copy paper. (page 16) Cartridge -siwr O .e.et'es;
Power switch Power cord connector Right cover Manual feed tray Cartridge status indicator This Indicates when to open the copier. Gray lever Lift this lever to install a new cartridge. • Cartridge color indicator Corona assembly cleaning groove cV„ • Tab 3 Cartridge Manual feed guide Slide the guides to adjust them to the size of the copy paper. (page 16) Cartridge -siwr O .e.et'es;
Operation Manual
Page 10
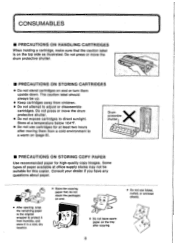
...after moving them upside down. Do not press or move the drum protective shutter. ■ PRECAUTIONS ON STORING CARTRIDGES • Do not stand cartridges on (page 6). ■ PRECAUTIONS ON STORING COPY PAPER Use recommended paper for this copier. CONSUMABLES ■ PRECAUTIONS ON HANDLING...dry location. • Store the copying paper flat; Do not press or move the drum protective shutter. • Do not expose cartridges to protect it in the original wrapper to direct sunlight. The caution label should always be suitable for high-quality copy images. Some ...
...after moving them upside down. Do not press or move the drum protective shutter. ■ PRECAUTIONS ON STORING CARTRIDGES • Do not stand cartridges on (page 6). ■ PRECAUTIONS ON STORING COPY PAPER Use recommended paper for this copier. CONSUMABLES ■ PRECAUTIONS ON HANDLING...dry location. • Store the copying paper flat; Do not press or move the drum protective shutter. • Do not expose cartridges to protect it in the original wrapper to direct sunlight. The caution label should always be suitable for high-quality copy images. Some ...

Operation Manual
Page 12
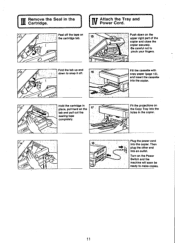
.... (Please see page 83 Lift the copier (in its outer bag in its sealed bag) out of the box, then remove the bag. Hold the cartridge horizontally and turn It gently 90° In both directions several times. Lift it stops. 111 10 Remove the orange screw on the cover. Remove... the copier. 1. Remove Tape, Screw, and Spacers. Peel all tape from forming inside the copier. If it Is packed separately, remove 111 it from the cartridge. Open the left cover by pulling the gray lever on the left cover before opening the bag. a If there are ready to Insert...
.... (Please see page 83 Lift the copier (in its outer bag in its sealed bag) out of the box, then remove the bag. Hold the cartridge horizontally and turn It gently 90° In both directions several times. Lift it stops. 111 10 Remove the orange screw on the cover. Remove... the copier. 1. Remove Tape, Screw, and Spacers. Peel all tape from forming inside the copier. If it Is packed separately, remove 111 it from the cartridge. Open the left cover by pulling the gray lever on the left cover before opening the bag. a If there are ready to Insert...
Operation Manual
Page 13
AO' Plug the power cord 18 into the holes in the Cartridge. Fit the projections on the Power Switch and the machine will soon be ready to make ... the copier. IVI Attach the Tray and Power Cord. 11 0 0 O 2 0 0 O 13 0 Peel off . 18 Hold the cartridge In place, pull hard on the upper right part of the copier and close the copier securely. Then plug the other end Into an outlet...14 0 O. Push down to pinch your fingers. Ile careful not to snap it off the tape on the cartridge tab. 5 Fold the tab up and down on the tab and pull out the sealing tape completely.
AO' Plug the power cord 18 into the holes in the Cartridge. Fit the projections on the Power Switch and the machine will soon be ready to make ... the copier. IVI Attach the Tray and Power Cord. 11 0 0 O 2 0 0 O 13 0 Peel off . 18 Hold the cartridge In place, pull hard on the upper right part of the copier and close the copier securely. Then plug the other end Into an outlet...14 0 O. Push down to pinch your fingers. Ile careful not to snap it off the tape on the cartridge tab. 5 Fold the tab up and down on the tab and pull out the sealing tape completely.
Operation Manual
Page 14
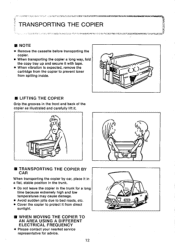
... advice. 12 II TRANSPORTING THE COPIER BY CAR When transporting the copier by car, place it with tape. • When vibration is expected, remove the cartridge from the copier to prevent toner from direct sunlight. • WHEN MOVING THE COPIER TO AN AREA USING A DIFFERENT ELECTRICAL FREQUENCY • Please contact your...
... advice. 12 II TRANSPORTING THE COPIER BY CAR When transporting the copier by car, place it with tape. • When vibration is expected, remove the cartridge from the copier to prevent toner from direct sunlight. • WHEN MOVING THE COPIER TO AN AREA USING A DIFFERENT ELECTRICAL FREQUENCY • Please contact your...
Operation Manual
Page 30
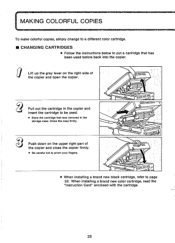
... the storage case. When installing a brand new color cartridge, read the "Instruction Card" enclosed with the cartridge. 28 Lift up the gray lever on the upper right part of the copier and open the copier. Close the case firmly. Push down on ... side of the copier and close the copier firmly. • Be careful not to pinch your fingers. 1/1/1////////////011/ 111 • When installing a brand new black cartridge, refer to page 32. MAKING COLORFUL COPIES To make colorful copies, simply change to a different color...
... the storage case. When installing a brand new color cartridge, read the "Instruction Card" enclosed with the cartridge. 28 Lift up the gray lever on the upper right part of the copier and open the copier. Close the case firmly. Push down on ... side of the copier and close the copier firmly. • Be careful not to pinch your fingers. 1/1/1////////////011/ 111 • When installing a brand new black cartridge, refer to page 32. MAKING COLORFUL COPIES To make colorful copies, simply change to a different color...

Operation Manual
Page 32
... the copier. • By following the same procedure. Make the copy. (Black copy) ight-blue cartridge Pull the black cartridge out of the copier and insert the light-blue a 4 cartridge into it. 0 (Original for light-blue) Place the original for black on the Manual Feed Tray with the copy side ... copier. Copies in black and light-blue can be made following the procedures above, copies in three colors can also be made . Black cartridge (Original for black) 7==="vcca Place the original for lightblue on the Copyboard Glass. 0 Place the black copy on the Copyboard Glass.
... the copier. • By following the same procedure. Make the copy. (Black copy) ight-blue cartridge Pull the black cartridge out of the copier and insert the light-blue a 4 cartridge into it. 0 (Original for light-blue) Place the original for black on the Manual Feed Tray with the copy side ... copier. Copies in black and light-blue can be made following the procedures above, copies in three colors can also be made . Black cartridge (Original for black) 7==="vcca Place the original for lightblue on the Copyboard Glass. 0 Place the black copy on the Copyboard Glass.

Operation Manual
Page 33
4 REPLACING CARTRIDGES The color of the indicator shows when to yellow, prepare a new 1 CD (red) cartridge. p 31 Indicator (yellow) When the indicator changes to install a new cartridge. (green) At first, the indicator is green. When the indicator changes to red, replace the cartridge.
4 REPLACING CARTRIDGES The color of the indicator shows when to yellow, prepare a new 1 CD (red) cartridge. p 31 Indicator (yellow) When the indicator changes to install a new cartridge. (green) At first, the indicator is green. When the indicator changes to red, replace the cartridge.
Operation Manual
Page 34
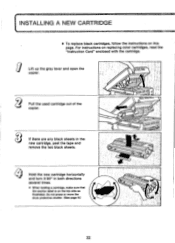
... the gray lever and open the copier. For instructions on this page. Pull the used cartridge out of the copier. If there are any black sheets in both directions several times. • When holding a cartridge, make sure that the caution label is on the top side as Illustrated. Hold the ...new cartridge horizontally and turn it 90° in the new cartridge, peel the tape and remove the two black sheets.
... the gray lever and open the copier. For instructions on this page. Pull the used cartridge out of the copier. If there are any black sheets in both directions several times. • When holding a cartridge, make sure that the caution label is on the top side as Illustrated. Hold the ...new cartridge horizontally and turn it 90° in the new cartridge, peel the tape and remove the two black sheets.
Operation Manual
Page 35
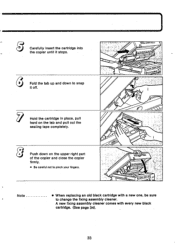
Fold the tab up and down on the tab and pull out the sealing tape completely. Hold the cartridge in place, pull hard on the upper right part of the copier and close the copier firmly. • Be careful not to pinch your fingers. • r 111 S 0 Note • When replacing an old black cartridge with every new black cartridge. (See page 34). 33 Push down to change the fixing assembly cleaner. A new fixing assembly cleaner comes with a new one, be sure to snap it stops. Carefully insert the cartridge into the copier until it off.
Fold the tab up and down on the tab and pull out the sealing tape completely. Hold the cartridge in place, pull hard on the upper right part of the copier and close the copier firmly. • Be careful not to pinch your fingers. • r 111 S 0 Note • When replacing an old black cartridge with every new black cartridge. (See page 34). 33 Push down to change the fixing assembly cleaner. A new fixing assembly cleaner comes with a new one, be sure to snap it stops. Carefully insert the cartridge into the copier until it off.

Operation Manual
Page 36
it3 Close the left cover by pulling its knob. CHANGING THE FIXING ASSEMBLY CLEANER Caution • When replacing an old black cartridge with every new black cartridge. • Since the fixing area is hot, be sure to turn the power off and allow the copier to change the fixing assembly cleaner. Pull ...
it3 Close the left cover by pulling its knob. CHANGING THE FIXING ASSEMBLY CLEANER Caution • When replacing an old black cartridge with every new black cartridge. • Since the fixing area is hot, be sure to turn the power off and allow the copier to change the fixing assembly cleaner. Pull ...

Operation Manual
Page 43
Is the power switch on the copyboard? Is the copier firmly closed? (zz: ztz.ct:t) 0 Is the left cover firmly closed? ■ COPIES ARE COMPLETELY BLANK Is the original placed on ? r, Is a cartridge installed in the copier? Is the sealing tape removed from the cartridge? 41 COPIES CANNOT BE MADE/COPIES ARE COMPLETELY BLANK ■ COPIES CANNOT BE MADE Is the power plug connected?
Is the power switch on the copyboard? Is the copier firmly closed? (zz: ztz.ct:t) 0 Is the left cover firmly closed? ■ COPIES ARE COMPLETELY BLANK Is the original placed on ? r, Is a cartridge installed in the copier? Is the sealing tape removed from the cartridge? 41 COPIES CANNOT BE MADE/COPIES ARE COMPLETELY BLANK ■ COPIES CANNOT BE MADE Is the power plug connected?

Operation Manual
Page 44
( DARK STRIPES APPEAR ON COPIES/COPIES ARE COMPLETELY DARK Wipe the DUSTPROOF GLASS with the attached cleaner. (See page 43.) Clean the CORONA WIRE OF THE CARTRIDGE. (See page 43.) Cleaner storage location or dustproof glass for corona wire WHEN CLEAR COPIES CANNOT BE MADE AFTER THE ABOVE OPERATIONS ARE PERFORMED • Is there condensation on the inside of the copier? (See page 6.) 42
( DARK STRIPES APPEAR ON COPIES/COPIES ARE COMPLETELY DARK Wipe the DUSTPROOF GLASS with the attached cleaner. (See page 43.) Clean the CORONA WIRE OF THE CARTRIDGE. (See page 43.) Cleaner storage location or dustproof glass for corona wire WHEN CLEAR COPIES CANNOT BE MADE AFTER THE ABOVE OPERATIONS ARE PERFORMED • Is there condensation on the inside of the copier? (See page 6.) 42

Operation Manual
Page 45
... the directon of the cleaner completely into the cartridge slot. ofiera„,„40, Place the cleaner against the dustproof glass and move it from end to end several times. 43 C Gently close the ... plug before performing the following operations. ■ CLEANING THE DUSTPROOF GLASS GPI C Lift up the gray lever and open the copier. 11' Pull out the cartridge. III CLEANING THE CORONA WIRE OF THE CARTRIDGE z Insert the tip of blue arrow, slide the cleaner from end to end several times.
... the directon of the cleaner completely into the cartridge slot. ofiera„,„40, Place the cleaner against the dustproof glass and move it from end to end several times. 43 C Gently close the ... plug before performing the following operations. ■ CLEANING THE DUSTPROOF GLASS GPI C Lift up the gray lever and open the copier. 11' Pull out the cartridge. III CLEANING THE CORONA WIRE OF THE CARTRIDGE z Insert the tip of blue arrow, slide the cleaner from end to end several times.

Operation Manual
Page 46
... and TURN IT several times as described above operations, clean the INSIDE OF THE COPIER (see page 45.) 44 Pull out the cartridge from dark originals have been made, or when copies have been made with the copyboard cover open the copier and see the Indicator ...new one, be reproduced even before the indicator changes to change the fixing assembly cleaner. Check if the cartridge INDICATOR is still unclear after cartridge changes. If troubleshooting fails after replacing the cartridge. IWHITE STRIPES APPEAR ON COPIES/PARTS OF COPIES ARE FAINT • White stripes may become faint or...
... and TURN IT several times as described above operations, clean the INSIDE OF THE COPIER (see page 45.) 44 Pull out the cartridge from dark originals have been made, or when copies have been made with the copyboard cover open the copier and see the Indicator ...new one, be reproduced even before the indicator changes to change the fixing assembly cleaner. Check if the cartridge INDICATOR is still unclear after cartridge changes. If troubleshooting fails after replacing the cartridge. IWHITE STRIPES APPEAR ON COPIES/PARTS OF COPIES ARE FAINT • White stripes may become faint or...

Operation Manual
Page 47
c VI O Gently move the cotton swab (included with a damp cloth. wire Rg metallisplate Gently close the copier as soon as cleaning is finished. ° 45 Lift up and down the thin wire, parallel to break this wire. ■ CLEANING THE INSIDE OF THE COPIER CAUTION • Turn the power switch off and disconnect the power plug before performing the following operation. Next, slide the swab along the left edge of -the metallic plate. Clean the metallic plate with each cartridge) up the gray lever and open the copier. Be careful not to the metallic plate.
c VI O Gently move the cotton swab (included with a damp cloth. wire Rg metallisplate Gently close the copier as soon as cleaning is finished. ° 45 Lift up and down the thin wire, parallel to break this wire. ■ CLEANING THE INSIDE OF THE COPIER CAUTION • Turn the power switch off and disconnect the power plug before performing the following operation. Next, slide the swab along the left edge of -the metallic plate. Clean the metallic plate with each cartridge) up the gray lever and open the copier. Be careful not to the metallic plate.

Operation Manual
Page 51
Acceptable originals: Desktop Canon PC system Sheets, books, and three-dimensional objects up to business card size (min. 2" x 3-1/21 Approx. 30 seconds 8 copies/min. (letter size, 1:1) 8. Power requirements: 20 ... to 4.4lbs 4. Paper supply: 1 to country. 16. Cassette loading: 13. Power consumption: 17. Copies in a variety of colors besides black can be made by replacing cartridges. (Please consult your dealer for most copies has a weight range of 14lbs to 341bs For cassette loading: 16lbs to change without notice. 49 Copy system...
Acceptable originals: Desktop Canon PC system Sheets, books, and three-dimensional objects up to business card size (min. 2" x 3-1/21 Approx. 30 seconds 8 copies/min. (letter size, 1:1) 8. Power requirements: 20 ... to 4.4lbs 4. Paper supply: 1 to country. 16. Cassette loading: 13. Power consumption: 17. Copies in a variety of colors besides black can be made by replacing cartridges. (Please consult your dealer for most copies has a weight range of 14lbs to 341bs For cassette loading: 16lbs to change without notice. 49 Copy system...


