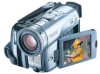
Canon Optura 30 Review - MiniDV Camcorder
Canon Optura 30 Review
Related Manual Pages


Similar Questions

Can A Laptop Computer Be Linked To The Xa10 Video Camera To Review Playback
(Posted by yogesnikso 9 years ago)


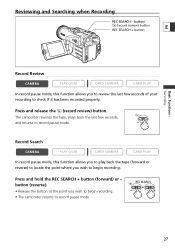
Fast Forward In Review
How do you fast forward when viewing a video on the camcorder on the FS200A?
How do you fast forward when viewing a video on the camcorder on the FS200A?
(Posted by debrobpar 11 years ago)
Related Terms
The following terms were also used when searching for Canon Optura 30 Review - MiniDV Camcorder:- canon optura
- canon optura 30
- canon optura 60
- canon optura 300
- canon optura xi
- optura 600
- optura 300
- optura 500
- canon optura 30 driver
- optura 30 driver
- canon optura 300 driver
- optura 300 driver
- canon optura 30 minidv
- canon optura 30 a
- canon optura 30 drivers
- optura 30 minidv
- optura 30 software
- canon optura 30 mini dv
- canon optura 30 software
- optura 20 manual
- optura 30 camcorder
- canon optura 30 camcorder
- canon optura 30 minidv camcorder
- optura 30 digital video camcorder
- canon optura 30 manual
- optura 30 a
- optura 30 drivers
- optura 30 manual
- optura 30 review
- canon optura 30 battery
- optura 30 battery
- optura 30 canon
- canon optura 30 digital video camcorder
- canon optura 30 driver download
- canon optura 30 mini dv camcorder
- optura 30 driver download
- optura 30 mini dv
- optura 30 minidv camcorder
- canon optura 30 review
- optura 30 accessories
- optura 30 mini dv camcorder
- canon optura 30 a camera manual
- canon optura 30 accessories
- canon optura 30 av/c camera storage driver
- canon optura 30 battery charger
- canon optura 30 battery pack
- canon optura 30 bp-2l14 battery
- canon optura 30 charger
- canon optura 30 driver windows 7
- canon optura 30 dv cable
- canon optura 30 firewire cable
- canon optura 30 firmware
- canon optura 30 instructions
- canon optura 30 manual download
- canon optura 30 mini dv video camera
- canon optura 30 no tape menu
- canon optura 30 power cord
- canon optura 30 price
- canon optura 30 sd card
- canon optura 30 transfer video
- canon optura 30 troubleshooting
- canon optura 30 user manual
- canon optura 30 windows 7
- canon optura 30 wont turn on
- canon optura 300 camcorder
- canon optura 300 digital camcorder
- canon optura 300 digital video camcorder
- canon optura 300 drivers
- canon optura 300 review
- canon optura30
- optura
- optura 10
- optura 10 manual
- optura 100mc
- optura 20
- optura 20 how
- optura 200
- optura 30
- optura 30 a camera
- optura 30 a camera manual
- optura 30 a manual
- optura 30 av/c camera storage driver
- optura 30 batteries
- optura 30 battery charger
- optura 30 battery pack
- optura 30 bp-2l14 battery
- optura 30 cannot connect
- optura 30 charger
- optura 30 driver windows 7
- optura 30 dv cable
- optura 30 eject problems
- optura 30 firewire cable
- optura 30 firmware
- optura 30 imovie
- optura 30 instructions
- optura 30 mac
- optura 30 manual download
- optura 30 mini dv video camera
- optura 30 no tape menu
- optura 30 power cord
- optura 30 price
- optura 30 sd card
- optura 30 specifications
- optura 30 transfer video
- optura 30 troubleshooting
- optura 30 user manual
- optura 30 vista
- optura 30 windows 7
- optura 30 wont turn on
- optura 300 camcorder
- optura 300 camera
- optura 300 canon
- optura 300 digital camcorder
- optura 300 digital video camcorder
- optura 300 drivers
- optura 300 for fs300
- optura 300 review
- optura 300 software
- optura 40
- optura 40 driver
- optura 40 manual
- optura 400
- optura 50
- optura 50 manual
- optura 50 sd card
- optura 60
- optura 60 can't find driver
- optura 60 driver
- optura 60 manual
- optura canon
- optura company
- optura pi
- optura s1
- optura soft
- optura xi
- optura30
- optura300 canon