
MultiPASS MP390 Software Guide
Page 20
... a background 46 Setting special effects/[Effects] tab 47 Saving settings as a print profile/[Profiles] tab 49 To save a print profile 49 To retrieve and use a print profile 50 To delete a print profile 50 To restore the factory pre-defined settings 50 Cleaning and machine settings/[Maintenance] tab 51 Cleaning the print head 52 Deep cleaning ...52
... a background 46 Setting special effects/[Effects] tab 47 Saving settings as a print profile/[Profiles] tab 49 To save a print profile 49 To retrieve and use a print profile 50 To delete a print profile 50 To restore the factory pre-defined settings 50 Cleaning and machine settings/[Maintenance] tab 51 Cleaning the print head 52 Deep cleaning ...52
MultiPASS MP390 Software Guide
Page 21
2 Aligning the print head 54 Printing the nozzle check pattern 56 Resetting the ink counter 57 Setting for slow-drying paper (Custom Settings 58 Controlling operating noise (Quiet Mode 59 Checking the status of the machine with the BJ Status Monitor 60 To start the BJ Status Monitor 60 To cancel printing...61 To display a list of printing jobs 62 Sharing the printer and using it on a network 63 Setting up the printer for sharing 63 Installing the printer driver on a client system 63 Sharing the printer in Windows 2000/XP 64
2 Aligning the print head 54 Printing the nozzle check pattern 56 Resetting the ink counter 57 Setting for slow-drying paper (Custom Settings 58 Controlling operating noise (Quiet Mode 59 Checking the status of the machine with the BJ Status Monitor 60 To start the BJ Status Monitor 60 To cancel printing...61 To display a list of printing jobs 62 Sharing the printer and using it on a network 63 Setting up the printer for sharing 63 Installing the printer driver on a client system 63 Sharing the printer in Windows 2000/XP 64

MultiPASS MP390 Software Guide
Page 53
... quiet mode and other functions. To open the [Printer Properties] or [Printing Preferences] dialog box J "Changing print settings (Opening the settings dialog box)" [Maintenance] tab For cleaning or deep cleaning J "Cleaning the print head" For print head alignment J "Aligning the print head" For printing the nozzle check pattern J "Printing the nozzle check pattern" For ink counter reset J "Resetting the ink...
... quiet mode and other functions. To open the [Printer Properties] or [Printing Preferences] dialog box J "Changing print settings (Opening the settings dialog box)" [Maintenance] tab For cleaning or deep cleaning J "Cleaning the print head" For print head alignment J "Aligning the print head" For printing the nozzle check pattern J "Printing the nozzle check pattern" For ink counter reset J "Resetting the ink...
MultiPASS MP390 Software Guide
Page 54
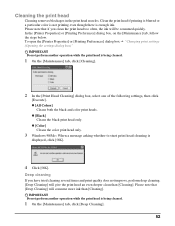
... color print heads. Please note that [Deep Cleaning] will give the print head an even deeper clean than [Cleaning]. z [Color] Cleans the color print head only. 3 Windows 98/Me: When a message asking whether to start print head cleaning is enough ink. Cleaning the print head Cleaning removes blockages in the print head nozzles. IMPORTANT Do not perform another operation while the print head is...
... color print heads. Please note that [Deep Cleaning] will give the print head an even deeper clean than [Cleaning]. z [Color] Cleans the color print head only. 3 Windows 98/Me: When a message asking whether to start print head cleaning is enough ink. Cleaning the print head Cleaning removes blockages in the print head nozzles. IMPORTANT Do not perform another operation while the print head is...
MultiPASS MP390 Software Guide
Page 56
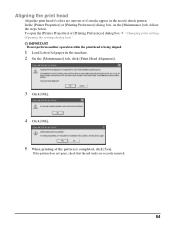
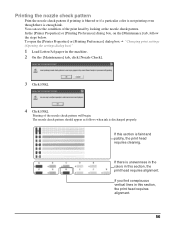
.... 2 On the [Maintenance] tab, click [Print Head Alignment]. 3 Click [OK]. 4 Click [OK]. 5 When printing of the pattern is being aligned. 1 Load Letter/A4 paper in the nozzle check pattern. In the [Printer Properties] or [Printing Preferences] dialog box, on the [Maintenance] tab..., follow the steps below. Aligning the print head Align the print head if colors are securely inserted. 54 To open the [Printer Properties] or [Printing Preferences] dialog box J "Changing print settings (Opening the settings ...
.... 2 On the [Maintenance] tab, click [Print Head Alignment]. 3 Click [OK]. 4 Click [OK]. 5 When printing of the pattern is being aligned. 1 Load Letter/A4 paper in the nozzle check pattern. In the [Printer Properties] or [Printing Preferences] dialog box, on the [Maintenance] tab..., follow the steps below. Aligning the print head Align the print head if colors are securely inserted. 54 To open the [Printer Properties] or [Printing Preferences] dialog box J "Changing print settings (Opening the settings ...
MultiPASS MP390 Software Guide
Page 58
... as follows when ink is enough ink. If you find conspicuous vertical lines in this section, the print head requires alignment. In the [Printer Properties] or [Printing Preferences] dialog box, on the [Maintenance] tab, follow the steps below. To open the [Printer Properties...] or [Printing Preferences] dialog box J "Changing print settings (Opening the settings dialog box)" 1 Load Letter/A4 paper in this section, the print head requires alignment. 56 If this section is unevenness in the colors in the machine...
... as follows when ink is enough ink. If you find conspicuous vertical lines in this section, the print head requires alignment. In the [Printer Properties] or [Printing Preferences] dialog box, on the [Maintenance] tab, follow the steps below. To open the [Printer Properties...] or [Printing Preferences] dialog box J "Changing print settings (Opening the settings dialog box)" 1 Load Letter/A4 paper in this section, the print head requires alignment. 56 If this section is unevenness in the colors in the machine...
MultiPASS MP390 Software Guide
Page 60
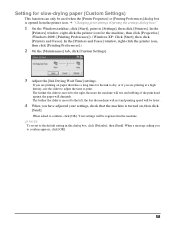
... slider is opened from the printer icon. J "Changing print settings (Opening the settings dialog box)" 1 On the Windows taskbar, click [Start], point to the right, the more the machine will rest and rubbing of the print head against the paper will be used when the [Printer Properties...] or [Printing Preferences] dialog box is moved to [Settings], then click [Printers]. Setting for slow-drying paper (Custom Settings...
... slider is opened from the printer icon. J "Changing print settings (Opening the settings dialog box)" 1 On the Windows taskbar, click [Start], point to the right, the more the machine will rest and rubbing of the print head against the paper will be used when the [Printer Properties...] or [Printing Preferences] dialog box is moved to [Settings], then click [Printers]. Setting for slow-drying paper (Custom Settings...
MultiPASS MP390 Software Guide
Page 124
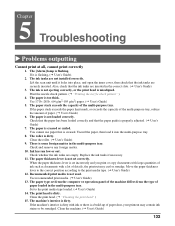
... as documents with ink or there is a build-up of paper. (J User's Guide) 6. The print head is not loaded correctly. Chapter 5 Troubleshooting X Problems outputting Cannot print at all, cannot print correctly 1. If it into place, and open the inner cover, then check that is set from the...dust, your printout may curl or smudge. Move the paper thickness lever to the correct position according to the print media type loaded. (J User's Guide) 14. Clean the print head. (J "Cleaning the print head" ) 15. Clean the machine. (J User's Guide) 122 Lift the scan unit until it locks into...
... as documents with ink or there is a build-up of paper. (J User's Guide) 6. The print head is not loaded correctly. Chapter 5 Troubleshooting X Problems outputting Cannot print at all, cannot print correctly 1. If it into place, and open the inner cover, then check that is set from the...dust, your printout may curl or smudge. Move the paper thickness lever to the correct position according to the print media type loaded. (J User's Guide) 14. Clean the print head. (J "Cleaning the print head" ) 15. Clean the machine. (J User's Guide) 122 Lift the scan unit until it locks into...
MultiPASS MP390 Software Guide
Page 125
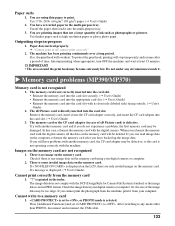
... is set curled paper in case of ink such as high resolution paper or glossy photo paper. IMPORTANT • The area around the print head may be damaged. Do not under any image data on the memory card. If you reformat the memory card with the DCF (Design ...< NO FILES ON CARD> is defective. X Memory card problems (MP390/MP370) Memory card is displayed, (J User's Guide). Press [Additional Functions] and set to a memory card 1. After switching to print. When you cannot print the photograph from the machine, print it into the card slot with another memory card, the CF card...
... is set curled paper in case of ink such as high resolution paper or glossy photo paper. IMPORTANT • The area around the print head may be damaged. Do not under any image data on the memory card. If you reformat the memory card with the DCF (Design ...< NO FILES ON CARD> is defective. X Memory card problems (MP390/MP370) Memory card is displayed, (J User's Guide). Press [Additional Functions] and set to a memory card 1. After switching to print. When you cannot print the photograph from the machine, print it into the card slot with another memory card, the CF card...
MultiPASS MP390 Software Guide
Page 127
... the status of that version, and reinstall the new version. Under [Device Manager], the green mark [?] is displayed on the Setup CD-ROM but the [Canon] folder remains in the [Start] menu. 1. z Uninstallation of the BJ Status Monitor picture is yellow or red. In the [Start] menu, open . In ... in the Software Guide of the machine with the BJ Status Monitor" ) If appears: Clear the paper jam or whatever is preventing the print head holder from moving, then cancel printing from your computer and press [OK/Set]. (J User's Guide) If the message remains, press [ON/OFF] to turn the machine OFF...
... the status of that version, and reinstall the new version. Under [Device Manager], the green mark [?] is displayed on the Setup CD-ROM but the [Canon] folder remains in the [Start] menu. 1. z Uninstallation of the BJ Status Monitor picture is yellow or red. In the [Start] menu, open . In ... in the Software Guide of the machine with the BJ Status Monitor" ) If appears: Clear the paper jam or whatever is preventing the print head holder from moving, then cancel printing from your computer and press [OK/Set]. (J User's Guide) If the message remains, press [ON/OFF] to turn the machine OFF...
MultiPASS MP390 Software Guide
Page 136
...Crop 85, 93 Multi-page PDF 130 Multi-Scan 75, 83, 84 N Network printer 63 Noise Reduction 48 Normal-size Printing 27 Nozzle check pattern 56 O OCR 71, 130 Operating noise controlling 59 Output Resolution 92, 105 Outside line access number 109 P Page... 131 Photo Optimizer PRO 48 Poster Printing 28, 31 Preferences 95 [Preferences] dialog box 96 Preview 88, 89, 131 displaying before printing 25 print 20 Preview at opening of ScanGear MP 96 Print Advisor 22 Print head alignment 54 Print head cleaning 52 Print jobs list 62 Print profile deleting 50 retrieving 50 saving ...
...Crop 85, 93 Multi-page PDF 130 Multi-Scan 75, 83, 84 N Network printer 63 Noise Reduction 48 Normal-size Printing 27 Nozzle check pattern 56 O OCR 71, 130 Operating noise controlling 59 Output Resolution 92, 105 Outside line access number 109 P Page... 131 Photo Optimizer PRO 48 Poster Printing 28, 31 Preferences 95 [Preferences] dialog box 96 Preview 88, 89, 131 displaying before printing 25 print 20 Preview at opening of ScanGear MP 96 Print Advisor 22 Print head alignment 54 Print head cleaning 52 Print jobs list 62 Print profile deleting 50 retrieving 50 saving ...
MultiPASS MP390 Set-Up Sheet
Page 1
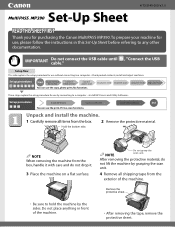
Install print head Install ink tanks Load print media Align print head These steps explain the setup procedure for use the print, PC fax, scan functions. Hold the bottom side. IMPORTANT Do not connect the USB cable... to a computer. Set-Up Sheet HT3-2145-000-V.1.0 READ THIS SHEET FIRST Thank you for use the copy, photo print, fax functions. Install Utility Software End Unpack and install the machine. 1 Carefully remove all shipping tape from the exterior of...without connecting to any other documentation. To prepare your machine for purchasing the Canon MultiPASS MP390.
Install print head Install ink tanks Load print media Align print head These steps explain the setup procedure for use the print, PC fax, scan functions. Hold the bottom side. IMPORTANT Do not connect the USB cable... to a computer. Set-Up Sheet HT3-2145-000-V.1.0 READ THIS SHEET FIRST Thank you for use the copy, photo print, fax functions. Install Utility Software End Unpack and install the machine. 1 Carefully remove all shipping tape from the exterior of...without connecting to any other documentation. To prepare your machine for purchasing the Canon MultiPASS MP390.
MultiPASS MP390 Set-Up Sheet
Page 2
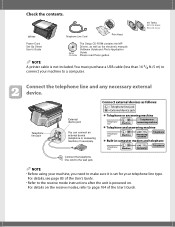
... these guides. NOTE A printer cable is set for your telephone line type. For details on . Ink Tanks: BCI-24 Black BCI-24 Color MP390 Telephone Line Cord Print Head Power Cord Set-Up Sheet User's Guide Setup CD-ROM The Setup CD-ROM contains the MP Drivers, as well as follows: = Telephone line...
... these guides. NOTE A printer cable is set for your telephone line type. For details on . Ink Tanks: BCI-24 Black BCI-24 Color MP390 Telephone Line Cord Print Head Power Cord Set-Up Sheet User's Guide Setup CD-ROM The Setup CD-ROM contains the MP Drivers, as well as follows: = Telephone line...
MultiPASS MP390 Set-Up Sheet
Page 3
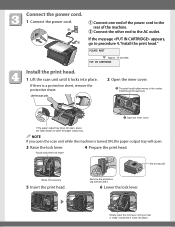
... the inner cover. If the paper output tray does not open, press the Open button to open . 3 Raise the lock lever. 4 Prepare the print head. NOTE If you hear a "snap" sound and it . 6 Lower the lock lever. Do not touch! Remove the protective cap and discard it ...until it locks into place. If the message appears, go to the rear of the power cord to procedure 4, "Install the print head." Raise this securely. 5 Insert the print head. Install the print head here. Connect the power cord. 1 Connect the power cord. 2 1 q Connect one end of the machine. If there ...
... the inner cover. If the paper output tray does not open, press the Open button to open . 3 Raise the lock lever. 4 Prepare the print head. NOTE If you hear a "snap" sound and it . 6 Lower the lock lever. Do not touch! Remove the protective cap and discard it ...until it locks into place. If the message appears, go to the rear of the power cord to procedure 4, "Install the print head." Raise this securely. 5 Insert the print head. Install the print head here. Connect the power cord. 1 Connect the power cord. 2 1 q Connect one end of the machine. If there ...

MultiPASS MP390 Set-Up Sheet
Page 5
...Column A BAD SAMPLE Least solid box GOOD SAMPLE Most solid box 3 Align the print head. e The machine prints a print head position pattern. 2 Enter checkmarks in step 2, then press [Set]. Align the print head from the operation panel. From column A to select the pattern number of white ...the machine to a computer for use, see page 118 of the print head to K) 4 Repeat step 3 for instructions on the printout, place a checkmark by one digit. Pattern numbers Columns (F to ensure print quality. 1 Print the print head position pattern. q This message appears.
...Column A BAD SAMPLE Least solid box GOOD SAMPLE Most solid box 3 Align the print head. e The machine prints a print head position pattern. 2 Enter checkmarks in step 2, then press [Set]. Align the print head from the operation panel. From column A to select the pattern number of white ...the machine to a computer for use, see page 118 of the print head to K) 4 Repeat step 3 for instructions on the printout, place a checkmark by one digit. Pattern numbers Columns (F to ensure print quality. 1 Print the print head position pattern. q This message appears.


