MultiPASS F20 Setup Sheet
Page 1
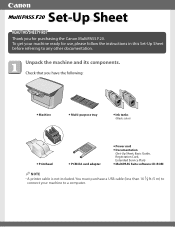
...ft./5 m) to connect your machine ready for purchasing the Canon MultiPASS F20. Unpack the machine and its components. Check that you for use, please follow the instructions in Japan l Multi-purpose tray l Ink tanks (Black, color) l Printhead l PCMCIA card adapter l Power cord l Documentation (Set...-Up Sheet, Basic Guide, Registration Card, Extended Service Plan) l MultiPASS Suite software CD-ROM NOTE • A printer cable is not included. To...
...ft./5 m) to connect your machine ready for purchasing the Canon MultiPASS F20. Unpack the machine and its components. Check that you for use, please follow the instructions in Japan l Multi-purpose tray l Ink tanks (Black, color) l Printhead l PCMCIA card adapter l Power cord l Documentation (Set...-Up Sheet, Basic Guide, Registration Card, Extended Service Plan) l MultiPASS Suite software CD-ROM NOTE • A printer cable is not included. To...

MultiPASS F20 Setup Sheet
Page 2
...; DO NOT remove the USB label A at this stage. PLEASE WAIT Co Approx. 30 seconds PUT IN CARTRIDGE NOTE • Please note that the cartridge (printhead and ink tanks) is closed. 1 Plug the power cord 2 When you connect the 3 If nothing appears into the holes on the power, make sure the...
...; DO NOT remove the USB label A at this stage. PLEASE WAIT Co Approx. 30 seconds PUT IN CARTRIDGE NOTE • Please note that the cartridge (printhead and ink tanks) is closed. 1 Plug the power cord 2 When you connect the 3 If nothing appears into the holes on the power, make sure the...

MultiPASS F20 Setup Sheet
Page 4
... • Do not touch the electrical contacts B. B A 3 Raise the lock lever C, then gently slide the printhead into the holder. C IMPORTANT • Do not touch the lock lever once the printhead has been installed. This will ensure that you print (in black and color) or clean the... printhead approximately once a month to maintain the printhead in good working condition. 1 Remove the tape q, then open the inner cover w. • The printhead holder automatically moves to continue q w IMPORTANT • Do not try to ...
... • Do not touch the electrical contacts B. B A 3 Raise the lock lever C, then gently slide the printhead into the holder. C IMPORTANT • Do not touch the lock lever once the printhead has been installed. This will ensure that you print (in black and color) or clean the... printhead approximately once a month to maintain the printhead in good working condition. 1 Remove the tape q, then open the inner cover w. • The printhead holder automatically moves to continue q w IMPORTANT • Do not try to ...

MultiPASS F20 Setup Sheet
Page 5
Install the ink tanks. 1 Start with the black ink tank. Be sure to now align the printhead as shown below, then remove the protective cap A. Remove the ink tank from its packaging, hold it as explained in step 7. NOTE A • Do not ...
Install the ink tanks. 1 Start with the black ink tank. Be sure to now align the printhead as shown below, then remove the protective cap A. Remove the ink tank from its packaging, hold it as explained in step 7. NOTE A • Do not ...

MultiPASS F20 Setup Sheet
Page 6
Align the printhead. For details, see p. 9-7 of the Basic Guide. 1 When the LCD A displays the following, press [Set]. Note the value next to enter it. BAD SAMPLE Least ... to this box and use [2] or [3] on the printout, note which box has the most solid image. NOTE • If you can also align the printhead from the software. Then press [Set]. ALIGN PRINT HEAD A PRESS SET KEY The machine will print a horizontal line pattern, and the LCD will be installing...
Align the printhead. For details, see p. 9-7 of the Basic Guide. 1 When the LCD A displays the following, press [Set]. Note the value next to enter it. BAD SAMPLE Least ... to this box and use [2] or [3] on the printout, note which box has the most solid image. NOTE • If you can also align the printhead from the software. Then press [Set]. ALIGN PRINT HEAD A PRESS SET KEY The machine will print a horizontal line pattern, and the LCD will be installing...

MultiPASS F20 Basic Guide
Page 6
... 9-1 Replacing an ink tank 9-2 Resetting the ink counter 9-4 Checking the ink level 9-4 Maintaining the printhead 9-5 Flowchart of printhead maintenance 9-5 Printing the nozzle check pattern 9-6 Cleaning the printhead 9-6 Aligning the printhead 9-7 Aligning the printhead from the operation panel 9-7 Aligning the printhead from the MultiPASS Suite 9-7 Cleaning your machine 9-9 Cleaning the exterior 9-9 Cleaning the scanning area 9-9 Cleaning the roller...
... 9-1 Replacing an ink tank 9-2 Resetting the ink counter 9-4 Checking the ink level 9-4 Maintaining the printhead 9-5 Flowchart of printhead maintenance 9-5 Printing the nozzle check pattern 9-6 Cleaning the printhead 9-6 Aligning the printhead 9-7 Aligning the printhead from the operation panel 9-7 Aligning the printhead from the MultiPASS Suite 9-7 Cleaning your machine 9-9 Cleaning the exterior 9-9 Cleaning the scanning area 9-9 Cleaning the roller...

MultiPASS F20 Basic Guide
Page 10
... and this guide. If further servicing is printing as parts inside the machine, turn off the power immediately, disconnect the power cord and contact the Canon Customer Care Center. • Do not touch the high-voltage electrical parts as this may result in electrical shock. • Do not place heavy... as jewelry and watches - Containers of the machine. Close the multi-purpose tray and paper output tray, and lift the machine by any of the printhead. • Do not place the following objects on top of water or other liquids such as glasses, vases, or pot plants If water etc....
... and this guide. If further servicing is printing as parts inside the machine, turn off the power immediately, disconnect the power cord and contact the Canon Customer Care Center. • Do not touch the high-voltage electrical parts as this may result in electrical shock. • Do not place heavy... as jewelry and watches - Containers of the machine. Close the multi-purpose tray and paper output tray, and lift the machine by any of the printhead. • Do not place the following objects on top of water or other liquids such as glasses, vases, or pot plants If water etc....

MultiPASS F20 Basic Guide
Page 14
Main components of the machine q w e o r t y i u !0 q Document cover w Multi-purpose tray e Tray extension r [Eject] button t Card slot y Indicator light u Paper output tray 1-2 Introduction !2 !1 !3 i Tray extension o Operation panel !0 Platen glass !1 Inner cover !2 Printhead holder !3 Paper thickness lever Chapter 1
Main components of the machine q w e o r t y i u !0 q Document cover w Multi-purpose tray e Tray extension r [Eject] button t Card slot y Indicator light u Paper output tray 1-2 Introduction !2 !1 !3 i Tray extension o Operation panel !0 Platen glass !1 Inner cover !2 Printhead holder !3 Paper thickness lever Chapter 1

MultiPASS F20 Basic Guide
Page 16
This ensures optimum print quality but also consumes a small amount of ink during the cleaning process. NOTE • The power cannot be turned off with [ON/OFF] when instructed to do so in the machine. For this reason, it is recommended that you only turn the machine off when the machine is operating. • Your machine performs printhead cleaning every time you plug in this guide. 1-4 Introduction Chapter 1
This ensures optimum print quality but also consumes a small amount of ink during the cleaning process. NOTE • The power cannot be turned off with [ON/OFF] when instructed to do so in the machine. For this reason, it is recommended that you only turn the machine off when the machine is operating. • Your machine performs printhead cleaning every time you plug in this guide. 1-4 Introduction Chapter 1

MultiPASS F20 Basic Guide
Page 24
Setting the paper thickness lever The paper thickness lever adjusts the gap between the printhead and the print media to set the paper thickness lever. BCI-24 Color BCI-24 Black 3-6 Print media handling Chapter 3 Before printing, be sure to ... cover. 4 The LCD displays the following message: INK TANK CHANGED? Follow this procedure to set the paper thickness lever: 1 Open the inner cover. • The printhead holder moves to the left. 2 Move the paper thickness lever to the appropriate setting. • For details on which position to suit the print media...
Setting the paper thickness lever The paper thickness lever adjusts the gap between the printhead and the print media to set the paper thickness lever. BCI-24 Color BCI-24 Black 3-6 Print media handling Chapter 3 Before printing, be sure to ... cover. 4 The LCD displays the following message: INK TANK CHANGED? Follow this procedure to set the paper thickness lever: 1 Open the inner cover. • The printhead holder moves to the left. 2 Move the paper thickness lever to the appropriate setting. • For details on which position to suit the print media...

MultiPASS F20 Basic Guide
Page 67
... or , warning you to check if print quality deterioration is blank. Maintenance Guidelines CAUTION • Keep the printhead and ink tanks out of the reach of how much ink is not covered by Canon's warranty. • Replaced ink tanks should be accurate. • For best ink quality, use the ink... tanks within one year of purchase. Color ink tank: BCI-24 Color • To ensure optimum printing results and to avoid printing problems, Canon recommends using refilled ink tanks is left in the machine, use ink tanks within six months. • Do not open the ink tank packaging ...
... or , warning you to check if print quality deterioration is blank. Maintenance Guidelines CAUTION • Keep the printhead and ink tanks out of the reach of how much ink is not covered by Canon's warranty. • Replaced ink tanks should be accurate. • For best ink quality, use the ink... tanks within one year of purchase. Color ink tank: BCI-24 Color • To ensure optimum printing results and to avoid printing problems, Canon recommends using refilled ink tanks is left in the machine, use ink tanks within six months. • Do not open the ink tank packaging ...

MultiPASS F20 Basic Guide
Page 68
CAUTION • Do not replace ink tanks while the machine is turned on. 2 Open the inner cover. • The printhead holder moves to the left. CAUTION • Do not remove the printhead from the machine. • If both ink tanks need replacing, remove and replace each one individually. • Do not touch the... cap A. • Do not shake or drop the ink tank as the ink may cause the ink tank not to manually move or stop the printhead holder. • Do not touch any metal parts. Doing so may leak and stain your clothes or hands. • Do not attempt to replace an...
CAUTION • Do not replace ink tanks while the machine is turned on. 2 Open the inner cover. • The printhead holder moves to the left. CAUTION • Do not remove the printhead from the machine. • If both ink tanks need replacing, remove and replace each one individually. • Do not touch the... cap A. • Do not shake or drop the ink tank as the ink may cause the ink tank not to manually move or stop the printhead holder. • Do not touch any metal parts. Doing so may leak and stain your clothes or hands. • Do not attempt to replace an...

MultiPASS F20 Basic Guide
Page 69
..., press [3]. • The ink counter is now reset. To check the ink level of the ink tanks at any time, see p. 9-4. Press firmly on the printhead. B BCI-24 Black 5 Insert the ink tank into the empty slot on the ink tank's tab until it clicks into place. Maintenance Chapter 9 Maintenance 9-3
..., press [3]. • The ink counter is now reset. To check the ink level of the ink tanks at any time, see p. 9-4. Press firmly on the printhead. B BCI-24 Black 5 Insert the ink tank into the empty slot on the ink tank's tab until it clicks into place. Maintenance Chapter 9 Maintenance 9-3

MultiPASS F20 Basic Guide
Page 71
...printhead ( p. 9-7). Contact the Canon Customer Care Center. This pattern allows you to three times. The printhead is aligned. Maintaining the printhead Flowchart of the printhead nozzles correctly and if the printhead is misaligned. The ink is no improvement. If there is not coming out of printhead...: C Step 1 Print the nozzle check pattern ( p. 9-6). Step 3 C Perform deep printhead cleaning ( setting) ( p. 9-6). 9 If there is no improvement. You can perform normal printhead cleaning up to check if the ink is coming out correctly. Maintenance Step 4 C Replace the...
...printhead ( p. 9-7). Contact the Canon Customer Care Center. This pattern allows you to three times. The printhead is aligned. Maintaining the printhead Flowchart of the printhead nozzles correctly and if the printhead is misaligned. The ink is no improvement. If there is not coming out of printhead...: C Step 1 Print the nozzle check pattern ( p. 9-6). Step 3 C Perform deep printhead cleaning ( setting) ( p. 9-6). 9 If there is no improvement. You can perform normal printhead cleaning up to check if the ink is coming out correctly. Maintenance Step 4 C Replace the...

MultiPASS F20 Basic Guide
Page 72
...displayed. Follow this procedure to select the cleaning setting you want. • Select: - Ex: 7 . for normal printhead cleaning. - Follow this procedure to select, see Cleaning the printhead, below. or A4-size plain paper in the ink tanks. • You can also print the nozzle check pattern ...I N T E N A N C E NOZZLE CHECK 3 Press [Set]. Nozzle check pattern If the pattern is broken, missing, or a specific color is displayed. NOTE • Cleaning the printhead consumes a small amount of ink in the multi-purpose tray. 2 Press [Menu] repeatedly until is not uniform, align the...
...displayed. Follow this procedure to select the cleaning setting you want. • Select: - Ex: 7 . for normal printhead cleaning. - Follow this procedure to select, see Cleaning the printhead, below. or A4-size plain paper in the ink tanks. • You can also print the nozzle check pattern ...I N T E N A N C E NOZZLE CHECK 3 Press [Set]. Nozzle check pattern If the pattern is broken, missing, or a specific color is displayed. NOTE • Cleaning the printhead consumes a small amount of ink in the multi-purpose tray. 2 Press [Menu] repeatedly until is not uniform, align the...

MultiPASS F20 Basic Guide
Page 73
...In column A on the printout, note which box has the most solid image. Note the value next to this procedure to align the printhead from the MultiPASS Suite software: 1 Load letter- or A4-size plain paper in the multi-purpose tray. 2 Press [Menu] repeatedly until is displayed. Aligning the... printhead from the MultiPASS Suite Follow this box and use [2] or [3] to select . 4 Press [Set]. • The machine prints a horizontal line pattern. If you ...
...In column A on the printout, note which box has the most solid image. Note the value next to this procedure to align the printhead from the MultiPASS Suite software: 1 Load letter- or A4-size plain paper in the multi-purpose tray. 2 Press [Menu] repeatedly until is displayed. Aligning the... printhead from the MultiPASS Suite Follow this box and use [2] or [3] to select . 4 Press [Set]. • The machine prints a horizontal line pattern. If you ...

MultiPASS F20 Basic Guide
Page 74
Note the value next to F. 8 Click [OK]. Repeat for columns B to this box and enter the number. BAD SAMPLE Least solid box GOOD SAMPLE Most solid box 9-8 Maintenance Chapter 9 3 In the Printers (Printers and Faxes) window, click the machine icon. 4 On the File menu, click [Properties] or [Printing Preferences...]. 5 In the Properties dialog box, on the Maintenance tab, click the printhead alignment icon. 6 Follow the on-screen instructions. 7 In column A on the printout, note which box has the most solid image.
Note the value next to F. 8 Click [OK]. Repeat for columns B to this box and enter the number. BAD SAMPLE Least solid box GOOD SAMPLE Most solid box 9-8 Maintenance Chapter 9 3 In the Printers (Printers and Faxes) window, click the machine icon. 4 On the File menu, click [Properties] or [Printing Preferences...]. 5 In the Properties dialog box, on the Maintenance tab, click the printhead alignment icon. 6 Follow the on-screen instructions. 7 In column A on the printout, note which box has the most solid image.

MultiPASS F20 Basic Guide
Page 79
...printer sharing ( Software Guide). 3. Chapter 10 Troubleshooting 10-3 Is the application you trying to the shared printer? To remove the MultiPASS Suite, see the Setup Sheet. To install, see the Software Guide. Is there a warning or attention displayed in the LCD? ... standby? 6. Is there an application error or General Protection Fault error displayed on ? Print the nozzle check pattern ( Maintaining the printhead, p. 9-5). 5. Set up the server for printer sharing? Troubleshooting Cannot print to increase the available disk space. 8. Set up the...
...printer sharing ( Software Guide). 3. Chapter 10 Troubleshooting 10-3 Is the application you trying to the shared printer? To remove the MultiPASS Suite, see the Setup Sheet. To install, see the Software Guide. Is there a warning or attention displayed in the LCD? ... standby? 6. Is there an application error or General Protection Fault error displayed on ? Print the nozzle check pattern ( Maintaining the printhead, p. 9-5). 5. Set up the server for printer sharing? Troubleshooting Cannot print to increase the available disk space. 8. Set up the...

MultiPASS F20 Basic Guide
Page 80
...the intensity with intense colors. Use thicker paper such as photographs or illustrations? Uncurl the paper and reload. Print the nozzle check pattern ( Maintaining the printhead, p. 9-5). 2. Printing stops in the printer driver. P 2. Paper does not feed properly. Does the paper stack exceed the paper limit mark ... a large quantity of time. In the Properties dialog box, on the Main tab, click [Manual] in the multi-purpose tray? If so, the printhead will stop temporarily and resume after 30 to 60 seconds and remove when the ink has dried. 2. P 1. P 3. P 3. Has the machine ...
...the intensity with intense colors. Use thicker paper such as photographs or illustrations? Uncurl the paper and reload. Print the nozzle check pattern ( Maintaining the printhead, p. 9-5). 2. Printing stops in the printer driver. P 2. Paper does not feed properly. Does the paper stack exceed the paper limit mark ... a large quantity of time. In the Properties dialog box, on the Main tab, click [Manual] in the multi-purpose tray? If so, the printhead will stop temporarily and resume after 30 to 60 seconds and remove when the ink has dried. 2. P 1. P 3. P 3. Has the machine ...

MultiPASS F20 Basic Guide
Page 81
... the document is dirty even on the wrong side of ink such as documents with the Intensity slider. Print the nozzle check pattern ( Maintaining the printhead, p. 9-5). P 2. Change the margin settings in the application to the right ( p. 3-6). Some papers have a "right" side for printing. P ...too high in Problems printing from your computer, p. 10-3. P 6. Is the Alarm light blinking? Print the nozzle check pattern ( Maintaining the printhead, p. 9-5). Does the LCD show the correct type of paper. 3. Are you print documents that can only be printed on the platen glass. ...
... the document is dirty even on the wrong side of ink such as documents with the Intensity slider. Print the nozzle check pattern ( Maintaining the printhead, p. 9-5). P 2. Change the margin settings in the application to the right ( p. 3-6). Some papers have a "right" side for printing. P ...too high in Problems printing from your computer, p. 10-3. P 6. Is the Alarm light blinking? Print the nozzle check pattern ( Maintaining the printhead, p. 9-5). Does the LCD show the correct type of paper. 3. Are you print documents that can only be printed on the platen glass. ...


