User Manual
Page 10
... 1 Introduction Supplies and Accessories 1-2 BJ Cartridges and BJ Tanks 1-2 Canon Specialty Papers 1-3 Getting Help From Canon 1-4 Servicing the MultiPASS C635 1-5 Important Safety Instructions 1-5 Main Components of the MultiPASS C635 1-7 Front View ...1-7 Back View ...1-8 Inside the Printer Area 1-8...MultiPASS 1-21 2 Printing With the MultiPASS C635 Paper Handling 2-2 Selecting Paper 2-2 Paper Guidelines 2-4 Understanding the Printer Driver 2-4 Printing a Document 2-4 Setting Up Print Jobs 2-6 Using the Page Setup Dialog 2-6 Using the Print Dialog 2-11 Using the Preview Window...
... 1 Introduction Supplies and Accessories 1-2 BJ Cartridges and BJ Tanks 1-2 Canon Specialty Papers 1-3 Getting Help From Canon 1-4 Servicing the MultiPASS C635 1-5 Important Safety Instructions 1-5 Main Components of the MultiPASS C635 1-7 Front View ...1-7 Back View ...1-8 Inside the Printer Area 1-8...MultiPASS 1-21 2 Printing With the MultiPASS C635 Paper Handling 2-2 Selecting Paper 2-2 Paper Guidelines 2-4 Understanding the Printer Driver 2-4 Printing a Document 2-4 Setting Up Print Jobs 2-6 Using the Page Setup Dialog 2-6 Using the Print Dialog 2-11 Using the Preview Window...
User Manual
Page 12
... to Calls 5-8 Communicating Using the Distinctive Ring Pattern Detection (DRPD) Feature 5-9 6 Scanning With the MultiPASS C635 Launching ScanTastic 6-1 Exploring the ScanTastic Window 6-2 Using the Device Panel 6-3 Picking an Image Type 6-5 Scaling the Image 6-5 Previewing the Image ... 6-25 Poor Image Quality When Printing 6-25 Rebuilding ScanTastic Preferences 6-26 7 Maintaining the MultiPASS C635 MultiPASS Guidelines 7-2 Routine Maintenance 7-3 Cleaning Inside the MultiPASS 7-3 Cleaning the Scanner Components 7-4 Printing the Nozzle Check 7-7 Cleaning the BJ Cartridge Print...
... to Calls 5-8 Communicating Using the Distinctive Ring Pattern Detection (DRPD) Feature 5-9 6 Scanning With the MultiPASS C635 Launching ScanTastic 6-1 Exploring the ScanTastic Window 6-2 Using the Device Panel 6-3 Picking an Image Type 6-5 Scaling the Image 6-5 Previewing the Image ... 6-25 Poor Image Quality When Printing 6-25 Rebuilding ScanTastic Preferences 6-26 7 Maintaining the MultiPASS C635 MultiPASS Guidelines 7-2 Routine Maintenance 7-3 Cleaning Inside the MultiPASS 7-3 Cleaning the Scanner Components 7-4 Printing the Nozzle Check 7-7 Cleaning the BJ Cartridge Print...
User Manual
Page 44
... the window. 3. Click the Set button. You would have a gray radio button beside them . 2. Click the Set button. Click the Delete button. 3. Custom margins defined this way only affect the maximum printable area. You cannot modify sizes that are used when you are using the Settings dialog. 2-10 Printing With the MultiPASS C635...
... the window. 3. Click the Set button. You would have a gray radio button beside them . 2. Click the Set button. Click the Delete button. 3. Custom margins defined this way only affect the maximum printable area. You cannot modify sizes that are used when you are using the Settings dialog. 2-10 Printing With the MultiPASS C635...
User Manual
Page 45
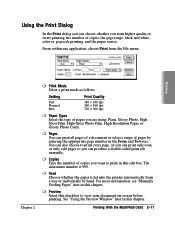
Printing With the MultiPASS C635 2-11 Printing Chapter 2 ❍ Print Mode Select a print mode as follows. Setting Fast Normal Best Print Quality 180 × 180 dpi 360 × 360 dpi .... The maximum number is 999. ❍ Feed Choose whether the paper is fed into the printer automatically from the File menu. See "Using the Preview Window" later in this chapter. From within any application, choose Print from a tray or individually by entering the appropriate page number in the From and To...
Printing With the MultiPASS C635 2-11 Printing Chapter 2 ❍ Print Mode Select a print mode as follows. Setting Fast Normal Best Print Quality 180 × 180 dpi 360 × 360 dpi .... The maximum number is 999. ❍ Feed Choose whether the paper is fed into the printer automatically from the File menu. See "Using the Preview Window" later in this chapter. From within any application, choose Print from a tray or individually by entering the appropriate page number in the From and To...
User Manual
Page 48
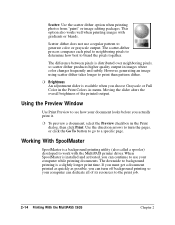
... dialog, then click Print. Moving the slider alters the overall brightness of its resources to the print job. 2-14 Printing With the MultiPASS C635 Chapter 2 Working With SpoolMaster SpoolMaster is a background printing utility (also called a spooler) developed to background printing is available when you actually... compares each pixel to neighboring pixels to determine how best to see how your computer while printing documents. Using the Preview Window Use Print Preview to blend the pixels together. When SpoolMaster is installed and activated, you can continue to generate color or...
... dialog, then click Print. Moving the slider alters the overall brightness of its resources to the print job. 2-14 Printing With the MultiPASS C635 Chapter 2 Working With SpoolMaster SpoolMaster is a background printing utility (also called a spooler) developed to background printing is available when you actually... compares each pixel to neighboring pixels to determine how best to see how your computer while printing documents. Using the Preview Window Use Print Preview to blend the pixels together. When SpoolMaster is installed and activated, you can continue to generate color or...
User Manual
Page 50
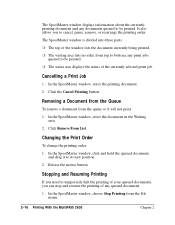
... Cancel Printing button. Removing a Document from the Queue To remove a document from the File menu. 2-16 Printing With the MultiPASS C635 Chapter 2 Cancelling a Print Job 1. Release the mouse button. In the SpoolMaster window, select the document in order, from top to bottom, any queued document. 1. Stopping and Resuming Printing If you need to...
... Cancel Printing button. Removing a Document from the Queue To remove a document from the File menu. 2-16 Printing With the MultiPASS C635 Chapter 2 Cancelling a Print Job 1. Release the mouse button. In the SpoolMaster window, select the document in order, from top to bottom, any queued document. 1. Stopping and Resuming Printing If you need to...
User Manual
Page 51
...to print pages with a lot of shading for your document. For the best quality output when you are three settings in the MultiPASS printer driver Print and Color dialogs that affect both print speed and output quality: Print Mode in the Print dialog, and Print Colors...affects the quality of blends or color detail. Chapter 2 Printing With the MultiPASS C635 2-17 Printing 2. If a document is in the Print dialog determines your Preferences, then click OK. Setting the SpoolMaster Preferences Set the Preferences window to form the grayscale or color image. From the File menu, choose ...
...to print pages with a lot of shading for your document. For the best quality output when you are three settings in the MultiPASS printer driver Print and Color dialogs that affect both print speed and output quality: Print Mode in the Print dialog, and Print Colors...affects the quality of blends or color detail. Chapter 2 Printing With the MultiPASS C635 2-17 Printing 2. If a document is in the Print dialog determines your Preferences, then click OK. Setting the SpoolMaster Preferences Set the Preferences window to form the grayscale or color image. From the File menu, choose ...
User Manual
Page 62
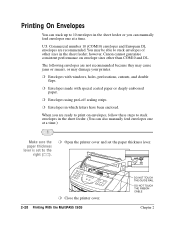
U.S. You may damage your printer. ❍ Envelopes with windows, holes, perforations, cutouts, and double flaps. ❍ Envelopes made with special ... smears, or may be able to 10 envelopes in the sheet feeder or you are recommended. however, Canon cannot guarantee consistent performance on envelopes, follow these steps to stack envelopes in the sheet feeder. (You...printer cover and set the paper thickness lever. ❍ Close the printer cover. 2-28 Printing With the MultiPASS C635 DO NOT TOUCH THE GUIDE RAIL DO NOT TOUCH THE RIBBON CABLE Chapter 2 Printing On Envelopes You can ...
U.S. You may damage your printer. ❍ Envelopes with windows, holes, perforations, cutouts, and double flaps. ❍ Envelopes made with special ... smears, or may be able to 10 envelopes in the sheet feeder or you are recommended. however, Canon cannot guarantee consistent performance on envelopes, follow these steps to stack envelopes in the sheet feeder. (You...printer cover and set the paper thickness lever. ❍ Close the printer cover. 2-28 Printing With the MultiPASS C635 DO NOT TOUCH THE GUIDE RAIL DO NOT TOUCH THE RIBBON CABLE Chapter 2 Printing On Envelopes You can ...
User Manual
Page 72
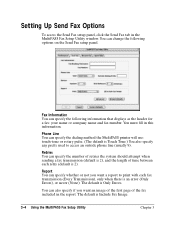
...sending a fax transmission (default is 2), and the length of the fax included in the report. The default is Include Fax Image. 3-4 Using the MultiPASS Fax Setup Utility Chapter 3 Setting Up Send Fax Options To access the Send Fax setup panel, click the Send Fax tab in this information. You... must fill in the MultiPASS Fax Setup Utility window. Retries You can specify the dialing method the MultiPASS printer will use: touch-tone or rotary pulse. (The default is 2). The default is Only Errors. You ...
...sending a fax transmission (default is 2), and the length of the fax included in the report. The default is Include Fax Image. 3-4 Using the MultiPASS Fax Setup Utility Chapter 3 Setting Up Send Fax Options To access the Send Fax setup panel, click the Send Fax tab in this information. You... must fill in the MultiPASS Fax Setup Utility window. Retries You can specify the dialing method the MultiPASS printer will use: touch-tone or rotary pulse. (The default is 2). The default is Only Errors. You ...
User Manual
Page 75
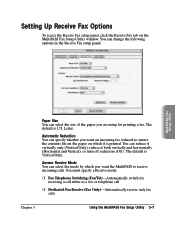
...Setup Utility 3-7 The default is Vertical Only. Automatic Reduction You can specify whether you want the MultiPASS to ensure the contents fits on the paper on the MultiPASS Fax Setup Utility window. Letter. The default is U.S. You can select the mode by which it both vertically and ...horizontally (Horizontal and Vertical), or turn off reduction (Off). MultiPASS Fax Setup Utility Paper Size You can reduce ...
...Setup Utility 3-7 The default is Vertical Only. Automatic Reduction You can specify whether you want the MultiPASS to ensure the contents fits on the paper on the MultiPASS Fax Setup Utility window. Letter. The default is U.S. You can select the mode by which it both vertically and ...horizontally (Horizontal and Vertical), or turn off reduction (Off). MultiPASS Fax Setup Utility Paper Size You can reduce ...
User Manual
Page 107
...; Launching ScanTastic ❍ Exploring the ScanTastic Window ❍ Enhancing images with the results, you first scan a preview of the document. The preview image allows you to review the results of your hard drive. Scanning Scanning With the 6 MultiPASS C635 You can use ScanTastic scanning software on its... with ScanTastic ❍ Using the advanced functions of documents and save them as image files. Chapter 6 Scanning With the MultiPASS C635 6-1 To use the MultiPASS to size, tint, and so on its own or as a plug-in in applications that support the Adobe® ...
...; Launching ScanTastic ❍ Exploring the ScanTastic Window ❍ Enhancing images with the results, you first scan a preview of the document. The preview image allows you to review the results of your hard drive. Scanning Scanning With the 6 MultiPASS C635 You can use ScanTastic scanning software on its... with ScanTastic ❍ Using the advanced functions of documents and save them as image files. Chapter 6 Scanning With the MultiPASS C635 6-1 To use the MultiPASS to size, tint, and so on its own or as a plug-in in applications that support the Adobe® ...
User Manual
Page 108
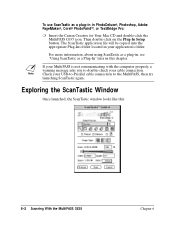
...in this : 6-2 Scanning With the MultiPASS C635 Chapter 6 Exploring the ScanTastic Window Once launched, the ScanTastic window looks like this chapter. Then double-click on the Plug-In Setup button. N If your MultiPASS is not communicating with the computer properly, a warning message asks you to the MultiPASS, then try launching ScanTastic again. For ... Plug-Ins folder located in PhotoDeluxe®, Photoshop, Adobe PageMaker®, Corel® PhotoPaint™, or TextBridge Pro: ❍ Insert the Canon Creative for Your Mac CD and double-click the MultiPASS C635 icon.
...in this : 6-2 Scanning With the MultiPASS C635 Chapter 6 Exploring the ScanTastic Window Once launched, the ScanTastic window looks like this chapter. Then double-click on the Plug-In Setup button. N If your MultiPASS is not communicating with the computer properly, a warning message asks you to the MultiPASS, then try launching ScanTastic again. For ... Plug-Ins folder located in PhotoDeluxe®, Photoshop, Adobe PageMaker®, Corel® PhotoPaint™, or TextBridge Pro: ❍ Insert the Canon Creative for Your Mac CD and double-click the MultiPASS C635 icon.
User Manual
Page 112
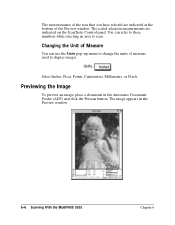
... that you have selected are indicated on the ScanTastic Control panel. Previewing the Image To preview an image, place a document in the Preview window: 6-6 Scanning With the MultiPASS C635 Chapter 6 The scaled selection measurements are indicated at the bottom of measure used to display images. Changing the Unit of Measure You can refer...
... that you have selected are indicated on the ScanTastic Control panel. Previewing the Image To preview an image, place a document in the Preview window: 6-6 Scanning With the MultiPASS C635 Chapter 6 The scaled selection measurements are indicated at the bottom of measure used to display images. Changing the Unit of Measure You can refer...
User Manual
Page 113
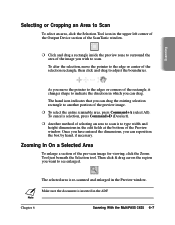
... entire scannable area, press Command+A (select All). The selected area is to type width and height dimensions in the Preview window. Chapter 6 Scanning With the MultiPASS C635 6-7 To cancel a selection, press Command+D (Deselect). ❍ Another method of the selection rectangle, then click and drag... to scan is re-scanned and enlarged in the edit fields at the bottom of the Preview window. As you can drag. ...
... entire scannable area, press Command+A (select All). The selected area is to type width and height dimensions in the Preview window. Chapter 6 Scanning With the MultiPASS C635 6-7 To cancel a selection, press Command+D (Deselect). ❍ Another method of the selection rectangle, then click and drag... to scan is re-scanned and enlarged in the edit fields at the bottom of the Preview window. As you can drag. ...
User Manual
Page 128
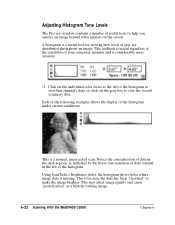
This may affect image quality and cause "posterization", or a blotchy looking image. 6-22 Scanning With the MultiPASS C5500 Chapter 6 This is a normal, uncorrected scan. This is because the data has been "stretched" to make the image brighter. Notice the concentration of ... more accurate. ❍ Click on the individual color boxes to the left of the histogram. A histogram is missing. Adjusting Histogram Tone Levels The Preview window contains a number of useful tools to help you analyze an image beyond what appears on the gray box to view the overall summary data.
This may affect image quality and cause "posterization", or a blotchy looking image. 6-22 Scanning With the MultiPASS C5500 Chapter 6 This is a normal, uncorrected scan. This is because the data has been "stretched" to make the image brighter. Notice the concentration of ... more accurate. ❍ Click on the individual color boxes to the left of the histogram. A histogram is missing. Adjusting Histogram Tone Levels The Preview window contains a number of useful tools to help you analyze an image beyond what appears on the gray box to view the overall summary data.
User Manual
Page 158
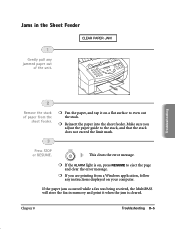
... feeder. This clears the error message. ❍ If the ALARM light is cleared. If the paper jam occurred while a fax was being received, the MultiPASS will store the fax in the Sheet Feeder 1 Gently pull any instructions displayed on a flat surface to the stack, and that the stack does not... exceed the limit mark. 3 Press STOP STOP or RESUME. Chapter 8 Troubleshooting 8-5 CLEAR PAPER JAM Troubleshooting 2 Remove the stack of paper from a Windows application, follow any jammed paper out of the unit. Jams in memory and print it on your computer.
... feeder. This clears the error message. ❍ If the ALARM light is cleared. If the paper jam occurred while a fax was being received, the MultiPASS will store the fax in the Sheet Feeder 1 Gently pull any instructions displayed on a flat surface to the stack, and that the stack does not... exceed the limit mark. 3 Press STOP STOP or RESUME. Chapter 8 Troubleshooting 8-5 CLEAR PAPER JAM Troubleshooting 2 Remove the stack of paper from a Windows application, follow any jammed paper out of the unit. Jams in memory and print it on your computer.
User Manual
Page 159
... driver. Quit the application if it will use the new memory allocation. Output problems displayed in the Preview window are printing. The MultiPASS driver can print only what the application sends it . 3. Find the application on your output using the Preview option in the application from which you ...
... driver. Quit the application if it will use the new memory allocation. Output problems displayed in the Preview window are printing. The MultiPASS driver can print only what the application sends it . 3. Find the application on your output using the Preview option in the application from which you ...
User Manual
Page 160
If it does not, check "Printing Problems" described later in Chapter 2, Printing With the MultiPASS C635. Delete any applications you are running. 2. Delete the SpoolMaster Folder. 4. Step 3. Step 4. Remove Corrupted Print or Preference Files If you experience output ...drivers preference files can be corrupted. In the Chooser, reselect and re-setup your hard drive icon to the Trash. 5. Print a Finder Window Printing a finder window helps determine if the problem is happening everywhere or only within one . 3. Drag the the PowerPrint™ Prefs Files folder to display its...
If it does not, check "Printing Problems" described later in Chapter 2, Printing With the MultiPASS C635. Delete any applications you are running. 2. Delete the SpoolMaster Folder. 4. Step 3. Step 4. Remove Corrupted Print or Preference Files If you experience output ...drivers preference files can be corrupted. In the Chooser, reselect and re-setup your hard drive icon to the Trash. 5. Print a Finder Window Printing a finder window helps determine if the problem is happening everywhere or only within one . 3. Drag the the PowerPrint™ Prefs Files folder to display its...
User Manual
Page 162
... . 3. You cannot change an application's memory allocation while the application is usually adequate when printing most files. Follow the steps listed below: 1. The Get Info window will appear. 4. Close the Get Info window. Select Get Info from the File Menu. The Info window will appear. 4. Select Get Info from the File Menu.
... . 3. You cannot change an application's memory allocation while the application is usually adequate when printing most files. Follow the steps listed below: 1. The Get Info window will appear. 4. Close the Get Info window. Select Get Info from the File Menu. The Info window will appear. 4. Select Get Info from the File Menu.
User Manual
Page 211
FILE PRINT: B-2 Finder window: 8-7 Fine mode, fax: A-4 resolution: 4-14-15 Flipping, an image: 2-8 Fractional widths: 2-7 Full Color setting: 2-13 Function buttons: 1-9, 1-11 FUNCTION button: 1-11, 7-8,...Greeting Cards: 1-3, 2-3, 2-21, A-1 Group dialing: 4-6-7 defining: 3-14 Guide rail: 2-19, 7-12, 7-16 Guidelines auto feed: 2-24-25 MultiPASS: 7-2 H Halftone dither: 2-13 resolution: 6-19 Hard disk space: A-6 Hardware connections: 8-8 HEAD CLEANING function: 7-8, B-2 Help, Canon: 1-4 High Gloss Film: 1-3, 2-3, 2-21, 2-31, A-1 High Resolution Paper: 1-3, 1-19, 2-3, 2-21-22, 2-32-34, A-1 Hilite ...
FILE PRINT: B-2 Finder window: 8-7 Fine mode, fax: A-4 resolution: 4-14-15 Flipping, an image: 2-8 Fractional widths: 2-7 Full Color setting: 2-13 Function buttons: 1-9, 1-11 FUNCTION button: 1-11, 7-8,...Greeting Cards: 1-3, 2-3, 2-21, A-1 Group dialing: 4-6-7 defining: 3-14 Guide rail: 2-19, 7-12, 7-16 Guidelines auto feed: 2-24-25 MultiPASS: 7-2 H Halftone dither: 2-13 resolution: 6-19 Hard disk space: A-6 Hardware connections: 8-8 HEAD CLEANING function: 7-8, B-2 Help, Canon: 1-4 High Gloss Film: 1-3, 2-3, 2-21, 2-31, A-1 High Resolution Paper: 1-3, 1-19, 2-3, 2-21-22, 2-32-34, A-1 Hilite ...


