User Manual
Page 10
... 1 Introduction Supplies and Accessories 1-2 BJ Cartridges and BJ Tanks 1-2 Canon Specialty Papers 1-3 Getting Help From Canon 1-4 Servicing the MultiPASS C635 1-5 Important Safety Instructions 1-5 Main Components of the MultiPASS C635 1-7 Front View ...1-7 Back View ...1-8 Inside the Printer Area 1-8...MultiPASS 1-21 2 Printing With the MultiPASS C635 Paper Handling 2-2 Selecting Paper 2-2 Paper Guidelines 2-4 Understanding the Printer Driver 2-4 Printing a Document 2-4 Setting Up Print Jobs 2-6 Using the Page Setup Dialog 2-6 Using the Print Dialog 2-11 Using the Preview Window...
... 1 Introduction Supplies and Accessories 1-2 BJ Cartridges and BJ Tanks 1-2 Canon Specialty Papers 1-3 Getting Help From Canon 1-4 Servicing the MultiPASS C635 1-5 Important Safety Instructions 1-5 Main Components of the MultiPASS C635 1-7 Front View ...1-7 Back View ...1-8 Inside the Printer Area 1-8...MultiPASS 1-21 2 Printing With the MultiPASS C635 Paper Handling 2-2 Selecting Paper 2-2 Paper Guidelines 2-4 Understanding the Printer Driver 2-4 Printing a Document 2-4 Setting Up Print Jobs 2-6 Using the Page Setup Dialog 2-6 Using the Print Dialog 2-11 Using the Preview Window...
User Manual
Page 12
... to Calls 5-8 Communicating Using the Distinctive Ring Pattern Detection (DRPD) Feature 5-9 6 Scanning With the MultiPASS C635 Launching ScanTastic 6-1 Exploring the ScanTastic Window 6-2 Using the Device Panel 6-3 Picking an Image Type 6-5 Scaling the Image 6-5 Previewing the Image ... 6-25 Poor Image Quality When Printing 6-25 Rebuilding ScanTastic Preferences 6-26 7 Maintaining the MultiPASS C635 MultiPASS Guidelines 7-2 Routine Maintenance 7-3 Cleaning Inside the MultiPASS 7-3 Cleaning the Scanner Components 7-4 Printing the Nozzle Check 7-7 Cleaning the BJ Cartridge Print...
... to Calls 5-8 Communicating Using the Distinctive Ring Pattern Detection (DRPD) Feature 5-9 6 Scanning With the MultiPASS C635 Launching ScanTastic 6-1 Exploring the ScanTastic Window 6-2 Using the Device Panel 6-3 Picking an Image Type 6-5 Scaling the Image 6-5 Previewing the Image ... 6-25 Poor Image Quality When Printing 6-25 Rebuilding ScanTastic Preferences 6-26 7 Maintaining the MultiPASS C635 MultiPASS Guidelines 7-2 Routine Maintenance 7-3 Cleaning Inside the MultiPASS 7-3 Cleaning the Scanner Components 7-4 Printing the Nozzle Check 7-7 Cleaning the BJ Cartridge Print...
User Manual
Page 44
...1. In the Print List, click the paper size you want to delete. For example, if you are using the Settings dialog. 2-10 Printing With the MultiPASS C635 Chapter 2 To set the printed margins, define the document's margins within the application you are printing from. 5. Click the Set button. To adjust the page... US Legal, most often on the Page Setup dialog, be best for you use most of the time, the factory default setting of the window. 3. Using the Settings Dialog Click the Settings button in the bottom section of US Letter will not be sure to change the paper size ...
...1. In the Print List, click the paper size you want to delete. For example, if you are using the Settings dialog. 2-10 Printing With the MultiPASS C635 Chapter 2 To set the printed margins, define the document's margins within the application you are printing from. 5. Click the Set button. To adjust the page... US Legal, most often on the Page Setup dialog, be best for you use most of the time, the factory default setting of the window. 3. Using the Settings Dialog Click the Settings button in the bottom section of US Letter will not be sure to change the paper size ...
User Manual
Page 45
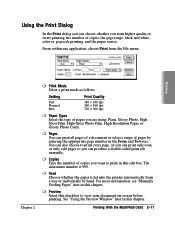
...box. The maximum number is 999. ❍ Feed Choose whether the paper is fed into the printer automatically from the File menu. Printing With the MultiPASS C635 2-11 Using the Print Dialog In the Print dialog you can choose whether you are using: Plain, Glossy Photo, High Gloss Film, High Gloss ... can print all pages of a document or select a range of paper you want to view your document on-screen before printing. See "Using the Preview Window" later in this chapter. Setting Fast Normal Best Print Quality 180 × 180 dpi 360 × 360 dpi 720 × 360 dpi ❍ Paper...
...box. The maximum number is 999. ❍ Feed Choose whether the paper is fed into the printer automatically from the File menu. Printing With the MultiPASS C635 2-11 Using the Print Dialog In the Print dialog you can choose whether you are using: Plain, Glossy Photo, High Gloss Film, High Gloss ... can print all pages of a document or select a range of paper you want to view your document on-screen before printing. See "Using the Preview Window" later in this chapter. Setting Fast Normal Best Print Quality 180 × 180 dpi 360 × 360 dpi 720 × 360 dpi ❍ Paper...
User Manual
Page 48
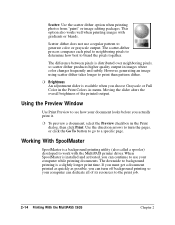
...and subtly. Moving the slider alters the overall brightness of its resources to the print job. 2-14 Printing With the MultiPASS C635 Chapter 2 Using the Preview Window Use Print Preview to print than pattern dither. ❍ Brightness An adjustment slider is available when you actually print it.... click Print. Working With SpoolMaster SpoolMaster is a slightly longer print time. This option also works well when printing images with the MultiPASS printer driver. Use the direction arrows to turn off background printing so your computer while printing documents. If you must get a ...
...and subtly. Moving the slider alters the overall brightness of its resources to the print job. 2-14 Printing With the MultiPASS C635 Chapter 2 Using the Preview Window Use Print Preview to print than pattern dither. ❍ Brightness An adjustment slider is available when you actually print it.... click Print. Working With SpoolMaster SpoolMaster is a slightly longer print time. This option also works well when printing images with the MultiPASS printer driver. Use the direction arrows to turn off background printing so your computer while printing documents. If you must get a ...
User Manual
Page 50
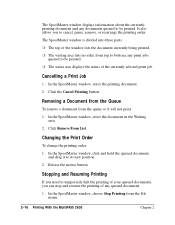
...need to its new position. 2. In the SpoolMaster window, click and hold the queued document, and drag it will not print: 1. Removing a Document from the Queue To remove a document from the File menu. 2-16 Printing With the MultiPASS C635 Chapter 2 Changing the Print Order To change the ...printing order: 1. The SpoolMaster window is divided into three parts: ❍ The top of any documents queued to be printed. ❍ ...
...need to its new position. 2. In the SpoolMaster window, click and hold the queued document, and drag it will not print: 1. Removing a Document from the Queue To remove a document from the File menu. 2-16 Printing With the MultiPASS C635 Chapter 2 Changing the Print Order To change the ...printing order: 1. The SpoolMaster window is divided into three parts: ❍ The top of any documents queued to be printed. ❍ ...
User Manual
Page 51
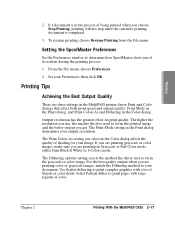
... setting selects the method the driver uses to form the printed image and the better output you get. Chapter 2 Printing With the MultiPASS C635 2-17 If a document is completed. 3. Set your output resolution. Output resolution has the greatest effect on print quality. If you... Colors mode. Use Scatter dithering to your image. From the File menu, choose Preferences. 2. Setting the SpoolMaster Preferences Set the Preferences window to print pages with a lot of its actions during the printing process. 1. Printing Tips Achieving the Best Output Quality There are three ...
... setting selects the method the driver uses to form the printed image and the better output you get. Chapter 2 Printing With the MultiPASS C635 2-17 If a document is completed. 3. Set your output resolution. Output resolution has the greatest effect on print quality. If you... Colors mode. Use Scatter dithering to your image. From the File menu, choose Preferences. 2. Setting the SpoolMaster Preferences Set the Preferences window to print pages with a lot of its actions during the printing process. 1. Printing Tips Achieving the Best Output Quality There are three ...
User Manual
Page 62
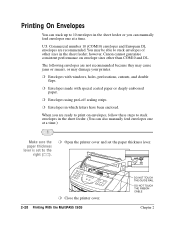
You may damage your printer. ❍ Envelopes with windows, holes, perforations, cutouts, and double flaps. ❍ Envelopes made with special coated...the printer cover and set the paper thickness lever. ❍ Close the printer cover. 2-28 Printing With the MultiPASS C635 DO NOT TOUCH THE GUIDE RAIL DO NOT TOUCH THE RIBBON CABLE Chapter 2 The following envelopes are recommended. Commercial... able to stack envelopes in the sheet feeder; U.S. however, Canon cannot guarantee consistent performance on envelopes, follow these steps to stack envelopes of other than COM10 and DL.
You may damage your printer. ❍ Envelopes with windows, holes, perforations, cutouts, and double flaps. ❍ Envelopes made with special coated...the printer cover and set the paper thickness lever. ❍ Close the printer cover. 2-28 Printing With the MultiPASS C635 DO NOT TOUCH THE GUIDE RAIL DO NOT TOUCH THE RIBBON CABLE Chapter 2 The following envelopes are recommended. Commercial... able to stack envelopes in the sheet feeder; U.S. however, Canon cannot guarantee consistent performance on envelopes, follow these steps to stack envelopes of other than COM10 and DL.
User Manual
Page 72
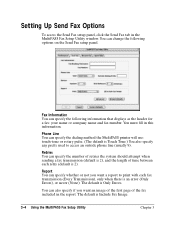
Fax Information You can specify the dialing method the MultiPASS printer will use: touch-tone or rotary pulse. (The default is Touch Tone.) You also specify any prefix ...whether or not you want a report to access an outside phone line (usually 9). The default is Include Fax Image. 3-4 Using the MultiPASS Fax Setup Utility Chapter 3 Report You can change the following information that displays as the header for a fax: your name or company name... the Send Fax setup panel, click the Send Fax tab in this information. You must fill in the MultiPASS Fax Setup Utility window.
Fax Information You can specify the dialing method the MultiPASS printer will use: touch-tone or rotary pulse. (The default is Touch Tone.) You also specify any prefix ...whether or not you want a report to access an outside phone line (usually 9). The default is Include Fax Image. 3-4 Using the MultiPASS Fax Setup Utility Chapter 3 Report You can change the following information that displays as the header for a fax: your name or company name... the Send Fax setup panel, click the Send Fax tab in this information. You must fill in the MultiPASS Fax Setup Utility window.
User Manual
Page 75
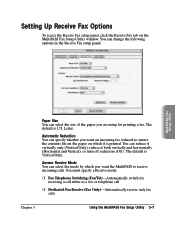
... The default is U.S. Answer Receive Mode You can select the size of the paper you want the MultiPASS to ensure the contents fits on the paper on the MultiPASS Fax Setup Utility window. You can change the following options in the Receive Fax setup panel. You must specify a Receive mode... a call either as a fax or telephone call ❍ Dedicated Fax Receive (Fax Only)-Automatically receive only fax calls Chapter 3 Using the MultiPASS Fax Setup Utility 3-7 You can reduce it vertically only (Vertical Only), reduce it is printed. Setting Up Receive Fax Options To access the ...
... The default is U.S. Answer Receive Mode You can select the size of the paper you want the MultiPASS to ensure the contents fits on the paper on the MultiPASS Fax Setup Utility window. You can change the following options in the Receive Fax setup panel. You must specify a Receive mode... a call either as a fax or telephone call ❍ Dedicated Fax Receive (Fax Only)-Automatically receive only fax calls Chapter 3 Using the MultiPASS Fax Setup Utility 3-7 You can reduce it vertically only (Vertical Only), reduce it is printed. Setting Up Receive Fax Options To access the ...
User Manual
Page 107
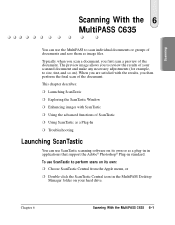
... folder on ). The preview image allows you then perform the final scan of your hard drive. Chapter 6 Scanning With the MultiPASS C635 6-1 This chapter describes: ❍ Launching ScanTastic ❍ Exploring the ScanTastic Window ❍ Enhancing images with the results, you to size, tint, and so on your scanned document and make any necessary...
... folder on ). The preview image allows you then perform the final scan of your hard drive. Chapter 6 Scanning With the MultiPASS C635 6-1 This chapter describes: ❍ Launching ScanTastic ❍ Exploring the ScanTastic Window ❍ Enhancing images with the results, you to size, tint, and so on your scanned document and make any necessary...
User Manual
Page 108
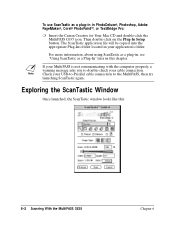
... the ScanTastic Window Once launched, the ScanTastic window looks like this chapter. The ScanTastic application file will be copied into the appropriate Plug-Ins folder located in your cable connection. For more information, about using ScanTastic as a plug-in, see "Using ScanTastic as a plug-in in this : 6-2 Scanning With the MultiPASS C635 Chapter 6...use ScanTastic as a Plug-In" later in PhotoDeluxe®, Photoshop, Adobe PageMaker®, Corel® PhotoPaint™, or TextBridge Pro: ❍ Insert the Canon Creative for Your Mac CD and double-click the MultiPASS C635 icon.
... the ScanTastic Window Once launched, the ScanTastic window looks like this chapter. The ScanTastic application file will be copied into the appropriate Plug-Ins folder located in your cable connection. For more information, about using ScanTastic as a plug-in, see "Using ScanTastic as a plug-in in this : 6-2 Scanning With the MultiPASS C635 Chapter 6...use ScanTastic as a Plug-In" later in PhotoDeluxe®, Photoshop, Adobe PageMaker®, Corel® PhotoPaint™, or TextBridge Pro: ❍ Insert the Canon Creative for Your Mac CD and double-click the MultiPASS C635 icon.
User Manual
Page 112
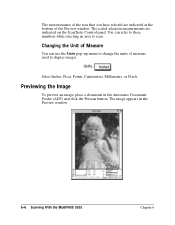
... units of measure used to scan. The scaled selection measurements are indicated at the bottom of the Preview window. Previewing the Image To preview an image, place a document in the Preview window: 6-6 Scanning With the MultiPASS C635 Chapter 6 The measurements of the area that you have selected are indicated on the ScanTastic Control panel.
... units of measure used to scan. The scaled selection measurements are indicated at the bottom of the Preview window. Previewing the Image To preview an image, place a document in the Preview window: 6-6 Scanning With the MultiPASS C635 Chapter 6 The measurements of the area that you have selected are indicated on the ScanTastic Control panel.
User Manual
Page 113
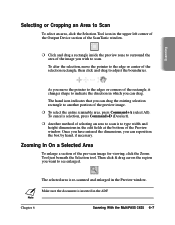
...Zooming In On a Selected Area To enlarge a section of the selection rectangle, then click and drag to adjust the boundaries. Chapter 6 Scanning With the MultiPASS C635 6-7 To alter the selection, move the pointer to the edges or corners of the preview image. ❍ To select the entire scannable area, press ...bottom of selecting an area to scan is re-scanned and enlarged in the upper left corner of the Output Device section of the ScanTastic window. ❍ Click and drag a rectangle inside the preview zone to surround the area of the image you can drag the existing selection ...
...Zooming In On a Selected Area To enlarge a section of the selection rectangle, then click and drag to adjust the boundaries. Chapter 6 Scanning With the MultiPASS C635 6-7 To alter the selection, move the pointer to the edges or corners of the preview image. ❍ To select the entire scannable area, press ...bottom of selecting an area to scan is re-scanned and enlarged in the upper left corner of the Output Device section of the ScanTastic window. ❍ Click and drag a rectangle inside the preview zone to surround the area of the image you can drag the existing selection ...
User Manual
Page 128
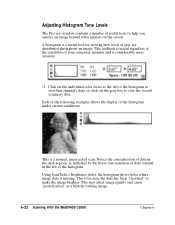
...or click on the screen. This may affect image quality and cause "posterization", or a blotchy looking image. 6-22 Scanning With the MultiPASS C5500 Chapter 6 Each of the following examples shows the display of gray are distributed throughout an image. Using ScanTastic's Brightness slider, the... histogram shows holes where image data is a normal, uncorrected scan. Adjusting Histogram Tone Levels The Preview window contains a number of useful tools to the left of the histogram. This is missing. This feedback is useful regardless of the ...
...or click on the screen. This may affect image quality and cause "posterization", or a blotchy looking image. 6-22 Scanning With the MultiPASS C5500 Chapter 6 Each of the following examples shows the display of gray are distributed throughout an image. Using ScanTastic's Brightness slider, the... histogram shows holes where image data is a normal, uncorrected scan. Adjusting Histogram Tone Levels The Preview window contains a number of useful tools to the left of the histogram. This is missing. This feedback is useful regardless of the ...
User Manual
Page 158
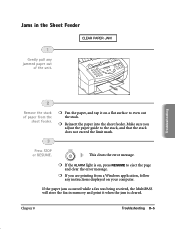
CLEAR PAPER JAM Troubleshooting 2 Remove the stack of the unit. If the paper jam occurred while a fax was being received, the MultiPASS will store the fax in the Sheet Feeder 1 Gently pull any instructions displayed on a flat surface to the stack, and that the stack does not... exceed the limit mark. 3 Press STOP STOP or RESUME. Chapter 8 Troubleshooting 8-5 Make sure you are printing from a Windows application, follow any jammed paper out of paper from the sheet feeder. ❍ Fan the paper, and tap it when the jam is on, press...
CLEAR PAPER JAM Troubleshooting 2 Remove the stack of the unit. If the paper jam occurred while a fax was being received, the MultiPASS will store the fax in the Sheet Feeder 1 Gently pull any instructions displayed on a flat surface to the stack, and that the stack does not... exceed the limit mark. 3 Press STOP STOP or RESUME. Chapter 8 Troubleshooting 8-5 Make sure you are printing from a Windows application, follow any jammed paper out of paper from the sheet feeder. ❍ Fan the paper, and tap it when the jam is on, press...
User Manual
Page 159
... problem, select the Preview option in the Print dialog. Output problems displayed in the Preview window are usually problems from the setup in the Preferred size field. 5. Close the Info window. The next time you the image sent to an application: 1. This option shows you.... 8-6 Troubleshooting Chapter 8 General Troubleshooting Procedures General Printing Problems Most printing problems can I make sure my application is running. The MultiPASS driver can print only what the application sends it will use the new memory allocation. You cannot change the memory allocation of an...
... problem, select the Preview option in the Print dialog. Output problems displayed in the Preview window are usually problems from the setup in the Preferred size field. 5. Close the Info window. The next time you the image sent to an application: 1. This option shows you.... 8-6 Troubleshooting Chapter 8 General Troubleshooting Procedures General Printing Problems Most printing problems can I make sure my application is running. The MultiPASS driver can print only what the application sends it will use the new memory allocation. You cannot change the memory allocation of an...
User Manual
Page 160
... Delete the SpoolMaster Folder. 4. Delete any applications you do experience a problem while printing, old print jobs may remain in Chapter 2, Printing With the MultiPASS C635. In the Chooser, reselect and re-setup your hard drive icon to display its contents. 3. Double-click your printer driver. Open the System Folder ...on your hard drive. This test prints a page showing the contents of your hard drive. 2. Step 3. Step 2. Print a Finder Window Printing a finder window helps determine if the problem is happening everywhere or only within one . 3.
... Delete the SpoolMaster Folder. 4. Delete any applications you do experience a problem while printing, old print jobs may remain in Chapter 2, Printing With the MultiPASS C635. In the Chooser, reselect and re-setup your hard drive icon to display its contents. 3. Double-click your printer driver. Open the System Folder ...on your hard drive. This test prints a page showing the contents of your hard drive. 2. Step 3. Step 2. Print a Finder Window Printing a finder window helps determine if the problem is happening everywhere or only within one . 3.
User Manual
Page 162
For example, if your Mac has 32MB of free RAM. The Get Info window will appear. 4. Select Get Info from the File Menu. Increasing the Preferred Size by 1,000K is running at 14MB (14,000K), this now leaves less ... Size box, enter 512K. 2. In the Preferred Size box, enter a new value. Click on the SpoolMaster application once to SpoolMaster. The Info window will appear. 4. Close the Get Info window. If your application is usually adequate when printing most files. Ensure that you are encountering problems while using background printing, we recommend...
For example, if your Mac has 32MB of free RAM. The Get Info window will appear. 4. Select Get Info from the File Menu. Increasing the Preferred Size by 1,000K is running at 14MB (14,000K), this now leaves less ... Size box, enter 512K. 2. In the Preferred Size box, enter a new value. Click on the SpoolMaster application once to SpoolMaster. The Info window will appear. 4. Close the Get Info window. If your application is usually adequate when printing most files. Ensure that you are encountering problems while using background printing, we recommend...
User Manual
Page 211
FILE PRINT: B-2 Finder window: 8-7 Fine mode, fax: A-4 resolution: 4-14-15 Flipping, an image: 2-8 Fractional widths: 2-7 Full Color setting: 2-13 Function buttons: 1-9, 1-11 FUNCTION button: 1-11, 7-8,...Greeting Cards: 1-3, 2-3, 2-21, A-1 Group dialing: 4-6-7 defining: 3-14 Guide rail: 2-19, 7-12, 7-16 Guidelines auto feed: 2-24-25 MultiPASS: 7-2 H Halftone dither: 2-13 resolution: 6-19 Hard disk space: A-6 Hardware connections: 8-8 HEAD CLEANING function: 7-8, B-2 Help, Canon: 1-4 High Gloss Film: 1-3, 2-3, 2-21, 2-31, A-1 High Resolution Paper: 1-3, 1-19, 2-3, 2-21-22, 2-32-34, A-1 Hilite ...
FILE PRINT: B-2 Finder window: 8-7 Fine mode, fax: A-4 resolution: 4-14-15 Flipping, an image: 2-8 Fractional widths: 2-7 Full Color setting: 2-13 Function buttons: 1-9, 1-11 FUNCTION button: 1-11, 7-8,...Greeting Cards: 1-3, 2-3, 2-21, A-1 Group dialing: 4-6-7 defining: 3-14 Guide rail: 2-19, 7-12, 7-16 Guidelines auto feed: 2-24-25 MultiPASS: 7-2 H Halftone dither: 2-13 resolution: 6-19 Hard disk space: A-6 Hardware connections: 8-8 HEAD CLEANING function: 7-8, B-2 Help, Canon: 1-4 High Gloss Film: 1-3, 2-3, 2-21, 2-31, A-1 High Resolution Paper: 1-3, 1-19, 2-3, 2-21-22, 2-32-34, A-1 Hilite ...


