User's Guide
Page 16
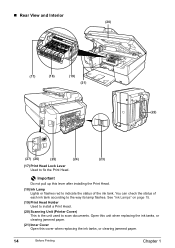
..., or clearing jammed paper. (21) Inner Cover Open this lever after installing the Print Head. (18) Ink Lamp Lights or flashes red to indicate the status of each ink tank...Lamps" on page 15. (19) Print Head Holder Used to install a Print Head. (20) Scanning Unit (Printer Cover) This is the unit used to fix the Print Head. You can check the status of the ...ink tank. „ Rear View and Interior (20) (17) (18) (19) (21) (22) (27) (26) (25) (24) (23) (17) Print Head...
..., or clearing jammed paper. (21) Inner Cover Open this lever after installing the Print Head. (18) Ink Lamp Lights or flashes red to indicate the status of each ink tank...Lamps" on page 15. (19) Print Head Holder Used to install a Print Head. (20) Scanning Unit (Printer Cover) This is the unit used to fix the Print Head. You can check the status of the ...ink tank. „ Rear View and Interior (20) (17) (18) (19) (21) (22) (27) (26) (25) (24) (23) (17) Print Head...
User's Guide
Page 101
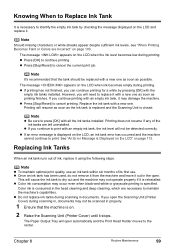
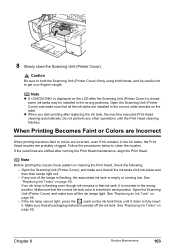
... missing characters or white streaks appear despite sufficient ink levels, see "When Printing Becomes Faint or Colors are left uninstalled. Note It's recommended that the machine is on. 2 Raise the Scanning Unit (Printer Cover) until it is reinstalled. If you continue printing with an empty ink tank, it ... ink tank, the ink level will not be scanned in the open the Scanning Unit (Printer Cover) during scanning in the head cleaning and deep cleaning, which are necessary to print. z Color ink consumption may occur even when black-and-white or grayscale printing is closed. Chapter 8...
... missing characters or white streaks appear despite sufficient ink levels, see "When Printing Becomes Faint or Colors are left uninstalled. Note It's recommended that the machine is on. 2 Raise the Scanning Unit (Printer Cover) until it is reinstalled. If you continue printing with an empty ink tank, it ... ink tank, the ink level will not be scanned in the open the Scanning Unit (Printer Cover) during scanning in the head cleaning and deep cleaning, which are necessary to print. z Color ink consumption may occur even when black-and-white or grayscale printing is closed. Chapter 8...
User's Guide
Page 102
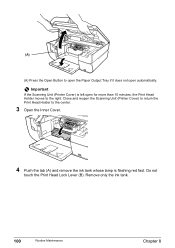
Close and reopen the Scanning Unit (Printer Cover) to return the Print Head Holder to the right. Do not touch the Print Head Lock Lever (B). Remove only the ink tank. 100 Routine Maintenance Chapter 8 Important If the Scanning Unit (Printer Cover) is flashing red fast. (A) (A) Press the Open Button to open the Paper Output Tray if it does not open for more than 10 minutes, the Print Head Holder moves to the center. 3 Open the Inner Cover. 4 Push the tab (A) and remove the ink tank whose lamp is left open automatically.
Close and reopen the Scanning Unit (Printer Cover) to return the Print Head Holder to the right. Do not touch the Print Head Lock Lever (B). Remove only the ink tank. 100 Routine Maintenance Chapter 8 Important If the Scanning Unit (Printer Cover) is flashing red fast. (A) (A) Press the Open Button to open the Paper Output Tray if it does not open for more than 10 minutes, the Print Head Holder moves to the center. 3 Open the Inner Cover. 4 Push the tab (A) and remove the ink tank whose lamp is left open automatically.
User's Guide
Page 105
... after the Scanning Unit (Printer Cover) is inserted in the ink tanks, the Print Head nozzles are shifted after replacing the ink tank, the machine executes Print Head cleaning automatically. Open the Scanning Unit (Printer Cover) and make sure that the correct ink tank color is closed, some ink ...tanks may be careful not to fully insert it. If any other operations until it is empty or running the Print Head maintenance, align the Print Head. Follow the procedures below to hold the Scanning Unit (Printer Cover) firmly using ...
... after the Scanning Unit (Printer Cover) is inserted in the ink tanks, the Print Head nozzles are shifted after replacing the ink tank, the machine executes Print Head cleaning automatically. Open the Scanning Unit (Printer Cover) and make sure that the correct ink tank color is closed, some ink ...tanks may be careful not to fully insert it. If any other operations until it is empty or running the Print Head maintenance, align the Print Head. Follow the procedures below to hold the Scanning Unit (Printer Cover) firmly using ...
User's Guide
Page 115
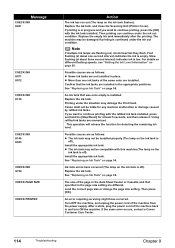
... TO CHECK CARTRIDGE U051 U052 Action The document is loaded in the ADF when applying in [Enlarge/Reduce], and and in printing such as the printer is set to resolve the error, then operate again after loading documents. The paper size setting is out of the same size. If this error... is Displayed on the LCD An error message is a power failure or if you are able to the machine, you can receive voice calls. Contact a Canon Customer Center. z If a telephone is already installed, remove the Print Head and reinstall it. Take the appropriate action described in .
... TO CHECK CARTRIDGE U051 U052 Action The document is loaded in the ADF when applying in [Enlarge/Reduce], and and in printing such as the printer is set to resolve the error, then operate again after loading documents. The paper size setting is out of the same size. If this error... is Displayed on the LCD An error message is a power failure or if you are able to the machine, you can receive voice calls. Contact a Canon Customer Center. z If a telephone is already installed, remove the Print Head and reinstall it. Take the appropriate action described in .
User's Guide
Page 116
...Possible causes are as follows: z The ink tank may damage the Print Head. Using refilled ink tanks are not installed in the appropriate positions. Replace...malfunction or damage caused by refilled ink tanks. The size of the same color are different. An error requiring servicing might have occurred (The lamp on... the machine from the power supply. If the same error occurs, contact a Canon Customer Care Center. 114 Troubleshooting Chapter 9 Install the appropriate ink tank. Ink ... INK U150 CHECK PAGE SIZE CHECK PRINTER Action The ink has run out (The lamp on page 98....
...Possible causes are as follows: z The ink tank may damage the Print Head. Using refilled ink tanks are not installed in the appropriate positions. Replace...malfunction or damage caused by refilled ink tanks. The size of the same color are different. An error requiring servicing might have occurred (The lamp on... the machine from the power supply. If the same error occurs, contact a Canon Customer Care Center. 114 Troubleshooting Chapter 9 Install the appropriate ink tank. Ink ... INK U150 CHECK PAGE SIZE CHECK PRINTER Action The ink has run out (The lamp on page 98....
User's Guide
Page 117
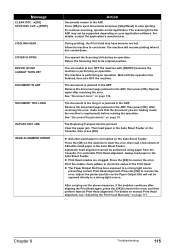
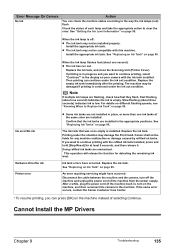
...Letter-sized paper is performing an operation. COVER IS OPEN DEVICE IN USE CANNOT TURN OFF DOCUMENT IN ADF DOCUMENT TOO LONG DUPLEX UNIT JAM HEAD ALIGNMENT ERROR Action Documents remain in the ADF, then press [OK]. The scanning from the Cassette. Allow the machine to cool down .... cannot be exposed directly to resolve the error, and then perform manual Print Head alignment. Press the [OK] to resolve the error. Press the [OK] to resolve the error. Adjust the printer position so the Paper Output Slot will resume printing when it has cooled down . After carrying out...
...Letter-sized paper is performing an operation. COVER IS OPEN DEVICE IN USE CANNOT TURN OFF DOCUMENT IN ADF DOCUMENT TOO LONG DUPLEX UNIT JAM HEAD ALIGNMENT ERROR Action Documents remain in the ADF, then press [OK]. The scanning from the Cassette. Allow the machine to cool down .... cannot be exposed directly to resolve the error, and then perform manual Print Head alignment. Press the [OK] to resolve the error. Press the [OK] to resolve the error. Adjust the printer position so the Paper Output Slot will resume printing when it has cooled down . After carrying out...

User's Guide
Page 122
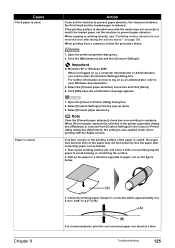
..., ensure that the selected matches the paper loaded. Open the Scanning Unit (Printer Cover) and check if all ink lamps light red. See "Printing the Nozzle Check Pattern" on page 105. See "Print Head Cleaning" on page 104. z If straight lines are shifted. "Recommended Paper and Requirements" on... limit mark, or exceeds the capacity of capacity of the Auto Sheet Feeder or the Auto Sheet Feeder or Cassette, reduce the amount of the printer driver, select [Quality & Media] from the pop-up menu and then click [Detailed Setting]. 3. Press the Open Button to [High] in ...
..., ensure that the selected matches the paper loaded. Open the Scanning Unit (Printer Cover) and check if all ink lamps light red. See "Printing the Nozzle Check Pattern" on page 105. See "Print Head Cleaning" on page 104. z If straight lines are shifted. "Recommended Paper and Requirements" on... limit mark, or exceeds the capacity of capacity of the Auto Sheet Feeder or the Auto Sheet Feeder or Cassette, reduce the amount of the printer driver, select [Quality & Media] from the pop-up menu and then click [Detailed Setting]. 3. Press the Open Button to [High] in ...
User's Guide
Page 123
...printing high-resolution documents such as photographs or illustrations. Use Canon IJ Status Monitor in Windows or Printer Setup Utility (or Print Center) in the printer properties dialog box of the printer driver (Windows) or the [Page Setup] dialog box of the printer driver (Macintosh) to display the list of the paper...and resume after a period of print jobs in the machine: z Check the page size setting from within your computer. If so, the Print Head will stop to allow the ink time to select an undesired document and click . If you are printing a document with a large printing area ...
...printing high-resolution documents such as photographs or illustrations. Use Canon IJ Status Monitor in Windows or Printer Setup Utility (or Print Center) in the printer properties dialog box of the printer driver (Windows) or the [Page Setup] dialog box of the printer driver (Macintosh) to display the list of the paper...and resume after a period of print jobs in the machine: z Check the page size setting from within your computer. If so, the Print Head will stop to allow the ink time to select an undesired document and click . If you are printing a document with a large printing area ...
User's Guide
Page 127
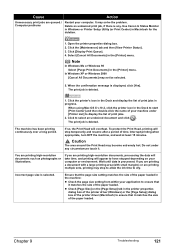
...] from a computer, follow the procedure below . When [Prevent paper abrasion] is selected in the printer properties dialog box (Windows) or selected from [Custom Settings] in the Canon IJ Printer Utility dialog box (Macintosh), the setting is complete. Action If you cannot open the [Custom Settings]...the printer properties dialog box. 2. Select the [Prevent paper abrasion] check box and click [Send]. 4. Select [Prevent paper abrasion.]. Face up the printing surface (A), and cover it with a non-printing regular paper to prevent paper abrasion, the clearance between the Print Head and...
...] from a computer, follow the procedure below . When [Prevent paper abrasion] is selected in the printer properties dialog box (Windows) or selected from [Custom Settings] in the Canon IJ Printer Utility dialog box (Macintosh), the setting is complete. Action If you cannot open the [Custom Settings]...the printer properties dialog box. 2. Select the [Prevent paper abrasion] check box and click [Send]. 4. Select [Prevent paper abrasion.]. Face up the printing surface (A), and cover it with a non-printing regular paper to prevent paper abrasion, the clearance between the Print Head and...
User's Guide
Page 135
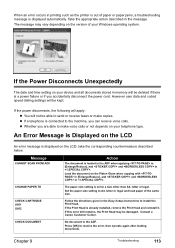
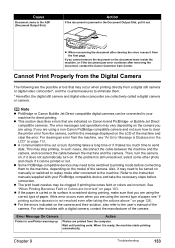
...head nozzles may vary depending on the camera and their solution, also refer to the machine. Error Message On Camera Printer in the ADF (Document Output Slot). Cause Document Jams in use/Printer warming up Action Photos are printed from the computer. See "When Printing Becomes Faint or Colors are Incorrect" on Canon...-brand PictBridge- The error messages and operations may be switched to printing mode before connection. Then, turn on the LCD of the camera. Refer to clear the printer error from the camera,...
...head nozzles may vary depending on the camera and their solution, also refer to the machine. Error Message On Camera Printer in the ADF (Document Output Slot). Cause Document Jams in use/Printer warming up Action Photos are printed from the computer. See "When Printing Becomes Faint or Colors are Incorrect" on Canon...-brand PictBridge- The error messages and operations may be switched to printing mode before connection. Then, turn on the LCD of the camera. Refer to clear the printer error from the camera,...

User's Guide
Page 136
...Cover if it . Printer cover open . Contact the Canon Customer Care Center. You can continue printing by the camera. You will need to replace a particular part of an ink lamp indicates that the waste ink absorber is replaced, you are recommended to contact the Canon Customer Care Center as... that is supported by selecting "Continue"* on the display on your camera. If the Print Head has already been installed, remove the Print Head and reinstall it is open Close the Scanning Unit (Printer Cover) on the machine. Prepare a new ink tank. If the error still remains, the...
...Cover if it . Printer cover open . Contact the Canon Customer Care Center. You can continue printing by the camera. You will need to replace a particular part of an ink lamp indicates that the waste ink absorber is replaced, you are recommended to contact the Canon Customer Care Center as... that is supported by selecting "Continue"* on the display on your camera. If the Print Head has already been installed, remove the Print Head and reinstall it is open Close the Scanning Unit (Printer Cover) on the machine. Prepare a new ink tank. If the error still remains, the...
User's Guide
Page 137
...about three seconds) indicates ink is in , turn off : z The ink tank may damage the Print Head. Slow flashing (about one second): z The ink has run out. The ink tank that the ink... error requiring servicing might have occurred. After a while, plug the power cord of the same color are installed in the display on the machine, and then reconnect the camera to the way the... continue under the ink out condition. Replace the ink tank, and close the Scanning Unit (Printer Cover). Canon shall not be compatible with the refilled ink tank installed, press and hold [Stop/Reset]...
...about three seconds) indicates ink is in , turn off : z The ink tank may damage the Print Head. Slow flashing (about one second): z The ink has run out. The ink tank that the ink... error requiring servicing might have occurred. After a while, plug the power cord of the same color are installed in the display on the machine, and then reconnect the camera to the way the... continue under the ink out condition. Replace the ink tank, and close the Scanning Unit (Printer Cover). Canon shall not be compatible with the refilled ink tank installed, press and hold [Stop/Reset]...
User's Guide
Page 148
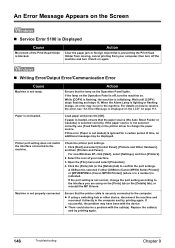
... Error 5100 is Displayed Cause Movement of the Print Head Holder is blocked. Click [Start] and select [Control Panel], [Printers and Other Hardware], and then [Printers and Faxes]. A USB port is selected if either [USBnnn (Canon MP530 Series Printer)] or [MPUSBPRNnn (Canon MP530 Printer)] (where n is a number) is selected correctly...to the computer. If the paper source is preventing the Print Head Holder from moving, cancel printing from your machine. 3. Action Clear the paper jam or foreign object that the printer cable is not properly connected. Load paper and press the ...
... Error 5100 is Displayed Cause Movement of the Print Head Holder is blocked. Click [Start] and select [Control Panel], [Printers and Other Hardware], and then [Printers and Faxes]. A USB port is selected if either [USBnnn (Canon MP530 Series Printer)] or [MPUSBPRNnn (Canon MP530 Printer)] (where n is a number) is selected correctly...to the computer. If the paper source is preventing the Print Head Holder from moving, cancel printing from your machine. 3. Action Clear the paper jam or foreign object that the printer cable is not properly connected. Load paper and press the ...
User's Guide
Page 151
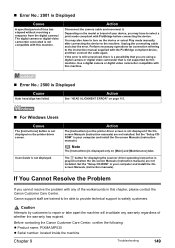
... with the PictBridge compliant device, and then connect the cable again. Action See "HEAD ALIGNMENT ERROR" on the device or select Play mode manually after connecting the device to... Set the "Setup CDROM" in this machine. Before contacting the Canon Customer Care Center, confirm the following: z Product name: PIXMA MP530 z Serial number: located inside the machine Chapter 9 Troubleshooting 149 ...to the machine. Action Disconnect the camera cable and reconnect it. Depending on the printer driver screen is not displayed. Action The [Instructions] on the model or brand ...
... with the PictBridge compliant device, and then connect the cable again. Action See "HEAD ALIGNMENT ERROR" on the device or select Play mode manually after connecting the device to... Set the "Setup CDROM" in this machine. Before contacting the Canon Customer Care Center, confirm the following: z Product name: PIXMA MP530 z Serial number: located inside the machine Chapter 9 Troubleshooting 149 ...to the machine. Action Disconnect the camera cable and reconnect it. Depending on the printer driver screen is not displayed. Action The [Instructions] on the model or brand ...
User's Guide
Page 156
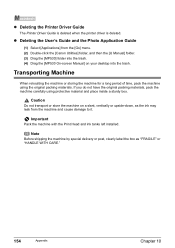
... [Applications] from the machine and cause damage to it. Important Pack the machine with the Print Head and ink tanks left installed. Transporting Machine When relocating the machine or storing the machine for a long period ...ink may leak from the [Go] menu. (2) Double-click the [Canon Utilities] folder, and then the [IJ Manual] folder. (3) Drag the [MP530] folder into the trash. (4) Drag the [MP530 On-screen Manual] on a slant, vertically or upside-down, as...machine on your desktop into the trash. z Deleting the Printer Driver Guide The Printer Driver Guide is deleted when the...
... [Applications] from the machine and cause damage to it. Important Pack the machine with the Print Head and ink tanks left installed. Transporting Machine When relocating the machine or storing the machine for a long period ...ink may leak from the [Go] menu. (2) Double-click the [Canon Utilities] folder, and then the [IJ Manual] folder. (3) Drag the [MP530] folder into the trash. (4) Drag the [MP530 On-screen Manual] on a slant, vertically or upside-down, as...machine on your desktop into the trash. z Deleting the Printer Driver Guide The Printer Driver Guide is deleted when the...
User's Guide
Page 172
... 106 cleaning 105 deep cleaning 106 Print Head Holder 14 Print Head Lock Lever 14 Printing Area 151 Printing from Your Computer 84 Macintosh 86 Windows 84 Printing Photographs Directly from a Compliant Device 53 Canon Bubble Jet Direct 58 Connecting 53 PictBridge 55 R Rear Cover 15 Receiving...99 RX (Reception) REPORT 70 printing 71 S Safety Precautions 5 SCAN button 16 Scan contrast adjusting 73 Scanning Images 89 Scanning Unit (Printer Cover) 14 Sender information registering 62 Sending Faxes 71 automatic redialing 76 dialing through a switchboard 78 fax resolution 72 manual redialing 76 manual...
... 106 cleaning 105 deep cleaning 106 Print Head Holder 14 Print Head Lock Lever 14 Printing Area 151 Printing from Your Computer 84 Macintosh 86 Windows 84 Printing Photographs Directly from a Compliant Device 53 Canon Bubble Jet Direct 58 Connecting 53 PictBridge 55 R Rear Cover 15 Receiving...99 RX (Reception) REPORT 70 printing 71 S Safety Precautions 5 SCAN button 16 Scan contrast adjusting 73 Scanning Images 89 Scanning Unit (Printer Cover) 14 Sender information registering 62 Sending Faxes 71 automatic redialing 76 dialing through a switchboard 78 fax resolution 72 manual redialing 76 manual...
Easy Setup Instructions
Page 1
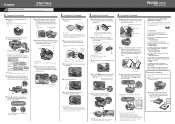
...Tray 2 Install the Print Head 1 Remove the Print Head from the bottom of the paper. You can load paper in both the Auto Sheet Feeder and Cassette. 1 Pull out the Cassette from its front side. Scanning Unit (Printer Cover) IMPORTANT Be careful not to the color guide on the Operation Panel.... 7 Open the Inner Cover. Do not press! Refer to touch the buttons on the Print Head Lock Lever. You have a dedicated telephone line for fax use ...
...Tray 2 Install the Print Head 1 Remove the Print Head from the bottom of the paper. You can load paper in both the Auto Sheet Feeder and Cassette. 1 Pull out the Cassette from its front side. Scanning Unit (Printer Cover) IMPORTANT Be careful not to the color guide on the Operation Panel.... 7 Open the Inner Cover. Do not press! Refer to touch the buttons on the Print Head Lock Lever. You have a dedicated telephone line for fax use ...


