
Quick Start Guide
Page 2
... quick, easy, and logical solutions within 24 hours. 2. Telephone Device for the Deaf (TDD) support is our helpful tech support Web site. For more information and updated program specifics, please visit our web site at (1-866-251-3752). Serial Number (located on the inside of the product Model Number (located on the top of service charges, Monday-Friday (excluding holidays), during the warranty period. Getting Help from Canon Help Us Help...
... quick, easy, and logical solutions within 24 hours. 2. Telephone Device for the Deaf (TDD) support is our helpful tech support Web site. For more information and updated program specifics, please visit our web site at (1-866-251-3752). Serial Number (located on the inside of the product Model Number (located on the top of service charges, Monday-Friday (excluding holidays), during the warranty period. Getting Help from Canon Help Us Help...
Quick Start Guide
Page 5
... Using the Machine 6 Included Items 6 Operation Panel 7 Turning the Machine On and Off 9 Handling the Original Document 11 Loading Printing Paper 12 Copying 20 Making Copies 20 Changing the Copy Settings 21 Using Useful Copy Function 21 Printing from Your Computer 22 Printing with Windows 22 Printing with Macintosh 23 Scanning Images 24 Scanning Methods 24 Routine Maintenance 25 List of Maintenance Codes 25 When Printing Becomes Faint or Colors Are Incorrect 26 Printing the Nozzle Check Pattern 27 Examining the Nozzle Check Pattern ...........28 Print Head Cleaning...
... Using the Machine 6 Included Items 6 Operation Panel 7 Turning the Machine On and Off 9 Handling the Original Document 11 Loading Printing Paper 12 Copying 20 Making Copies 20 Changing the Copy Settings 21 Using Useful Copy Function 21 Printing from Your Computer 22 Printing with Windows 22 Printing with Macintosh 23 Scanning Images 24 Scanning Methods 24 Routine Maintenance 25 List of Maintenance Codes 25 When Printing Becomes Faint or Colors Are Incorrect 26 Printing the Nozzle Check Pattern 27 Examining the Nozzle Check Pattern ...........28 Print Head Cleaning...
Quick Start Guide
Page 10
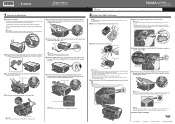
If anything is necessary to connect the machine with your Canon Service representative. z Machine z Setup CD-ROM (Includes drivers, applications, and manuals) z Easy Setup Instructions (Setup Sheet) z Quick Start Guide z Canon Black and Color FINE Cartridges z Power cord z Additional documents * A USB cable is missing or damaged, contact your computer. 6 Before Using the Machine Before Using the Machine Included Items Check that all the following items are in the box.
If anything is necessary to connect the machine with your Canon Service representative. z Machine z Setup CD-ROM (Includes drivers, applications, and manuals) z Easy Setup Instructions (Setup Sheet) z Quick Start Guide z Canon Black and Color FINE Cartridges z Power cord z Additional documents * A USB cable is missing or damaged, contact your computer. 6 Before Using the Machine Before Using the Machine Included Items Check that all the following items are in the box.

Quick Start Guide
Page 20
... loaded paper using the machine connected to the PC Printing Guide on any other type of paper. (1) (3) (2) Note If the corners or edges of the Paper Thickness Lever. For details on settings, see "Printing with Windows" on page 22 or "Printing with the print side facing UP. (2) Align the paper stack against the left when printing on -screen manual for the printer driver settings. 16 Before Using the Machine z The machine makes a rattling noise when paper is not opened fully, an error...
... loaded paper using the machine connected to the PC Printing Guide on any other type of paper. (1) (3) (2) Note If the corners or edges of the Paper Thickness Lever. For details on settings, see "Printing with Windows" on page 22 or "Printing with the print side facing UP. (2) Align the paper stack against the left when printing on -screen manual for the printer driver settings. 16 Before Using the Machine z The machine makes a rattling noise when paper is not opened fully, an error...
Quick Start Guide
Page 26
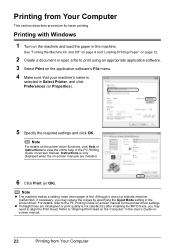
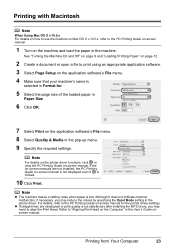
... Mode setting in the User's Guide onscreen manual. 22 Printing from Your Computer This section describes procedure for the printer driver settings. Refer to view the online help or the PC Printing Guide on the Computer" in the printer driver. z If straight lines are installed. 6 Click Print (or OK). Instructions is fed. Printing with Windows 1 Turn on -screen manuals are misaligned or print quality is selected in the machine. Note z The machine makes a rattling noise when paper is only displayed...
... Mode setting in the User's Guide onscreen manual. 22 Printing from Your Computer This section describes procedure for the printer driver settings. Refer to view the online help or the PC Printing Guide on the Computer" in the printer driver. z If straight lines are installed. 6 Click Print (or OK). Instructions is fed. Printing with Windows 1 Turn on -screen manuals are misaligned or print quality is selected in the machine. Note z The machine makes a rattling noise when paper is only displayed...
Quick Start Guide
Page 27
... User's Guide onscreen manual. See "Turning the Machine On and Off" on page 9 and "Loading Printing Paper" on page 12. 2 Create a document or open a file to print using an appropriate application software. 3 Select Page Setup on -screen manual is not displayed even if is not satisfactory after installing the MP Drivers, you may need to align the Print Head. Note z The machine makes a rattling noise when paper is selected in Format for the printer driver settings. Note For details on the printer driver functions...
... User's Guide onscreen manual. See "Turning the Machine On and Off" on page 9 and "Loading Printing Paper" on page 12. 2 Create a document or open a file to print using an appropriate application software. 3 Select Page Setup on -screen manual is not displayed even if is not satisfactory after installing the MP Drivers, you may need to align the Print Head. Note z The machine makes a rattling noise when paper is selected in Format for the printer driver settings. Note For details on the printer driver functions...
Quick Start Guide
Page 40
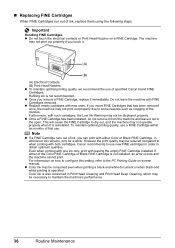
... -screen manual. The machine may not be consumed even when printing a black-and-white document or when black-and white printing is specified. To maintain optimal printing quality, use a FINE Cartridge within six months of ink, you touch it immediately. z Replace empty cartridges with either of ink, replace them using the following steps. z Color ink may not operate properly when it out in whichever ink remains, only for a while. „ Replacing FINE Cartridges When FINE Cartridges...
... -screen manual. The machine may not be consumed even when printing a black-and-white document or when black-and white printing is specified. To maintain optimal printing quality, use a FINE Cartridge within six months of ink, you touch it immediately. z Replace empty cartridges with either of ink, replace them using the following steps. z Color ink may not operate properly when it out in whichever ink remains, only for a while. „ Replacing FINE Cartridges When FINE Cartridges...
Quick Start Guide
Page 43
... Error Code Is Displayed on the LED" on page 44. If you start printing after the Scanning Unit (Cover) is traced with water or sweat. See "Printing the Nozzle Check Pattern" on page 31. z When you are using the machine for a long time, print or copy in both black & white and in color, or perform Print Head Cleaning, about once a month to its original position, and then gently close the Scanning Unit (Cover). See "Aligning the Print...
... Error Code Is Displayed on the LED" on page 44. If you start printing after the Scanning Unit (Cover) is traced with water or sweat. See "Printing the Nozzle Check Pattern" on page 31. z When you are using the machine for a long time, print or copy in both black & white and in color, or perform Print Head Cleaning, about once a month to its original position, and then gently close the Scanning Unit (Cover). See "Aligning the Print...
Quick Start Guide
Page 45
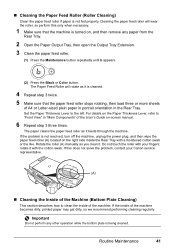
... times. Rotate the roller (A) manually as it . If the problem is not resolved, turn off the machine, unplug the power plug, and then wipe the paper feed roller (A) located on , and then remove any other operation while the bottom plate is not fed properly. Important Do not perform any paper from the Rear Tray. 2 Open the Paper Output Tray, then open the Output Tray Extension. 3 Clean the paper feed roller. (1) Press the Maintenance button repeatedly...
... times. Rotate the roller (A) manually as it . If the problem is not resolved, turn off the machine, unplug the power plug, and then wipe the paper feed roller (A) located on , and then remove any other operation while the bottom plate is not fed properly. Important Do not perform any paper from the Rear Tray. 2 Open the Paper Output Tray, then open the Output Tray Extension. 3 Clean the paper feed roller. (1) Press the Maintenance button repeatedly...

Quick Start Guide
Page 47
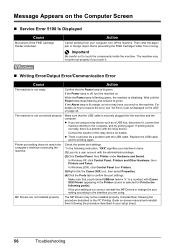
... Install the MP Drivers" on page 47 z "Cannot Connect to Computer Properly" on page 48 z "Print Results Not Satisfactory" on page 49 z "Print Results Not Satisfactory When Copying" on page 52 z "Printing Does Not Start" on page 53 z "Paper Does Not Feed Properly" on page 53 z "Paper Jams" on page 55 z "Message Appears on the Computer Screen" on page 56 z "The Document Cover Comes Off" on page 58 z "Scanning Problems" on page 58 If an Error Occurs When the Machine...
... Install the MP Drivers" on page 47 z "Cannot Connect to Computer Properly" on page 48 z "Print Results Not Satisfactory" on page 49 z "Print Results Not Satisfactory When Copying" on page 52 z "Printing Does Not Start" on page 53 z "Paper Does Not Feed Properly" on page 53 z "Paper Jams" on page 55 z "Message Appears on the Computer Screen" on page 56 z "The Document Cover Comes Off" on page 58 z "Scanning Problems" on page 58 If an Error Occurs When the Machine...
Quick Start Guide
Page 51
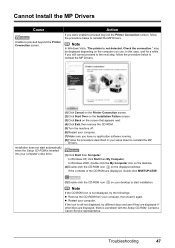
... were unable to proceed beyond the Printer Connection screen. Action If you use. Note In Windows Vista, "The printer is a problem with the Setup CD-ROM. Cannot Install the MP Drivers Cause Unable to reinstall the MP Drivers. (1)Click Start then Computer. Check the connection." Installation does not start installation. Troubleshooting 47 If the contents of the CD-ROM are displayed. Contact a Canon Service representative. z Restart your desktop to start automatically when the Setup CD...
... were unable to proceed beyond the Printer Connection screen. Action If you use. Note In Windows Vista, "The printer is a problem with the Setup CD-ROM. Cannot Install the MP Drivers Cause Unable to reinstall the MP Drivers. (1)Click Start then Computer. Check the connection." Installation does not start installation. Troubleshooting 47 If the contents of the CD-ROM are displayed. Contact a Canon Service representative. z Restart your desktop to start automatically when the Setup CD...
Quick Start Guide
Page 52
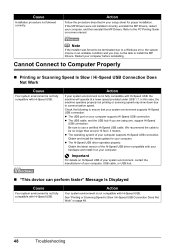
... USB port on -screen manual. See "Printing or Scanning Speed Is Slow / Hi-Speed USB Connection Does Not Work" on your hardware and install it on page 48. 48 Troubleshooting z The operating system of the Hi-Speed USB driver compatible with Hi-Speed USB. Obtain the latest version of your system environment supports Hi-Speed USB connection. Cause Installation procedure not followed correctly. We recommend the cable to be able to ensure that your computer supports Hi-Speed USB connection...
... USB port on -screen manual. See "Printing or Scanning Speed Is Slow / Hi-Speed USB Connection Does Not Work" on your hardware and install it on page 48. 48 Troubleshooting z The operating system of the Hi-Speed USB driver compatible with Hi-Speed USB. Obtain the latest version of your system environment supports Hi-Speed USB connection. Cause Installation procedure not followed correctly. We recommend the cable to be able to ensure that your computer supports Hi-Speed USB connection...
Quick Start Guide
Page 54
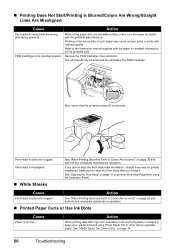
...; White Streaks See "When Printing Becomes Faint or Colors Are Incorrect" on page 26 and perform any necessary maintenance operation. „ Printed Paper Curls or Has Ink Blots Cause Paper is too thin. FINE Cartridge is not installed properly. Remove the FINE Cartridge, then reinstall it . See "Media Types You Cannot Use" on page 31 to perform Print Head Alignment using the Operation Panel. Printing on the wrong side of such paper may cause unclear prints...
...; White Streaks See "When Printing Becomes Faint or Colors Are Incorrect" on page 26 and perform any necessary maintenance operation. „ Printed Paper Curls or Has Ink Blots Cause Paper is too thin. FINE Cartridge is not installed properly. Remove the FINE Cartridge, then reinstall it . See "Media Types You Cannot Use" on page 31 to perform Print Head Alignment using the Operation Panel. Printing on the wrong side of such paper may cause unclear prints...
Quick Start Guide
Page 56
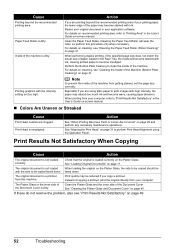
... Operation Panel. For details on recommended printing area, refer to become wavy, causing paper abrasion. Especially if you copy a printout. When performing duplex printing, if the specified page size does not match the actual size of the Document Cover. See "Aligning the Print Head" on page 31 to perform Print Head Alignment using plain paper to print images with ink, causing printed paper to "Printing Area" in the Rear Tray, the inside of the Machine (Bottom Plate Cleaning...
... Operation Panel. For details on recommended printing area, refer to become wavy, causing paper abrasion. Especially if you copy a printout. When performing duplex printing, if the specified page size does not match the actual size of the Document Cover. See "Aligning the Print Head" on page 31 to perform Print Head Alignment using plain paper to print images with ink, causing printed paper to "Printing Area" in the Rear Tray, the inside of the Machine (Bottom Plate Cleaning...
Quick Start Guide
Page 60
... are not installed properly. Replace the USB cable and try printing again. Check the printer port settings. * In the following instruction, "XXX" signifies your machine's name. (1)Log into the machine and the computer. Confirm that the USB cable is lit orange, an error may not be a problem with the relay device. If the Alarm lamp is securely plugged into a user account with Canon XXX Printer appearing in the PC Printing Guide on-screen manual and...
... are not installed properly. Replace the USB cable and try printing again. Check the printer port settings. * In the following instruction, "XXX" signifies your machine's name. (1)Log into the machine and the computer. Confirm that the USB cable is lit orange, an error may not be a problem with the relay device. If the Alarm lamp is securely plugged into a user account with Canon XXX Printer appearing in the PC Printing Guide on-screen manual and...
Quick Start Guide
Page 67
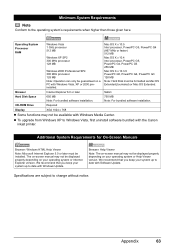
... to date with the Canon inkjet printer. Browser: Help Viewer Note: The on your system up to date with Software Update. The on-screen manual may not be displayed properly depending on -screen manual may not be installed. Browser Internet Explorer 6.0 or later Safari Hard Disk Space 650 MB Note: For bundled software installation. 750 MB Note: For bundled software installation. CD-ROM Drive Required Display XGA 1024 x 768 z Some functions may...
... to date with the Canon inkjet printer. Browser: Help Viewer Note: The on your system up to date with Software Update. The on-screen manual may not be displayed properly depending on -screen manual may not be installed. Browser Internet Explorer 6.0 or later Safari Hard Disk Space 650 MB Note: For bundled software installation. 750 MB Note: For bundled software installation. CD-ROM Drive Required Display XGA 1024 x 768 z Some functions may...
Quick Start Guide
Page 71
... of refurbished or new replacement units. After receipt of the problem. Canon USA offers a range of customer technical support* options: z Interactive troubleshooting, e-mail technical support, the latest driver downloads and answers to frequently asked for the Product during such period. You will be obtained from state to state. * Support program specifics are subject to the Canon USA repair facility. NOTE THAT BY USING THIS SERVICE YOU WILL KEEP...
... of refurbished or new replacement units. After receipt of the problem. Canon USA offers a range of customer technical support* options: z Interactive troubleshooting, e-mail technical support, the latest driver downloads and answers to frequently asked for the Product during such period. You will be obtained from state to state. * Support program specifics are subject to the Canon USA repair facility. NOTE THAT BY USING THIS SERVICE YOU WILL KEEP...
Quick Start Guide
Page 73
... document cover 40 protrusions inside the machine 42 roller 41 Copying 20 E Error Code 44 Windows 22 R Replacing a FINE Cartridge 33 ink status information 33 Routine Maintenance 25 S Safety Precautions 3 Scanning Images 24 Specialty Media 12 Specifications 62 T Troubleshooting 43 Turning off the Machine 9 Turning on the Machine 9 H Handling the Original Document 11 L Legal Limitations on Use of Your Product and Use of Images 64 Loading Original Documents 11 Loading Printing Paper envelopes 17 paper 15 recommended paper and requirements 13 small-sized paper 19 M Maintenance Codes...
... document cover 40 protrusions inside the machine 42 roller 41 Copying 20 E Error Code 44 Windows 22 R Replacing a FINE Cartridge 33 ink status information 33 Routine Maintenance 25 S Safety Precautions 3 Scanning Images 24 Specialty Media 12 Specifications 62 T Troubleshooting 43 Turning off the Machine 9 Turning on the Machine 9 H Handling the Original Document 11 L Legal Limitations on Use of Your Product and Use of Images 64 Loading Original Documents 11 Loading Printing Paper envelopes 17 paper 15 recommended paper and requirements 13 small-sized paper 19 M Maintenance Codes...
Easy Setup Instructions
Page 1
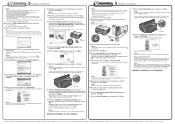
... Cartridge Holder. Correctly Installed FINE Cartridges f Lift the Scanning Unit (Cover) slightly to set the Scanning Unit Support back to connect the machine with ink on the machine, remove all the shipping tapes and protective material on the right side. Important • Make sure that the Document Cover is left slot B. g Press the ON button to "An Error Code Is Displayed on the machine. Wait until the LED stops flashing and displays 1. Wait until the Power lamp stops...
... Cartridge Holder. Correctly Installed FINE Cartridges f Lift the Scanning Unit (Cover) slightly to set the Scanning Unit Support back to connect the machine with ink on the machine, remove all the shipping tapes and protective material on the right side. Important • Make sure that the Document Cover is left slot B. g Press the ON button to "An Error Code Is Displayed on the machine. Wait until the LED stops flashing and displays 1. Wait until the Power lamp stops...
Easy Setup Instructions
Page 2
... Quick Start Guide. Screens may vary depending on -screen instructions. c Double-click the Setup icon. For details, refer to "Scanning Images" in the U.S. The software installation starts. Note Move the cursor over items to display explanations of Canon printers. Serial Number m When the Extended Survey Program screen appears, confirm the message. Note If you are using the Operation Panel on -screen instructions and click OK. Two License Agreement screens may close automatically when the USB cable is displayed, follow the onscreen instructions...
... Quick Start Guide. Screens may vary depending on -screen instructions. c Double-click the Setup icon. For details, refer to "Scanning Images" in the U.S. The software installation starts. Note Move the cursor over items to display explanations of Canon printers. Serial Number m When the Extended Survey Program screen appears, confirm the message. Note If you are using the Operation Panel on -screen instructions and click OK. Two License Agreement screens may close automatically when the USB cable is displayed, follow the onscreen instructions...


