imageCLASS MF6500 Series Basic Guide
Page 11
...-Installation Requirements for Canon Facsimile Equipment xxvi Notice xxvii Laser Safety xxix CDRH Regulations xxix 1 Before Using the Machine 1-1 Machine Components 1-1 Operation Panel 1-3 Main Operation Panel 1-3 Facsimile Operation Panel (MF6550/MF6560/MF6580 Only 1-5 LCD (Standby Mode 1-6 Copy Mode 1-6 Fax Mode 1-6 Scan Mode 1-6 Toner Cartridge 1-7 Maintaining the Toner Cartridge 1-7 Timer Settings 1-9 Setting Sleep Mode 1-9 Setting Auto Clear Time...
...-Installation Requirements for Canon Facsimile Equipment xxvi Notice xxvii Laser Safety xxix CDRH Regulations xxix 1 Before Using the Machine 1-1 Machine Components 1-1 Operation Panel 1-3 Main Operation Panel 1-3 Facsimile Operation Panel (MF6550/MF6560/MF6580 Only 1-5 LCD (Standby Mode 1-6 Copy Mode 1-6 Fax Mode 1-6 Scan Mode 1-6 Toner Cartridge 1-7 Maintaining the Toner Cartridge 1-7 Timer Settings 1-9 Setting Sleep Mode 1-9 Setting Auto Clear Time...

imageCLASS MF6500 Series Basic Guide
Page 38
... at a later date. ● Do not store the toner cartridge in its protective bag. Before Using the Machine Toner Cartridge The lifetime of the Canon Genuine starter toner cartridge which comes with the default print density setting. To purchase the Canon genuine replacement toner cartridge, contact your average document contains a lot of graphics, tables, or charts, the...
... at a later date. ● Do not store the toner cartridge in its protective bag. Before Using the Machine Toner Cartridge The lifetime of the Canon Genuine starter toner cartridge which comes with the default print density setting. To purchase the Canon genuine replacement toner cartridge, contact your average document contains a lot of graphics, tables, or charts, the...
imageCLASS MF6500 Series Basic Guide
Page 130
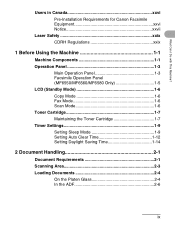
...your skin or clothing, wash with on the toner cartridge should be pointing toward the machine. A A B B - Maintenance 11-3 Do not touch the fixing assembly (A) as it is properly set the toner. 7 Hold the toner cartridge by its handle. If loose toner comes into cloth to make sure it becomes very... hot during use . Warm water will go. A C 9 Push the toner cartridge to remove any toner or the machine as far as this ...
...your skin or clothing, wash with on the toner cartridge should be pointing toward the machine. A A B B - Maintenance 11-3 Do not touch the fixing assembly (A) as it is properly set the toner. 7 Hold the toner cartridge by its handle. If loose toner comes into cloth to make sure it becomes very... hot during use . Warm water will go. A C 9 Push the toner cartridge to remove any toner or the machine as far as this ...
imageCLASS MF6500 Series Basic Guide
Page 131
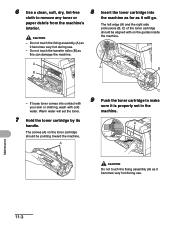
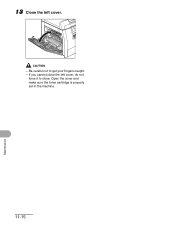
... the left cover. 10 Close the left cover, do not force it to get your fingers caught. - Open the cover and make sure the toner cartridge is replaced. Maintenance 11-4 Fuser Roller If black streaks appear with printing, the fuser roller in the main unit may be cleaned each time... the toner cartridge is properly set in the following procedure. Be careful not to close. The roller should also be dirty. Load a sheet of blank LTR paper into the...
... the left cover. 10 Close the left cover, do not force it to get your fingers caught. - Open the cover and make sure the toner cartridge is replaced. Maintenance 11-4 Fuser Roller If black streaks appear with printing, the fuser roller in the main unit may be cleaned each time... the toner cartridge is properly set in the following procedure. Be careful not to close. The roller should also be dirty. Load a sheet of blank LTR paper into the...

imageCLASS MF6500 Series Basic Guide
Page 138
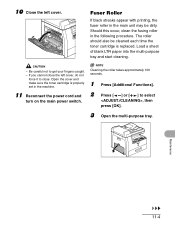
... it will go. Maintenance 11-11 The arrows (A) on the toner cartridge should be pointing toward the machine. A C 8 Push the toner cartridge to distribute toner evenly. A 7 Insert the toner cartridge into the machine as far as it is properly set in the machine. 5 Gently rock the toner cartridge 5 or 6 times to make sure it becomes very...
... it will go. Maintenance 11-11 The arrows (A) on the toner cartridge should be pointing toward the machine. A C 8 Push the toner cartridge to distribute toner evenly. A 7 Insert the toner cartridge into the machine as far as it is properly set in the machine. 5 Gently rock the toner cartridge 5 or 6 times to make sure it becomes very...

imageCLASS MF6500 Series Basic Guide
Page 139
Replacing the Toner Cartridge 1 Open the left cover, do not force it to get your fingers caught. - A 3 Pull the blue plastic pull tab until you cannot close the left cover. Maintenance 11-12 If you can easily hold the handle of the toner cartridge. Be careful not to close. 9 Close the left cover. CAUTION - Grasp the blue plastic pull tab (A) on the toner cartridge. Open the cover and make sure the toner cartridge is properly 2 set in the machine.
Replacing the Toner Cartridge 1 Open the left cover, do not force it to get your fingers caught. - A 3 Pull the blue plastic pull tab until you cannot close the left cover. Maintenance 11-12 If you can easily hold the handle of the toner cartridge. Be careful not to close. 9 Close the left cover. CAUTION - Grasp the blue plastic pull tab (A) on the toner cartridge. Open the cover and make sure the toner cartridge is properly 2 set in the machine.

imageCLASS MF6500 Series Basic Guide
Page 141
... be pointing toward the machine. NOTE Do not pull out the seal at an angle. 10 Hold the toner cartridge by its handle. A A B C 12 \Push the toner cartridge to make sure it is properly set in the machine. A CAUTION Do not touch the fixing assembly (A) as it will go. 9 Pull out the ...seal completely. 11 Insert the toner cartridge into the machine as far as it becomes very hot during use. The ...
... be pointing toward the machine. NOTE Do not pull out the seal at an angle. 10 Hold the toner cartridge by its handle. A A B C 12 \Push the toner cartridge to make sure it is properly set in the machine. A CAUTION Do not touch the fixing assembly (A) as it will go. 9 Pull out the ...seal completely. 11 Insert the toner cartridge into the machine as far as it becomes very hot during use. The ...
imageCLASS MF6500 Series Basic Guide
Page 142
CAUTION - Be careful not to close the left cover. If you cannot close . 13 Close the left cover, do not force it to get your fingers caught. - Open the cover and make sure the toner cartridge is properly set in the machine. 11-15 Maintenance
CAUTION - Be careful not to close the left cover. If you cannot close . 13 Close the left cover, do not force it to get your fingers caught. - Open the cover and make sure the toner cartridge is properly set in the machine. 11-15 Maintenance
imageCLASS MF6500 Series Basic Guide
Page 154
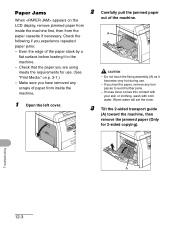
...sure you tear the paper, remove any scraps of the machine. If you have removed any torn pieces to avoid further jams. - Warm water will set the toner. 3 Tilt the 2-sided transport guide (A) toward the machine, then remove the jammed paper (Only for use . - Check the following if you..."Print Media," on the out of paper from inside the machine first, then from inside the machine. 1 Open the left cover. - If loose toner comes into contact with your skin or clothing, wash with cold water. LCD display, remove jammed paper from the A paper cassette if necessary. Paper Jams...
...sure you tear the paper, remove any scraps of the machine. If you have removed any torn pieces to avoid further jams. - Warm water will set the toner. 3 Tilt the 2-sided transport guide (A) toward the machine, then remove the jammed paper (Only for use . - Check the following if you..."Print Media," on the out of paper from inside the machine first, then from inside the machine. 1 Open the left cover. - If loose toner comes into contact with your skin or clothing, wash with cold water. LCD display, remove jammed paper from the A paper cassette if necessary. Paper Jams...

imageCLASS MF6500 Series Basic Guide
Page 161
...- Troubleshooting 12-10 The machine received the fax in the paper cassette, replace the toner cartridge, or clear the paper jams. For more information, see the following: "Setting Paper Type and Size," on p. 3-8 "Replacing the Toner Cartridge," on p. 11-12 "Clearing Jams," on the main power switch, or ...when the machine is not ready for printing. Press [OK], then set the document again. The paper jammed or ran...
...- Troubleshooting 12-10 The machine received the fax in the paper cassette, replace the toner cartridge, or clear the paper jams. For more information, see the following: "Setting Paper Type and Size," on p. 3-8 "Replacing the Toner Cartridge," on p. 11-12 "Clearing Jams," on the main power switch, or ...when the machine is not ready for printing. Press [OK], then set the document again. The paper jammed or ran...
imageCLASS MF6500 Series Basic Guide
Page 162
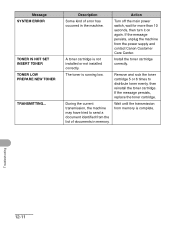
...again. Troubleshooting 12-11 Wait until the transmission from the power supply and contact Canon Customer Care Center. Message SYSTEM ERROR TONER IS NOT SET INSERT TONER TONER LOW PREPARE NEW TONER TRANSMITTING... If the message persists, unplug the machine from memory is complete. Install... the toner cartridge correctly. Remove and rock the toner cartridge 5 or 6 times to send a document ...
...again. Troubleshooting 12-11 Wait until the transmission from the power supply and contact Canon Customer Care Center. Message SYSTEM ERROR TONER IS NOT SET INSERT TONER TONER LOW PREPARE NEW TONER TRANSMITTING... If the message persists, unplug the machine from memory is complete. Install... the toner cartridge correctly. Remove and rock the toner cartridge 5 or 6 times to send a document ...
imageCLASS MF6500 Series Basic Guide
Page 173
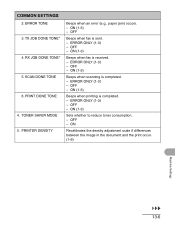
ERROR TONE 3. TX JOB DONE TONE* 4. SCAN DONE TONE 6. PRINT DONE TONE 4. ON (1-3) - OFF - ERROR ONLY (1-3) - ON (1-3) Sets whether to reduce toner consumption. - OFF - TONER SAVER MODE 5. OFF - OFF - ON (1-3) Beeps when printing is sent. - RX JOB DONE TONE* 5. PRINTER DENSITY Beeps when an error (e.g., paper jam) occurs. - OFF Beeps ...
ERROR TONE 3. TX JOB DONE TONE* 4. SCAN DONE TONE 6. PRINT DONE TONE 4. ON (1-3) - OFF - ERROR ONLY (1-3) - ON (1-3) Sets whether to reduce toner consumption. - OFF - TONER SAVER MODE 5. OFF - OFF - ON (1-3) Beeps when printing is sent. - RX JOB DONE TONE* 5. PRINTER DENSITY Beeps when an error (e.g., paper jam) occurs. - OFF Beeps ...
imageCLASS MF6500 Series Basic Guide
Page 184
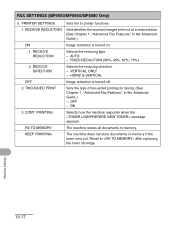
...reduction is turned off. 2. OFF - ON 3. CONT. RX TO MEMORY The machine stores all documents in memory if the toner runs out. Reset to printer functions. 1. AUTO - REDUCE DIRECTION Selects the reducing direction. - KEEP PRINTING The machine does not ...store documents in memory. PRINTER SETTINGS Sets the to after replacing the toner cartridge. FAX SETTINGS (MF6550/MF6560/MF6580 Only) 5. FIXED REDUCTION (90%, 95%, 97%, 75%) 2. PRINTING Selects how the machine ...
...reduction is turned off. 2. OFF - ON 3. CONT. RX TO MEMORY The machine stores all documents in memory if the toner runs out. Reset to printer functions. 1. AUTO - REDUCE DIRECTION Selects the reducing direction. - KEEP PRINTING The machine does not ...store documents in memory. PRINTER SETTINGS Sets the to after replacing the toner cartridge. FAX SETTINGS (MF6550/MF6560/MF6580 Only) 5. FIXED REDUCTION (90%, 95%, 97%, 75%) 2. PRINTING Selects how the machine ...
imageCLASS MF6500 Series Basic Guide
Page 188
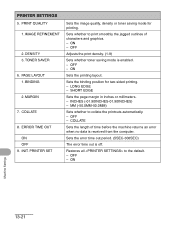
... printouts automatically. - OFF Adjusts the print density. (1-9) Sets whether toner saving mode is off. LONG EDGE - INCHES (-01.90INCHES-01.90INCHES) - OFF - ON - ON Sets the printing layout. MM (-50.0MM-50.0MM) Sets whether to the default. - COLLATE Sets the length of characters and graphics. - MARGIN 7. COLLATE 8. Sets the error time out period. (5SEC-300SEC...
... printouts automatically. - OFF Adjusts the print density. (1-9) Sets whether toner saving mode is off. LONG EDGE - INCHES (-01.90INCHES-01.90INCHES) - OFF - ON - ON Sets the printing layout. MM (-50.0MM-50.0MM) Sets whether to the default. - COLLATE Sets the length of characters and graphics. - MARGIN 7. COLLATE 8. Sets the error time out period. (5SEC-300SEC...
imageCLASS MF6500 Series Basic Guide
Page 194
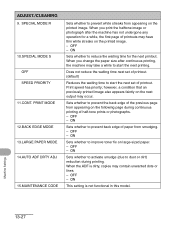
...of the previous page from smudging. - SPECIAL MODE R 10.SPECIAL MODE S OFF SPEED PRIORITY 11.CONT. Print speed has priority; ON Sets whether to prevent white streaks from appearing on the following page during printing. OFF - however, a condition that an previously printed image also appears...MODE 13.LARGE PAPER MODE 14.AUTO ADF DRTY ADJ 15.MAINTENANCE CODE Sets whether to improve toner fix on the next output may contain unwanted dots or lines. - ADJUST./CLEANING 9. OFF - OFF - ON Sets whether to dust or dirt) reduction during continuous printing of paper from...
...of the previous page from smudging. - SPECIAL MODE R 10.SPECIAL MODE S OFF SPEED PRIORITY 11.CONT. Print speed has priority; ON Sets whether to prevent white streaks from appearing on the following page during printing. OFF - however, a condition that an previously printed image also appears...MODE 13.LARGE PAPER MODE 14.AUTO ADF DRTY ADJ 15.MAINTENANCE CODE Sets whether to improve toner fix on the next output may contain unwanted dots or lines. - ADJUST./CLEANING 9. OFF - OFF - ON Sets whether to dust or dirt) reduction during continuous printing of paper from...
imageCLASS MF6500 Series Basic Guide
Page 211
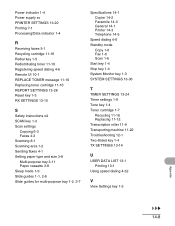
... 14-3 General 14-1 Printer 14-3 Telephone 14-5 Speed dialing 4-6 Standby mode Copy 1-6 Fax 1-6 Scan 1-6 Start key 1-4 Stop key 1-4 System Monitor key 1-3 SYSTEM SETTINGS 13-30 T TIMER SETTINGS 13-24 Timer settings 1-9 Tone key 1-4 Toner cartridge 1-7 Recycling 11-16 Replacing 11-12 Transcription roller 11-9 Transporting machine 11-22 Troubleshooting 12-1 Two-Sided key 1-4 TX...
... 14-3 General 14-1 Printer 14-3 Telephone 14-5 Speed dialing 4-6 Standby mode Copy 1-6 Fax 1-6 Scan 1-6 Start key 1-4 Stop key 1-4 System Monitor key 1-3 SYSTEM SETTINGS 13-30 T TIMER SETTINGS 13-24 Timer settings 1-9 Tone key 1-4 Toner cartridge 1-7 Recycling 11-16 Replacing 11-12 Transcription roller 11-9 Transporting machine 11-22 Troubleshooting 12-1 Two-Sided key 1-4 TX...
imageCLASS MF6500 Series Starter Guide
Page 2
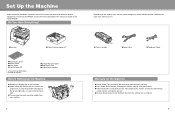
... CD * MF6550/ MF6560/ MF6580 Only **MF6560/ MF6580 Only ●Limited Warranty Notice ●Registration Card ●Unpacking Instructions Before Setting Up the Machine ● Remove all shipping tape on the machine. ● When moving the machine, be sure at least two... the model of your machine. 1 ●Toner Cartridge ●Power Cord ●Telephone Cable* Manuals for the Machine ● Starter Guide (This Document): Machine set-up and software installation ● Basic Guide: Basic features, maintenance, machine settings, and specifications ● Advanced Guide (in ...
... CD * MF6550/ MF6560/ MF6580 Only **MF6560/ MF6580 Only ●Limited Warranty Notice ●Registration Card ●Unpacking Instructions Before Setting Up the Machine ● Remove all shipping tape on the machine. ● When moving the machine, be sure at least two... the model of your machine. 1 ●Toner Cartridge ●Power Cord ●Telephone Cable* Manuals for the Machine ● Starter Guide (This Document): Machine set-up and software installation ● Basic Guide: Basic features, maintenance, machine settings, and specifications ● Advanced Guide (in ...

imageCLASS MF6500 Series Starter Guide
Page 3
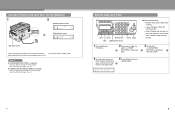
...NOTE Do not pull out the seal at an angle. 9 A Push the toner cartridge to close. Install Toner Cartridge 1 Remove the toner cartridge from the bag. Open the cover and make sure it to make sure the toner cartridge is properly set in the illustration above. 8 B A C The left cover. 10 Hold ...the toner cartridge by its handle. Close the left cover, do not force it is properly set in step 4. 3 Pull out the seal completely. Be ...
...NOTE Do not pull out the seal at an angle. 9 A Push the toner cartridge to close. Install Toner Cartridge 1 Remove the toner cartridge from the bag. Open the cover and make sure it to make sure the toner cartridge is properly set in the illustration above. 8 B A C The left cover. 10 Hold ...the toner cartridge by its handle. Close the left cover, do not force it is properly set in step 4. 3 Pull out the seal completely. Be ...
imageCLASS MF6500 Series Starter Guide
Page 5
... cursor position, or the entire entry if held for more than one second. 3 Confirm that the toner cartridge is installed properly. (See "Install Toner Cartridge," on p. 3.) Set the Date and Time COPY FAX SCAN System Monitor View Settings @./ 1 ABC 2 DEF 3 Reset Collate GHI 4 JKL MNO 56 Paper Select Additional 2 on p. 3.) ● is displayed: Make...
... cursor position, or the entire entry if held for more than one second. 3 Confirm that the toner cartridge is installed properly. (See "Install Toner Cartridge," on p. 3.) Set the Date and Time COPY FAX SCAN System Monitor View Settings @./ 1 ABC 2 DEF 3 Reset Collate GHI 4 JKL MNO 56 Paper Select Additional 2 on p. 3.) ● is displayed: Make...
imageCLASS MF6500 Series Advanced Guide
Page 24
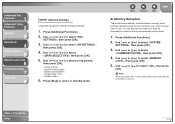
... press [OK]. 6. NOTE When you select , the machine starts to print the received documents in memory when printing is disabled under certain conditions (e.g., toner or paper has run out). Table of Contents Index 1-10 Use [ ] or [ ] to select , then press [OK]. 4. Back Previous Next.... Press [Stop] to return to select , then press [OK]. 5. Use [ ] or [ ] to store all documents in memory without automatically printing them. 1. You can also set the machine to select , then press [OK]. Use [ ] or [ ] to select , then press [OK]. 3. Use [ ] or [ ] to select , then press ...
... press [OK]. 6. NOTE When you select , the machine starts to print the received documents in memory when printing is disabled under certain conditions (e.g., toner or paper has run out). Table of Contents Index 1-10 Use [ ] or [ ] to select , then press [OK]. 4. Back Previous Next.... Press [Stop] to return to select , then press [OK]. 5. Use [ ] or [ ] to store all documents in memory without automatically printing them. 1. You can also set the machine to select , then press [OK]. Use [ ] or [ ] to select , then press [OK]. 3. Use [ ] or [ ] to select , then press ...


