
imageCLASS MF5770 Set-Up Instructions for the Machine
Page 3
Pulling it will go. 6 Close the front cover of the machine. B A 5 Hold the cartridge so that the instructions (A) and the arrow (B) are facing up, and insert it in the machine horizontally as far as it at an angle may damage the paper sensing lever inside the machine. B A 1 Hold the document feeder (A) with one hand, and open the document feeder tray (B) with the other. 2 Pull out the paper cassette completely. NOTE ● Pull the cassette straight/forward. Assemble the cassette and load paper.
Pulling it will go. 6 Close the front cover of the machine. B A 5 Hold the cartridge so that the instructions (A) and the arrow (B) are facing up, and insert it in the machine horizontally as far as it at an angle may damage the paper sensing lever inside the machine. B A 1 Hold the document feeder (A) with one hand, and open the document feeder tray (B) with the other. 2 Pull out the paper cassette completely. NOTE ● Pull the cassette straight/forward. Assemble the cassette and load paper.
imageCLASS MF5750 Set-Up Instructions
Page 2
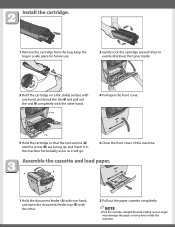
Install the cartridge. 1 Remove the cartridge from the bag. B 4 Pull open the document feeder tray (B) with the other hand. NOTE ● Pull the cassette straight/forward. Pulling it will go. 6 Close the front cover of the machine. Keep the bag ...in the machine horizontally as far as it at an angle may damage the paper sensing lever inside . 3 Hold the cartridge on a flat stable surface with the other . 2 Pull out the paper cassette completely. Assemble the cassette and load paper. B A 1 Hold the document feeder (A) with one hand, and break the tab ➊ and...
Install the cartridge. 1 Remove the cartridge from the bag. B 4 Pull open the document feeder tray (B) with the other hand. NOTE ● Pull the cassette straight/forward. Pulling it will go. 6 Close the front cover of the machine. Keep the bag ...in the machine horizontally as far as it at an angle may damage the paper sensing lever inside . 3 Hold the cartridge on a flat stable surface with the other . 2 Pull out the paper cassette completely. Assemble the cassette and load paper. B A 1 Hold the document feeder (A) with one hand, and break the tab ➊ and...
imageCLASS MF5750/MF5770 Facsimile Guide
Page 68
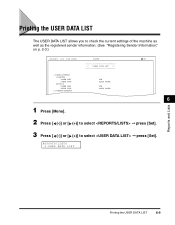
PAPER SETTINGS CASSETTE PAPER SIZE PAPER TYPE MP TRAY PAPER SIZE PAPER TYPE 2. REPORTS/LISTS 3.USER DATA LIST Reports and Lists Printing the USER DATA LIST 6-9 COMMON SETTINGS CANON USER'S DATA LIST LTR PLAIN PAPER LTR PLAIN PAPER 1 Press [Menu]. 001 6 2 Press [ (-)] or [ (+)] to select ➞ press [Set]. 3 Press [ (-)] or [ (+)] to check the current settings of the machine as well...
PAPER SETTINGS CASSETTE PAPER SIZE PAPER TYPE MP TRAY PAPER SIZE PAPER TYPE 2. REPORTS/LISTS 3.USER DATA LIST Reports and Lists Printing the USER DATA LIST 6-9 COMMON SETTINGS CANON USER'S DATA LIST LTR PLAIN PAPER LTR PLAIN PAPER 1 Press [Menu]. 001 6 2 Press [ (-)] or [ (+)] to select ➞ press [Set]. 3 Press [ (-)] or [ (+)] to check the current settings of the machine as well...

imageCLASS MF5730 Set-Up Instructions
Page 2
... for future use. 2 Gently rock the cartridge several times to evenly distribute the toner inside the machine. B 4 Pull open the document feeder tray (B) with the other . 2 Pull out the paper cassette completely. B A 1 Hold the document feeder (A) with one hand, and break the tab ➊ and pull out the seal ➋...; completely with the other hand. Keep the bag in the machine horizontally as far as it at an angle may damage the paper sensing lever inside . 3 Hold the cartridge on a flat stable surface with one hand, and open the front cover. Assemble the cassette and ...
... for future use. 2 Gently rock the cartridge several times to evenly distribute the toner inside the machine. B 4 Pull open the document feeder tray (B) with the other . 2 Pull out the paper cassette completely. B A 1 Hold the document feeder (A) with one hand, and break the tab ➊ and pull out the seal ➋...; completely with the other hand. Keep the bag in the machine horizontally as far as it at an angle may damage the paper sensing lever inside . 3 Hold the cartridge on a flat stable surface with one hand, and open the front cover. Assemble the cassette and ...
imageCLASS MF5700 Series Basic Guide
Page 24
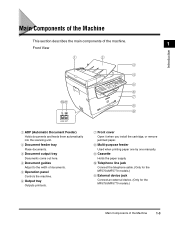
.... g Front cover Open it when you install the cartridge, or remove jammed paper. b Document feeder tray Place documents. j Telephone line jack Connect the telephone cable. (Only for the MF5750/MF5770 models.) k External device jack Connect an external device. (Only for the MF5750/MF5770 models.) Main Components of the machine. 1 Front View a b c d e f g jk h i LINE EXT...
.... g Front cover Open it when you install the cartridge, or remove jammed paper. b Document feeder tray Place documents. j Telephone line jack Connect the telephone cable. (Only for the MF5750/MF5770 models.) k External device jack Connect an external device. (Only for the MF5750/MF5770 models.) Main Components of the machine. 1 Front View a b c d e f g jk h i LINE EXT...
imageCLASS MF5700 Series Basic Guide
Page 41
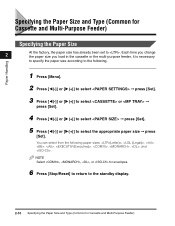
... to the standby display. 2-10 Specifying the Paper Size and Type (Common for Cassette and Multi-Purpose Feeder) Specifying the Paper Size 2 At the factory, the paper size has already been set to . Each time you change the paper size you load in the cassette or the ...multi-purpose feeder, it is necessary to specify the paper size according to select the appropriate paper size ➞ press [Set]. Paper Handling 1 Press [Menu]. 2 Press [((-)] or [)(+)] to select ➞ press [Set]. 3 Press [((-)] or [)(+)] to select or ➞ press [Set]. 4 Press ...
... to the standby display. 2-10 Specifying the Paper Size and Type (Common for Cassette and Multi-Purpose Feeder) Specifying the Paper Size 2 At the factory, the paper size has already been set to . Each time you change the paper size you load in the cassette or the ...multi-purpose feeder, it is necessary to specify the paper size according to select the appropriate paper size ➞ press [Set]. Paper Handling 1 Press [Menu]. 2 Press [((-)] or [)(+)] to select ➞ press [Set]. 3 Press [((-)] or [)(+)] to select or ➞ press [Set]. 4 Press ...
imageCLASS MF5700 Series Basic Guide
Page 42
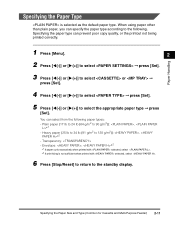
... is not sufficient when printed with selected, select . *2 If print fixing is selected as the default paper type. When using paper other than plain paper, you can prevent poor copy quality, or the printout not being printed correctly. 1 Press [Menu]. 2 2 Press [((-)] or...➞ press [Set]. 4 Press [((-)] or [)(+)] to select ➞ press [Set]. 5 Press [((-)] or [)(+)] to select the appropriate paper type ➞ press [Set]. Envelope: , *2 *1 If paper curls excessively when printed with selected, select . 6 Press [Stop/Reset] to return to the standby display. Specifying the...
... is not sufficient when printed with selected, select . *2 If print fixing is selected as the default paper type. When using paper other than plain paper, you can prevent poor copy quality, or the printout not being printed correctly. 1 Press [Menu]. 2 2 Press [((-)] or...➞ press [Set]. 4 Press [((-)] or [)(+)] to select ➞ press [Set]. 5 Press [((-)] or [)(+)] to select the appropriate paper type ➞ press [Set]. Envelope: , *2 *1 If paper curls excessively when printed with selected, select . 6 Press [Stop/Reset] to return to the standby display. Specifying the...
imageCLASS MF5700 Series Basic Guide
Page 44
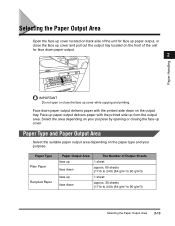
... (64 g/m2 to 90 g/m2)) 1 sheet approx. 30 sheets (17 lb to 24 lb (64 g/m2 to 90 g/m2)) Selecting the Paper Output Area 2-13 Select the area depending on the output tray. Selecting the Paper Output Area Open the face up cover located on back side of the unit for face down...
... (64 g/m2 to 90 g/m2)) 1 sheet approx. 30 sheets (17 lb to 24 lb (64 g/m2 to 90 g/m2)) Selecting the Paper Output Area 2-13 Select the area depending on the output tray. Selecting the Paper Output Area Open the face up cover located on back side of the unit for face down...
imageCLASS MF5700 Series Basic Guide
Page 45
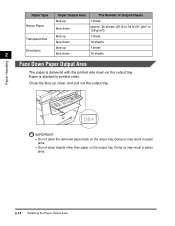
... 2 face down 1 sheet 10 sheets Paper Handling Face Down Paper Output Area The paper is stacked in paper jams. 2-14 Selecting the Paper Output Area Doing so may result in paper jams. • Do not place objects other than paper on the output tray. Doing so may result in printed order. Paper Type Paper Output Area The Number of Output...
... 2 face down 1 sheet 10 sheets Paper Handling Face Down Paper Output Area The paper is stacked in paper jams. 2-14 Selecting the Paper Output Area Doing so may result in paper jams. • Do not place objects other than paper on the output tray. Doing so may result in printed order. Paper Type Paper Output Area The Number of Output...
imageCLASS MF5700 Series Basic Guide
Page 46
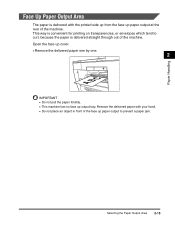
... on transparencies, or envelopes which tend to prevent a paper jam. Open the face up cover. • Remove the delivered paper one by one. 2 IMPORTANT • Do not pull the paper forcibly. • This machine has no face up output tray. Paper Handling Face Up Paper Output Area The paper is delivered straight through out of the face...
... on transparencies, or envelopes which tend to prevent a paper jam. Open the face up cover. • Remove the delivered paper one by one. 2 IMPORTANT • Do not pull the paper forcibly. • This machine has no face up output tray. Paper Handling Face Up Paper Output Area The paper is delivered straight through out of the face...
imageCLASS MF5700 Series Basic Guide
Page 61
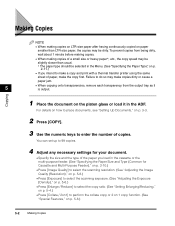
... to make a copy and print with a thermal transfer printer using the same sheet of paper, make copies dirty or cause a paper jam. 5 • When copying onto transparencies, remove each transparency from the output tray as it in the ADF. To prevent copies from being dirty, wait about 1 minute before... making copies. • When making copies on LTR-size paper after having continuously copied on paper smaller than usual. * The paper type should be selected in the ...
... to make a copy and print with a thermal transfer printer using the same sheet of paper, make copies dirty or cause a paper jam. 5 • When copying onto transparencies, remove each transparency from the output tray as it in the ADF. To prevent copies from being dirty, wait about 1 minute before... making copies. • When making copies on LTR-size paper after having continuously copied on paper smaller than usual. * The paper type should be selected in the ...
imageCLASS MF5700 Series Basic Guide
Page 109
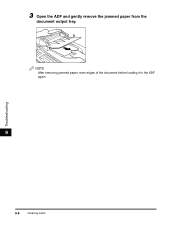
NOTE After removing jammed paper, even edges of the document before loading it in the ADF again. 9 Troubleshooting 9-8 Clearing Jams 3 Open the ADF and gently remove the jammed paper from the document output tray.
NOTE After removing jammed paper, even edges of the document before loading it in the ADF again. 9 Troubleshooting 9-8 Clearing Jams 3 Open the ADF and gently remove the jammed paper from the document output tray.
imageCLASS MF5700 Series Basic Guide
Page 112
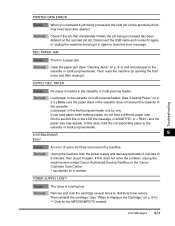
...machine and contact Canon Authorized Service Facilities or the Canon Customer Care Center. * xxx stands for the MF5750/MF5770 models. TONER SUPPLY LOW** Cause The toner is a paper jam. PAPER JAM Cause There is running low. Then reset the machine by one. PAPER Cause No paper is loaded in... power supply and wait approximately 3 minutes to clear the error message. Troubleshooting PRINTER DATA ERROR Cause When you load paper while making copies, do not load a different paper size. Remedy Check if the job that immediately follows the job being processed, the next job on p. 8-4.) ...
...machine and contact Canon Authorized Service Facilities or the Canon Customer Care Center. * xxx stands for the MF5750/MF5770 models. TONER SUPPLY LOW** Cause The toner is a paper jam. PAPER JAM Cause There is running low. Then reset the machine by one. PAPER Cause No paper is loaded in... power supply and wait approximately 3 minutes to clear the error message. Troubleshooting PRINTER DATA ERROR Cause When you load paper while making copies, do not load a different paper size. Remedy Check if the job that immediately follows the job being processed, the next job on p. 8-4.) ...
imageCLASS MF5700 Series Basic Guide
Page 115
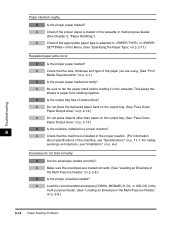
...that the machine is selected in in the Multi-Purpose Feeder," on p. Q Are the envelopes loaded correctly? Q Is the output tray free of paper from sticking together. A Load the recommended envelopes (COM10, MONARCH, DL, or ISO-C5) in the multi-purpose feeder. (See ...machine, see "Installation," on p. 2-8.) 9-14 Paper Feeding Problems Troubleshooting A Do not place the delivered paper back on the output tray. (See "Face Down Paper Output Area," on p. 2-14.) A Do not place objects other than paper on the output tray. (See "Face Down Paper Output Area," on p. 2-14.) Q Is ...
...that the machine is selected in in the Multi-Purpose Feeder," on p. Q Are the envelopes loaded correctly? Q Is the output tray free of paper from sticking together. A Load the recommended envelopes (COM10, MONARCH, DL, or ISO-C5) in the multi-purpose feeder. (See ...machine, see "Installation," on p. 2-8.) 9-14 Paper Feeding Problems Troubleshooting A Do not place the delivered paper back on the output tray. (See "Face Down Paper Output Area," on p. 2-14.) A Do not place objects other than paper on the output tray. (See "Face Down Paper Output Area," on p. 2-14.) Q Is ...
imageCLASS MF5700 Series Basic Guide
Page 125
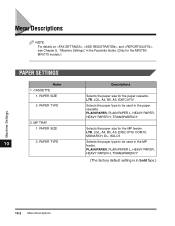
... for the MP feeder. PLAIN PAPER, PLAIN PAPER L, HEAVY PAPER, HEAVY PAPER H, TRANSPARENCY (The factory default setting is in the Facsimile Guide. (Only for the MF5750/ MF5770 models.) PAPER SETTINGS Name 1. Menu Descriptions NOTE For details on , , and , see Chapter 8, "Machine Settings," in bold face.) 10-2 Menu Descriptions CASSETTE 1. PAPER SIZE 10 2. MP TRAY 1. LTR, LGL, A4, B5...
... for the MP feeder. PLAIN PAPER, PLAIN PAPER L, HEAVY PAPER, HEAVY PAPER H, TRANSPARENCY (The factory default setting is in the Facsimile Guide. (Only for the MF5750/ MF5770 models.) PAPER SETTINGS Name 1. Menu Descriptions NOTE For details on , , and , see Chapter 8, "Machine Settings," in bold face.) 10-2 Menu Descriptions CASSETTE 1. PAPER SIZE 10 2. MP TRAY 1. LTR, LGL, A4, B5...
imageCLASS MF5700 Series Basic Guide
Page 133
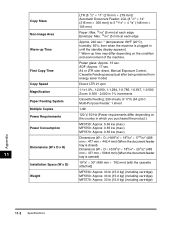
... lb (15.0 kg) (including cartridge) MF5750: Approx. 33 lb (15.0 kg) (including cartridge) MF5770: Approx. 33 lb (15.0 kg) (including cartridge) 11-2 Specifications from energy saver mode) Copy Speed... 1:2.000, 1:1.294, 1:0.786, 1:0.647, 1:0.500 Zoom: 0.500 - 2.000 in 1% increments Paper Feeding System Cassette Feeding: 250 sheets of the machine. First Copy Time Platen glass: Approx. 15 sec... 1713/32" (486 mm × 477 mm × 442.4 mm) (When the document feeder Dimensions (W x D x H) tray is closed) Dimensions (W × D × H)191/8" × 185/64" × 201/32" (486 11 mm &#...
... lb (15.0 kg) (including cartridge) MF5750: Approx. 33 lb (15.0 kg) (including cartridge) MF5770: Approx. 33 lb (15.0 kg) (including cartridge) 11-2 Specifications from energy saver mode) Copy Speed... 1:2.000, 1:1.294, 1:0.786, 1:0.647, 1:0.500 Zoom: 0.500 - 2.000 in 1% increments Paper Feeding System Cassette Feeding: 250 sheets of the machine. First Copy Time Platen glass: Approx. 15 sec... 1713/32" (486 mm × 477 mm × 442.4 mm) (When the document feeder Dimensions (W x D x H) tray is closed) Dimensions (W × D × H)191/8" × 185/64" × 201/32" (486 11 mm &#...
imageCLASS MF5700 Series Basic Guide
Page 136
Document feeder tray, 1-3 Document guides, 1-3 Document output tray, 1-3 E Energy Saver key, 1-6 restoring, 1-10 ENERGY SAVER setting, 10-7 Enlarge / Reduce key, 1-6 setting, 5-4 Enlargement/Reduction, 5-4 Envelope loading, 2-8 printing ... cover, 1-5 FAX key, 1-6 Front cover, 1-3 G General Problems, 9-20 I Image Quality adjusting, 5-6 key, 1-7 In Use / Memory indicator, 1-6 INSTALL CARTRIDGE, 9-10 J Jammed paper removing from the ADF, 9-7 K KEYPAD VOLUME settings, 10-3 L LCD, 1-6 LCD Messages, 9-9 LINE MONITOR VOL. setting, 10-4 Loading an envelope in the multi-purpose feeder, 2-8 documents...
Document feeder tray, 1-3 Document guides, 1-3 Document output tray, 1-3 E Energy Saver key, 1-6 restoring, 1-10 ENERGY SAVER setting, 10-7 Enlarge / Reduce key, 1-6 setting, 5-4 Enlargement/Reduction, 5-4 Envelope loading, 2-8 printing ... cover, 1-5 FAX key, 1-6 Front cover, 1-3 G General Problems, 9-20 I Image Quality adjusting, 5-6 key, 1-7 In Use / Memory indicator, 1-6 INSTALL CARTRIDGE, 9-10 J Jammed paper removing from the ADF, 9-7 K KEYPAD VOLUME settings, 10-3 L LCD, 1-6 LCD Messages, 9-9 LINE MONITOR VOL. setting, 10-4 Loading an envelope in the multi-purpose feeder, 2-8 documents...
imageCLASS MF5700 Series Basic Guide
Page 137
... TONE setting, 10-3 S SCAN DONE TONE setting, 10-3 SCAN key, 1-6 Scanned area, 3-2 Scanning areas, 3-2 beforehand, 6-1 documents, 6-2 problems, 9-19 Set key, 1-7 O Operation panel, 1-3, 1-6 Orientation document, 2-12 paper, 2-12 Output tray, 1-3 P Paper acceptable paper, 2-2 cassette, 1-3 feeding problems, 9-12 jam, 2-1, 9-1, 9-7 loading, 2-3 orientation, 2-12 output area, 2-13 printing area, 2-2 requirements, 2-1 type, 2-11, 2-13...
... TONE setting, 10-3 S SCAN DONE TONE setting, 10-3 SCAN key, 1-6 Scanned area, 3-2 Scanning areas, 3-2 beforehand, 6-1 documents, 6-2 problems, 9-19 Set key, 1-7 O Operation panel, 1-3, 1-6 Orientation document, 2-12 paper, 2-12 Output tray, 1-3 P Paper acceptable paper, 2-2 cassette, 1-3 feeding problems, 9-12 jam, 2-1, 9-1, 9-7 loading, 2-3 orientation, 2-12 output area, 2-13 printing area, 2-2 requirements, 2-1 type, 2-11, 2-13...
imageCLASS MF5700 Series Basic Guide
Page 138
... W Weight document, 3-1 machine, 11-2 paper, 2-2 Z Zoom, 5-5 ZOOM RATIO setting, 10-5 T Telephone line jack, 1-3 TONER SAVER setting, 10-4 Transporting, 8-17 Tray document feeder, 1-3 document output, 1-3 output, 1-3 Troubleshooting, 9-1 TX DONE TONE setting, ...10-3 Appendix U 11 USB port, 1-5 V VOLUME CONTROL settings, 10-3 Index 11-7 IMAGEQUALITY setting, 10-5 Stop/Reset key, 1-7 SUPPLY REC. Setting Enlargement/Reduction, 5-4 SHARPNESS setting, 10-5 Size document, 3-1 marks, 3-3 paper...
... W Weight document, 3-1 machine, 11-2 paper, 2-2 Z Zoom, 5-5 ZOOM RATIO setting, 10-5 T Telephone line jack, 1-3 TONER SAVER setting, 10-4 Transporting, 8-17 Tray document feeder, 1-3 document output, 1-3 output, 1-3 Troubleshooting, 9-1 TX DONE TONE setting, ...10-3 Appendix U 11 USB port, 1-5 V VOLUME CONTROL settings, 10-3 Index 11-7 IMAGEQUALITY setting, 10-5 Stop/Reset key, 1-7 SUPPLY REC. Setting Enlargement/Reduction, 5-4 SHARPNESS setting, 10-5 Size document, 3-1 marks, 3-3 paper...
User Guide
Page 11
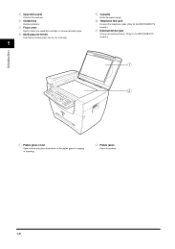
i0 Telephone line Jack Ceiinect the telephorle cable. (Onlyfor the MF5750/MF5770 models.) il External device Jack Ceiinect art external device. (Only for copying :i: Platen glass Plaoedocuments. 1-2 Front cover Open it when you install the cartridge, or removeiammed paper. Multi-purpose feeder Used when printing paper one by one manually. 19 Cassette Holdstpe paper supply. Output tray Outputs printouts. II Operation panel CoIItrols themachine. oil the platen glass for the MF5750/MF5770 models.) 0 c Platen glass cover Open it when you place documents or scanrtirlg.
i0 Telephone line Jack Ceiinect the telephorle cable. (Onlyfor the MF5750/MF5770 models.) il External device Jack Ceiinect art external device. (Only for copying :i: Platen glass Plaoedocuments. 1-2 Front cover Open it when you install the cartridge, or removeiammed paper. Multi-purpose feeder Used when printing paper one by one manually. 19 Cassette Holdstpe paper supply. Output tray Outputs printouts. II Operation panel CoIItrols themachine. oil the platen glass for the MF5750/MF5770 models.) 0 c Platen glass cover Open it when you place documents or scanrtirlg.


