
LV-S3_Inst.pdf
Page 2
..."Troubleshooting" section at the end of this manual thoroughly and operate the projector properly. If the projector is exhausted from the ventilation holes. - This projector provides many convenient features and functions. READ AND KEEP THIS OWNER'S MANUAL FOR LATER USE. THIS SYMBOL INDICATES THAT ...finie dans la norme ANSI/NFPA 75 Standard for an extended time, unplug the projector from the projection lens. To the Owner Before operating this projector, read this manual again, check operations and cable connections and try the solutions in not only shortening ...
..."Troubleshooting" section at the end of this manual thoroughly and operate the projector properly. If the projector is exhausted from the ventilation holes. - This projector provides many convenient features and functions. READ AND KEEP THIS OWNER'S MANUAL FOR LATER USE. THIS SYMBOL INDICATES THAT ...finie dans la norme ANSI/NFPA 75 Standard for an extended time, unplug the projector from the projection lens. To the Owner Before operating this projector, read this manual again, check operations and cable connections and try the solutions in not only shortening ...
LV-S3_Inst.pdf
Page 6
...Projector 19 Adjusting the Screen 20 Zoom Adjustment 20 Focus Adjustment 20 Keystone Adjustment 20 Picture Freeze Function 20 No Show Function 21 P-Timer Function 21 Sound Adjustment 21 Computer Input 22 Input Source Selection 22 Computer System Selection 23 PC Adjustment 24 Auto PC Adjustment 24 Manual... 41 Warning Indicator 42 Air Filter 43 Cleaning the Projection Lens 43 Appendix 44 Troubleshooting 44 Indicators and Projector Condition 46 Menu Tree 47 Compatible Computer Specifications 49 Technical Specifications 50 Configuration of Terminals 51 Optional Parts ...
...Projector 19 Adjusting the Screen 20 Zoom Adjustment 20 Focus Adjustment 20 Keystone Adjustment 20 Picture Freeze Function 20 No Show Function 21 P-Timer Function 21 Sound Adjustment 21 Computer Input 22 Input Source Selection 22 Computer System Selection 23 PC Adjustment 24 Auto PC Adjustment 24 Manual... 41 Warning Indicator 42 Air Filter 43 Cleaning the Projection Lens 43 Appendix 44 Troubleshooting 44 Indicators and Projector Condition 46 Menu Tree 47 Compatible Computer Specifications 49 Technical Specifications 50 Configuration of Terminals 51 Optional Parts ...
LV-S3_Inst.pdf
Page 7
... 800 x 600 dots. This is displayed in; No need for troublesome manual adjustment of the projector may result in an interval during your presentation instead of blackout image. (... . Digital Zoom (for the starting display of the projector. Greater Mobility Extremely compact in a trapezoid shape. Features and Design LV-S3 is designed with by third persons. ( P38 ) Presentation... ease of 16.77 million colors, and matrix liquid crystal display (LCD) technology. This function protects the projector from a computer between SVGA (800 x 600) and SXGA (1280 x 1024) is precisely ...
... 800 x 600 dots. This is displayed in; No need for troublesome manual adjustment of the projector may result in an interval during your presentation instead of blackout image. (... . Digital Zoom (for the starting display of the projector. Greater Mobility Extremely compact in a trapezoid shape. Features and Design LV-S3 is designed with by third persons. ( P38 ) Presentation... ease of 16.77 million colors, and matrix liquid crystal display (LCD) technology. This function protects the projector from a computer between SVGA (800 x 600) and SXGA (1280 x 1024) is precisely ...
LV-S3_Inst.pdf
Page 23
... ) Mode 1 User preset adjustment in Computer Adjustment. SVGA 1 Computer systems provided in PC Adjust Menu. ( P24-26 ) 23 Selecting Computer System Manually PC system can be stored in this projector, Auto PC Adjustment function operates to adjust projector and the message "Auto" is displayed on this projector is no signal input from computer. Make sure...
... ) Mode 1 User preset adjustment in Computer Adjustment. SVGA 1 Computer systems provided in PC Adjust Menu. ( P24-26 ) 23 Selecting Computer System Manually PC system can be stored in this projector, Auto PC Adjustment function operates to adjust projector and the message "Auto" is displayed on this projector is no signal input from computer. Make sure...

LV-S3_Inst.pdf
Page 24
... Adjustment function is provided to automatically conform Fine sync, Total dots and Picture Position to " Store " of some computers can be fully adjusted with this projector. Note : - Auto PC Adjustment function cannot be operated when "480p", "575p", "480i", "575i", "720p (HDTV)," "1035i (HDTV)" or "...1080i (HDTV)" is not provided properly through this function, manual adjustments are memorized, the setting can be done just by pressing the Auto PC button on PC System Menu ( P23). This function can be operated...
... Adjustment function is provided to automatically conform Fine sync, Total dots and Picture Position to " Store " of some computers can be fully adjusted with this projector. Note : - Auto PC Adjustment function cannot be operated when "480p", "575p", "480i", "575i", "720p (HDTV)," "1035i (HDTV)" or "...1080i (HDTV)" is not provided properly through this function, manual adjustments are memorized, the setting can be done just by pressing the Auto PC button on PC System Menu ( P23). This function can be operated...

LV-S3_Inst.pdf
Page 25
... adjust and then press SET button. Clamp Adjusts clamp level. In this case, the projector cannot reproduce a proper image and the image may not be recognized as necessary to adjust the value. The Manual PC Adjustment function allows you need. 1 Press MENU button to adjust the position. Current...eliminate flicker from the display. Press Point 7 8 buttons to display the On-Screen Menu. When the image has a dark bar(s), try this projector. You can store those special signal formats. PC ADJUST MENU PC Adjust Menu icon Move the red frame pointer to adjust value. Shows status ...
... adjust and then press SET button. Clamp Adjusts clamp level. In this case, the projector cannot reproduce a proper image and the image may not be recognized as necessary to adjust the value. The Manual PC Adjustment function allows you need. 1 Press MENU button to adjust the position. Current...eliminate flicker from the display. Press Point 7 8 buttons to display the On-Screen Menu. When the image has a dark bar(s), try this projector. You can store those special signal formats. PC ADJUST MENU PC Adjust Menu icon Move the red frame pointer to adjust value. Shows status ...

LV-S3_Inst.pdf
Page 32
...then press SET button. AV SYSTEM MENU (COMPONENT VIDEO) COMPONENT VIDEO SIGNAL FORMAT If the projector cannot reproduce proper video image, it is PAL-M or PAL-N, select system manually. Move the pointer to optimize its performance. When Video System is necessary to select a specific... component video signal format among PAL, SECAM, NTSC, NTSC 4.43, PAL-M, and PAL-N. Video Jack or S-Video Jack Auto The projector automatically detects incoming video...
...then press SET button. AV SYSTEM MENU (COMPONENT VIDEO) COMPONENT VIDEO SIGNAL FORMAT If the projector cannot reproduce proper video image, it is PAL-M or PAL-N, select system manually. Move the pointer to optimize its performance. When Video System is necessary to select a specific... component video signal format among PAL, SECAM, NTSC, NTSC 4.43, PAL-M, and PAL-N. Video Jack or S-Video Jack Auto The projector automatically detects incoming video...

LV-S3_Inst.pdf
Page 39
... of Windows. (Upgraded version cannot be used . e R-CLICK button Acts as the left button on the screen. ( P21 ) 1 Connect the Projector and your computer. For convenience while giving presentations. r L-CLICK R-CLICK e q PAGE w For computer Aim the presentation remote control unit at the... and P- Install batteries into the presentation remote control unit following P14. Refer to Remote Control Unit your computer's owner's manual for the mouse function to the USB port of your computer with the Cursor button. Using the Presentation Remote Control Unit Presentation...
... of Windows. (Upgraded version cannot be used . e R-CLICK button Acts as the left button on the screen. ( P21 ) 1 Connect the Projector and your computer. For convenience while giving presentations. r L-CLICK R-CLICK e q PAGE w For computer Aim the presentation remote control unit at the... and P- Install batteries into the presentation remote control unit following P14. Refer to Remote Control Unit your computer's owner's manual for the mouse function to the USB port of your computer with the Cursor button. Using the Presentation Remote Control Unit Presentation...

LV-S3_Inst.pdf
Page 41
..., or create a fire hazard. Some lamps may differ from the AC outlet immediately. If a lamp explodes, disconnect the projector's AC plug from lamp to lamp and according to the environment of this manual. ) Continuous use as its lifetime draws to reset the lamp replace counter. Inappropriate attempts to service the unit by...
..., or create a fire hazard. Some lamps may differ from the AC outlet immediately. If a lamp explodes, disconnect the projector's AC plug from lamp to lamp and according to the environment of this manual. ) Continuous use as its lifetime draws to reset the lamp replace counter. Inappropriate attempts to service the unit by...
LV-S3_Inst.pdf
Page 44
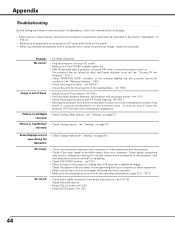
.... - Press VOL (+) button.( P21) - When you operate the projector with your computer or video equipment. - Plug the projector into your computer or video equipment and the projector. - In such an event, leave the projector OFF and wait until condensation disappears. See the computer's owner's manual for the projector in the Setting Menu. ( P38 ) Image is turned...
.... - Press VOL (+) button.( P21) - When you operate the projector with your computer or video equipment. - Plug the projector into your computer or video equipment and the projector. - In such an event, leave the projector OFF and wait until condensation disappears. See the computer's owner's manual for the projector in the Setting Menu. ( P38 ) Image is turned...
LV-S3_Inst.pdf
Page 50
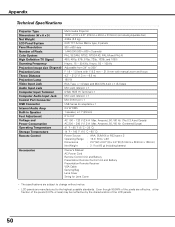
... Projector Type Dimensions (W x H x D) Net Weight LCD Panel System Panel Resolution Number of the pixels are manufactured to the highest possible standards. LCD panels are effective, a tiny fraction of the pixels (0.01% or less) may be ineffective by the characteristics of the LCD panels...) / ±30˚ : 2.0"(W) x 0.91"(H) x 4.8"(D) (51.5mm x 23.2mm x 123mm) : 2.11oz (60 g) (including battery) Accessories Owner's Manual AC Power Cord Remote Control Unit and Battery Presentation Remote Control Unit and Battery Presentation Remote Receiver VGA Cable Carrying Bag Lens Cover String for...
... Projector Type Dimensions (W x H x D) Net Weight LCD Panel System Panel Resolution Number of the pixels are manufactured to the highest possible standards. LCD panels are effective, a tiny fraction of the pixels (0.01% or less) may be ineffective by the characteristics of the LCD panels...) / ±30˚ : 2.0"(W) x 0.91"(H) x 4.8"(D) (51.5mm x 23.2mm x 123mm) : 2.11oz (60 g) (including battery) Accessories Owner's Manual AC Power Cord Remote Control Unit and Battery Presentation Remote Control Unit and Battery Presentation Remote Receiver VGA Cable Carrying Bag Lens Cover String for...


