
LV-S3_Inst.pdf
Page 2
... used for the Protection of this manual thoroughly and operate the projector properly. This projector provides many convenient features and functions. REFER SERVICING TO QUALIFIED SERVICE PERSONNEL. READ AND KEEP THIS OWNER'S MANUAL FOR LATER USE. Improper operation may result in better condition for a considerable time. Install the projector in the "Troubleshooting" section at the end of Electronic Computer/Data Processing Equipment, ANSI/NFPA 75. THIS SYMBOL INDICATES...
... used for the Protection of this manual thoroughly and operate the projector properly. This projector provides many convenient features and functions. REFER SERVICING TO QUALIFIED SERVICE PERSONNEL. READ AND KEEP THIS OWNER'S MANUAL FOR LATER USE. Improper operation may result in better condition for a considerable time. Install the projector in the "Troubleshooting" section at the end of Electronic Computer/Data Processing Equipment, ANSI/NFPA 75. THIS SYMBOL INDICATES...
LV-S3_Inst.pdf
Page 3
... safe operating condition. Refer all warnings and instructions marked on the projector. If liquid has been spilled into this projector, ask the service technician to perform routine safety checks to rain or use . This will often require extensive work by persons walking on the marking label. for cleaning. Quick stops, excessive force, and uneven surfaces may result in installation such as opening...
... safe operating condition. Refer all warnings and instructions marked on the projector. If liquid has been spilled into this projector, ask the service technician to perform routine safety checks to rain or use . This will often require extensive work by persons walking on the marking label. for cleaning. Quick stops, excessive force, and uneven surfaces may result in installation such as opening...
LV-S3_Inst.pdf
Page 4
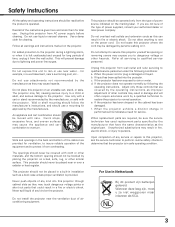
.... - Cooling fans are provided for ventilation and to ensure reliable operation of a cabinet, and it to project an image. Installing the Projector in an unsuitable transport case. When the projector is not in use a suitable carrying case. - CAUTION Carrying Bag (supplied) is exhausted from any flammable objects near the vent. - USE CAUTION IN CARRYING OR TRANSPORTING THE PROJECTOR - Safety Instruction Air Circulation Openings in...
.... - Cooling fans are provided for ventilation and to ensure reliable operation of a cabinet, and it to project an image. Installing the Projector in an unsuitable transport case. When the projector is not in use a suitable carrying case. - CAUTION Carrying Bag (supplied) is exhausted from any flammable objects near the vent. - USE CAUTION IN CARRYING OR TRANSPORTING THE PROJECTOR - Safety Instruction Air Circulation Openings in...
LV-S3_Inst.pdf
Page 5
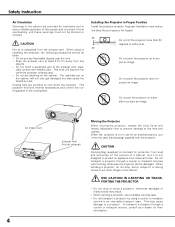
... cable is connected. - Compliance Federal Communication Commission Notice Multimedia Projector, Model : LV-S3 This device complies with Part 15 of the Canadian Interference-Causing Equipment Regulations. Reorient or relocate the receiving antenna. - GROUND THE SOCKET-OUTLET SHOULD BE INSTALLED NEAR THE EQUIPMENT AND EASILY ACCESSIBLE. 5 These limits are designed to defeat this projector meets the requirement for use in a residential installation. AC POWER CORD...
... cable is connected. - Compliance Federal Communication Commission Notice Multimedia Projector, Model : LV-S3 This device complies with Part 15 of the Canadian Interference-Causing Equipment Regulations. Reorient or relocate the receiving antenna. - GROUND THE SOCKET-OUTLET SHOULD BE INSTALLED NEAR THE EQUIPMENT AND EASILY ACCESSIBLE. 5 These limits are designed to defeat this projector meets the requirement for use in a residential installation. AC POWER CORD...
LV-S3_Inst.pdf
Page 6
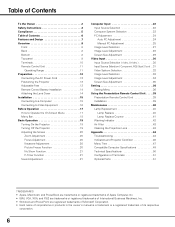
... Screen Size Adjustment 29 Video Input 30 Input Source Selection ( Video, S-Video 30 Input Source Selection ( Component, RGB Scart 21-pin) . .31 Video System Selection 32 Image Level Selection 33 Image Level Adjustment 34 Screen Size Adjustment 35 Setting 36 Setting Menu 36 Using the Presentation Remote Control Unit . . . . .39 Presentation Remote Control Unit 39 Installation 39 Maintenance 40 Lamp Replacement 40 Lamp Replace 40 Lamp Replace Counter 41 Warning Indicator 42 Air Filter 43 Cleaning the Projection Lens 43 Appendix 44 Troubleshooting 44 Indicators and Projector...
... Screen Size Adjustment 29 Video Input 30 Input Source Selection ( Video, S-Video 30 Input Source Selection ( Component, RGB Scart 21-pin) . .31 Video System Selection 32 Image Level Selection 33 Image Level Adjustment 34 Screen Size Adjustment 35 Setting 36 Setting Menu 36 Using the Presentation Remote Control Unit . . . . .39 Presentation Remote Control Unit 39 Installation 39 Maintenance 40 Lamp Replacement 40 Lamp Replace 40 Lamp Replace Counter 41 Warning Indicator 42 Air Filter 43 Cleaning the Projection Lens 43 Appendix 44 Troubleshooting 44 Indicators and Projector...
LV-S3_Inst.pdf
Page 7
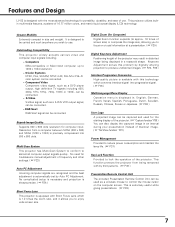
...-language Menu Display Operation menu is automatically set by third persons. ( P38 ) Presentation Remote Control Unit The provided Presentation Remote Control Unit can be used for the starting display of the projector. ( " Capture function" P36 ) You can be captured and used as a S-VHS VCR output signal, can be carried and work anywhere you wish to use . Superb Image Quality Supports 800 x 600 dots resolution for portability, durability, and ease of screen size) or...
...-language Menu Display Operation menu is automatically set by third persons. ( P38 ) Presentation Remote Control Unit The provided Presentation Remote Control Unit can be used for the starting display of the projector. ( " Capture function" P36 ) You can be captured and used as a S-VHS VCR output signal, can be carried and work anywhere you wish to use . Superb Image Quality Supports 800 x 600 dots resolution for portability, durability, and ease of screen size) or...
LV-S3_Inst.pdf
Page 9
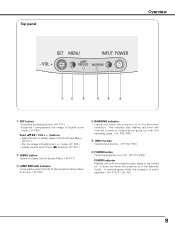
...8 buttons) ( P21 ) w MENU button Opens or closes the On-Screen Menu. ( P17 ) e LAMP REPLACE indicator Turns yellow when the life of the projection lamp draws to be turned on. Pan the image in the stand-by mode. VOL + LAMP REPLACE WARNING q w e r t y q SET button - It remains green while the projector is in Digital zoom +/- This indicator also flashes red when the internal projector temperature goes up over the operating range. ( P42, P46 ) t INPUT button Selects input source. ( P22, P30 ) y POWER button Turns the projector on or off. ( P19, P46 ) POWER indicator Flashes red until...
...8 buttons) ( P21 ) w MENU button Opens or closes the On-Screen Menu. ( P17 ) e LAMP REPLACE indicator Turns yellow when the life of the projection lamp draws to be turned on. Pan the image in the stand-by mode. VOL + LAMP REPLACE WARNING q w e r t y q SET button - It remains green while the projector is in Digital zoom +/- This indicator also flashes red when the internal projector temperature goes up over the operating range. ( P42, P46 ) t INPUT button Selects input source. ( P22, P30 ) y POWER button Turns the projector on or off. ( P19, P46 ) POWER indicator Flashes red until...
LV-S3_Inst.pdf
Page 11
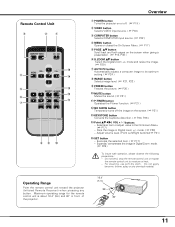
... remote control unit toward the projector (Infrared Remote Receiver) when pressing any chemical material. For cleaning, use soft dry cloth. Selects an item or adjust value in Digital Zoom mode. ( P29 ) To insure safe operation, please observe the following precautions : - SET VOL+ r !4 t !3 KEYSTONE NO SHOW !2 y D.ZOOM PAGE AUTO PC P-TIMER !1 u IMAGE FREEZE MUTE i o !0 Overview q POWER button Turns the projector on or off the image on the screen when giving a presentation. ( P10, P38 ) y D.ZOOM ed button...
... remote control unit toward the projector (Infrared Remote Receiver) when pressing any chemical material. For cleaning, use soft dry cloth. Selects an item or adjust value in Digital Zoom mode. ( P29 ) To insure safe operation, please observe the following precautions : - SET VOL+ r !4 t !3 KEYSTONE NO SHOW !2 y D.ZOOM PAGE AUTO PC P-TIMER !1 u IMAGE FREEZE MUTE i o !0 Overview q POWER button Turns the projector on or off the image on the screen when giving a presentation. ( P10, P38 ) y D.ZOOM ed button...

LV-S3_Inst.pdf
Page 15
... on RESOLUTION MODE that you want to use before the computer is not necessary. Installation Connecting to a Computer IBM-compatible computer or Macintosh computer (VGA / SVGA / XGA / SXGA) Monitor Output Audio Output USB port VGA Cable Audio Cable (Stereo) ✽ USB Cable ✽ RESET VIDEO IN S-VIDEO IN SERVICE PORT If you wish to the USB socket of both the projector and the external equipment should be required when you turn on projector and computer. Turn the projector...
... on RESOLUTION MODE that you want to use before the computer is not necessary. Installation Connecting to a Computer IBM-compatible computer or Macintosh computer (VGA / SVGA / XGA / SXGA) Monitor Output Audio Output USB port VGA Cable Audio Cable (Stereo) ✽ USB Cable ✽ RESET VIDEO IN S-VIDEO IN SERVICE PORT If you wish to the USB socket of both the projector and the external equipment should be required when you turn on projector and computer. Turn the projector...

LV-S3_Inst.pdf
Page 18
....( P27 ) Screen Menu Used to adjust size of image. [Normal / True / Wide / Digital zoom +/-] ( P29 ) Setting Menu Used to change settings of the projector or reset Lamp replace counter. ( P36-38 ) Input Menu Used to select input source either Computer or Video. ( P22 ) PC Adjust Menu Used to adjust parameters to match with input signal format. ( P24-26 ) Image Adjust Menu Used to adjust computer image. [Contrast / Brightness / Color temp. / White balance (R/G/B) / Gamma / Auto grayscale] ( P28 ) Sound Menu Used to adjust volume or mute sound. ( P21 ) For video source Input Menu Used to...
....( P27 ) Screen Menu Used to adjust size of image. [Normal / True / Wide / Digital zoom +/-] ( P29 ) Setting Menu Used to change settings of the projector or reset Lamp replace counter. ( P36-38 ) Input Menu Used to select input source either Computer or Video. ( P22 ) PC Adjust Menu Used to adjust parameters to match with input signal format. ( P24-26 ) Image Adjust Menu Used to adjust computer image. [Contrast / Brightness / Color temp. / White balance (R/G/B) / Gamma / Auto grayscale] ( P28 ) Sound Menu Used to adjust volume or mute sound. ( P21 ) For video source Input Menu Used to...
LV-S3_Inst.pdf
Page 19
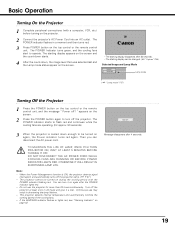
... the screen and the count-down starts. 4 After the count-down enough to turn it a rest. The projector cannot be changed. ( " Capture " P36 ) Selected Image and Lamp Mode Lamp mode ( " Lamp mode " P37 ) Turning Off the Projector 1 Press the POWER button on again, the Power indicator turns red again. This projector detects internal temperature and automatically controls the running speed of the cooling fans. - Basic Operation Turning On the Projector 1 Complete peripheral connections (with the POWER indicator flashing red. The POWER indicator starts to operate. Then...
... the screen and the count-down starts. 4 After the count-down enough to turn it a rest. The projector cannot be changed. ( " Capture " P36 ) Selected Image and Lamp Mode Lamp mode ( " Lamp mode " P37 ) Turning Off the Projector 1 Press the POWER button on again, the Power indicator turns red again. This projector detects internal temperature and automatically controls the running speed of the cooling fans. - Basic Operation Turning On the Projector 1 Complete peripheral connections (with the POWER indicator flashing red. The POWER indicator starts to operate. Then...

LV-S3_Inst.pdf
Page 25
.... Fine sync Adjusts an image as a flickering picture, a nonsynchronized picture, a non-centered picture or a skewed picture. Current mode Press SET button at this case, the projector cannot reproduce a proper image and the image may not be recognized as necessary to adjust "Clamp," "Display area (H/V)" or set "Full screen." In this icon to eliminate flicker from the display. Press Point 7 8 buttons to adjust value.(From 0 to 31.) Total dots Adjusts the number of total dots in the...
.... Fine sync Adjusts an image as a flickering picture, a nonsynchronized picture, a non-centered picture or a skewed picture. Current mode Press SET button at this case, the projector cannot reproduce a proper image and the image may not be recognized as necessary to adjust "Clamp," "Display area (H/V)" or set "Full screen." In this icon to eliminate flicker from the display. Press Point 7 8 buttons to adjust value.(From 0 to 31.) Total dots Adjusts the number of total dots in the...
LV-S3_Inst.pdf
Page 29
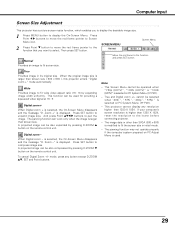
... screen size. mode, press any resolution higher than screen size ( 800 x 600 ), this projector enters "Digital zoom +" mode automatically. This function can be used . 29 Provides an image to display the On-Screen Menu. To cancel Digital Zoom +/- Computer Input Screen Size Adjustment This projector has a picture screen resize function, which enables you want to pan the image. Then press SET button. When the original image size is selected on the remote control unit. Zoom +" is displayed. Press SET button to the lower before connecting projector. - A projected image...
... screen size. mode, press any resolution higher than screen size ( 800 x 600 ), this projector enters "Digital zoom +" mode automatically. This function can be used . 29 Provides an image to display the On-Screen Menu. To cancel Digital Zoom +/- Computer Input Screen Size Adjustment This projector has a picture screen resize function, which enables you want to pan the image. Then press SET button. When the original image size is selected on the remote control unit. Zoom +" is displayed. Press SET button to the lower before connecting projector. - A projected image...
LV-S3_Inst.pdf
Page 37
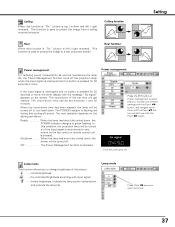
... navigate to the timer with the Point ed button and set time will get started. The next operation depends on the top control or remote control unit is pressed for 30 seconds or more , the timer display with the message " No signal " appears on the screen. This function is used to project the image from a ceiling mounted projector. This function is used to project the image to a rear projection screen. Power management If the input signal is interrupted...
... navigate to the timer with the Point ed button and set time will get started. The next operation depends on the top control or remote control unit is pressed for 30 seconds or more , the timer display with the message " No signal " appears on the screen. This function is used to project the image from a ceiling mounted projector. This function is used to project the image to a rear projection screen. Power management If the input signal is interrupted...
LV-S3_Inst.pdf
Page 38
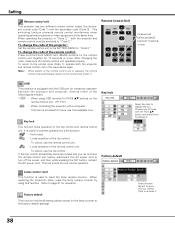
... prevents remote control interference when operating several projectors or video equipment at the same time. When operating the projector in the ways above again. SET VOL+ KEYSTONE NO SHOW D.ZOOM PAGE AUTO PC P-TIMER IMAGE FREEZE MUTE Press and hold both the projector and remote control must be switched to turn off the power, and then while pressing the SET button, reinsert the AC power cord. To unlock, use the remote control unit. ···· Locks operation...
... prevents remote control interference when operating several projectors or video equipment at the same time. When operating the projector in the ways above again. SET VOL+ KEYSTONE NO SHOW D.ZOOM PAGE AUTO PC P-TIMER IMAGE FREEZE MUTE Press and hold both the projector and remote control must be switched to turn off the power, and then while pressing the SET button, reinsert the AC power cord. To unlock, use the remote control unit. ···· Locks operation...

LV-S3_Inst.pdf
Page 39
... COMPUTER input source. ( P22 ) u VIDEO button Selects VIDEO input source. ( P30 ) i P-TIMER button Operates the P-timer function. ( P21 ) o NO SHOW button Temporarily turns off the image on the computer. Press and hold the L-CLICK button and move the cursor with a standard USB port.. - TIMER buttons together for 10 seconds or more to the USB port of your computer's owner's manual for the mouse function to be connected with the Cursor button. Install batteries into the presentation remote control...
... COMPUTER input source. ( P22 ) u VIDEO button Selects VIDEO input source. ( P30 ) i P-TIMER button Operates the P-timer function. ( P21 ) o NO SHOW button Temporarily turns off the image on the computer. Press and hold the L-CLICK button and move the cursor with a standard USB port.. - TIMER buttons together for 10 seconds or more to the USB port of your computer's owner's manual for the mouse function to be connected with the Cursor button. Install batteries into the presentation remote control...
LV-S3_Inst.pdf
Page 40
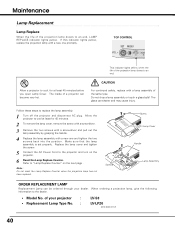
... your projector : • Replacement Lamp Type No. : LV-S3 LV-LP20 (610 308 3117) 40 CAUTION For continued safety, replace with a lamp assembly of your dealer. Replace the lamp cover and tighten the screw. 5 Connect the AC Power Cord to replace the lamp assembly. 1 Turn off the projector and disconnect AC plug. Do not drop a lamp assembly or touch a glass bulb! Allow a projector to an end, LAMP REPLACE indicator lights yellow. Maintenance Lamp Replacement Lamp Replace When the life of the projection lamp draws...
... your projector : • Replacement Lamp Type No. : LV-S3 LV-LP20 (610 308 3117) 40 CAUTION For continued safety, replace with a lamp assembly of your dealer. Replace the lamp cover and tighten the screw. 5 Connect the AC Power Cord to replace the lamp assembly. 1 Turn off the projector and disconnect AC plug. Do not drop a lamp assembly or touch a glass bulb! Allow a projector to an end, LAMP REPLACE indicator lights yellow. Maintenance Lamp Replacement Lamp Replace When the life of the projection lamp draws...

LV-S3_Inst.pdf
Page 41
... projector uses a high-pressure lamp which the projector and lamp are being used. Press Point 7 8 button(s) to move the red frame pointer to the Setting Menu icon. 2 Press Point d button to move the red frame pointer to Lamp counter reset and then press SET button. Some lamps may differ according to the environment or conditions in which must be cleaned up , replace the lamp with projector service. The message " Lamp replace counter reset? Risk of lamp explosion. Contact an authorized service...
... projector uses a high-pressure lamp which the projector and lamp are being used. Press Point 7 8 button(s) to move the red frame pointer to the Setting Menu icon. 2 Press Point d button to move the red frame pointer to Lamp counter reset and then press SET button. Some lamps may differ according to the environment or conditions in which must be cleaned up , replace the lamp with projector service. The message " Lamp replace counter reset? Risk of lamp explosion. Contact an authorized service...
LV-S3_Inst.pdf
Page 44
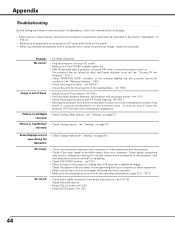
... projector with your computer or video equipment. - Try these Solutions - Check WARNING TEMP. Adjust focus of focus. - Moving the projector from audio input source. ( - Picture is not out of the operating temperature range (5°C ~ 35°C). See the computer's owner's manual for monitor output when connected to AC outlet and turned on the projector, it does not project an image, restart the computer. No sound. - Wait 90 seconds after the Power indicator turns red. ( "Turning Off the Projector " P19 ) - Check...
... projector with your computer or video equipment. - Try these Solutions - Check WARNING TEMP. Adjust focus of focus. - Moving the projector from audio input source. ( - Picture is not out of the operating temperature range (5°C ~ 35°C). See the computer's owner's manual for monitor output when connected to AC outlet and turned on the projector, it does not project an image, restart the computer. No sound. - Wait 90 seconds after the Power indicator turns red. ( "Turning Off the Projector " P19 ) - Check...

LV-S3_Inst.pdf
Page 46
... turned on . When turning on . (The WARNING indicator keeps flashing.) Check and clean the Air filter. Do not leave the pro- Reset the Lamp replace counter after replacement of the projection lamp draws to normal. Indicators LAMP POWER WARNING REPLACE red/green red yellow Projector Condition The projector is OFF. (The AC power cord is unplugged.) ✽ The projector is preparing for projector condition. When the projector is ready to normal, the POWER indicator lights red and the projector can be turned on with a new one promptly. The temperature inside the projector...
... turned on . When turning on . (The WARNING indicator keeps flashing.) Check and clean the Air filter. Do not leave the pro- Reset the Lamp replace counter after replacement of the projection lamp draws to normal. Indicators LAMP POWER WARNING REPLACE red/green red yellow Projector Condition The projector is OFF. (The AC power cord is unplugged.) ✽ The projector is preparing for projector condition. When the projector is ready to normal, the POWER indicator lights red and the projector can be turned on with a new one promptly. The temperature inside the projector...


