Digital Video Software (Windows) Ver.26 Instruction Manual
Page 2
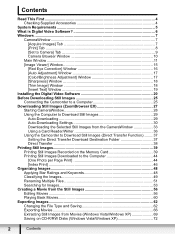
... Supplied Accessories 4 System Requirements 5 What is Digital Video Software 6 Windows ...7 CameraWindow ...7 [Acquire Images] Tab 7 [Print] Tab ...8 [Set to Camera] Tab 9 Camera Browser Window 10 Main Window ...11 [Image Viewer]... Window 15 [Red Eye Correction] Window 16 [Auto Adjustment] Window 17 [Color/Brightness Adjustment] Window 17 [Sharpness] Window 18 [Trim Image] Window 18 [Insert Text] Window 19 Installing the Digital Video Software 20 Before Downloading Still Images 25 Connecting the Camcorder...
... Supplied Accessories 4 System Requirements 5 What is Digital Video Software 6 Windows ...7 CameraWindow ...7 [Acquire Images] Tab 7 [Print] Tab ...8 [Set to Camera] Tab 9 Camera Browser Window 10 Main Window ...11 [Image Viewer]... Window 15 [Red Eye Correction] Window 16 [Auto Adjustment] Window 17 [Color/Brightness Adjustment] Window 17 [Sharpness] Window 18 [Trim Image] Window 18 [Insert Text] Window 19 Installing the Digital Video Software 20 Before Downloading Still Images 25 Connecting the Camcorder...

Digital Video Software (Windows) Ver.26 Instruction Manual
Page 20
... Follow the instructions in the [User Account Control] window that appears. - Installing the Digital Video Software Be sure to install the Digital Video Software before connecting the camcorder to the computer. You must have authorization as a Computer System Administrator to install ...programs. Windows Vista/Windows XP Users: Your digital video camcorder is equipped with the USB cable (applications such as the [Scanner and Camera Wizard] start ] menu. 2) Right-click the CD-ROM icon and select [Open] from the...
... Follow the instructions in the [User Account Control] window that appears. - Installing the Digital Video Software Be sure to install the Digital Video Software before connecting the camcorder to the computer. You must have authorization as a Computer System Administrator to install ...programs. Windows Vista/Windows XP Users: Your digital video camcorder is equipped with the USB cable (applications such as the [Scanner and Camera Wizard] start ] menu. 2) Right-click the CD-ROM icon and select [Open] from the...
Digital Video Software (Windows) Ver.26 Instruction Manual
Page 22
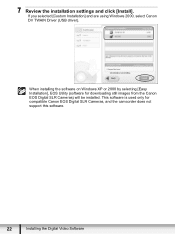
When installing the software on Windows XP or 2000 by selecting [Easy Installation], EOS Utility (software for compatible Canon EOS Digital SLR Cameras, and the camcorder does not support this software. 22 Installing the Digital Video Software This software is used only for downloading still images from the Canon EOS Digital SLR Cameras) will be installed. If you selected [Custom Installation] and are using Windows 2000, select Canon DV TWAIN Driver (USB driver). 7 Review the installation settings and click [Install].
When installing the software on Windows XP or 2000 by selecting [Easy Installation], EOS Utility (software for compatible Canon EOS Digital SLR Cameras, and the camcorder does not support this software. 22 Installing the Digital Video Software This software is used only for downloading still images from the Canon EOS Digital SLR Cameras) will be installed. If you selected [Custom Installation] and are using Windows 2000, select Canon DV TWAIN Driver (USB driver). 7 Review the installation settings and click [Install].

Digital Video Software (Windows) Ver.26 Instruction Manual
Page 87
... before installing the Digital Video Software. 1 Click the Windows [Start] menu and select [Settings] and [Control Panel]. 2 Double-click the [System] icon. 3 Click the [Hardware] tab. 4 Click the [Device Manager] button. 5 If [Canon Camera] or your camcorder model name does not appear in the [Scanners and Cameras Properties] or [Scanners and Cameras]. - In the [Advanced setting...
... before installing the Digital Video Software. 1 Click the Windows [Start] menu and select [Settings] and [Control Panel]. 2 Double-click the [System] icon. 3 Click the [Hardware] tab. 4 Click the [Device Manager] button. 5 If [Canon Camera] or your camcorder model name does not appear in the [Scanners and Cameras Properties] or [Scanners and Cameras]. - In the [Advanced setting...

Digital Video Software (Macintosh) Ver.26 Instruction Manual
Page 2
Contents Read This First ...4 Checking Supplied Accessories 4 System Requirements 5 What is Digital Video Software 6 Windows ...7 CameraWindow ...7 [Acquire Images] Tab 7 [Print] Tab ...8 [Set to Camera] Tab 9 Camera Browser Window 10 Browser Window 11 [Image Viewer] Window 16 [Trim Image] Window 17 ...Curve Adjustment] Window 19 [Sharpness] Window 20 [Auto Adjustment] Window 20 Installing the Digital Video Software 21 Before Downloading Still Images 24 Connecting the Camcorder to a Computer 24 Downloading Still Images (ImageBrowser 26 Using the Computer to Download Still Images ...
Contents Read This First ...4 Checking Supplied Accessories 4 System Requirements 5 What is Digital Video Software 6 Windows ...7 CameraWindow ...7 [Acquire Images] Tab 7 [Print] Tab ...8 [Set to Camera] Tab 9 Camera Browser Window 10 Browser Window 11 [Image Viewer] Window 16 [Trim Image] Window 17 ...Curve Adjustment] Window 19 [Sharpness] Window 20 [Auto Adjustment] Window 20 Installing the Digital Video Software 21 Before Downloading Still Images 24 Connecting the Camcorder to a Computer 24 Downloading Still Images (ImageBrowser 26 Using the Computer to Download Still Images ...

Digital Video Software (Macintosh) Ver.26 Instruction Manual
Page 22
To install the software individually, select [Custom Installation]. This software is used only for downloading still images from the Canon EOS Digital SLR Cameras) will be installed. When installing the software by selecting [Easy Installation], EOS Utility (software for compatible Canon EOS Digital SLR Cameras, and the camcorder does not support this software. 6 Read the license agreement and click [Agree] to accept the terms. 22 Installing the Digital Video Software Installer Panel 5 Select [Easy Installation] and click [Next]. 4 Click [Install] under Digital Video Software.
To install the software individually, select [Custom Installation]. This software is used only for downloading still images from the Canon EOS Digital SLR Cameras) will be installed. When installing the software by selecting [Easy Installation], EOS Utility (software for compatible Canon EOS Digital SLR Cameras, and the camcorder does not support this software. 6 Read the license agreement and click [Agree] to accept the terms. 22 Installing the Digital Video Software Installer Panel 5 Select [Easy Installation] and click [Next]. 4 Click [Install] under Digital Video Software.
User Manual
Page 11
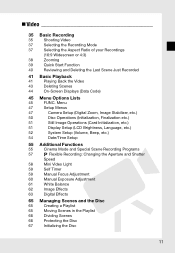
... Deleting the Last Scene Just Recorded 41 Basic Playback 41 Playing Back the Video 43 Deleting Scenes 44 On-Screen Displays (Data Code) 45 Menu Options Lists 45 FUNC. Menu 47 Setup Menus 47 Camera Setup (Digital Zoom, Image Stabilizer, etc.) 50 Disc Operations (Initialization, ... Additional Functions 55 Cinema Mode and Special Scene Recording Programs 57 Flexible Recording: Changing the Aperture and Shutter Speed 58 Mini Video Light 59 Self Timer 59 Manual Focus Adjustment 60 Manual Exposure Adjustment 61 White Balance 62 Image Effects 63 Digital Effects 65...
... Deleting the Last Scene Just Recorded 41 Basic Playback 41 Playing Back the Video 43 Deleting Scenes 44 On-Screen Displays (Data Code) 45 Menu Options Lists 45 FUNC. Menu 47 Setup Menus 47 Camera Setup (Digital Zoom, Image Stabilizer, etc.) 50 Disc Operations (Initialization, ... Additional Functions 55 Cinema Mode and Special Scene Recording Programs 57 Flexible Recording: Changing the Aperture and Shutter Speed 58 Mini Video Light 59 Self Timer 59 Manual Focus Adjustment 60 Manual Exposure Adjustment 61 White Balance 62 Image Effects 63 Digital Effects 65...
User Manual
Page 35
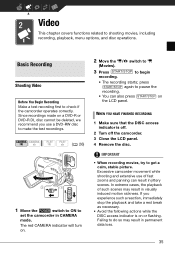
... recordings. ( 26) 1 Move the switch to ON to set the camcorder in visually induced motion sickness. Failing to pause the recording. • You can result in permanent data loss. 35 Basic Recording Basic Recording Shooting Video Before You Begin Recording Make a test recording first to get a calm,... stable picture. In extreme cases, the playback of fast zooms and panning can also press START/STOP on or flashing. press START/STOP again to do so may result in CAMERA mode. If...
... recordings. ( 26) 1 Move the switch to ON to set the camcorder in visually induced motion sickness. Failing to pause the recording. • You can result in permanent data loss. 35 Basic Recording Basic Recording Shooting Video Before You Begin Recording Make a test recording first to get a calm,... stable picture. In extreme cases, the playback of fast zooms and panning can also press START/STOP on or flashing. press START/STOP again to do so may result in CAMERA mode. If...

User Manual
Page 38
...the zoom speed ( 48). You can select one of three fixed zoom speeds or a variable speed that depends on a TV with the Video ID-1 system will automatically switch to close as 1 cm (0.39 in (telephoto). The default is also available ( 47). Move it ... the subject. Zooming POINTS TO CHECK ( 26) : In addition to open the setup menus. 3 Select ( ) [CAMERA SETUP] and press ( ). 4 Select ( ) [WIDESCREEN] and press ( ). 5 Select ( ) a setting option and press ( ). Video FUNC. ( 28) CAMERA SETUP Default value WIDESCREEN ON 1 Press FUNC. . 2 Select ( ) the icon and press ( ...
...the zoom speed ( 48). You can select one of three fixed zoom speeds or a variable speed that depends on a TV with the Video ID-1 system will automatically switch to close as 1 cm (0.39 in (telephoto). The default is also available ( 47). Move it ... the subject. Zooming POINTS TO CHECK ( 26) : In addition to open the setup menus. 3 Select ( ) [CAMERA SETUP] and press ( ). 4 Select ( ) [WIDESCREEN] and press ( ). 5 Select ( ) a setting option and press ( ). Video FUNC. ( 28) CAMERA SETUP Default value WIDESCREEN ON 1 Press FUNC. . 2 Select ( ) the icon and press ( ...

User Manual
Page 44
... of recording. Turning the On-Screen Displays On/Off Repeatedly press DISP. On-Screen Displays (Data Code) The camcorder keeps a data code containing the date and time and other camera data (shutter speed, aperture, etc.) registered at the time of recording. You can be able to turn the... deleted (while the DISC access indicator is protected ( 66). • You may not be selected with the [DATA CODE] setting ( 51). 44 Video IMPORTANT Be careful when deleting original recordings. to delete scenes shorter than 5 seconds. To delete such scenes you must initialize the disc ( 67), in...
... of recording. Turning the On-Screen Displays On/Off Repeatedly press DISP. On-Screen Displays (Data Code) The camcorder keeps a data code containing the date and time and other camera data (shutter speed, aperture, etc.) registered at the time of recording. You can be able to turn the... deleted (while the DISC access indicator is protected ( 66). • You may not be selected with the [DATA CODE] setting ( 51). 44 Video IMPORTANT Be careful when deleting original recordings. to delete scenes shorter than 5 seconds. To delete such scenes you must initialize the disc ( 67), in...
User Manual
Page 51
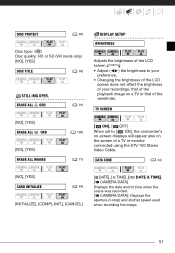
...], [COMPL.INIT.], [CANCEL] [ DATE], [ TIME], [ DATE & TIME], [ CAMERA DATA] Displays the date and/or time when the scene was recorded. [ CAMERA DATA]: Displays the aperture (f-stop) and shutter speed used when recording the image. 51 ...brightness of your recordings, that of a TV or monitor connected using the STV-100 Stereo Video Cable. ERASE ALL ORD ( 91) Display Setup (LCD Brightness, Language, etc.) DISPLAY ...the brightness of the LCD screen. • Adjust ( ) the brightness to [ ON], the camcorder's on-screen displays will appear also on a TV or that of the playback image on the ...
...], [COMPL.INIT.], [CANCEL] [ DATE], [ TIME], [ DATE & TIME], [ CAMERA DATA] Displays the date and/or time when the scene was recorded. [ CAMERA DATA]: Displays the aperture (f-stop) and shutter speed used when recording the image. 51 ...brightness of your recordings, that of a TV or monitor connected using the STV-100 Stereo Video Cable. ERASE ALL ORD ( 91) Display Setup (LCD Brightness, Language, etc.) DISPLAY ...the brightness of the LCD screen. • Adjust ( ) the brightness to [ ON], the camcorder's on-screen displays will appear also on a TV or that of the playback image on the ...

User Manual
Page 59
...movies), press PHOTO fully (when recording still images) or turn the mini video light off the camcorder to cancel the self timer. POINTS TO CHECK ( 26) FUNC. ( 28) FUNC. The countdown appears on the screen. MENU CAMERA SETUP SELF TIMER FUNC. In such case, focus manually. • Reflective ... 26) Adjust the zoom before you can appear on the screen. * 2 seconds when using the mini video light while the optional Wide-converter is attached; Self Timer The camcorder starts recording after a 10-second countdown*. NOTES Once the countdown has begun, you start the procedure. 59...
...movies), press PHOTO fully (when recording still images) or turn the mini video light off the camcorder to cancel the self timer. POINTS TO CHECK ( 26) FUNC. ( 28) FUNC. The countdown appears on the screen. MENU CAMERA SETUP SELF TIMER FUNC. In such case, focus manually. • Reflective ... 26) Adjust the zoom before you can appear on the screen. * 2 seconds when using the mini video light while the optional Wide-converter is attached; Self Timer The camcorder starts recording after a 10-second countdown*. NOTES Once the countdown has begun, you start the procedure. 59...
User Manual
Page 122
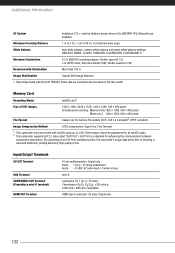
... be guaranteed for enhancing the communication between camcorders and printers. Output only Video: 1 Vp-p / 75 ohms unbalanced Audio: -10 dBV (47 kohm load) / 3 kohm or less mini-B Luminance (Y): 1 Vp-p / 75 ohms Chrominance (PB/PR (CB/CR)): ±350 mVp-p 1080i (D3) / 480i (D1) compatible ... 480 pixels Movies (4:3) 1440 x 1080, 640 x 480 pixels Design rule for Camera File system (DCF), Exif 2.2 compliant3, DPOF compliant Image Compression Method JPEG (compression: Super Fine, Fine, Normal) 2 This camcorder has been tested with the [24F PROGR.] frame rate are converted and recorded on ...
... be guaranteed for enhancing the communication between camcorders and printers. Output only Video: 1 Vp-p / 75 ohms unbalanced Audio: -10 dBV (47 kohm load) / 3 kohm or less mini-B Luminance (Y): 1 Vp-p / 75 ohms Chrominance (PB/PR (CB/CR)): ±350 mVp-p 1080i (D3) / 480i (D1) compatible ... 480 pixels Movies (4:3) 1440 x 1080, 640 x 480 pixels Design rule for Camera File system (DCF), Exif 2.2 compliant3, DPOF compliant Image Compression Method JPEG (compression: Super Fine, Fine, Normal) 2 This camcorder has been tested with the [24F PROGR.] frame rate are converted and recorded on ...


