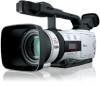
DIGITAL VIDEO SOLUTION DISK Ver.3 Software Instruction Manual
Page 4
... sales and use Company's product, and for the earlier of this license and Licensee's compliance with Licensee. READ CAREFULLY BEFORE USING Canon DVC Storage Driver License Agreement EXHIBIT A TO IFG CODE TECHNOLOGY LICENSE AGREEMENT SHRINK WRAP LICENSE BY PUTTING THE DISKETTE INTO YOUR DISK DRIVE OR PUTTING ...ROM DRIVE YOU, THE END USER ("LICENSEE") INDICATE YOUR ACCEPTANCE OF THE TERMS OF THIS SHRINK WRAP LICENSE AGREEMENT ("AGREEMENT") BETWEEN YOU AND CANON INC. ("COMPANY"). IF YOU DO NOT AGREE TO THE TERMS OF THIS AGREEMENT, PROMPTLY RETURN THE DISKETTE OR CD-ROM TO COMPANY OR...
DIGITAL VIDEO SOLUTION DISK Ver.3 Software Instruction Manual
Page 5
... Supplied Accessories 7 Windows System Requirements 8 What Can Be Accomplished with the Software 9 Installing from the Canon DIGITAL VIDEO SOLUTION DISK 10 Installing the DVC Storage Driver/Disconnecting the Camcorder from the Computer Windows 98 12 Windows Me 17 Windows 2000 21 Windows XP 27 ......51 Macintosh System Requirements 53 What Can Be Accomplished with the Software 54 Installing from the Canon DIGITAL VIDEO SOLUTION DISK 55 Installing the DVC Storage Driver 56 Connecting the Camcorder to a Computer 57 Connecting to a USB Port 57 Disconnecting the Camcorder...
DIGITAL VIDEO SOLUTION DISK Ver.3 Software Instruction Manual
Page 9
...Canon Digital Video Solution Disk in the computer's CD-ROM drive. Follow the onscreen instructions to install Adobe Acrobat Reader 1. If it is not, install it is required that Adobe® Acrobat® Reader is installed on the CD-ROMs. E ■ DVC Storage Driver ( 12) • Driver...8226; Categorizing and Organizing Large Volumes of the software programs contained on your computer. How to install Adobe Acrobat Reader. 9 Place the Canon Digital Video Solution Disk in the computer's CD-ROM drive. 2. The installer panel will be displayed. 2. Double-click the [ar405eng....
DIGITAL VIDEO SOLUTION DISK Ver.3 Software Instruction Manual
Page 11
.... • Depending on the computer you are using, the installer panel might not display again after the installation is complete. Next, install the DVC Storage Driver.
DIGITAL VIDEO SOLUTION DISK Ver.3 Software Instruction Manual
Page 12
... 2000 ( 21), Windows XP ( 27). • Be sure to install the DIGITAL VIDEO SOLUTION DISK before installation of the DVC Storage Driver is complete. Select [Search for the best driver for installation of your computer and go to the computer using . Confirm the OS of the DVC Storage... 5. Connect the Power Adapter to CARD. • The Add New Hardware Wizard will open. 4. Windows 98 Installing the DVC Storage Driver 1. Installing the DVC Storage Driver The procedure for your device. [Recommended].] and then click [Next]. 12 Windows 98 Slide the POWER switch to PLAY(VCR) and ...
DIGITAL VIDEO SOLUTION DISK Ver.3 Software Instruction Manual
Page 13
For [Specify a location:] display [G:\STORAGE DRIVER\WIN98], and then click [Next]. • The drive letter (e.g. Be sure to select this. 7. Windows 98 13 Windows 6. On the [Browse for Folder] window, select [Win98] in the folder named [STORAGE DRIVER] on the computer you are using. "G:") varies depending on the CD-ROM, and then click [OK]. Be sure to select Win98. 8. Select [Specify a location:] and then click [Browse...]. • If a check mark ( ) is displayed beside [CD-ROM drive], click it to E remove it.
DIGITAL VIDEO SOLUTION DISK Ver.3 Software Instruction Manual
Page 14
In case "Removable Disk" does not appear even if you have restarted your computer. Installing the DVC Storage Driver 9. Click [Next]. • Driver installation starts. 10.Click [Finish]. • Installation ends and the driver is registered by Explorer as [Removable Disk]. 11.Check if the DVC Storage Driver has been installed correctly. • Check if "Removable Disk" is not shown, restart your computer, installation has not been done correctly ( 51). 14 Windows 98 If "Removable Disk" is shown in Explorer.
DIGITAL VIDEO SOLUTION DISK Ver.3 Software Instruction Manual
Page 15
... off the camcorder and detach the USB cable. ● To detach the cable, always hold the connector by its sides to the camcorder. 2. Check if [Canon DVC] or [USB device] is displayed under [Other devices], [Imaging Device] or [Universal Serial Bus controllers], delete all of them. Connect the Power Adapter ...to pull it out. ● Turn off the camcorder before inserting/removing the memory card. ● When Uninstalling the DVC Storage Driver If DVC Storage Driver installation has not been done correctly, or when otherwise necessary, uninstall the...
DIGITAL VIDEO SOLUTION DISK Ver.3 Software Instruction Manual
Page 16
On the [View] menu, select [Folder Options]. 2. Delete [Canon Inc. Under [Hidden Files], select [Show all files]. 4. Installing the DVC Storage Driver 8. Click the [View] tab. 3. Click [OK]. • The [Folder Options] dialog box closes. • You will now be unable to see the folders and files ...
DIGITAL VIDEO SOLUTION DISK Ver.3 Software Instruction Manual
Page 17
... then click [Next]. 5. INF] and then click [OK]. • The drive letter (e.g. Windows Me 17 Be sure to the computer using . • Driver installation starts. On the [Select Other Driver] window, select [F:\STORAGED\ WINME\CANDV_ME. Connect the Power Adapter to CARD. • The Add New Hardware Wizard will open. 4. Slide the POWER.../CARD switch to the camcorder. 2. "F:") varies depending on the computer you are using the supplied USB cable ( 32). 3. Windows Windows Me E Installing the DVC Storage Driver 1.
DIGITAL VIDEO SOLUTION DISK Ver.3 Software Instruction Manual
Page 18
...does not appear even if you have restarted your computer. Disconnecting the Camcorder From the Computer 1. Click [Stop USB Disk - Check if the DVC Storage Driver has been installed correctly. • Check if "Removable Disk" is shown in the task bar, turn off your computer and then detach the USB cable.... 2. Click [Finish]. • Installation ends and the driver is safe to remove the device. 18 Windows Me If "Removable Disk" is not displayed in Explorer. Click the icon in the task bar. •...
DIGITAL VIDEO SOLUTION DISK Ver.3 Software Instruction Manual
Page 19
.../removing the memory card. ● When uninstalling the DVC Storage Driver If DVC Storage Driver installation has not been done correctly, or when otherwise necessary, uninstall the driver. 1. Click the [Device Manager] tab. 7. Click [Canon DVC] or [USB device]. 2. If a confirmation message appears,... click [OK] and close [System Properties]. • If there are multiple [Canon DVC] or [USB device] entries under [...
DIGITAL VIDEO SOLUTION DISK Ver.3 Software Instruction Manual
Page 20
... the wrong files. Click [OK]. • The [Folder Options] dialog box closes. • You will now be able to see previously. 9. Delete [Canon Inc. If you delete the wrong file, you could not see the folders and files you may be unable to restart Windows. 20 Windows Me... Click the [View] tab. 3. Be extremely careful not to the computer's operation. On the [Tools] menu, select [Folder Options]. 2. Installing the DVC Storage Driver 8. Double-click the [My Computer] icon on the desktop followed by the [C:] drive, the [WINDOWS], [INF] and [OTHER] folders. • If you cannot ...
DIGITAL VIDEO SOLUTION DISK Ver.3 Software Instruction Manual
Page 21
Connect the camcorder to install programs. 1. Windows 2000 21 Windows Windows 2000 E Installing the DVC Storage Driver User of Windows 2000 must first log in as an Administrator to the computer using the supplied USB cable ( 32). 3. Slide the POWER switch to PLAY(VCR) and the TAPE/CARD switch to the camcorder. 2. On the [Found New Hardware Wizard] dialog box, click [Next]. 5. Select [Search for a suitable driver for my device [recommended]] and then click [Next]. Connect the Power Adapter to CARD. • The Found New Hardware Wizard will open. 4.
DIGITAL VIDEO SOLUTION DISK Ver.3 Software Instruction Manual
Page 22
Select [Specify a location] and then click [Next]. • If a check mark ( ) is displayed beside [CD-ROM drive], click it . For [Look in:], select the CD-ROM, [STORAGE DRIVER], [WIN2000] and [CANDV_2K], and then click [Open]. 9. Click [OK]. 22 Windows 2000 Be sure to remove it to select this. 7. Click [Browse...]. 8. Installing the DVC Storage Driver 6.
DIGITAL VIDEO SOLUTION DISK Ver.3 Software Instruction Manual
Page 23
E 11.Click [Finish]. • Installation ends and the driver is registered by Explorer as [Removable Disk]. 12.Check if the DVC Storage Driver has been installed correctly. • Check if "Removable Disk" is not shown, restart your computer, installation has not been done correctly ( 51). 10.Click [Next]. • Driver installation starts. If "Removable Disk" is shown in Explorer. In case "Removable Disk" does not appear even if you have restarted your computer. Windows Windows 2000 23
DIGITAL VIDEO SOLUTION DISK Ver.3 Software Instruction Manual
Page 24
...icon in the task bar. • If the icon is not displayed in the [System Properties] dialog. 7. Drive(H:)]. • The message [The 'Canon DVC' device can now be safely removed from the system] will appear on the display. 3. Connect the camcorder to the camcorder. 2. Click [Device ... ● To detach the cable, always hold the connector by its sides to CARD. 4. Double-click the [System] icon. 6. Installing the DVC Storage Driver Disconnecting the Camcorder From the Computer 1. On the [Start] menu, select [Settings] e [Control Panel]. 5. Click [OK]. 4. Click the [Hardware] tab...
DIGITAL VIDEO SOLUTION DISK Ver.3 Software Instruction Manual
Page 26
... the [Oem*] file with a file named [Oem*.pnf], which shares the same number in the position of the file name. 11. Installing the DVC Storage Driver 10. Double-click [Oem*]. • The asterisk (*) in its first line. Repeat the above stands for a value. • The [Oem*] file is grouped ...with [;***Canon Digital Video Camera USB Setup File****] in the above steps until you do not make a note of the asterisk. • The [Inf] file may be ...
DIGITAL VIDEO SOLUTION DISK Ver.3 Software Instruction Manual
Page 27
...ROM...)], click it to CARD. • "Found New Hardware" will appear on the display. 4. Windows Windows XP E Installing the DVC Storage Driver User of Windows XP Professional must first log in as an Administrator to the computer using the supplied USB cable ( 32). 3. Connect the ...Found New Hardware Wizard] screen, select [Install from a list or specific location [Advanced].] and then click [Next]. 5. Select [Search for the best driver in the search: ]. Windows XP 27 Be sure to the camcorder. 2. Connect the Power Adapter to select this location in these locations.] and then ...
DIGITAL VIDEO SOLUTION DISK Ver.3 Software Instruction Manual
Page 28
For [Browse For Folder], select [WINXP] in the [STORAGE DRIVER] folder on the CD-ROM, and then click [OK]. Click [Finish]. • Installation ends and the driver is registered by Explorer as [Removable Disk]. 28 Windows XP Be sure to select this. 7. Installing the DVC Storage Driver 6. Click [Next]. • Driver installation starts. 8.