FAXPHONE L100 Starter Guide
Page 2
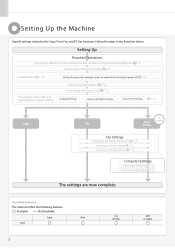
... 12 Language Settings Country and Region Settings Current Time Settings P. 13 Copy USB Fax Print PC Fax Connection Fax Settings Registering the Sender Information P. 14 Selecting the Receive Mode P. 15 Connecting a Telephone Line P. 16 Computer Settings Installing the Software P. 18 Connecting a USB Cable P. 19 The settings are required after turning the power ON. Setting Up the Machine Specify settings related to the Installation Site and Removing the Packing Materials P. 6 Preparing the Toner Cartridges P. 7 Loading Paper P. 10 Settings for paper sizes and paper types are...
... 12 Language Settings Country and Region Settings Current Time Settings P. 13 Copy USB Fax Print PC Fax Connection Fax Settings Registering the Sender Information P. 14 Selecting the Receive Mode P. 15 Connecting a Telephone Line P. 16 Computer Settings Installing the Software P. 18 Connecting a USB Cable P. 19 The settings are required after turning the power ON. Setting Up the Machine Specify settings related to the Installation Site and Removing the Packing Materials P. 6 Preparing the Toner Cartridges P. 7 Loading Paper P. 10 Settings for paper sizes and paper types are...

FAXPHONE L100 Starter Guide
Page 3
... guide, store it in the e-Manual. 3 A-1 Telephone Cable Speed Dial Labels x2 About the USB cable The machine does not come with the default print density setting. *2 "ISO/IEC 19752" is the global standard related to a Computer Appendix Checking the Supplied Accessories 1. For information about machine setup and software installation, see the e-Manual included on A4 paper with a USB cable. Confirm that of the included toner cartridge is as follows: Canon Cartridge...
... guide, store it in the e-Manual. 3 A-1 Telephone Cable Speed Dial Labels x2 About the USB cable The machine does not come with the default print density setting. *2 "ISO/IEC 19752" is the global standard related to a Computer Appendix Checking the Supplied Accessories 1. For information about machine setup and software installation, see the e-Manual included on A4 paper with a USB cable. Confirm that of the included toner cartridge is as follows: Canon Cartridge...
FAXPHONE L100 Starter Guide
Page 4
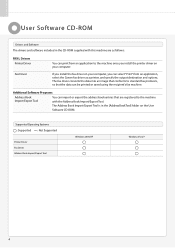
... data into an image that the data can select "Print" from an application, select the Canon fax driver as follows: FAX L Drivers Printer Driver Fax Driver You can print from an application to standard fax protocols, so that conforms to the machine once you can be printed or saved using the recipient's fax machine. Supported Operating Systems : Supported : Not Supported Printer Driver Fax Driver Address Book Import/Export Tool Windows 2000/XP Windows Vista/7 4 User Software CD-ROM Drivers and Software The drivers and software...
... data into an image that the data can select "Print" from an application, select the Canon fax driver as follows: FAX L Drivers Printer Driver Fax Driver You can print from an application to standard fax protocols, so that conforms to the machine once you can be printed or saved using the recipient's fax machine. Supported Operating Systems : Supported : Not Supported Printer Driver Fax Driver Address Book Import/Export Tool Windows 2000/XP Windows Vista/7 4 User Software CD-ROM Drivers and Software The drivers and software...
FAXPHONE L100 Starter Guide
Page 5
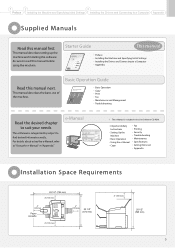
... finish reading this manual next. This manual describes the basic use of the machine. The e-Manual is included in the User Software CD-ROM. • Important Safety Instructions • Setting Up the Machine • Basic Operation • Using the e-Manual • Copy • Fax • Printing • Security • Troubleshooting • Maintenance • Specifications • Setting Menu List • Appendix Installation Space Requirements 28 1/2" (724 mm) 4" (100 mm) 4" (100 mm) Paper cassette 4" (100 mm...
... finish reading this manual next. This manual describes the basic use of the machine. The e-Manual is included in the User Software CD-ROM. • Important Safety Instructions • Setting Up the Machine • Basic Operation • Using the e-Manual • Copy • Fax • Printing • Security • Troubleshooting • Maintenance • Specifications • Setting Menu List • Appendix Installation Space Requirements 28 1/2" (724 mm) 4" (100 mm) 4" (100 mm) Paper cassette 4" (100 mm...

FAXPHONE L100 Starter Guide
Page 14
... No. 031234567 + To display the "Fax Setup Guide" if you send. Register unit name. (Sender name, company name, etc.) *Next Screen: Press OK Enter. Fax/Telephone Number (FAX No.) Sender Name Sending Date/Time (Unit Name) Page Number 01/01/2011 02:07 PM FAX 123XXXXXXX Telephone Number Mark CANON P.0001 Entering Text Enter information (text, symbols, and numbers) using the numeric keys or press [ ] (SYMBOLS). Key Entry mode: Entry mode: Entry mode: @ . - _ / 1 ABC abc...
... No. 031234567 + To display the "Fax Setup Guide" if you send. Register unit name. (Sender name, company name, etc.) *Next Screen: Press OK Enter. Fax/Telephone Number (FAX No.) Sender Name Sending Date/Time (Unit Name) Page Number 01/01/2011 02:07 PM FAX 123XXXXXXX Telephone Number Mark CANON P.0001 Entering Text Enter information (text, symbols, and numbers) using the numeric keys or press [ ] (SYMBOLS). Key Entry mode: Entry mode: Entry mode: @ . - _ / 1 ABC abc...
FAXPHONE L100 Basic Operation Guide
Page 4
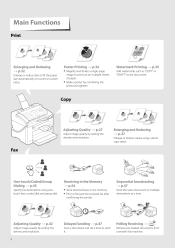
... Receiving → Retrieve pre-loaded documents from a sender's fax machine. 4 Watermark Printing → p.35 Add watermarks such as "COPY" or "DRAFT" to send it. Delayed Sending → p.47 Scan a document and set a time to the document. Receiving in the Memory → p.54 • Store received faxes in the memory. • Print or forward the received fax after confirming the sender. Main Functions Print Enlarging and Reducing → p.32 Enlarge or reduce data to fit the paper size automatically or to multiple destinations...
... Receiving → Retrieve pre-loaded documents from a sender's fax machine. 4 Watermark Printing → p.35 Add watermarks such as "COPY" or "DRAFT" to send it. Delayed Sending → p.47 Scan a document and set a time to the document. Receiving in the Memory → p.54 • Store received faxes in the memory. • Print or forward the received fax after confirming the sender. Main Functions Print Enlarging and Reducing → p.32 Enlarge or reduce data to fit the paper size automatically or to multiple destinations...

FAXPHONE L100 Basic Operation Guide
Page 5
... View and Cancel Copy Jobs ...28 Change the Default Copy Settings ...29 Print Print a Document ...32 Enlarge or Reduce a Document ...32 Print Multiple Pages onto One Sheet ...33 Print a Poster ...34 Add Watermarks to a Printout ...35 View and Cancel Print Jobs...36 Fax Register Numbers in the Address Book ...38 Registering Numbers to One-Touch Keys ...38 Registering Numbers to Coded Dialing Codes ...39 Registering Recipients for Group Dialing ...40 Editing and Deleting Registered Destinations ...42 Adjust the Image Quality for Fax ...42 Adjusting the...
... View and Cancel Copy Jobs ...28 Change the Default Copy Settings ...29 Print Print a Document ...32 Enlarge or Reduce a Document ...32 Print Multiple Pages onto One Sheet ...33 Print a Poster ...34 Add Watermarks to a Printout ...35 View and Cancel Print Jobs...36 Fax Register Numbers in the Address Book ...38 Registering Numbers to One-Touch Keys ...38 Registering Numbers to Coded Dialing Codes ...39 Registering Recipients for Group Dialing ...40 Editing and Deleting Registered Destinations ...42 Adjust the Image Quality for Fax ...42 Adjusting the...
FAXPHONE L100 Basic Operation Guide
Page 6
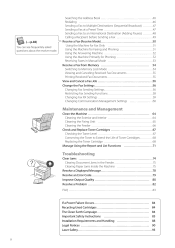
...59 Changing Communication Management Settings ...60 Maintenance and Management Clean the Machine ...64 Cleaning the Exterior and Interior ...64 Cleaning the Fixing Unit ...65 Cleaning the Feeder ...66 Check and Replace Toner Cartridges ...67 Checking the Toner Level ...67 Conserving the Toner to Extend the Life of Toner Cartridges...68 Replacing the Toner Cartridge ...68 Manage Using the Report and List Functions ...71 Troubleshooting Clear Jams ...74 Clearing Document Jams in the Feeder...75 Clearing Paper Jams Inside the Machine ...75 Resolve a Displayed Message ...78 Resolve an Error Code...
...59 Changing Communication Management Settings ...60 Maintenance and Management Clean the Machine ...64 Cleaning the Exterior and Interior ...64 Cleaning the Fixing Unit ...65 Cleaning the Feeder ...66 Check and Replace Toner Cartridges ...67 Checking the Toner Level ...67 Conserving the Toner to Extend the Life of Toner Cartridges...68 Replacing the Toner Cartridge ...68 Manage Using the Report and List Functions ...71 Troubleshooting Clear Jams ...74 Clearing Document Jams in the Feeder...75 Clearing Paper Jams Inside the Machine ...75 Resolve a Displayed Message ...78 Resolve an Error Code...

FAXPHONE L100 Basic Operation Guide
Page 11
Display Energy Saver Press to start copying or sending a fax. Start Press to manually set or cancel the Sleep mode (→p.24). Press to enter letters and numbers. • Press to switch the character entry * # mode. • When sending a fax, press to decrease or increase the fax ring volume. OK Reset • Press to return to the previous screen, proceed to the next screen, or move the cursor to the left...
Display Energy Saver Press to start copying or sending a fax. Start Press to manually set or cancel the Sleep mode (→p.24). Press to enter letters and numbers. • Press to switch the character entry * # mode. • When sending a fax, press to decrease or increase the fax ring volume. OK Reset • Press to return to the previous screen, proceed to the next screen, or move the cursor to the left...

FAXPHONE L100 Basic Operation Guide
Page 37
...51 Using the Machine for Faxing and Phoning ...51 Using the Answering Machine ...52 Using the Machine Primarily for Fax ...42 Adjusting the Density ...42 Selecting the Resolution ...43 Changing the Default Settings ...43 Send a Fax ...44 Entering a Fax Number with the Alphanumeric Keys ...44 Using the One-Touch Keys ...45 Using the Coded Dialing Codes...45 Searching the Address Book ...46 Redialing ...46 Sending a Fax to Multiple Destinations (Sequential Broadcast) ...47 Sending a Fax at a Preset Time ...47 Sending a Fax to Memory Lock Mode ...54 Viewing and Canceling Received Fax Documents...
...51 Using the Machine for Faxing and Phoning ...51 Using the Answering Machine ...52 Using the Machine Primarily for Fax ...42 Adjusting the Density ...42 Selecting the Resolution ...43 Changing the Default Settings ...43 Send a Fax ...44 Entering a Fax Number with the Alphanumeric Keys ...44 Using the One-Touch Keys ...45 Using the Coded Dialing Codes...45 Searching the Address Book ...46 Redialing ...46 Sending a Fax to Multiple Destinations (Sequential Broadcast) ...47 Sending a Fax at a Preset Time ...47 Sending a Fax to Memory Lock Mode ...54 Viewing and Canceling Received Fax Documents...

FAXPHONE L100 Basic Operation Guide
Page 51
RX Mode Auto Fax/Tel Auto Switch Manual Answer 4 Specify ring settings. Press [▲] or [▼] to highlight < Fax/Tel Auto Switch>, and then press [OK]. Press [▲] or [▼] to highlight , and then press [OK]. To change the number of rings. Fax Using the Machine for Fax Only Set the fax receive mode to . 1 2 3 Switch to the Fax Mode (→p.13). Specify how long the machine will attempt to detect a fax tone before the machine receives a fax, press [ ] (Menu) , and...
RX Mode Auto Fax/Tel Auto Switch Manual Answer 4 Specify ring settings. Press [▲] or [▼] to highlight < Fax/Tel Auto Switch>, and then press [OK]. Press [▲] or [▼] to highlight , and then press [OK]. To change the number of rings. Fax Using the Machine for Fax Only Set the fax receive mode to . 1 2 3 Switch to the Fax Mode (→p.13). Specify how long the machine will attempt to detect a fax tone before the machine receives a fax, press [ ] (Menu) , and...
FAXPHONE L100 Basic Operation Guide
Page 52
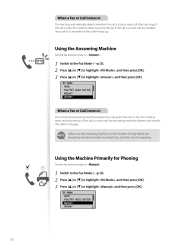
... Mode Auto Fax/Tel Auto Switch Manual Answer 52 RX Mode Auto Fax/Tel Auto Switch Manual Answer When a Fax or Call Comes In The connected answering machine answers the call, and if the call is a fax or voice call after two rings. When a Fax or Call Comes In The machine automatically detects whether the call is a fax, the machine starts receiving the fax. Press [▲] or [▼] to highlight , and then press [OK]. Using the Answering Machine Set the fax receive mode to . 1 2 3 Switch to...
... Mode Auto Fax/Tel Auto Switch Manual Answer 52 RX Mode Auto Fax/Tel Auto Switch Manual Answer When a Fax or Call Comes In The connected answering machine answers the call, and if the call is a fax or voice call after two rings. When a Fax or Call Comes In The machine automatically detects whether the call is a fax, the machine starts receiving the fax. Press [▲] or [▼] to highlight , and then press [OK]. Using the Answering Machine Set the fax receive mode to . 1 2 3 Switch to...
FAXPHONE L100 Basic Operation Guide
Page 58
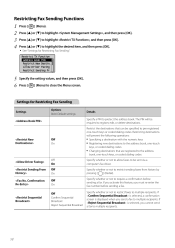
Restricting Fax Sending Functions 1 2 3 4 Press [ ] (Menu). Press [ ] (Menu) to restrict sending faxes from history by ] (Redial). Restricting destinations will be sent via a computer's fax driver. If you activate this feature, you must re-enter the fax number before sending a fax. If is selected, a confirmation screen is selected, you send a fax to require a confirmation before sending a fax. Restrict TX Function Address Book PIN Restrict New Destin...Allow Driver Faxing Restrict Sending Fr... 5 6 Specify the setting values, and then press...
Restricting Fax Sending Functions 1 2 3 4 Press [ ] (Menu). Press [ ] (Menu) to restrict sending faxes from history by ] (Redial). Restricting destinations will be sent via a computer's fax driver. If you activate this feature, you must re-enter the fax number before sending a fax. If is selected, a confirmation screen is selected, you send a fax to require a confirmation before sending a fax. Restrict TX Function Address Book PIN Restrict New Destin...Allow Driver Faxing Restrict Sending Fr... 5 6 Specify the setting values, and then press...
FAXPHONE L100 Basic Operation Guide
Page 60
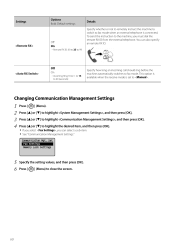
... fax mode. Off On Remote RX ID: 00 to 25 to 99 Off On Incoming Ring Time: 1 to 15 to 99 (seconds) Specify how long an incoming call should ring before the machine automatically switches to highlight , and then press [OK]. Changing Communication Management Settings 1 2 3 4 Press [ ] (Menu). Press [▲] or [▼] to the machine, you can also specify an remote RX ID. To send the instruction to...
... fax mode. Off On Remote RX ID: 00 to 25 to 99 Off On Incoming Ring Time: 1 to 15 to 99 (seconds) Specify how long an incoming call should ring before the machine automatically switches to highlight , and then press [OK]. Changing Communication Management Settings 1 2 3 4 Press [ ] (Menu). Press [▲] or [▼] to the machine, you can also specify an remote RX ID. To send the instruction to...
FAXPHONE L100 Basic Operation Guide
Page 78
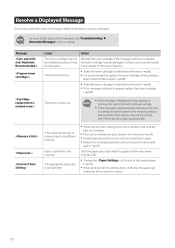
... authorized Canon dealer or the Canon help line. • Shake the toner cartridge to redistribute the toner (→p.68). • It is recommended to replace the toner cartridge when printing a large volume of the loaded paper (→p.23). • When printing with the printer driver, verify that the paper size setting on the computer is displayed while receiving a fax, the incoming fax will continue normally. • If this message continues to insufficient memory. Paper is displayed during copying or printing, the...
... authorized Canon dealer or the Canon help line. • Shake the toner cartridge to redistribute the toner (→p.68). • It is recommended to replace the toner cartridge when printing a large volume of the loaded paper (→p.23). • When printing with the printer driver, verify that the paper size setting on the computer is displayed while receiving a fax, the incoming fax will continue normally. • If this message continues to insufficient memory. Paper is displayed during copying or printing, the...
FAXPHONE L100 Basic Operation Guide
Page 79
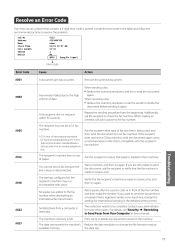
.... Print, send, or delete any documents stored in the table and follow the recommended actions to receive a fax. The machine's memory is busy or disconnected. You cannot send a fax because the line is full. The restriction needs to the fax number when attempting an international fax transmission. Address Name Start Time Call Length Sheets Result 0123 0123456789 name 01/01 02:07 AM 01'15 1 NG #018 Busy/No Signal Error code Error Code #001 Cause A document jam...
.... Print, send, or delete any documents stored in the table and follow the recommended actions to receive a fax. The machine's memory is busy or disconnected. You cannot send a fax because the line is full. The restriction needs to the fax number when attempting an international fax transmission. Address Name Start Time Call Length Sheets Result 0123 0123456789 name 01/01 02:07 AM 01'15 1 NG #018 Busy/No Signal Error code Error Code #001 Cause A document jam...
FAXPHONE L100 Basic Operation Guide
Page 80
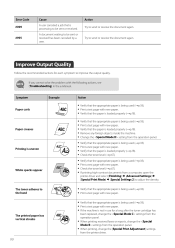
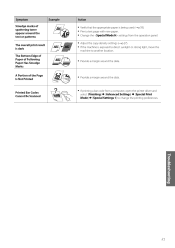
... recommended actions for a long after the toner cartridge has The printed paper has vertical streaks been replaced, change the settings from the operation panel. • When printing received faxes or reports, change the settings from the operation panel. • When printing, change the [Special Print Adjustment] settings from the printer driver. 80 Print a test page with new paper. Change the setting from a computer, open the printer driver and select [Finishing] [Advanced Settings] [Special Print Mode] [Special Settings 2] to adjust the density. If...
... recommended actions for a long after the toner cartridge has The printed paper has vertical streaks been replaced, change the settings from the operation panel. • When printing received faxes or reports, change the settings from the operation panel. • When printing, change the [Special Print Adjustment] settings from the printer driver. 80 Print a test page with new paper. Change the setting from a computer, open the printer driver and select [Finishing] [Advanced Settings] [Special Print Mode] [Special Settings 2] to adjust the density. If...
FAXPHONE L100 Basic Operation Guide
Page 81
...; Print a test page with new paper. • Change the settings from a computer, open the printer driver and select [Finishing] [Advanced Settings] [Special Print Mode] [Special Settings 1] to another location. • Provide a margin around the data. • Provide a margin around the data. Printed Bar Codes Cannot Be Scanned • If printing a bar code from the operation panel. • Adjust the copy density settings (→p.27). • If the machine is exposed to direct...
...; Print a test page with new paper. • Change the settings from a computer, open the printer driver and select [Finishing] [Advanced Settings] [Special Print Mode] [Special Settings 1] to another location. • Provide a margin around the data. • Provide a margin around the data. Printed Bar Codes Cannot Be Scanned • If printing a bar code from the operation panel. • Adjust the copy density settings (→p.27). • If the machine is exposed to direct...
FAXPHONE L100 Basic Operation Guide
Page 91
... communications. If the RJ11-C wall jack is not present, telephone/facsimile operation is set forth below. Do not connect this number must accept any interference received, including interference that interference will not occur in accordance with your product to scan, print or otherwise reproduce certain documents, and the use of the images scanned, printed or otherwise reproduced, you make any particular document, and/or of the use...
... communications. If the RJ11-C wall jack is not present, telephone/facsimile operation is set forth below. Do not connect this number must accept any interference received, including interference that interference will not occur in accordance with your product to scan, print or otherwise reproduce certain documents, and the use of the images scanned, printed or otherwise reproduced, you make any particular document, and/or of the use...
FAXPHONE L100 Basic Operation Guide
Page 92
... power switch turned ON until the problem is 1.0. • Before installing this guide or the e-Manual, disconnect the equipment from your facsimile unit. A single telephone line (touch-tone or rotary) should not exceed five (5.0). DDD (Direct Distance Dial) line -orIDDD (International Direct Distance Dial) line if you should be connected to determine the number of 1.0). It should complete the procedure for registering your machine, you communicate overseas Canon recommends an individual line following industry standards, i.e., 2,500 (touch-tone...
... power switch turned ON until the problem is 1.0. • Before installing this guide or the e-Manual, disconnect the equipment from your facsimile unit. A single telephone line (touch-tone or rotary) should not exceed five (5.0). DDD (Direct Distance Dial) line -orIDDD (International Direct Distance Dial) line if you should be connected to determine the number of 1.0). It should complete the procedure for registering your machine, you communicate overseas Canon recommends an individual line following industry standards, i.e., 2,500 (touch-tone...


