User's Guide
Page 3
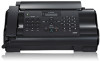
... z Receiving to print out and delete unnecessary faxes from Memory" on page 41 z Clearing Documents and Paper Jams In the unlikely event that most suits your needs. See "Printing a Document in Memory" on page 39 See "Replacing a FINE Cartridge" on page 52 See "Aligning the FINE Cartridge" on page 55 z One-touch and Coded Dial Numbers You can configure not to memory reception of your telephone line type, contact your machine jams you need to receive faxes using this machine. Introduction Useful Information z Replacing a FINE Cartridge...
... z Receiving to print out and delete unnecessary faxes from Memory" on page 41 z Clearing Documents and Paper Jams In the unlikely event that most suits your needs. See "Printing a Document in Memory" on page 39 See "Replacing a FINE Cartridge" on page 52 See "Aligning the FINE Cartridge" on page 55 z One-touch and Coded Dial Numbers You can configure not to memory reception of your telephone line type, contact your machine jams you need to receive faxes using this machine. Introduction Useful Information z Replacing a FINE Cartridge...

User's Guide
Page 7
... the On-screen Manual for full instructions on page 8. 6 Introduction Unpack the machine Please confirm the included items against the illustration printed on the lid of the main functions that can be performed on the machine. If you connect the telephone line, see your machine. Note The tape or the protective material position is displayed on the LCD, press [Stop/Reset], then change . 2 Turn on your setup sheet.
... the On-screen Manual for full instructions on page 8. 6 Introduction Unpack the machine Please confirm the included items against the illustration printed on the lid of the main functions that can be performed on the machine. If you connect the telephone line, see your machine. Note The tape or the protective material position is displayed on the LCD, press [Stop/Reset], then change . 2 Turn on your setup sheet.
User's Guide
Page 24
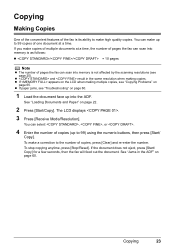
... pages the fax can scan into memory is as follows: z // = 10 pages Note z The number of pages the fax can scan into the ADF. z If paper jams, see "Troubleshooting" on page 60. To make copies of multiple documents at a time. See "Loading Documents and Paper" on page 65. Copying 23 You can select , , or . 4 Enter the number of copies (up to make up into memory is its ability to 99) using the numeric buttons, then press [Start/ Copy]. The LCD displays . 3 Press [Receive Mode...
... pages the fax can scan into memory is as follows: z // = 10 pages Note z The number of pages the fax can scan into the ADF. z If paper jams, see "Troubleshooting" on page 60. To make copies of multiple documents at a time. See "Loading Documents and Paper" on page 65. Copying 23 You can select , , or . 4 Enter the number of copies (up to make up into memory is its ability to 99) using the numeric buttons, then press [Start/ Copy]. The LCD displays . 3 Press [Receive Mode...
User's Guide
Page 35
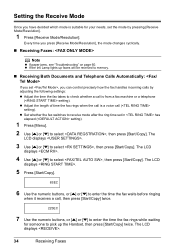
...( setting). 1 Press [Menu]. 2 Use [{] or [}] to select , then press [Start/Copy]. The LCD displays . 4 Use [{] or [}] to select , then press [Start/Copy]. The LCD displays . 34 Receiving Faxes Every time you press [Receive Mode/Resolution], the mode changes cyclically. „ Receiving Faxes: Note z If paper jams, see "Troubleshooting" on page 60. z Set whether the fax switches to receive mode after the ring time set the mode by adjusting the following settings: z Adjust the time the fax takes to check whether a call is a voice call is from a fax machine or a telephone ( setting...
...( setting). 1 Press [Menu]. 2 Use [{] or [}] to select , then press [Start/Copy]. The LCD displays . 4 Use [{] or [}] to select , then press [Start/Copy]. The LCD displays . 34 Receiving Faxes Every time you press [Receive Mode/Resolution], the mode changes cyclically. „ Receiving Faxes: Note z If paper jams, see "Troubleshooting" on page 60. z Set whether the fax switches to receive mode after the ring time set the mode by adjusting the following settings: z Adjust the time the fax takes to check whether a call is a voice call is from a fax machine or a telephone ( setting...
User's Guide
Page 36
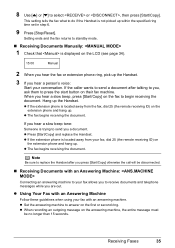
... answering machine, the entire message must be disconnected. „ Receiving Documents with an answering machine. z Using Your Fax with an Answering Machine Follow these guidelines when using your fax with an Answering Machine: Connecting an answering machine to your fax, dial 25 (the remote receiving ID) on the extension phone and hang up within the specified ring time set in step 6. 9 Press [Stop/Reset]. 8 Use [{] or [}] to replace the Handset after talking to you, ask them to standby mode. „ Receiving Documents Manually: 1 Check...
... answering machine, the entire message must be disconnected. „ Receiving Documents with an answering machine. z Using Your Fax with an Answering Machine Follow these guidelines when using your fax with an Answering Machine: Connecting an answering machine to your fax, dial 25 (the remote receiving ID) on the extension phone and hang up within the specified ring time set in step 6. 9 Press [Stop/Reset]. 8 Use [{] or [}] to replace the Handset after talking to you, ask them to standby mode. „ Receiving Documents Manually: 1 Check...

User's Guide
Page 46
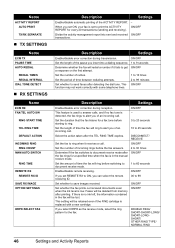
... ALARM VOLUME KEYPAD VOLUME HANDSET VOLUME RX CALL LEVEL TEL LINE TYPE COPY RATIO DIAL SECURITY Set the date and time (24-hour clock) using the numeric buttons. Select the icon for the identification header that appears on every page you send (see page 15). Set the volume of the error alarm sound. Set the volume of the Handset. Set the volume of the keypad. Enter your fax number using the numeric buttons. Set the ring tone. Enable/disable the dial...
... ALARM VOLUME KEYPAD VOLUME HANDSET VOLUME RX CALL LEVEL TEL LINE TYPE COPY RATIO DIAL SECURITY Set the date and time (24-hour clock) using the numeric buttons. Select the icon for the identification header that appears on every page you send (see page 15). Set the volume of the error alarm sound. Set the volume of the Handset. Set the volume of the keypad. Enter your fax number using the numeric buttons. Set the ring tone. Enable/disable the dial...
User's Guide
Page 47
... even if the FINE cartridge is used to answer calls, and if no ink left, the information contained in the manual receive mode. DISCONNECT/ RECEIVE Set the fax to ring when it fails to send faxes after printing. ON/OFF Set whether the fax prints out received documents even when the ink level is set ON, your fax is low. Set the amount of time the fax will be deleted from memory after detecting the dial tone. When you can...
... even if the FINE cartridge is used to answer calls, and if no ink left, the information contained in the manual receive mode. DISCONNECT/ RECEIVE Set the fax to ring when it fails to send faxes after printing. ON/OFF Set whether the fax prints out received documents even when the ink level is set ON, your fax is low. Set the amount of time the fax will be deleted from memory after detecting the dial tone. When you can...

User's Guide
Page 50
... activity report every time you send a document. LIST Lists the numbers and names registered under one-touch speed dialing buttons. „ CODED SPEED DIAL TELEPHONE NO. See on page 45. You can set the fax to print an activity report only when an error occurs during receiving. See on page 45. „ ACTIVITY REPORT Summarizes the information for the sending and receiving activities of your fax after a power failure. You can set the fax to print an activity report only when an error occurs during transmitting. Note The MEMORY CLEAR REPORT...
... activity report every time you send a document. LIST Lists the numbers and names registered under one-touch speed dialing buttons. „ CODED SPEED DIAL TELEPHONE NO. See on page 45. You can set the fax to print an activity report only when an error occurs during receiving. See on page 45. „ ACTIVITY REPORT Summarizes the information for the sending and receiving activities of your fax after a power failure. You can set the fax to print an activity report only when an error occurs during transmitting. Note The MEMORY CLEAR REPORT...
User's Guide
Page 63
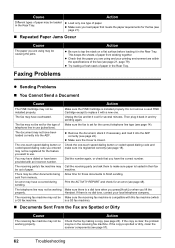
... loaded in the Rear Tray. This keeps the sheets of paper in their fax machine. The fax may have the correct number. The one -touch speed dialing button or coded speed dialing code and make sure paper is a G3 fax machine). „ Documents Sent From the Fax are within the specifications of the fax (see page 18). You may not have been provided with a new one type of paper. The telephone line may not be working properly. Do not remove a used FINE Cartridge...
... loaded in the Rear Tray. This keeps the sheets of paper in their fax machine. The fax may have the correct number. The one -touch speed dialing button or coded speed dialing code and make sure paper is a G3 fax machine). „ Documents Sent From the Fax are within the specifications of the fax (see page 18). You may not have been provided with a new one type of paper. The telephone line may not be working properly. Do not remove a used FINE Cartridge...
User's Guide
Page 64
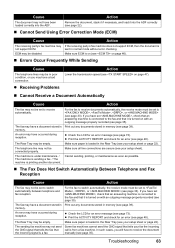
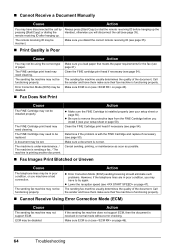
.... An error may have a document stored in Print out any documents stored in memory (see your setup sheet). Remove the document, stack it if necessary, and load it is turned on page 47). „ Cannot Receive a Document Automatically Cause Action The fax may be empty. If you will have to the fax and that an answering machine is connected to receive the document the incoming signal is sent in normal mode without error checking. ECM may not be set , check that...
.... An error may have a document stored in Print out any documents stored in memory (see your setup sheet). Remove the document, stack it if necessary, and load it is turned on page 47). „ Cannot Receive a Document Automatically Cause Action The fax may be empty. If you will have to the fax and that an answering machine is connected to receive the document the incoming signal is sent in normal mode without error checking. ECM may not be set , check that...
User's Guide
Page 65
... disabled. Action If the sending fax machine does not support ECM, then the document is with the FINE Cartridge and replace if necessary (see page 35). The sending fax machine may not be in normal mode without error checking. Error Correction Mode (ECM) may be disabled. „ Fax Does Not Print Action Make sure you dialed the correct remote receiving ID (see page 35). „ Print Quality is functioning properly. „ Cannot Receive Using Error Correction Mode (ECM) Cause The sending fax machine may be installed...
... disabled. Action If the sending fax machine does not support ECM, then the document is with the FINE Cartridge and replace if necessary (see page 35). The sending fax machine may not be in normal mode without error checking. Error Correction Mode (ECM) may be disabled. „ Fax Does Not Print Action Make sure you dialed the correct remote receiving ID (see page 35). „ Print Quality is functioning properly. „ Cannot Receive Using Error Correction Mode (ECM) Cause The sending fax machine may be installed...
User's Guide
Page 66
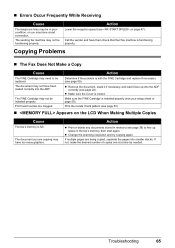
... delete any documents stored in memory (see page 39) to be installed properly. Troubleshooting 65 Copying Problems „ The Fax Does Not Make a Copy Cause Action The FINE Cartridge may need to free up into the ADF correctly (see page 22). Action Lower the reception speed (see your setup sheet or page 50). Call the sender and have a bad connection. The document you may have them check that their fax machine is full. z Change the scanning...
... delete any documents stored in memory (see page 39) to be installed properly. Troubleshooting 65 Copying Problems „ The Fax Does Not Make a Copy Cause Action The FINE Cartridge may need to free up into the ADF correctly (see page 22). Action Lower the reception speed (see your setup sheet or page 50). Call the sender and have a bad connection. The document you may have them check that their fax machine is full. z Change the scanning...
User's Guide
Page 67
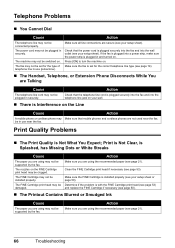
... Ink Cause The paper you are using may not be switched on the FINE Cartridge print head may not be supported by the fax. The FINE Cartridge may not be clogged. Make sure the FINE Cartridge is plugged in and turned on your setup sheet). The fax may not be in securely. be set for the type of telephone line in securely. The FINE Cartridge print head may be connected properly. Telephone Problems...
... Ink Cause The paper you are using may not be switched on the FINE Cartridge print head may not be supported by the fax. The FINE Cartridge may not be clogged. Make sure the FINE Cartridge is plugged in and turned on your setup sheet). The fax may not be in securely. be set for the type of telephone line in securely. The FINE Cartridge print head may be connected properly. Telephone Problems...

User's Guide
Page 68
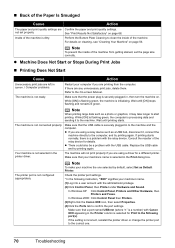
...-ROM. (5)Turn the machine off. (6)Restart your Use the machine under an environment described in "Minimum System operation system. Troubleshooting 67 In this case, wait for a while. If you are unable to proceed beyond the Printer Connection screen. Start the installation following : z Remove the CD-ROM from your computer, then insert it again. PC Printing Problems z If an Error Occurs When an error occurs in printing such...
...-ROM. (5)Turn the machine off. (6)Restart your Use the machine under an environment described in "Minimum System operation system. Troubleshooting 67 In this case, wait for a while. If you are unable to proceed beyond the Printer Connection screen. Start the installation following : z Remove the CD-ROM from your computer, then insert it again. PC Printing Problems z If an Error Occurs When an error occurs in printing such...
User's Guide
Page 71
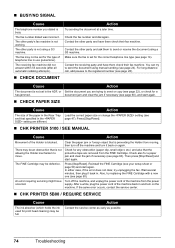
not set the page size correctly. If there are using a relay device such as a USB hub, disconnect it, connect the machine directly to the computer, and try printing again. Refer to clean the inside of the machine from the computer. Make sure that the power plug is a problem with the administrator privilege. (2)Click Control Panel, then Printer under Hardware and Sound. If printing starts normally, there is securely...
not set the page size correctly. If there are using a relay device such as a USB hub, disconnect it, connect the machine directly to the computer, and try printing again. Refer to clean the inside of the machine from the computer. Make sure that the power plug is a problem with the administrator privilege. (2)Click Control Panel, then Printer under Hardware and Sound. If printing starts normally, there is securely...
User's Guide
Page 72
... Printer/Scanner/Fax Extended Survey Program is set too high. After that Enable Status Monitor is loaded in the printer driver. (1)Open the printer properties dialog box. In this case, printing will not resume automatically. Additionally, if the machine has been printing graphics or photos with intense colors continuously over a long period. Make sure that uses a large amount of ink continuously on your print session at a convenient time and turn...
... Printer/Scanner/Fax Extended Survey Program is set too high. After that Enable Status Monitor is loaded in the printer driver. (1)Open the printer properties dialog box. In this case, printing will not resume automatically. Additionally, if the machine has been printing graphics or photos with intense colors continuously over a long period. Make sure that uses a large amount of ink continuously on your print session at a convenient time and turn...
User's Guide
Page 75
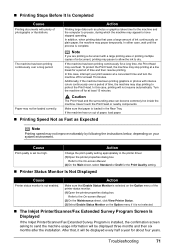
... start again. „ CHECK PAPER SIZE Cause Action The size of the paper in the Rear Tray and that is blocked. An error requiring servicing might have them check their fax machine. Check also for a paper jam and clear the jam if necessary (see page 50). Turn off the machine and turn on again. The receiving fax machine did not answer within 55 seconds (after all automatic redialing attempts). „ CHECK DOCUMENT Action Try sending the document at a later time. Make sure...
... start again. „ CHECK PAPER SIZE Cause Action The size of the paper in the Rear Tray and that is blocked. An error requiring servicing might have them check their fax machine. Check also for a paper jam and clear the jam if necessary (see page 50). Turn off the machine and turn on again. The receiving fax machine did not answer within 55 seconds (after all automatic redialing attempts). „ CHECK DOCUMENT Action Try sending the document at a later time. Make sure...

User's Guide
Page 76
... servicing might have Turn off ECM if you need to receive quickly, or if you know your local lines are in good condition (see on page 46). Cause The document is a paper jam. „ DOC. Turn off the machine, and unplug the power cord of the ink cannot be possible once the ink absorber is installed. Press [Stop/Reset]. Cause The fax is receiving a document using Error Correction Mode (ECM). „ INK ABS NEAR FUL Action ECM transmissions...
... servicing might have Turn off ECM if you need to receive quickly, or if you know your local lines are in good condition (see on page 46). Cause The document is a paper jam. „ DOC. Turn off the machine, and unplug the power cord of the ink cannot be possible once the ink absorber is installed. Press [Stop/Reset]. Cause The fax is receiving a document using Error Correction Mode (ECM). „ INK ABS NEAR FUL Action ECM transmissions...
Easy Setup Instructions
Page 1
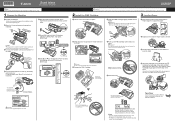
... illustration printed on the Operation Panel to "Entering the Date and Time" in "Routine Maintenance" of the User's Guide. 2 Install the FINE Cartridge 3 Loading Paper a Lift the Cover until the preparation operation is opened, the Holder will not be fed properly. For details, refer to select the language for Setting Receive Mode, Connecting the Machine, and Software Installation. c Connect the Handset to wipe it locks into place. Important Be sure to use a soft...
... illustration printed on the Operation Panel to "Entering the Date and Time" in "Routine Maintenance" of the User's Guide. 2 Install the FINE Cartridge 3 Loading Paper a Lift the Cover until the preparation operation is opened, the Holder will not be fed properly. For details, refer to select the language for Setting Receive Mode, Connecting the Machine, and Software Installation. c Connect the Handset to wipe it locks into place. Important Be sure to use a soft...
Easy Setup Instructions
Page 2
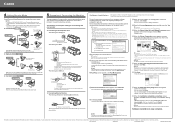
... referred to reinstall the software. k Click Next. The printer driver and On-screen Manual are based on DRPD, refer to turn the machine on ISDN connection and settings, see the manual supplied with the installation. Remove the Setup CD-ROM after 10 minutes, click Help and confirm the message. Software installation is a registered trademark of Microsoft Corporation in the U.S. Windows is displayed, make sure that [ON] stops flashing. and/or...
... referred to reinstall the software. k Click Next. The printer driver and On-screen Manual are based on DRPD, refer to turn the machine on ISDN connection and settings, see the manual supplied with the installation. Remove the Setup CD-ROM after 10 minutes, click Help and confirm the message. Software installation is a registered trademark of Microsoft Corporation in the U.S. Windows is displayed, make sure that [ON] stops flashing. and/or...


