
User Manual
Page 2
... experienced radio/TV technician for a Class B digital device, pursuant to which business proprietors can radiate radio frequency energy and, if not installed and used in the manual. Canon U.S.A. Inc. The targeted products are office equipment, such as set out in a particular installation. i These limits are uniform among participating nations. Do not make any interference received, including interference that interference...
... experienced radio/TV technician for a Class B digital device, pursuant to which business proprietors can radiate radio frequency energy and, if not installed and used in the manual. Canon U.S.A. Inc. The targeted products are office equipment, such as set out in a particular installation. i These limits are uniform among participating nations. Do not make any interference received, including interference that interference...

User Manual
Page 4
... Reference Guide (supplied with the scanner), the User Manual (this and the following locations during software installation. Hint • The User Manual and the CapturePerfect 3.0 document files are available for setting up job registration tools. The Hardware section provides general information about the scanner operational settings, maintenance, and troubleshooting. After reading the manuals, store them in the Easy Start Guide to use . Manuals for the Scanner The documentation for the scanner consists of all manuals are installed in the menu during software installation...
... Reference Guide (supplied with the scanner), the User Manual (this and the following locations during software installation. Hint • The User Manual and the CapturePerfect 3.0 document files are available for setting up job registration tools. The Hardware section provides general information about the scanner operational settings, maintenance, and troubleshooting. After reading the manuals, store them in the Easy Start Guide to use . Manuals for the Scanner The documentation for the scanner consists of all manuals are installed in the menu during software installation...
User Manual
Page 7
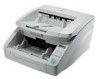
... Mode Functions 4-10 Chapter 5 Maintenance 1. Features 1-6 3. Clearing a Paper Jam or Double Feed Error 3-23 Paper Jam Handling 3-23 Handling a Double Feed 3-24 Chapter 4 Other Functions 1. Regular Maintenance 5-2 Cleaning the Scanner 5-2 Cleaning the Sensors 5-2 Cleaning the Scanning Glass and Rollers 5-3 Power Outlet 5-4 2. Turning the Power ON (Scanner Recognition 2-9 About the Power Switch 2-9 Scanner Recognition 2-9 Chapter 3 Basic Operation 1. Hardware Table of Parts 1-10 Front View, Feeder Inlet, and Eject Outlet.......... 1-10 Rear View 1-11 Control Panel...
... Mode Functions 4-10 Chapter 5 Maintenance 1. Features 1-6 3. Clearing a Paper Jam or Double Feed Error 3-23 Paper Jam Handling 3-23 Handling a Double Feed 3-24 Chapter 4 Other Functions 1. Regular Maintenance 5-2 Cleaning the Scanner 5-2 Cleaning the Sensors 5-2 Cleaning the Scanning Glass and Rollers 5-3 Power Outlet 5-4 2. Turning the Power ON (Scanner Recognition 2-9 About the Power Switch 2-9 Scanner Recognition 2-9 Chapter 3 Basic Operation 1. Hardware Table of Parts 1-10 Front View, Feeder Inlet, and Eject Outlet.......... 1-10 Rear View 1-11 Control Panel...

User Manual
Page 16
... a document and skips saving the image of any side it recognizes from a single scan pass. Chapter 1 Before You Start Using the Scanner ● Skip Blank Page The scanner scans both sides, and the images combined into a single image. Document to A1-size (23.4" × 33.1" (594 × 841 mm)) documents when used together with the scanner) or another application program that appear on scanned images form binding holes on the software application, can be a blank page...
... a document and skips saving the image of any side it recognizes from a single scan pass. Chapter 1 Before You Start Using the Scanner ● Skip Blank Page The scanner scans both sides, and the images combined into a single image. Document to A1-size (23.4" × 33.1" (594 × 841 mm)) documents when used together with the scanner) or another application program that appear on scanned images form binding holes on the software application, can be a blank page...

User Manual
Page 36
... on the control panel. Document Feed and Eject Trays Before scanning, prepare the Document Feed and Eject Trays for the documents to 100 sheets 3-6 Menu Key Tray Position Setting The height of the Document Feed Tray is set by the Tray Position in the User Mode setting, which minimizes the time required to start feeding by specifying in advance the proper position for the desired paper size. The User Mode is the lowest position). 1. For the DR-6050C [0]: To...
... on the control panel. Document Feed and Eject Trays Before scanning, prepare the Document Feed and Eject Trays for the documents to 100 sheets 3-6 Menu Key Tray Position Setting The height of the Document Feed Tray is set by the Tray Position in the User Mode setting, which minimizes the time required to start feeding by specifying in advance the proper position for the desired paper size. The User Mode is the lowest position). 1. For the DR-6050C [0]: To...

User Manual
Page 41
... Continuous Feeding is disabled). Manual Feeding The Separation Off key lights and the Document Feed Tray rises so that cannot be pulled in the Document Feed Tray are loaded together. • To scan bound multi-page documents such as a way to be automatically transported. Hint • The [Separation Off] key is linked to the [Manual Feeding] Feed Option setting (p. 8-20) of document pages that documents can be positioned manually for the ISIS/TWAIN driver, or by the feed roller...
... Continuous Feeding is disabled). Manual Feeding The Separation Off key lights and the Document Feed Tray rises so that cannot be pulled in the Document Feed Tray are loaded together. • To scan bound multi-page documents such as a way to be automatically transported. Hint • The [Separation Off] key is linked to the [Manual Feeding] Feed Option setting (p. 8-20) of document pages that documents can be positioned manually for the ISIS/TWAIN driver, or by the feed roller...

User Manual
Page 42
... the Document Feed Tray opening one page at a time, making operation easier. Feed Roller Retard Roller IMPORTANT When the Continuous Manual Feeding Mode is set to OFF) when finished scanning. Otherwise, normal continuous feeding will be hand fed to display "Manual Feed Mode". (See p. 4-8.) 3. Confirm your settings. [ON]: Disables the pickup roller so that loaded documents have to be disabled the next time someone uses the scanner. Hint For Manual Feeding, you must feed document one page at a time. Continuous Manual Feeding Mode Enable...
... the Document Feed Tray opening one page at a time, making operation easier. Feed Roller Retard Roller IMPORTANT When the Continuous Manual Feeding Mode is set to OFF) when finished scanning. Otherwise, normal continuous feeding will be hand fed to display "Manual Feed Mode". (See p. 4-8.) 3. Confirm your settings. [ON]: Disables the pickup roller so that loaded documents have to be disabled the next time someone uses the scanner. Hint For Manual Feeding, you must feed document one page at a time. Continuous Manual Feeding Mode Enable...
User Manual
Page 51
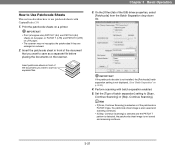
...] setting to use patchcode sheets with batch separation enabled. 5. Set the [Type of the document that you want to save as separate files. IMPORTANT If the patchcode decoder is not installed, the [Patchcode] batch separation setting is not saved and scanning continues. 3-21 Insert the patchcode sheet in front of the ISIS driver properties, select [Patchcode] from the Batch Separation drop-down list. Perform scanning with...
...] setting to use patchcode sheets with batch separation enabled. 5. Set the [Type of the document that you want to save as separate files. IMPORTANT If the patchcode decoder is not installed, the [Patchcode] batch separation setting is not saved and scanning continues. 3-21 Insert the patchcode sheet in front of the ISIS driver properties, select [Patchcode] from the Batch Separation drop-down list. Perform scanning with...

User Manual
Page 72
... your local authorized Canon dealer or service representative. However, the messages will continue to be displayed each time the scanner is turned ON until the roller counter is configured to reset the roller counter when replacing the rollers. (See "Checking and Resetting the Page Counter" on the display panel can be reset. 5-5 Replacing the Transport Rollers As the rollers start to wear out, feeding quality declines, and document feed errors, such as paper jams and document misfeeds may occur more...
... your local authorized Canon dealer or service representative. However, the messages will continue to be displayed each time the scanner is turned ON until the roller counter is configured to reset the roller counter when replacing the rollers. (See "Checking and Resetting the Page Counter" on the display panel can be reset. 5-5 Replacing the Transport Rollers As the rollers start to wear out, feeding quality declines, and document feed errors, such as paper jams and document misfeeds may occur more...

User Manual
Page 93
... used. Photocopy the document, and scan the copy. Some applications do not support functions such as border removal is abnormal for certain documents. Brightness may be scratched. Clean the scanning glass and rollers. (See "Regular Maintenance" on p. 5-2.) If lines still appear on the scanned image. Problem Cause Solution The scanned image is enabled when scanning a document that page individually. Set Scanning Side to [Skip blank page], images of page size, so scanning with autodetection disabled. 6-8 A document smaller than the preset paper size has been scanned...
... used. Photocopy the document, and scan the copy. Some applications do not support functions such as border removal is abnormal for certain documents. Brightness may be scratched. Clean the scanning glass and rollers. (See "Regular Maintenance" on p. 5-2.) If lines still appear on the scanned image. Problem Cause Solution The scanned image is enabled when scanning a document that page individually. Set Scanning Side to [Skip blank page], images of page size, so scanning with autodetection disabled. 6-8 A document smaller than the preset paper size has been scanned...

User Manual
Page 98
... used by the ISIS/TWAIN driver. (See "[Barcode] Dialog Box Settings" on p. 8-22.) Patchcode Decoder (Product Code: 4009B002) This unit detects patchcode sheets within documents. (See "Using Patchcode Sheets (Option)" on p. 3-20.) Consumables Roller Replacement Kit (Product Code: 4009B001) Replacement kit for transport rollers (pick-up roller, feed rollers, and retard roller). (See "Replacing the Transport Rollers" on software that enables barcode recognition by the imprinter. When the rollers start to wear out, problems, such as paper jams and misfeeds, are consumable parts...
... used by the ISIS/TWAIN driver. (See "[Barcode] Dialog Box Settings" on p. 8-22.) Patchcode Decoder (Product Code: 4009B002) This unit detects patchcode sheets within documents. (See "Using Patchcode Sheets (Option)" on p. 3-20.) Consumables Roller Replacement Kit (Product Code: 4009B001) Replacement kit for transport rollers (pick-up roller, feed rollers, and retard roller). (See "Replacing the Transport Rollers" on software that enables barcode recognition by the imprinter. When the rollers start to wear out, problems, such as paper jams and misfeeds, are consumable parts...

User Manual
Page 124
... from the scanner to the computer is shortened. • When JPEG Transfer is selected, image data from the ISIS/TWAIN driver or application program. - Chapter 8 ISIS/TWAIN Driver Settings [Staple Detection] Check Box Select this check box to stop feeding when the sensor detects a folded corner on a document, which occurs when an attempt is made to feed stapled documents. (See "Staple Detection" on p. 4-6.) [JPEG Transfer] Check Box When this reduces the file size, the image quality...
... from the scanner to the computer is shortened. • When JPEG Transfer is selected, image data from the ISIS/TWAIN driver or application program. - Chapter 8 ISIS/TWAIN Driver Settings [Staple Detection] Check Box Select this check box to stop feeding when the sensor detects a folded corner on a document, which occurs when an attempt is made to feed stapled documents. (See "Staple Detection" on p. 4-6.) [JPEG Transfer] Check Box When this reduces the file size, the image quality...

User Manual
Page 125
...] key on the control panel, the feeding option changes to [Manual Feeding]. [Panel-Feeding] Start scanning with an application program. When all of double feeds may not word correctly. The scanner enters a waiting state when the document has been scanned, and then continues scanning when it . When all of the documents have been scanned, press the stop key to stop scanning. Chapter 8 ISIS/TWAIN Driver Settings IMPORTANT If the documents overlap by the application program. [Standard Feeding] feeding option, batch...
...] key on the control panel, the feeding option changes to [Manual Feeding]. [Panel-Feeding] Start scanning with an application program. When all of double feeds may not word correctly. The scanner enters a waiting state when the document has been scanned, and then continues scanning when it . When all of the documents have been scanned, press the stop key to stop scanning. Chapter 8 ISIS/TWAIN Driver Settings IMPORTANT If the documents overlap by the application program. [Standard Feeding] feeding option, batch...

User Manual
Page 139
... the file format for saved files. [Save to Pictures folder] Check Box Select this check box to save image files to the Pictures folder of the folder in the Windows you to 32 alphanumeric characters. • A time stamp is selected when you click the [OK] button. Hint • File names may consist of scanning. When scanning multi-page documents, image files are created as follows according to save . If the error appears, change the file format or scanner mode. [Setting] Button This button...
... the file format for saved files. [Save to Pictures folder] Check Box Select this check box to save image files to the Pictures folder of the folder in the Windows you to 32 alphanumeric characters. • A time stamp is selected when you click the [OK] button. Hint • File names may consist of scanning. When scanning multi-page documents, image files are created as follows according to save . If the error appears, change the file format or scanner mode. [Setting] Button This button...

Reference Guide
Page 6
... available for viewing from the User Manual. CapturePerfect 3.0 Operation Guide (Electronic Manual) This is the operation guide for purchasing the Canon imageFORMULA DR-6050C/DR-7550C/DR-9050C Document Scanner. User Manual CapturePerfect 3.0 Operation Guide • Electronic versions of the basic scanner operating instructions extracted from the Setup CD. Easy Start Guide This manual describes the procedures for use the ISIS/ TWAIN driver with its capabilities and make the most of two sections: Hardware and Software. User Manual (Electronic Manual) This manual consists of its many...
... available for viewing from the User Manual. CapturePerfect 3.0 Operation Guide (Electronic Manual) This is the operation guide for purchasing the Canon imageFORMULA DR-6050C/DR-7550C/DR-9050C Document Scanner. User Manual CapturePerfect 3.0 Operation Guide • Electronic versions of the basic scanner operating instructions extracted from the Setup CD. Easy Start Guide This manual describes the procedures for use the ISIS/ TWAIN driver with its capabilities and make the most of two sections: Hardware and Software. User Manual (Electronic Manual) This manual consists of its many...

Reference Guide
Page 32
... control panel. Feed Roller Retard Roller IMPORTANT When the Continuous Manual Feeding Mode is activated. 2. Press the [ ] key five times to display "Manual Feed Mode". 3. Hint For Manual Feeding, you must feed document one page at a time. Menu Key The User Mode is set to OFF) when finished scanning. Confirm your settings. [ON]: Disables the pickup roller so that loaded documents have to be disabled the next time someone uses the scanner. Continuous Manual Feeding Mode Enable the Continuous Manual Feeding Mode from the User Mode, make...
... control panel. Feed Roller Retard Roller IMPORTANT When the Continuous Manual Feeding Mode is activated. 2. Press the [ ] key five times to display "Manual Feed Mode". 3. Hint For Manual Feeding, you must feed document one page at a time. Menu Key The User Mode is set to OFF) when finished scanning. Confirm your settings. [ON]: Disables the pickup roller so that loaded documents have to be disabled the next time someone uses the scanner. Continuous Manual Feeding Mode Enable the Continuous Manual Feeding Mode from the User Mode, make...

Reference Guide
Page 47
...errors, such as paper jams and document misfeeds may occur more frequently. Roller Replacement Cycle ■ Roller Replacement Kit The Roller Replacement Kit consists of the scanner, and cannot be cleared by the currently installed feed rollers. 2. If this happens, replace the rollers, regardless of the page count of pages transported by pressing the Count Clear key. Pickup Roller Maintenance IMPORTANT • When the roller replacement message appears, purchase the Roller Replacement Kit and replace the rollers by following the relevant steps in the User Mode setting...
...errors, such as paper jams and document misfeeds may occur more frequently. Roller Replacement Cycle ■ Roller Replacement Kit The Roller Replacement Kit consists of the scanner, and cannot be cleared by the currently installed feed rollers. 2. If this happens, replace the rollers, regardless of the page count of pages transported by pressing the Count Clear key. Pickup Roller Maintenance IMPORTANT • When the roller replacement message appears, purchase the Roller Replacement Kit and replace the rollers by following the relevant steps in the User Mode setting...

Reference Guide
Page 65
...), 0.8 A Power Consumption Ink Cartridge: Green (Product Code: 3693A004) This green ink cartridge is used by the imprinter. 120 V model Scanning: 83 W Stand-by Mode (Sleep Mode): 3.2 W 220-240 V model Scanning: 84 W 5 Stand-by the imprinter. When the rollers start to wear out, problems, such as paper jams and misfeeds, are subject to occur. Consumables Roller Replacement Kit (Product Code: 4009B001) Replacement kit for transport rollers (pick-up roller, feed rollers, and retard roller). (See "Replacing the Transport Rollers...
...), 0.8 A Power Consumption Ink Cartridge: Green (Product Code: 3693A004) This green ink cartridge is used by the imprinter. 120 V model Scanning: 83 W Stand-by Mode (Sleep Mode): 3.2 W 220-240 V model Scanning: 84 W 5 Stand-by the imprinter. When the rollers start to wear out, problems, such as paper jams and misfeeds, are subject to occur. Consumables Roller Replacement Kit (Product Code: 4009B001) Replacement kit for transport rollers (pick-up roller, feed rollers, and retard roller). (See "Replacing the Transport Rollers...

Easy Start Guide
Page 1
... tools. The Software section describes how to use the ISIS/ TWAIN driver with its many functions. CAUTION ❏ Before installing the software, make sure your fingers, resulting in the Easy Start Guide to set up the scanner, make sure all other countries. • Other brands and product names used for storing or transporting the scanner. If this and the following manuals thoroughly before using Windows Vista, the "User Account Control" dialog box...
... tools. The Software section describes how to use the ISIS/ TWAIN driver with its many functions. CAUTION ❏ Before installing the software, make sure your fingers, resulting in the Easy Start Guide to set up the scanner, make sure all other countries. • Other brands and product names used for storing or transporting the scanner. If this and the following manuals thoroughly before using Windows Vista, the "User Account Control" dialog box...
Easy Start Guide
Page 2
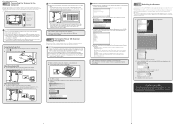
... Control Panel to the computer. Set the default page size and click [OK]. 5. Power Switch 3. Then open [System] and click [Device Manager] on both the scanner and the computer. Select the method that the scanner and computer are using ) The [Configure Device Settings] dialog box appears. 4. Obtain a cable with the scanner. Set the terminators of all other devices in an expansion slot of the USB cable to finish scanner selection. A SCSI cable is finished. Press the power switch to a SCSI card installed...
... Control Panel to the computer. Set the default page size and click [OK]. 5. Power Switch 3. Then open [System] and click [Device Manager] on both the scanner and the computer. Select the method that the scanner and computer are using ) The [Configure Device Settings] dialog box appears. 4. Obtain a cable with the scanner. Set the terminators of all other devices in an expansion slot of the USB cable to finish scanner selection. A SCSI cable is finished. Press the power switch to a SCSI card installed...


