User Manual
Page 2
... Video Display 24 Basic operations to use the OSD menu 24 Adjusting Image Quality While Viewing the Entire Image 25 Temporarily Saving Parameters (Anchor Point Setting) 27 Enlarging the display (Zoom function) 27 Adjusting image quality for each screen in two screen display 28 Changing the screen display area (for video of 4096x2160) 28 Performing calibrations 28 Export/Import 30 Set Date/Time 32 Inputting Characters 32 Using the Function (F) Buttons 33 Using the Channel (CH) Button 33 Checking Signal...
... Video Display 24 Basic operations to use the OSD menu 24 Adjusting Image Quality While Viewing the Entire Image 25 Temporarily Saving Parameters (Anchor Point Setting) 27 Enlarging the display (Zoom function) 27 Adjusting image quality for each screen in two screen display 28 Changing the screen display area (for video of 4096x2160) 28 Performing calibrations 28 Export/Import 30 Set Date/Time 32 Inputting Characters 32 Using the Function (F) Buttons 33 Using the Channel (CH) Button 33 Checking Signal...

User Manual
Page 8
... may change due to remove dust from the surface of light. Less than 99.99% of the pixels operating to the panel. • The screen and cabinet may occur where you see remnants of the LCD panel. The screen may be scratched if wiped too hard with a cleaning cloth with foreign particles attached. • When the screen is produced using the video display. This...
... may change due to remove dust from the surface of light. Less than 99.99% of the pixels operating to the panel. • The screen and cabinet may occur where you see remnants of the LCD panel. The screen may be scratched if wiped too hard with a cleaning cloth with foreign particles attached. • When the screen is produced using the video display. This...

User Manual
Page 10
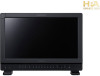
... "Canon Log 3". Features 10 The DP-V1710 Video Display provides a wide range of workflows on location from videoing to editing. • Supports 4K RAW. A 4K RAW workflow is provided by a metal outer covering • Includes a convenient carrying handle for comparison and image quality adjustment using meta information from the camera.) • Supports multiple LUT/CDL settings. • Supports the "2 Sample Interleave" signal transmission method. • Supports dual screen...
... "Canon Log 3". Features 10 The DP-V1710 Video Display provides a wide range of workflows on location from videoing to editing. • Supports 4K RAW. A 4K RAW workflow is provided by a metal outer covering • Includes a convenient carrying handle for comparison and image quality adjustment using meta information from the camera.) • Supports multiple LUT/CDL settings. • Supports the "2 Sample Interleave" signal transmission method. • Supports dual screen...

User Manual
Page 17
...install a ventilation fan. • When installing the video display on a wall, make sufficient space from its back. In order to maintain the operating temperature condition of the video display (0 ˚C to perform this step with at least 4 cm (1.6 in a surrounding area, the operating temperature may increase, causing a failure or overheating. Installation/Connection Mounting... wall so that cables are not squeezed or twisted. • Avoid touching the screen during installation/removal. 1 Attach a commercially available stand or wall mount bracket using the screw holes on the back...
...install a ventilation fan. • When installing the video display on a wall, make sufficient space from its back. In order to maintain the operating temperature condition of the video display (0 ˚C to perform this step with at least 4 cm (1.6 in a surrounding area, the operating temperature may increase, causing a failure or overheating. Installation/Connection Mounting... wall so that cables are not squeezed or twisted. • Avoid touching the screen during installation/removal. 1 Attach a commercially available stand or wall mount bracket using the screw holes on the back...

User Manual
Page 22
... power indicator lights up in amber. • DC power supply input terminal specifications are shown below. The power indicator will flash during firmware updates or when an error is detected even if it is displayed. • Do not connect cables for example, the video becomes choppy or nothing is set from [Off] or [1 (dark)] to [5 (brightest)] ( 73). Using a power supply with incompatible voltage and polarity may not work normally: for audio devices or sound cables...
... power indicator lights up in amber. • DC power supply input terminal specifications are shown below. The power indicator will flash during firmware updates or when an error is detected even if it is displayed. • Do not connect cables for example, the video becomes choppy or nothing is set from [Off] or [1 (dark)] to [5 (brightest)] ( 73). Using a power supply with incompatible voltage and polarity may not work normally: for audio devices or sound cables...

User Manual
Page 26
... to the original OSD menu. Selecting [RGB] will be displayed. 3 Switch the guide in the upper right area of the slider screen using the jog dial ( ). • The indication changes to [RGB], [R], [G], and [B]. Operating the Video Display Color temperature detailed settings (gain, bias) You can adjust RGB all at once or individually when the screens for adjusting [Gain] or [Bias] are displayed. 1 Open the [Color Temperature] menu. 26 [Adjustment] [Color Temperature] • [Gain R], [Gain G], [Gain...
... to the original OSD menu. Selecting [RGB] will be displayed. 3 Switch the guide in the upper right area of the slider screen using the jog dial ( ). • The indication changes to [RGB], [R], [G], and [B]. Operating the Video Display Color temperature detailed settings (gain, bias) You can adjust RGB all at once or individually when the screens for adjusting [Gain] or [Bias] are displayed. 1 Open the [Color Temperature] menu. 26 [Adjustment] [Color Temperature] • [Gain R], [Gain G], [Gain...

User Manual
Page 28
... be changed on the right: [Channel Settings] [Picture Mode R] 4 Adjusting the image quality. 5 When adjustments are Konika Minolta Display Color Analyzers CA-310 and CA-210. Performing calibrations ( 46) You can be trimmed for display. 1 Press the jog dial ( ) while the OSD menu is open: -- Be sure to also read the instruction manual of the CA-310 and CA-210. 1 Connect the display color analyzer to the USB port...
... be changed on the right: [Channel Settings] [Picture Mode R] 4 Adjusting the image quality. 5 When adjustments are Konika Minolta Display Color Analyzers CA-310 and CA-210. Performing calibrations ( 46) You can be trimmed for display. 1 Press the jog dial ( ) while the OSD menu is open: -- Be sure to also read the instruction manual of the CA-310 and CA-210. 1 Connect the display color analyzer to the USB port...

User Manual
Page 29
... the probe as shown below according to the displayed content. Operating the Video Display 2 Select [User 1] to [User 7] and then open the [Calibration] menu. 1 [Adjustment] [Picture Mode] [User 1] to [User 7] 2 [Adjustment] [Detail Settings] [Calibration] • Set each target value. 3 Press the jog dial and select [Start]. 29 • Please follow the information indicated on the screen. 4 Initialize the sensor. • Set the mode dial of the Universal Measuring Probe to [0-CAL...
... the probe as shown below according to the displayed content. Operating the Video Display 2 Select [User 1] to [User 7] and then open the [Calibration] menu. 1 [Adjustment] [Picture Mode] [User 1] to [User 7] 2 [Adjustment] [Detail Settings] [Calibration] • Set each target value. 3 Press the jog dial and select [Start]. 29 • Please follow the information indicated on the screen. 4 Initialize the sensor. • Set the mode dial of the Universal Measuring Probe to [0-CAL...

User Manual
Page 30
Operating the Video Display Export/Import You can export/import LUT and CDL parameters as well as main menu settings. 30 LUT Import ( 45) 1 Insert a USB memory stick into the USB port of the main unit. 2 Open the [LUT Import] menu. [Adjustment] [Detail Settings] [LUT Import] 3 Select the file using the jog dial. • In the [Filename] field, search and display a file with extension [.clut...
Operating the Video Display Export/Import You can export/import LUT and CDL parameters as well as main menu settings. 30 LUT Import ( 45) 1 Insert a USB memory stick into the USB port of the main unit. 2 Open the [LUT Import] menu. [Adjustment] [Detail Settings] [LUT Import] 3 Select the file using the jog dial. • In the [Filename] field, search and display a file with extension [.clut...

User Manual
Page 35
... right. Note • When [Multi View (Dual)] or [Multi View (Quad)] is fixed at "45000". The following characters can be entered. There are two tally lights, on the screen. Operating the Video Display 1 Connect an external control device to the REMOTE terminal. 2 Open the [Remote(GPI)] menu. [System Settings] [Network/Remote(GPI) Settings] [Remote(GPI)] • The pin selection screen will be displayed. 35 3 Select a pin number using the jog dial and press...
... right. Note • When [Multi View (Dual)] or [Multi View (Quad)] is fixed at "45000". The following characters can be entered. There are two tally lights, on the screen. Operating the Video Display 1 Connect an external control device to the REMOTE terminal. 2 Open the [Remote(GPI)] menu. [System Settings] [Network/Remote(GPI) Settings] [Remote(GPI)] • The pin selection screen will be displayed. 35 3 Select a pin number using the jog dial and press...

User Manual
Page 40
... 3000 Adjusts the white level of the image. (Increments of 1) When using DC power, the upper limit of the setting value is [1000] when [Backlight Control] is set each item in optimum gamma and color gamut. The factory defaults differ according to the [Picture Mode] setting. ( 51) 40 Sub Menu Setting Options (Bold: factory default) Picture Mode SMPTE-C EBU ITU-R BT.709 ITU-R BT.2020 Adobe RGB DCI-P3 User 1 to User 7 Canon...
... 3000 Adjusts the white level of the image. (Increments of 1) When using DC power, the upper limit of the setting value is [1000] when [Backlight Control] is set each item in optimum gamma and color gamut. The factory defaults differ according to the [Picture Mode] setting. ( 51) 40 Sub Menu Setting Options (Bold: factory default) Picture Mode SMPTE-C EBU ITU-R BT.709 ITU-R BT.2020 Adobe RGB DCI-P3 User 1 to User 7 Canon...

User Manual
Page 47
...-P3 User 1 to User 7 Select the Picture Mode. [User 1] to factory default. Performs copy. Return [Picture Mode] to [User 7]: Select from other than the currently set mode. Note that in [User 1] to [User 7] mode where you are performing calibration, the setting returns to the value after calibration instead of [User 1] to [User 7] Copy the Picture Mode settings. OSD Menu Sub Menu Color Gamut Gamma Start Copy Picture Mode10 Picture Mode Execute Picture Mode Name Anchor Adjustment Reset Setting Options (Bold: factory default) SMPTE-C Sets the color gamut...
...-P3 User 1 to User 7 Select the Picture Mode. [User 1] to factory default. Performs copy. Return [Picture Mode] to [User 7]: Select from other than the currently set mode. Note that in [User 1] to [User 7] mode where you are performing calibration, the setting returns to the value after calibration instead of [User 1] to [User 7] Copy the Picture Mode settings. OSD Menu Sub Menu Color Gamut Gamma Start Copy Picture Mode10 Picture Mode Execute Picture Mode Name Anchor Adjustment Reset Setting Options (Bold: factory default) SMPTE-C Sets the color gamut...

User Manual
Page 53
... [Channel Settings]. "Supported Signal Format" ( 82) 53 Sub Menu Setting Options Select Channel1 CH1 to each of [Channel Settings] to CH20 Display the channel number. Input Configuration 6G/3G/HD-SDI 3G-SDI RAW HDMI - (Not set) Select the input. Factory default depend on the channel ( 34). Select Input Signal2 Automatic Quad Input Dual Input A,B Dual Input C,D Single Input A Single Input B Single Input C Single Input D Sets the signal display method ( 20). [Automatic]: The display method...
... [Channel Settings]. "Supported Signal Format" ( 82) 53 Sub Menu Setting Options Select Channel1 CH1 to each of [Channel Settings] to CH20 Display the channel number. Input Configuration 6G/3G/HD-SDI 3G-SDI RAW HDMI - (Not set) Select the input. Factory default depend on the channel ( 34). Select Input Signal2 Automatic Quad Input Dual Input A,B Dual Input C,D Single Input A Single Input B Single Input C Single Input D Sets the signal display method ( 20). [Automatic]: The display method...

User Manual
Page 54
... image. [2 Sample Interleave]: Displays a signal transmitted divided into a 2K/HD signal as a single image. [Multi View (Dual)]: Each of the images from the two inputs (each input up to a 1920x1080 signal) are supported for 4K video signals. OSD Menu Sub Menu Image Division 54 Setting Options Sets the display method when using either [Quad Input] or [Dual Input]. Two division methods "Square Division" and "2 Sample Interleave" are shown in two screens. When [Input Configuration...
... image. [2 Sample Interleave]: Displays a signal transmitted divided into a 2K/HD signal as a single image. [Multi View (Dual)]: Each of the images from the two inputs (each input up to a 1920x1080 signal) are supported for 4K video signals. OSD Menu Sub Menu Image Division 54 Setting Options Sets the display method when using either [Quad Input] or [Dual Input]. Two division methods "Square Division" and "2 Sample Interleave" are shown in two screens. When [Input Configuration...

User Manual
Page 55
... to input signal terminal. 5 This setting becomes invalid except for enabling image quality setting functions in 4:4:4 RGB 10-bit format. 4 When [Single] is selected, this function: [Peaking], [False Color], [Various Function (Monochrome, Blue Only, Red Off, Green Off, Blue Off)] Separator On, Off [Left and Right]: Entire screen [Left]: Left screen only [Right]: Right screen only In the [Multi View (Quad)] or [Multi View (Dual)] display, displays...
... to input signal terminal. 5 This setting becomes invalid except for enabling image quality setting functions in 4:4:4 RGB 10-bit format. 4 When [Single] is selected, this function: [Peaking], [False Color], [Various Function (Monochrome, Blue Only, Red Off, Green Off, Blue Off)] Separator On, Off [Left and Right]: Entire screen [Left]: Left screen only [Right]: Right screen only In the [Multi View (Quad)] or [Multi View (Dual)] display, displays...
User Manual
Page 70
... [Select Channel] under [Screen Capture], or when [Test Pattern] is displayed. 8 • If the power is turned off , the message [Fan will be rotated as the temperature is high.] is off once and then back on other DP-V1710 or PC, color may not be played back precisely. 11 When [CDL/User LUT] is set to [On], [Vector Scope] turns [Off]. When calibration has been started --
... [Select Channel] under [Screen Capture], or when [Test Pattern] is displayed. 8 • If the power is turned off , the message [Fan will be rotated as the temperature is high.] is off once and then back on other DP-V1710 or PC, color may not be played back precisely. 11 When [CDL/User LUT] is set to [On], [Vector Scope] turns [Off]. When calibration has been started --

User Manual
Page 72
OSD Menu System Settings This menu is displayed. Network/Remote(GPI) Settings Network1 Configures settings for the network of the video display. Display 192.168.0.1 Subnet Mask 255.255.255.0 In Monitor Display The video display supports Television Systems Ltd.'s "TSL UMD Protocol Ver. 5.0". You can specify the characters using an external device connected to the CH button on the screen. Sub Menu Setting Options (Bold: factory default) 72 Function/Channel Button Sets the function or channel...
OSD Menu System Settings This menu is displayed. Network/Remote(GPI) Settings Network1 Configures settings for the network of the video display. Display 192.168.0.1 Subnet Mask 255.255.255.0 In Monitor Display The video display supports Television Systems Ltd.'s "TSL UMD Protocol Ver. 5.0". You can specify the characters using an external device connected to the CH button on the screen. Sub Menu Setting Options (Bold: factory default) 72 Function/Channel Button Sets the function or channel...
User Manual
Page 74
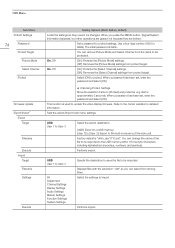
.... Factory default is blank. USB User 1 to User 3 All Adjustment Channel Settings Display Settings Audio Settings Marker Settings Function Settings System Settings Specify the destination to save the file to be exported to be changed. OSD Menu Sub Menu Protect Settings 74 Password Protect Target Picture Mode Select Channel Protect Firmware Update Export/Import6 Export Target Filename Execute Import Target Filename Settings Execute Setting Options (Bold: factory default) Locks the settings so they are locked. Sets the export/import main menu settings. You...
.... Factory default is blank. USB User 1 to User 3 All Adjustment Channel Settings Display Settings Audio Settings Marker Settings Function Settings System Settings Specify the destination to save the file to be exported to be changed. OSD Menu Sub Menu Protect Settings 74 Password Protect Target Picture Mode Select Channel Protect Firmware Update Export/Import6 Export Target Filename Execute Import Target Filename Settings Execute Setting Options (Bold: factory default) Locks the settings so they are locked. Sets the export/import main menu settings. You...
User Manual
Page 100
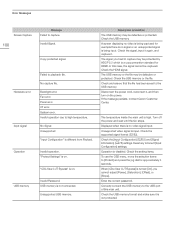
... for HDMI. If the message persists, contact Canon Customer Center. Check the USB memory format and make sure it , and then turn on the power. Panel error. System error. Description and Action The USB memory may be captured. Turn off the power and wait until the fan stops. Operation is input. "Protect Settings" is not connected. Check the [Input Configuration] ( 53) and [Signal Information] ( 78) settings. Enter the correct password. Invalid operation. Invalid Password. A screen displaying no video...
... for HDMI. If the message persists, contact Canon Customer Center. Check the USB memory format and make sure it , and then turn on the power. Panel error. System error. Description and Action The USB memory may be captured. Turn off the power and wait until the fan stops. Operation is input. "Protect Settings" is not connected. Check the [Input Configuration] ( 53) and [Signal Information] ( 78) settings. Enter the correct password. Invalid operation. Invalid Password. A screen displaying no video...

User Manual
Page 102
... the LCD panel and you should avoid displaying - Turn on the model of DC power supply used, the output voltage power supply is connected 22 correctly. • Brightness of supported products. Connect a charged DC power supply or AC power supply. If the screen becomes dark or starts flickering, contact Canon Customer Center. The image does not display. • Set each 78 terminal. website for a long time. Check the signal. Burn-in image appears. • This is flashing orange: 22 • Flashing...
... the LCD panel and you should avoid displaying - Turn on the model of DC power supply used, the output voltage power supply is connected 22 correctly. • Brightness of supported products. Connect a charged DC power supply or AC power supply. If the screen becomes dark or starts flickering, contact Canon Customer Center. The image does not display. • Set each 78 terminal. website for a long time. Check the signal. Burn-in image appears. • This is flashing orange: 22 • Flashing...


