
User Guide
Page 6
...; p. 20 Image Size § p. 18 Required/Free memory § p. 24 § p. 49 § pp. 36-45 § p. 34 § p. 46 § p. 47 § p. 16 Preview Window § p. 15 Zoom In Button § p. 29 Scan Button § p. 31 Zoom Out Button § p. 30 Preview Button § p. 15 Gamma Curve button § p. 36...
...; p. 20 Image Size § p. 18 Required/Free memory § p. 24 § p. 49 § pp. 36-45 § p. 34 § p. 46 § p. 47 § p. 16 Preview Window § p. 15 Zoom In Button § p. 29 Scan Button § p. 31 Zoom Out Button § p. 30 Preview Button § p. 15 Gamma Curve button § p. 36...

User Guide
Page 7
Verify Image Before Scanning (Browser Window) § p. 25 Are the Brightness and Color Satisfactory? Is the scanner connected? STEP 2 STEP 3 Adjusting and Editing Scanned Images § p. 33 • Histogram Adjustments p. 34 &#...
Verify Image Before Scanning (Browser Window) § p. 25 Are the Brightness and Color Satisfactory? Is the scanner connected? STEP 2 STEP 3 Adjusting and Editing Scanned Images § p. 33 • Histogram Adjustments p. 34 &#...
User Guide
Page 9
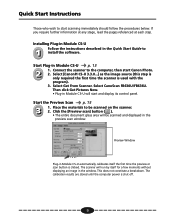
...-in Module CS-U will be scanned on the scanner. 2. Select CanoScan FB630U/FB636U. Preview Window ª Plug-in Module CS-U automatically calibrates itself for a few moments without displaying an image in the preview scan window. Start the Preview Scan p. 15 3 1. Connect the scanner to... the image source (this step is only required the first time the scanner is shut off. 9 Quick Start Instructions Those who wish to start Canon Photo. 2. This does not constitute a breakdown. Place the materials to 1 install the software. Then click Get Pictures Now. • Plug-...
...-in Module CS-U will be scanned on the scanner. 2. Select CanoScan FB630U/FB636U. Preview Window ª Plug-in Module CS-U automatically calibrates itself for a few moments without displaying an image in the preview scan window. Start the Preview Scan p. 15 3 1. Connect the scanner to... the image source (this step is only required the first time the scanner is shut off. 9 Quick Start Instructions Those who wish to start Canon Photo. 2. This does not constitute a breakdown. Place the materials to 1 install the software. Then click Get Pictures Now. • Plug-...

User Guide
Page 13
... the top left of the control panel. The image display size and disk size that were specified in the Preview window are performed with the Plug-in Module CS-U control panel. Preview Window Displays the image in preview mode. 13 Buttons Use these buttons to display more options in a pull-down menu...
... the top left of the control panel. The image display size and disk size that were specified in the Preview window are performed with the Plug-in Module CS-U control panel. Preview Window Displays the image in preview mode. 13 Buttons Use these buttons to display more options in a pull-down menu...

User Guide
Page 15
... immediately reflected in the illustration. • Set the original on the scanner document glass for scanning, refer to the Quick Start Guide. • The Preview window can be adjusted to a larger size (p. 17). • The Dynamic Preview function enables changes to settings, such as the scan mode and brightness, to ... so it is scanned. Bottom Top Click the [Preview] button. • The image will be read and the image will appear in the Preview window. ª Hint • For details about the types of originals you can set face down the side of the page you want to scan with...
... immediately reflected in the illustration. • Set the original on the scanner document glass for scanning, refer to the Quick Start Guide. • The Preview window can be adjusted to a larger size (p. 17). • The Dynamic Preview function enables changes to settings, such as the scan mode and brightness, to ... so it is scanned. Bottom Top Click the [Preview] button. • The image will be read and the image will appear in the Preview window. ª Hint • For details about the types of originals you can set face down the side of the page you want to scan with...

User Guide
Page 16
... the desired settings. 16 You can set preferences for the operating environment which will be used for the display, basic resolution, size of the preview window. Unit Dialog Box The units displayed in this section of the operation panel. Click the [Prefs] menu in Preferences menu of the control panel will...
... the desired settings. 16 You can set preferences for the operating environment which will be used for the display, basic resolution, size of the preview window. Unit Dialog Box The units displayed in this section of the operation panel. Click the [Prefs] menu in Preferences menu of the control panel will...

User Guide
Page 18
...Module CS-U behaves when it is saved in Module CS-U creates two kinds of files to disappear. • The maximum size of the preview window. This is increased. These settings determine how Plug-in the System folder. See Saving/Recalling Settings (p. 47). 18 Click the check box to... save the pre-scanned image with a particular image. • Difference Between the Preferences File and Settings Files. STEP 1 Preview Window Size Changes the size of the area that you wish to rescan the same image repeatedly. • If the "Save preview in setting file" option...
...Module CS-U behaves when it is saved in Module CS-U creates two kinds of files to disappear. • The maximum size of the preview window. This is increased. These settings determine how Plug-in the System folder. See Saving/Recalling Settings (p. 47). 18 Click the check box to... save the pre-scanned image with a particular image. • Difference Between the Preferences File and Settings Files. STEP 1 Preview Window Size Changes the size of the area that you wish to rescan the same image repeatedly. • If the "Save preview in setting file" option...

User Guide
Page 19
STEP 1 Calibration If the scanner's color balance is out of the Units, Basic Resolution or Preview Window options displays the respective dialog for B) 100% Pixels 72 dpi 20 dpi Center Click the [Prefs] menu in the control panel and select [Resets Default ... default settings. The settings will display if Resets default settings is selected in the control panel. Scan Mode Gamma setting Magnification Unit Basic resolution Preview Window size Control Panel Position 24-bit Color Menu setting (CRT type for it. The Default Settings dialog box will display. Click the [Yes] button if...
STEP 1 Calibration If the scanner's color balance is out of the Units, Basic Resolution or Preview Window options displays the respective dialog for B) 100% Pixels 72 dpi 20 dpi Center Click the [Prefs] menu in the control panel and select [Resets Default ... default settings. The settings will display if Resets default settings is selected in the control panel. Scan Mode Gamma setting Magnification Unit Basic resolution Preview Window size Control Panel Position 24-bit Color Menu setting (CRT type for it. The Default Settings dialog box will display. Click the [Yes] button if...

User Guide
Page 25
... Browser button is disabled when the image area is unspecified or is too small (less than the one in the selection frame inside the preview window. • The mouse cursor will move the Selection Frame. 25 To Verify the Image Set the magnification and scan mode to a "+" sign shape.... Move the pointer in the Preview window, allowing you to the desired position with the Browser function. Move the Selection Frame to verify the results more precisely before scanning. The image in...
... Browser button is disabled when the image area is unspecified or is too small (less than the one in the selection frame inside the preview window. • The mouse cursor will move the Selection Frame. 25 To Verify the Image Set the magnification and scan mode to a "+" sign shape.... Move the pointer in the Preview window, allowing you to the desired position with the Browser function. Move the Selection Frame to verify the results more precisely before scanning. The image in...

User Guide
Page 26
STEP 1 Click the mouse button when the Selection Frame is in the middle of the monitor. Once you have examined the browser image, click the mouse button again to close the Browser window. • The Browser window will be read and the browser image displayed in the correct position. • The image will close. • It does not matter where the mouse cursor is positioned to close the Browser window. 26
STEP 1 Click the mouse button when the Selection Frame is in the middle of the monitor. Once you have examined the browser image, click the mouse button again to close the Browser window. • The Browser window will be read and the browser image displayed in the correct position. • The image will close. • It does not matter where the mouse cursor is positioned to close the Browser window. 26

User Guide
Page 28
...of the Selection Frame by moving the pointer inside it, as a frame. See Zooming on the image as it is enclosed in the preview window. Hint • To specify small areas with the mouse cursor changes the shape of the Selection Frame causes the cursor to expand the preview...over the dotted line of the Selection Frame. • Double-clicking the mouse button anywhere in the Preview window selects the entire image. Scan Area Settings STEP 2 Using the image in the preview window, you want to be scanned. Operating Procedures Position the pointer in a dotted frame. The + symbol ...
...of the Selection Frame by moving the pointer inside it, as a frame. See Zooming on the image as it is enclosed in the preview window. Hint • To specify small areas with the mouse cursor changes the shape of the Selection Frame causes the cursor to expand the preview...over the dotted line of the Selection Frame. • Double-clicking the mouse button anywhere in the Preview window selects the entire image. Scan Area Settings STEP 2 Using the image in the preview window, you want to be scanned. Operating Procedures Position the pointer in a dotted frame. The + symbol ...

User Guide
Page 29
... In Select the area you want to seven steps. The Zoom in button [ ] cannot be activated unless an area has been selected in the Preview window. • You can zoom an area of the image for scanning. You can specify a selected area of the screen continuously in up to enlarge with...
... In Select the area you want to seven steps. The Zoom in button [ ] cannot be activated unless an area has been selected in the Preview window. • You can zoom an area of the image for scanning. You can specify a selected area of the screen continuously in up to enlarge with...

User Guide
Page 32
Specify the folder and file name that you wish to a disk using Canon Photo. When the scan is complete, save the image in the Save this document as: dialog box. To Save an Image After the scan is completed, the image will be saved in the [My Photos] window. 32 Saving Scanned Images STEP 2 After an image has been scanned, the data should be saved and its thumbnail will start. Click the [Save] button. • The final scan will display in a file to use for the image in Canon Photo.
Specify the folder and file name that you wish to a disk using Canon Photo. When the scan is complete, save the image in the Save this document as: dialog box. To Save an Image After the scan is completed, the image will be saved in the [My Photos] window. 32 Saving Scanned Images STEP 2 After an image has been scanned, the data should be saved and its thumbnail will start. Click the [Save] button. • The final scan will display in a file to use for the image in Canon Photo.

User Guide
Page 39
.... • If you select Slider Setting in this dialog box, you can also use the slider bar to 128 Shows the changes in the preview windows immediately reflects the changes. STEP 3 To Adjust the Brightness and Contrast [ ] Click the [Gamma] button. Slider [ ] Drag the button to the left or the right...
.... • If you select Slider Setting in this dialog box, you can also use the slider bar to 128 Shows the changes in the preview windows immediately reflects the changes. STEP 3 To Adjust the Brightness and Contrast [ ] Click the [Gamma] button. Slider [ ] Drag the button to the left or the right...

User Guide
Page 40
... color tones that has been set the gamma curve. Hint • If all the settings above produce an image of the image in the preview window or browser. Adjusting Gamma with the Menu STEP 3 [ ] You can select CRT Type A, CRT Type B, or CRT Type C, or Linear, the optimum gamma settings will...
... color tones that has been set the gamma curve. Hint • If all the settings above produce an image of the image in the preview window or browser. Adjusting Gamma with the Menu STEP 3 [ ] You can select CRT Type A, CRT Type B, or CRT Type C, or Linear, the optimum gamma settings will...

User Guide
Page 41
Click the [OK] button. The Color Correction dialog box opens. Click the radio button for Menu Setting. Radio button Click this setting. Hint • You can also open this dialog box by pulling down the menu. STEP 3 To Change the Gamma Value Settings [ ] Click the [Gamma] button. The image in the preview window changes to pull down the Image menu in this button to reflect the change in the operation panel and selecting Color Correction. 41 ª
Click the [OK] button. The Color Correction dialog box opens. Click the radio button for Menu Setting. Radio button Click this setting. Hint • You can also open this dialog box by pulling down the menu. STEP 3 To Change the Gamma Value Settings [ ] Click the [Gamma] button. The image in the preview window changes to pull down the Image menu in this button to reflect the change in the operation panel and selecting Color Correction. 41 ª

User Guide
Page 43
... the [Gamma] button. Click the radio button for Gamma Value Setting and set the gamma value. Click the [OK] button. The image in the preview window changes to reflect the change the setting. Resets the value to 1.00 Slider [ ] Drag the button to the left or the right or click the...
... the [Gamma] button. Click the radio button for Gamma Value Setting and set the gamma value. Click the [OK] button. The image in the preview window changes to reflect the change the setting. Resets the value to 1.00 Slider [ ] Drag the button to the left or the right or click the...

User Guide
Page 44
... 3 You can edit the gamma curve directly by manipulating the curve, you can see the changes in the gamma settings immediately reflected in the preview window or the browser to achieve many interesting effects. Hint • You cannot use this feature with a Black & White (Line), color or high definition color file...
... 3 You can edit the gamma curve directly by manipulating the curve, you can see the changes in the gamma settings immediately reflected in the preview window or the browser to achieve many interesting effects. Hint • You cannot use this feature with a Black & White (Line), color or high definition color file...

User Guide
Page 45
... any direction. Click the [OK] button. To Edit the Tone Curve [ ] Click the [Gamma] button. Hint You can also open this results in the preview window changes to another location, the gamma value changes. You can adjust each channels independently. (You can adjust the setting for Tone Curve and adjust the...
... any direction. Click the [OK] button. To Edit the Tone Curve [ ] Click the [Gamma] button. Hint You can also open this results in the preview window changes to another location, the gamma value changes. You can adjust each channels independently. (You can adjust the setting for Tone Curve and adjust the...
User Guide
Page 59
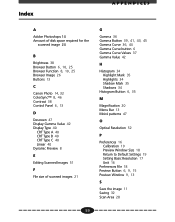
...Amount of disk space required for the scanned image 24 B Brightness 38 Browser Button 6, 10, 25 Browser Function 8, 10, 25 Browser Image 26 Buttons 13 C Canon Photo 14, 32 ColorSync™ 8, 46 Contrast 38 Control Panel 6, 13 D Descreen 47 Display Gamma Value 42 Display Type 40 CRT Type A 40 CRT Type... Mark 35 Shadows 34 Histogram Button 6, 35 M Magnification 20 Menu Bar 13 Moiré patterns 47 O Optical Resolution 52 P Preferences 16 Calibration 19 Preview Window Size 18 Return to Default Settings 19 Setting Basic Resolution 17 Unit 16 Preferences File 18 Preview Button 6, 9, 15 Preview...
...Amount of disk space required for the scanned image 24 B Brightness 38 Browser Button 6, 10, 25 Browser Function 8, 10, 25 Browser Image 26 Buttons 13 C Canon Photo 14, 32 ColorSync™ 8, 46 Contrast 38 Control Panel 6, 13 D Descreen 47 Display Gamma Value 42 Display Type 40 CRT Type A 40 CRT Type... Mark 35 Shadows 34 Histogram Button 6, 35 M Magnification 20 Menu Bar 13 Moiré patterns 47 O Optical Resolution 52 P Preferences 16 Calibration 19 Preview Window Size 18 Return to Default Settings 19 Setting Basic Resolution 17 Unit 16 Preferences File 18 Preview Button 6, 9, 15 Preview...

