User Guide
Page 8
... the image to achieve beautiful contrast with the results. This function presents a much higher quality image than the preview function. w w w • Works within Image Processing Software for the Macintosh operating system. Plug-in Module CS-U Special Features • See the Results of Adjustments Immediately (Dynamic Preview) Once in preview mode, the...
... the image to achieve beautiful contrast with the results. This function presents a much higher quality image than the preview function. w w w • Works within Image Processing Software for the Macintosh operating system. Plug-in Module CS-U Special Features • See the Results of Adjustments Immediately (Dynamic Preview) Once in preview mode, the...
User Guide
Page 9
...-in Module CS-U Follow the instructions described in Module CS-U p. 13 2 1. Start Plug-in the Quick Start Guide to 1 install the software. Select CanoScan FB630U/FB636U. Click the [Preview scan] button ( ). • The entire document glass area will run by itself the first time the preview... or scan button is used with the program). 3. Quick Start Instructions Those who wish to start Canon Photo. 2. Connect the scanner to be ...
...-in Module CS-U Follow the instructions described in Module CS-U p. 13 2 1. Start Plug-in the Quick Start Guide to 1 install the software. Select CanoScan FB630U/FB636U. Click the [Preview scan] button ( ). • The entire document glass area will run by itself the first time the preview... or scan button is used with the program). 3. Quick Start Instructions Those who wish to start Canon Photo. 2. Connect the scanner to be ...
User Guide
Page 11
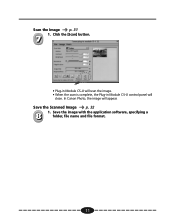
Save the image with the application software, specifying a 8 folder, file name and file format. 11 Click the [Scan] button. 7 ª • Plug-in Module CS-U will scan the image. • When the scan is complete, the Plug-in Module CS-U control panel will appear. In Canon Photo, the image will close. Save the Scanned Image p. 32 1. Scan the Image p. 31 1.
Save the image with the application software, specifying a 8 folder, file name and file format. 11 Click the [Scan] button. 7 ª • Plug-in Module CS-U will scan the image. • When the scan is complete, the Plug-in Module CS-U control panel will appear. In Canon Photo, the image will close. Save the Scanned Image p. 32 1. Scan the Image p. 31 1.

User Guide
Page 31
.... ª • The image will display. To save an image file, see Saving Scanned Images (p. 32). The following provides an example of scanning from within Canon Photo. Once the scan is complete, Plug-in Module CS-U control panel will close and the Save file dialog box will begin to be performed... pixels) or not specified. • The scan cannot be scanned. • When complete, the Plug-in Module CS-U automatically closes and returns to the application software, such as Canon Photo.
.... ª • The image will display. To save an image file, see Saving Scanned Images (p. 32). The following provides an example of scanning from within Canon Photo. Once the scan is complete, Plug-in Module CS-U control panel will close and the Save file dialog box will begin to be performed... pixels) or not specified. • The scan cannot be scanned. • When complete, the Plug-in Module CS-U automatically closes and returns to the application software, such as Canon Photo.
User Guide
Page 47
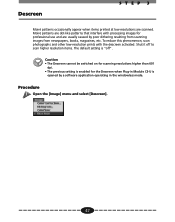
Descreen STEP 3 Moiré patterns occasionally appear when items printed at low resolutions are usually caused by a software application operating in Module CS-U is opened by poor dithering resulting from scanning images from newspapers, books, magazines, etc. Caution • The Descreen cannot be ...
Descreen STEP 3 Moiré patterns occasionally appear when items printed at low resolutions are usually caused by a software application operating in Module CS-U is opened by poor dithering resulting from scanning images from newspapers, books, magazines, etc. Caution • The Descreen cannot be ...

User Guide
Page 54
...in the Quick Start Guide. Refer to the troubleshooting sections of computer is connected with the scanner. Before you call for Canon Photo ®Solution: Plug-in Module CS-U may be asked what kind of the Product Guide electronic manual or the Troubleshooting... for Plug-in Module CS-U may be set to the following information if you purchased the software or the closest Canon Customer Care Center. For further details, refer to the Quick Start Guide and reinstall the software Problem: The image will be set too high. Try lowering the threshold setting. Troubleshooting A P P...
...in the Quick Start Guide. Refer to the troubleshooting sections of computer is connected with the scanner. Before you call for Canon Photo ®Solution: Plug-in Module CS-U may be asked what kind of the Product Guide electronic manual or the Troubleshooting... for Plug-in Module CS-U may be set to the following information if you purchased the software or the closest Canon Customer Care Center. For further details, refer to the Quick Start Guide and reinstall the software Problem: The image will be set too high. Try lowering the threshold setting. Troubleshooting A P P...

User Guide
Page 55
...) ®Solution 3: Close all other software applications other than Canon Photo, then try scanning again ®Solution 4: Close all software applications including Canon Photo, then restart Canon Photo and scanning again ®Solution 5: Shut down Canon Photo and all other applications and increase ...the amount of free memory, then start Canon Photo again. ®Solution 6: Increase ...
...) ®Solution 3: Close all other software applications other than Canon Photo, then try scanning again ®Solution 4: Close all software applications including Canon Photo, then restart Canon Photo and scanning again ®Solution 5: Shut down Canon Photo and all other applications and increase ...the amount of free memory, then start Canon Photo again. ®Solution 6: Increase ...
User Guide
Page 58
... the base or primary colors. There are often referred as the number of the image to read by creating an image with an image editing software program, such as Photoshop®. The final scan is generally comprised of bitmap data, a collection of color information corresponding to each dot of using a scanner...
... the base or primary colors. There are often referred as the number of the image to read by creating an image with an image editing software program, such as Photoshop®. The final scan is generally comprised of bitmap data, a collection of color information corresponding to each dot of using a scanner...
User Guide
Page 60
... contained in any form by any means without prior notice. reserves the right to change the specifications of the hardware and software described within this guide is accurate and complete, no warranties for damages resulting from corrupted or lost data due to ensure ... trademarks or registered trademarks of their respective companies. 60 While every effort has been made to the operation or malfunction of hardware and software. Canon Inc. makes no liability can be reproduced, transmitted, transcribed, stored in a retrieval system, or translated into any language in this...
... contained in any form by any means without prior notice. reserves the right to change the specifications of the hardware and software described within this guide is accurate and complete, no warranties for damages resulting from corrupted or lost data due to ensure ... trademarks or registered trademarks of their respective companies. 60 While every effort has been made to the operation or malfunction of hardware and software. Canon Inc. makes no liability can be reproduced, transmitted, transcribed, stored in a retrieval system, or translated into any language in this...
User Manual
Page 6
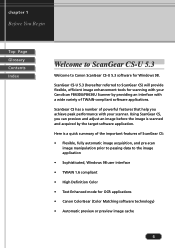
... image enhancement tools for scanning with your scanner. Here is scanned and acquired by providing an interface with your CanoScan FB630U/FB636U Scanner by the target software application. ScanGear CS has a number of powerful features that help you can preview and adjust an image before the... mode for Windows 98. chapter 1 Before You Begin Top Page Glossary Contents Index Welcome to ScanGear CS-U 5.3 Welcome to Canon ScanGear CS-U 5.3 software for OCR applications • Canon ColorGear (Color Matching software technology) • Automatic preview or preview image cache 6
... image enhancement tools for scanning with your scanner. Here is scanned and acquired by providing an interface with your CanoScan FB630U/FB636U Scanner by the target software application. ScanGear CS has a number of powerful features that help you can preview and adjust an image before the... mode for Windows 98. chapter 1 Before You Begin Top Page Glossary Contents Index Welcome to ScanGear CS-U 5.3 Welcome to Canon ScanGear CS-U 5.3 software for OCR applications • Canon ColorGear (Color Matching software technology) • Automatic preview or preview image cache 6
User Manual
Page 7
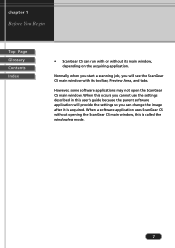
...start a scanning job, you will provide the settings so you cannot use the settings described in this user's guide because the parent software application will see the ScanGear CS main window with or without opening the ScanGear CS main window, this occurs you can run with ...its main window, depending on the acquiring application. When a software application uses ScanGear CS without its toolbar, Preview Area, and tabs. However, some software applications may not open the ScanGear CS main window. chapter 1 Before You Begin Top Page Glossary ...
...start a scanning job, you will provide the settings so you cannot use the settings described in this user's guide because the parent software application will see the ScanGear CS main window with or without opening the ScanGear CS main window, this occurs you can run with ...its main window, depending on the acquiring application. When a software application uses ScanGear CS without its toolbar, Preview Area, and tabs. However, some software applications may not open the ScanGear CS main window. chapter 1 Before You Begin Top Page Glossary ...
User Manual
Page 11
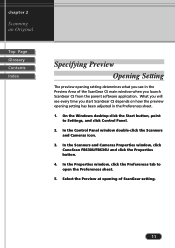
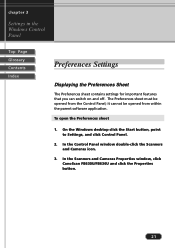
... opening setting determines what you see every time you launch ScanGear CS from the parent software application. In the Control Panel window double-click the Scanners and Cameras icon. 3. In the Scanners and Cameras Properties window, click CanoScan FB630U/FB636U and click the Properties button. 4. In the Properties window, click the Preferences...
... opening setting determines what you see every time you launch ScanGear CS from the parent software application. In the Control Panel window double-click the Scanners and Cameras icon. 3. In the Scanners and Cameras Properties window, click CanoScan FB630U/FB636U and click the Properties button. 4. In the Properties window, click the Preferences...
User Manual
Page 12
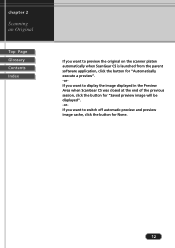
chapter 2 Scanning an Original Top Page Glossary Contents Index If you want to preview the original on the scanner platen automatically when ScanGear CS is launched from the parent software application, click the button for "Automatically execute a preview". -orIf you want to display the image displayed in the Preview Area when ScanGear CS was closed at the end of the previous session, click the button for "Saved preview image will be displayed". -orIf you want to switch off automatic preview and preview image cache, click the button for None. 12
chapter 2 Scanning an Original Top Page Glossary Contents Index If you want to preview the original on the scanner platen automatically when ScanGear CS is launched from the parent software application, click the button for "Automatically execute a preview". -orIf you want to display the image displayed in the Preview Area when ScanGear CS was closed at the end of the previous session, click the button for "Saved preview image will be displayed". -orIf you want to switch off automatic preview and preview image cache, click the button for None. 12
User Manual
Page 13
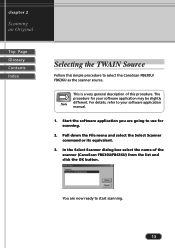
In the Select Scanner dialog box select the name of this simple procedure to use for your software application manual. 1. This is a very general description of the scanner (CanoScan FB630U/FB636U) from the list and click the OK button. Pull down the File menu and ... Original Top Page Glossary Contents Index Selecting the TWAIN Source Follow this procedure. You are going to select the CanoScan FB630U/ FB636U as the scanner source. Start the software application you are now ready to your software application may be slightly Note different. The procedure for scanning. 2.
In the Select Scanner dialog box select the name of this simple procedure to use for your software application manual. 1. This is a very general description of the scanner (CanoScan FB630U/FB636U) from the list and click the OK button. Pull down the File menu and ... Original Top Page Glossary Contents Index Selecting the TWAIN Source Follow this procedure. You are going to select the CanoScan FB630U/ FB636U as the scanner source. Start the software application you are now ready to your software application may be slightly Note different. The procedure for scanning. 2.
User Manual
Page 14
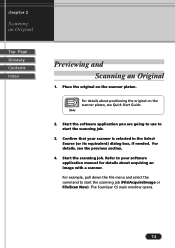
...command to start the scanning job. 3. Note 2. Place the original on the scanner platen, see the previous section. 4. Confirm that your software application manual for details about positioning the original on the scanner platen. Refer to start the scanning job (File|Acquire|Image or File|Scan ...New). For details, see Quick Start Guide. Start the software application you are going to use to your scanner is selected in the Select Source (or its equivalent) dialog box, if needed. chapter ...
...command to start the scanning job. 3. Note 2. Place the original on the scanner platen, see the previous section. 4. Confirm that your software application manual for details about positioning the original on the scanner platen. Refer to start the scanning job (File|Acquire|Image or File|Scan ...New). For details, see Quick Start Guide. Start the software application you are going to use to your scanner is selected in the Select Source (or its equivalent) dialog box, if needed. chapter ...
User Manual
Page 16
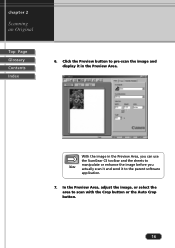
In the Preview Area, adjust the image, or select the area to the parent software application. 7. chapter 2 Scanning an Original Top Page Glossary Contents Index 6. With the image in the Preview Area, you can use the ScanGear CS toolbar and the sheets to Note manipulate or enhance the image before you actually scan it and send it in the Preview Area. Click the Preview button to pre-scan the image and display it to scan with the Crop button or the Auto Crop button. 16
In the Preview Area, adjust the image, or select the area to the parent software application. 7. chapter 2 Scanning an Original Top Page Glossary Contents Index 6. With the image in the Preview Area, you can use the ScanGear CS toolbar and the sheets to Note manipulate or enhance the image before you actually scan it and send it in the Preview Area. Click the Preview button to pre-scan the image and display it to scan with the Crop button or the Auto Crop button. 16
User Manual
Page 17
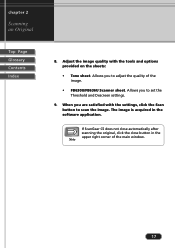
... options provided on the sheets: • Tone sheet. If ScanGear CS does not close automatically after scanning the original, click the close button in the software application. chapter 2 Scanning an Original Top Page Glossary Contents Index 8.
... options provided on the sheets: • Tone sheet. If ScanGear CS does not close automatically after scanning the original, click the close button in the software application. chapter 2 Scanning an Original Top Page Glossary Contents Index 8.
User Manual
Page 19
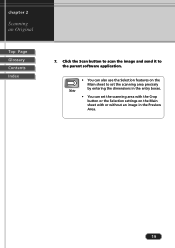
chapter 2 Scanning an Original Top Page Glossary Contents Index 7. Note • You can also use the Selection features on the Main sheet to set the scanning area with the Crop button or the Selection settings on the Main sheet with or without an image in the entry boxes. Click the Scan button to scan the image and send it to the parent software application. • You can set the scanning area precisely by entering the dimensions in the Preview Area. 19
chapter 2 Scanning an Original Top Page Glossary Contents Index 7. Note • You can also use the Selection features on the Main sheet to set the scanning area with the Crop button or the Selection settings on the Main sheet with or without an image in the entry boxes. Click the Scan button to scan the image and send it to the parent software application. • You can set the scanning area precisely by entering the dimensions in the Preview Area. 19
User Manual
Page 21
... features that you can switch on and off. In the Scanners and Cameras Properties window, click CanoScan FB630U/FB636U and click the Properties button. 21 The Preferences sheet must be opened from within the parent software application. On the Windows desktop click the Start button, point to Settings, and click Control Panel...
... features that you can switch on and off. In the Scanners and Cameras Properties window, click CanoScan FB630U/FB636U and click the Properties button. 21 The Preferences sheet must be opened from within the parent software application. On the Windows desktop click the Start button, point to Settings, and click Control Panel...
User Manual
Page 23
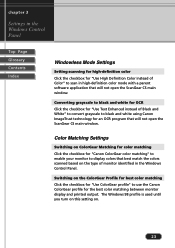
...and white using Canon ImageTrust technology for an OCR program that will not open the ScanGear CS main window. Switching on the ColorGear Profile for best color matching Click the checkbox for "Use ColorGear profile" to scan in high-definition color mode with a parent software application that ... Settings Setting scanning for high-definition color Click the checkbox for "Use High Definition Color instead of Color" to use the Canon ColorGear profile for "Canon ColorGear color matching" to enable your monitor to display colors that will not open the ScanGear CS main window. The Windows...
...and white using Canon ImageTrust technology for an OCR program that will not open the ScanGear CS main window. Switching on the ColorGear Profile for best color matching Click the checkbox for "Use ColorGear profile" to scan in high-definition color mode with a parent software application that ... Settings Setting scanning for high-definition color Click the checkbox for "Use High Definition Color instead of Color" to use the Canon ColorGear profile for "Canon ColorGear color matching" to enable your monitor to display colors that will not open the ScanGear CS main window. The Windows...


