User Guide
Page 3
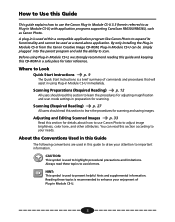
... helpful hints and supplemental information. About the Conventions Used in this Guide The following conventions are used in Module CS-U can read this section according to your needs. HINT: This symbol is used within a compatible application program like Canon Photo to expand its functionality and cannot be simply plugged into the parent program and add the ability to scan. Where to Look Quick Start Instructions...
... helpful hints and supplemental information. About the Conventions Used in this Guide The following conventions are used in Module CS-U can read this section according to your needs. HINT: This symbol is used within a compatible application program like Canon Photo to expand its functionality and cannot be simply plugged into the parent program and add the ability to scan. Where to Look Quick Start Instructions...
User Guide
Page 9
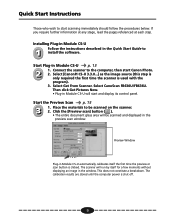
... CanoScan FB630U/FB636U. Installing Plug-in Module CS-U Follow the instructions described in Module CS-U will start and display its control panel. Click the [Preview scan] button ( ). • The entire document glass area will run by itself for a few moments without displaying an image in Module CS-U automatically calibrates itself the first time the preview or scan button is clicked. Start Plug-in the preview scan window. Connect the scanner...
... CanoScan FB630U/FB636U. Installing Plug-in Module CS-U Follow the instructions described in Module CS-U will start and display its control panel. Click the [Preview scan] button ( ). • The entire document glass area will run by itself for a few moments without displaying an image in Module CS-U automatically calibrates itself the first time the preview or scan button is clicked. Start Plug-in the preview scan window. Connect the scanner...
User Guide
Page 35
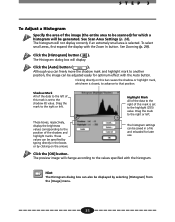
... button. The histogram will display. Click the [Auto] button ( ). Clicking directly on the arrows. Highlight Mark All of the data to the right of this bar causes the shadow or highlight mark, whichever is set ...directly in a file and reloaded for later use. The preview image will be generated. STEP 3 To Adjust a Histogram Specify the area of the image (the entire area to be scanned) for which a histogram will change according to the values specified with the Auto button. Hint The Histogram dialog box can be saved in the boxes or by selecting [Histogram] from the [Image] menu...
... button. The histogram will display. Click the [Auto] button ( ). Clicking directly on the arrows. Highlight Mark All of the data to the right of this bar causes the shadow or highlight mark, whichever is set ...directly in a file and reloaded for later use. The preview image will be generated. STEP 3 To Adjust a Histogram Specify the area of the image (the entire area to be scanned) for which a histogram will change according to the values specified with the Auto button. Hint The Histogram dialog box can be saved in the boxes or by selecting [Histogram] from the [Image] menu...
User Guide
Page 38
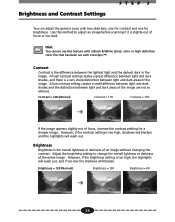
... and the highlights will blacken. Use this feature with a Black & White (Line), color or high definition color file that has been set with two slide bars, one for contrast and one for a sharper image. However, if the contrast setting is the overall lightness or darkness of the entire image. However, if the brightness setting is a very sharp distinction between light and dark shades, and...
... and the highlights will blacken. Use this feature with a Black & White (Line), color or high definition color file that has been set with two slide bars, one for contrast and one for a sharper image. However, if the contrast setting is the overall lightness or darkness of the entire image. However, if the brightness setting is a very sharp distinction between light and dark shades, and...
User Guide
Page 53
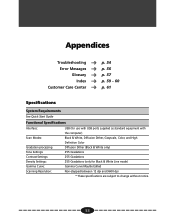
STEP 2 Appendices Troubleshooting Error Messages Glossary Index Customer Care Center p. 54 p. 56 p. 57 p. 59 - 60 p. 61 Specifications System Requirements See Quick Start Guide Functional Specifications Interface: Scan Modes: Gradation processing Tone Settings: Contrast Settings: Density Settings: Gamma Curve: Scanning Resolution: USB (for use with USB ports supplied as standard equipment with the computer) Black & White, Diffusion Dither, Grayscale, Color, and High Definition Color Diffusion Dither (Black & White only) 255 Gradations 255 Gradations 255...
STEP 2 Appendices Troubleshooting Error Messages Glossary Index Customer Care Center p. 54 p. 56 p. 57 p. 59 - 60 p. 61 Specifications System Requirements See Quick Start Guide Functional Specifications Interface: Scan Modes: Gradation processing Tone Settings: Contrast Settings: Density Settings: Gamma Curve: Scanning Resolution: USB (for use with USB ports supplied as standard equipment with the computer) Black & White, Diffusion Dither, Grayscale, Color, and High Definition Color Diffusion Dither (Black & White only) 255 Gradations 255 Gradations 255...

User Guide
Page 54
... you call , make sure you purchased the software or the closest Canon Customer Care Center. For details about setting the threshold setting, see Adjusting the Image with the scanner. Troubleshooting A P P E N D I C E S Please refer to the Quick Start Guide and reinstall the software Problem: The image will be asked what kind of the Product Guide electronic manual or the Troubleshooting item on the Import menus for Black & White Images (Threshold) (p. 48...
... you call , make sure you purchased the software or the closest Canon Customer Care Center. For details about setting the threshold setting, see Adjusting the Image with the scanner. Troubleshooting A P P E N D I C E S Please refer to the Quick Start Guide and reinstall the software Problem: The image will be asked what kind of the Product Guide electronic manual or the Troubleshooting item on the Import menus for Black & White Images (Threshold) (p. 48...
User Guide
Page 56
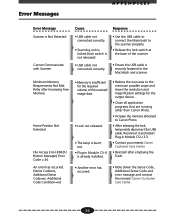
...; Use the USB cable to connect the Macintosh to the scanner properly. • Release the lock switch at the base of the scanner • USB cable not connected correctly. • Ensure the USB cable is already installed. • Reduce the scan area to the minimum possible scope and lower the resolution and magnification settings for the required volume of the scanned image data. • Lock not released. • The lamp is...
...; Use the USB cable to connect the Macintosh to the scanner properly. • Release the lock switch at the base of the scanner • USB cable not connected correctly. • Ensure the USB cable is already installed. • Reduce the scan area to the minimum possible scope and lower the resolution and magnification settings for the required volume of the scanned image data. • Lock not released. • The lamp is...
User Guide
Page 59
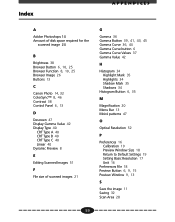
... 42 H Histogram 34 Highlight Mark 35 Highlights 34 Shadow Mark 35 Shadows 34 Histogram Button 6, 35 M Magnification 20 Menu Bar 13 Moiré patterns 47 O Optical Resolution 52 P Preferences 16 Calibration 19 Preview Window Size 18 Return to Default Settings 19 Setting Basic Resolution 17 Unit 16 Preferences File 18 Preview Button 6, 9, 15 Preview Window 9, 13 S Save the image 11 Saving 32 Scan Area 28 59
... 42 H Histogram 34 Highlight Mark 35 Highlights 34 Shadow Mark 35 Shadows 34 Histogram Button 6, 35 M Magnification 20 Menu Bar 13 Moiré patterns 47 O Optical Resolution 52 P Preferences 16 Calibration 19 Preview Window Size 18 Return to Default Settings 19 Setting Basic Resolution 17 Unit 16 Preferences File 18 Preview Button 6, 9, 15 Preview Window 9, 13 S Save the image 11 Saving 32 Scan Area 28 59
User Guide
Page 60
... Black and White Mode (Line) 22 Color Mode (24-bit) 23 Grayscale Mode (8-bit) 22 High Definition Color 23 Scan Resolution 20, 52 Scanning 31 Selection Frame 28 Set the Original 15 Settings File 18, 49 T Threshold Value 48 Tone Curve 44 Z Zoom In Button 6, 29 Zoom Out Button 6 Zoom Out button 30 Zooming 29 No part of this guide at any time without the prior written permission of Canon...
... Black and White Mode (Line) 22 Color Mode (24-bit) 23 Grayscale Mode (8-bit) 22 High Definition Color 23 Scan Resolution 20, 52 Scanning 31 Selection Frame 28 Set the Original 15 Settings File 18, 49 T Threshold Value 48 Tone Curve 44 Z Zoom In Button 6, 29 Zoom Out Button 6 Zoom Out button 30 Zooming 29 No part of this guide at any time without the prior written permission of Canon...
User Guide
Page 61
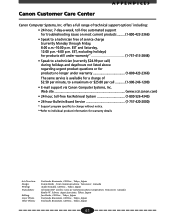
...Art Direction: Design: Writing: Translation: Editing: Cover Photo: Other Photos: Yoshisuke Kuramoto, CDS Inc., Tokyo, Japan Sumio Koike, J-Cat Communications, Vancouver, Canada Ayako Tanaka, CDS Inc., Tokyo, Japan Christian R.P. EST, excluding holidays) for products still under warranty 1-800-423-2366) The same service is ..., CDS Inc., Tokyo, Japan 61 Web site www.ccsi.canon.com) • 24-hour, toll-free Fax Retrieval System 1-800-526-4345) • 24-hour Bulletin Board Service 1-757-420-2000) * Support program specifics to change without notice. **Refer to a maximum or $25.00 per...
...Art Direction: Design: Writing: Translation: Editing: Cover Photo: Other Photos: Yoshisuke Kuramoto, CDS Inc., Tokyo, Japan Sumio Koike, J-Cat Communications, Vancouver, Canada Ayako Tanaka, CDS Inc., Tokyo, Japan Christian R.P. EST, excluding holidays) for products still under warranty 1-800-423-2366) The same service is ..., CDS Inc., Tokyo, Japan 61 Web site www.ccsi.canon.com) • 24-hour, toll-free Fax Retrieval System 1-800-526-4345) • 24-hour Bulletin Board Service 1-757-420-2000) * Support program specifics to change without notice. **Refer to a maximum or $25.00 per...
User Manual
Page 6
... scanner. Using ScanGear CS, you achieve peak performance with a wide variety of TWAIN-compliant software applications. ScanGear CS has a number of ScanGear CS: • Flexible, fully automatic image acquisition, and pre-scan image manipulation prior to passing data to the image application • Sophisticated, Windows 98 user interface • TWAIN 1.6 compliant • High Definition Color • Text Enhanced mode for Windows 98. ScanGear CS-U 5.3 (hereafter referred to Canon...
... scanner. Using ScanGear CS, you achieve peak performance with a wide variety of TWAIN-compliant software applications. ScanGear CS has a number of ScanGear CS: • Flexible, fully automatic image acquisition, and pre-scan image manipulation prior to passing data to the image application • Sophisticated, Windows 98 user interface • TWAIN 1.6 compliant • High Definition Color • Text Enhanced mode for Windows 98. ScanGear CS-U 5.3 (hereafter referred to Canon...
User Manual
Page 7
..., some software applications may not open the ScanGear CS main window. Normally when you start a scanning job, you will provide the settings so you cannot use the settings described in this is acquired. chapter 1 Before You Begin Top Page Glossary Contents Index • ScanGear CS can run with or without opening the ScanGear CS main window, this user's guide because the parent software application will...
..., some software applications may not open the ScanGear CS main window. Normally when you start a scanning job, you will provide the settings so you cannot use the settings described in this is acquired. chapter 1 Before You Begin Top Page Glossary Contents Index • ScanGear CS can run with or without opening the ScanGear CS main window, this user's guide because the parent software application will...
User Manual
Page 43
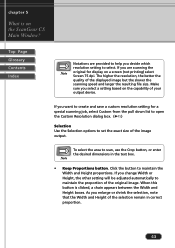
... for a special scanning job, select Custom from the pull down list to open the Custom Resolution dialog box. (345) Selection Use the Selection options to scan, use the Crop button, or enter the desired dimensions in correct proportion. 43 Note • Keep Proportions button. Click the button to select. To select the area to set the exact size of the original image. As you...
... for a special scanning job, select Custom from the pull down list to open the Custom Resolution dialog box. (345) Selection Use the Selection options to scan, use the Crop button, or enter the desired dimensions in correct proportion. 43 Note • Keep Proportions button. Click the button to select. To select the area to set the exact size of the original image. As you...
User Manual
Page 55
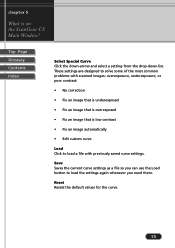
... a file so you can use the Load button to load the settings again whenever you need them. These settings are designed to solve some of the most common problems with scanned images: overexposure, underexposure, or poor contrast: • No correction • Fix an image that is underexposed • Fix an image that is overexposed • Fix an image that is on the ScanGear CS Main Window? Reset Resets...
... a file so you can use the Load button to load the settings again whenever you need them. These settings are designed to solve some of the most common problems with scanned images: overexposure, underexposure, or poor contrast: • No correction • Fix an image that is underexposed • Fix an image that is overexposed • Fix an image that is on the ScanGear CS Main Window? Reset Resets...

User Manual
Page 59
... the Start button in the printed image. Otherwise, this check box if you of the scanner. 59 Descreen Click this slidebar is the adjustment of color processing for input and output devices so the colors in the scanned image match the colors you see on the computer screen and in the Scanner Diagnostics dialog box to test your scanner manual to open the Scanner Diagnostics dialog box. Calibration Click this button to troubleshoot the problem...
... the Start button in the printed image. Otherwise, this check box if you of the scanner. 59 Descreen Click this slidebar is the adjustment of color processing for input and output devices so the colors in the scanned image match the colors you see on the computer screen and in the Scanner Diagnostics dialog box to test your scanner manual to open the Scanner Diagnostics dialog box. Calibration Click this button to troubleshoot the problem...
User Manual
Page 61
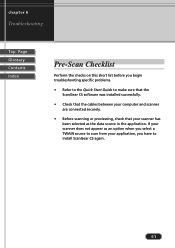
... data source in the application. chapter 6 Troubleshooting Top Page Glossary Contents Index Pre-Scan Checklist Perform the checks on this short list before you have to make sure that the ScanGear CS software was installed successfully. • Check that the cables between your computer and scanner are connected securely. • Before scanning or previewing, check that your application, you begin troubleshooting specific problems. • Refer to the Quick Start Guide to install...
... data source in the application. chapter 6 Troubleshooting Top Page Glossary Contents Index Pre-Scan Checklist Perform the checks on this short list before you have to make sure that the ScanGear CS software was installed successfully. • Check that the cables between your computer and scanner are connected securely. • Before scanning or previewing, check that your application, you begin troubleshooting specific problems. • Refer to the Quick Start Guide to install...
User Manual
Page 88
... Curves sheet, 54 editing a curve directly, 56 Status Bar, 31 Test Scanner, 59 Text Enhanced, 42 Threshold, 59 Tone sheet Tone buttons, 47 toolbar Auto Crop button, 39 Auto Tone button, 40 Crop button, 38 Help button, 40 Mirror button, 39 Move Image button, 38 Negative/Positive button, 39 Rotate Left button, 40 Rotate Right button, 40 Rulers button, 40 Zoom Tool button, 39 troubleshooting, 64 TWAIN source Select Scanner dialog box, 13 selecting, 13 U Units, 44...
... Curves sheet, 54 editing a curve directly, 56 Status Bar, 31 Test Scanner, 59 Text Enhanced, 42 Threshold, 59 Tone sheet Tone buttons, 47 toolbar Auto Crop button, 39 Auto Tone button, 40 Crop button, 38 Help button, 40 Mirror button, 39 Move Image button, 38 Negative/Positive button, 39 Rotate Left button, 40 Rotate Right button, 40 Rulers button, 40 Zoom Tool button, 39 troubleshooting, 64 TWAIN source Select Scanner dialog box, 13 selecting, 13 U Units, 44...

Macintosh User Guide
Page 3
... Canon Customer Care Center ...5 2 The CanoScan Toolbox Main Window 6 3 Using the Scanner Button 6 4 Scanning ...7 5 Saving Scanned Images 7 6 Opening Files ...8 Opening a Stored File ...8 Opening a New Image Window ...8 7 Faxing a Scanned Image 9 Setting the Fax Preferences ...9 Selecting the Fax Print Driver ...9 Scanning and Faxing a Document 9 8 Printing Copies of a Scanned Image 10 Setting the Copy Preferences ...10 Copying a Document ...10 9 Enhancing a Scanned Image 11 Using the Editing Tools ...11 Cropping a Scanned Image ...12 Changing the Image Viewing Size 12 Inverting Image...
... Canon Customer Care Center ...5 2 The CanoScan Toolbox Main Window 6 3 Using the Scanner Button 6 4 Scanning ...7 5 Saving Scanned Images 7 6 Opening Files ...8 Opening a Stored File ...8 Opening a New Image Window ...8 7 Faxing a Scanned Image 9 Setting the Fax Preferences ...9 Selecting the Fax Print Driver ...9 Scanning and Faxing a Document 9 8 Printing Copies of a Scanned Image 10 Setting the Copy Preferences ...10 Copying a Document ...10 9 Enhancing a Scanned Image 11 Using the Editing Tools ...11 Cropping a Scanned Image ...12 Changing the Image Viewing Size 12 Inverting Image...
Macintosh User Guide
Page 5
... Board Service 1-757-420-2000) * Support program specifics to change without notice. ** Refer to a maximum or $25.00 per call 1-900-246-1200) • E-mail support via Canon Computer ...Canon Customer Care Center Canon Computer Systems, Inc. EST and Saturday, 12:00 p.m.-6:00 p.m. offers a full range of technical support options* including: • 24-hour, 7-day-a-week, toll-free automated support for troubleshooting issues on most current products 1-800-423-2366) • Speak to a technician free of $2.50 per minute, to individual product information for the Macintosh, 1.0 5 CanoScan...
... Board Service 1-757-420-2000) * Support program specifics to change without notice. ** Refer to a maximum or $25.00 per call 1-900-246-1200) • E-mail support via Canon Computer ...Canon Customer Care Center Canon Computer Systems, Inc. EST and Saturday, 12:00 p.m.-6:00 p.m. offers a full range of technical support options* including: • 24-hour, 7-day-a-week, toll-free automated support for troubleshooting issues on most current products 1-800-423-2366) • Speak to a technician free of $2.50 per minute, to individual product information for the Macintosh, 1.0 5 CanoScan...
Macintosh User Guide
Page 7
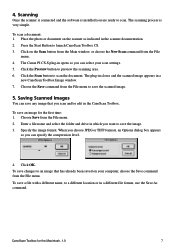
... dialog box appears so you are ready to save the image. 3. 4. Click on your scan settings. 5. Saving Scanned Images You can save the scanned image. 5. CanoScan Toolbox for the first time: 1. The scanning process is installed you can select your computer, choose the Save command from the File menu. 2. Choose the Save command from the File menu. 4. To save changes to save any image that has already been saved on the Scan button from the Main window, or...
... dialog box appears so you are ready to save the image. 3. 4. Click on your scan settings. 5. Saving Scanned Images You can save the scanned image. 5. CanoScan Toolbox for the first time: 1. The scanning process is installed you can select your computer, choose the Save command from the File menu. 2. Choose the Save command from the File menu. 4. To save changes to save any image that has already been saved on the Scan button from the Main window, or...


