
User Manual
Page 12
... remains on the operation panel. If the printer cable is not connected to the printer and computer correctly, an error can resume normal operation. 10 Memo The buttons and lamp for manually operating the printer are located on , the printer is switched on ? If this lamp lights or... the printer, the POWER/ERROR lamp lights, green. qIs the printer switched on , the POWER/ERROR lamp flashes green for service. 3 RESUME button Press the RESUME button to cancel errors after power on and off . Printing has stopped because an error has occurred. Call for a few seconds then lights steadily...
... remains on the operation panel. If the printer cable is not connected to the printer and computer correctly, an error can resume normal operation. 10 Memo The buttons and lamp for manually operating the printer are located on , the printer is switched on ? If this lamp lights or... the printer, the POWER/ERROR lamp lights, green. qIs the printer switched on , the POWER/ERROR lamp flashes green for service. 3 RESUME button Press the RESUME button to cancel errors after power on and off . Printing has stopped because an error has occurred. Call for a few seconds then lights steadily...

User Manual
Page 56
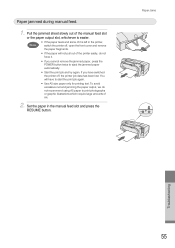
Pull the jammed sheet slowly out of the feed slot or the paper output slot, whichever is left in the sheet feeder and press the RESUME button. 54 To avoid excessive curl and jamming the paper output, we do not force it is easier. Paper or media jammed during auto feed 1. You ... the paper tears and some of it . • If you have to clear a paper jam. If you cannot remove the jammed paper, press the POWER button twice to print photographs or graphic illustrations which require large amounts of the printer easily, do not recommend using A5 paper to eject the jammed...
Pull the jammed sheet slowly out of the feed slot or the paper output slot, whichever is left in the sheet feeder and press the RESUME button. 54 To avoid excessive curl and jamming the paper output, we do not force it is easier. Paper or media jammed during auto feed 1. You ... the paper tears and some of it . • If you have to clear a paper jam. If you cannot remove the jammed paper, press the POWER button twice to print photographs or graphic illustrations which require large amounts of the printer easily, do not recommend using A5 paper to eject the jammed...
User Manual
Page 57
... which require large amounts of the manual feed slot or the paper output slot, whichever is left in the manual feed slot and press the RESUME button. Pull the jammed sheet slowly out of ink. 2. To avoid excessive curl and jamming the paper output, we do not force it is easier. Set...
... which require large amounts of the manual feed slot or the paper output slot, whichever is left in the manual feed slot and press the RESUME button. Pull the jammed sheet slowly out of ink. 2. To avoid excessive curl and jamming the paper output, we do not force it is easier. Set...
User Manual
Page 59
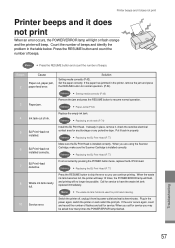
...power outlet and wait a few minutes. Switch the printer off, unplug it back in properly. Plug in the printer, remove the jam and press the RESUME button for normal operation. (P.54) Reference • Setting media correctly (P.42) 3 Paper jam. Reference • Paper Jams (P.54) 4 Ink tank out ...When an error occurs, the POWER/ERROR lamp will light or flash orange and the printer will beep. Remove the jam and press the RESUME button to resume normal operation. Install the BJ Print Head. Reference • Replacing the BJ Print Head (P.77) BJ Print Head 7 defective If ...
...power outlet and wait a few minutes. Switch the printer off, unplug it back in properly. Plug in the printer, remove the jam and press the RESUME button for normal operation. (P.54) Reference • Setting media correctly (P.42) 3 Paper jam. Reference • Paper Jams (P.54) 4 Ink tank out ...When an error occurs, the POWER/ERROR lamp will light or flash orange and the printer will beep. Remove the jam and press the RESUME button to resume normal operation. Install the BJ Print Head. Reference • Replacing the BJ Print Head (P.77) BJ Print Head 7 defective If ...

User Manual
Page 70
... • Loading plain paper or High Resolution Paper HR-101 (P.43) 2. Memo operation panel, press down and hold the RESUME button until you see faded or streaked colors and text, the nozzles may not be confirmed by : • Clogging which prevents the ...the nozzles. A B C D E F 68 1 Printing a nozzle check pattern The sensitive contact area of the print head that the printer is switched on the Canon BJC-8200 icon and select Properties. 4. Click! Right-click on , then load a sheet of plain paper into the Sheet Feeder. Check the nozzle check pattern. • If...
... • Loading plain paper or High Resolution Paper HR-101 (P.43) 2. Memo operation panel, press down and hold the RESUME button until you see faded or streaked colors and text, the nozzles may not be confirmed by : • Clogging which prevents the ...the nozzles. A B C D E F 68 1 Printing a nozzle check pattern The sensitive contact area of the print head that the printer is switched on the Canon BJC-8200 icon and select Properties. 4. Click! Right-click on , then load a sheet of plain paper into the Sheet Feeder. Check the nozzle check pattern. • If...

User Manual
Page 71
... you hear two beeps then release it. 6. Reference • Loading plain paper or High Resolution Paper HR-101 (P.43) 2. Click the Utilities button. 4. Click the down and hold the RESUME button until you are using. 3. Macintosh 1. Make sure the printer is streaked vertically 3 with the printer operation panel, press down -arrow to open...
... you hear two beeps then release it. 6. Reference • Loading plain paper or High Resolution Paper HR-101 (P.43) 2. Click the Utilities button. 4. Click the down and hold the RESUME button until you are using. 3. Macintosh 1. Make sure the printer is streaked vertically 3 with the printer operation panel, press down -arrow to open...

User Manual
Page 72
...cleaning does not work, consider that ink has run out and replace the ink tank. Right-click the Canon BJC-8200 icon and select Properties. Read the message and click the OK button. • The BJ Status Monitor opens automatically and closes when print head cleaning is still sufficient ink remaining... is not used for the POWER/ERROR lamp to clean the print head with the printer operation panel, press down and hold the RESUME button until print head cleaning is switched on the nozzle check pattern. Print a nozzle check pattern to check the results of the print ...
...cleaning does not work, consider that ink has run out and replace the ink tank. Right-click the Canon BJC-8200 icon and select Properties. Read the message and click the OK button. • The BJ Status Monitor opens automatically and closes when print head cleaning is still sufficient ink remaining... is not used for the POWER/ERROR lamp to clean the print head with the printer operation panel, press down and hold the RESUME button until print head cleaning is switched on the nozzle check pattern. Print a nozzle check pattern to check the results of the print ...

User Manual
Page 73
...8226; Replacing an ink tank (P.74) Troubleshooting 71 Read the message and click the OK button. • The POWER/ERROR lamp flashes green for about 30 seconds until you are using. 3. Click the Utilities button. Wait for a long period, it may not print normally and even up to stop ..., replace it . 6. Print a nozzle check pattern to clean the print head with the printer operation panel, press down and hold the RESUME button until print head cleaning is not used for the POWER/ERROR lamp to 5 print head cleanings may differ slightly, depending on the software application...
...8226; Replacing an ink tank (P.74) Troubleshooting 71 Read the message and click the OK button. • The POWER/ERROR lamp flashes green for about 30 seconds until you are using. 3. Click the Utilities button. Wait for a long period, it may not print normally and even up to stop ..., replace it . 6. Print a nozzle check pattern to clean the print head with the printer operation panel, press down and hold the RESUME button until print head cleaning is not used for the POWER/ERROR lamp to 5 print head cleanings may differ slightly, depending on the software application...

User Manual
Page 74
...faded prints. ON 2. When the POWER/ERROR lamp lights and remains on . Read the message and click the OK button. 6. Read the message and click the OK button. • The BJ Status Monitor opens and remains open until print head deep cleaning is completed. • Print head...) Reference • Replacing the BJ Print Head (P.77) 72 Click! Make sure the printer is switched on , you can resume printing. 7. Click! Right-click the Canon BJC-8200 icon and select Properties. 4. Wait for 1 minute until deep cleaning is sufficient ink in the ink tanks and several print head...
...faded prints. ON 2. When the POWER/ERROR lamp lights and remains on . Read the message and click the OK button. 6. Read the message and click the OK button. • The BJ Status Monitor opens and remains open until print head deep cleaning is completed. • Print head...) Reference • Replacing the BJ Print Head (P.77) 72 Click! Make sure the printer is switched on , you can resume printing. 7. Click! Right-click the Canon BJC-8200 icon and select Properties. 4. Wait for 1 minute until deep cleaning is sufficient ink in the ink tanks and several print head...

User Manual
Page 75
Memo • You can resume printing. 7. Press and hold down the RESUME button until deep cleaning is switched on the software application that you can also execute print head deep cleaning with the printer control panel. A B C D E F Troubleshooting 73 ... sure the Print Head Cleaning panel is unclear, faded ON Click! 4. Click the (Print head deep cleaning) icon. Read the message and click the OK button. • Print head deep cleaning begins and the POWER/ERROR lamp flashes for the POWER/ERROR lamp to stop flashing. When the POWER/ERROR lamp...
Memo • You can resume printing. 7. Press and hold down the RESUME button until deep cleaning is switched on the software application that you can also execute print head deep cleaning with the printer control panel. A B C D E F Troubleshooting 73 ... sure the Print Head Cleaning panel is unclear, faded ON Click! 4. Click the (Print head deep cleaning) icon. Read the message and click the OK button. • Print head deep cleaning begins and the POWER/ERROR lamp flashes for the POWER/ERROR lamp to stop flashing. When the POWER/ERROR lamp...


