lv7345_manual.pdf
Page 2
... manual again, check operations and cable connections and try the solutions in the "Trouble-shooting" section of the end of this booklet. Improper operation may result. THIS SYMBOL INDICATES THAT THERE ARE IMPORTANT OPERATING AND MAINTENANCE INSTRUCTIONS IN THE OWNER'S MANUAL WITH THIS UNIT. 2 If your projector, and can reduce the service life of the projector cabinet for an extended time, unplug the projector from the projection lens. Do not cover...
... manual again, check operations and cable connections and try the solutions in the "Trouble-shooting" section of the end of this booklet. Improper operation may result. THIS SYMBOL INDICATES THAT THERE ARE IMPORTANT OPERATING AND MAINTENANCE INSTRUCTIONS IN THE OWNER'S MANUAL WITH THIS UNIT. 2 If your projector, and can reduce the service life of the projector cabinet for an extended time, unplug the projector from the projection lens. Do not cover...

lv7345_manual.pdf
Page 3
... from overheating. This projector should be sure the service technician has used replacement parts specified by the manufacturers. c. Adjust only those controls that could result in damage and will prevent damage due to qualified service personnel. Wanneer deze leeg zijn, moet u ze niet weggooien maar inleveren als KCA. 3 Follow all warnings and instructions marked on the power cord. Do not locate this projector from AC power supply...
... from overheating. This projector should be sure the service technician has used replacement parts specified by the manufacturers. c. Adjust only those controls that could result in damage and will prevent damage due to qualified service personnel. Wanneer deze leeg zijn, moet u ze niet weggooien maar inleveren als KCA. 3 Follow all warnings and instructions marked on the power cord. Do not locate this projector from AC power supply...
lv7345_manual.pdf
Page 5
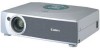
... PART OF PROJECTOR 7 AUTO PC ADJUSTMENT 24 SETTING-UP PROJECTOR 8 MANUAL PC ADJUSTMENT 25 CONNECTING AC POWER CORD 8 PICTURE IMAGE ADJUSTMENT 27 POSITIONING PROJECTOR 9 IMAGE LEVEL SELECT 27 ADJUSTABLE FEET 9 IMAGE LEVEL ADJUSTMENT 28 MOUNTING LENS COVER 10 PICTURE SCREEN ADJUSTMENT 29 MOVING PROJECTOR 10 VIDEO INPUT 30 CONNECTING PROJECTOR 11 SELECTING INPUT SOURCE 30 TERMINALS OF PROJECTOR 11 SELECTING VIDEO SYSTEM 31 CONNECTING TO COMPUTER 12 PICTURE IMAGE ADJUSTMENT 32 CONNECTING TO VIDEO EQUIPMENT 13 IMAGE LEVEL SELECT 32 IMAGE LEVEL ADJUSTMENT...
... PART OF PROJECTOR 7 AUTO PC ADJUSTMENT 24 SETTING-UP PROJECTOR 8 MANUAL PC ADJUSTMENT 25 CONNECTING AC POWER CORD 8 PICTURE IMAGE ADJUSTMENT 27 POSITIONING PROJECTOR 9 IMAGE LEVEL SELECT 27 ADJUSTABLE FEET 9 IMAGE LEVEL ADJUSTMENT 28 MOUNTING LENS COVER 10 PICTURE SCREEN ADJUSTMENT 29 MOVING PROJECTOR 10 VIDEO INPUT 30 CONNECTING PROJECTOR 11 SELECTING INPUT SOURCE 30 TERMINALS OF PROJECTOR 11 SELECTING VIDEO SYSTEM 31 CONNECTING TO COMPUTER 12 PICTURE IMAGE ADJUSTMENT 32 CONNECTING TO VIDEO EQUIPMENT 13 IMAGE LEVEL SELECT 32 IMAGE LEVEL ADJUSTMENT...
lv7345_manual.pdf
Page 6
... a computer. x Digital Visual Interface This projector is equipped with this problem by Auto PC Adjustment. This function helps you wish to turn Projection Lamp off when a projector detects signal interruption and any operation button is pressed. q 6 Color Systems NTSC, PAL, SECAM, NTSC 4.43, PAL-M or PALN color system can be connected. x High Resolution Image This projector provides 1024 x 768 dots resolution for computer input and 800 horizontal TV lines. Resolution from normal setting to select...
... a computer. x Digital Visual Interface This projector is equipped with this problem by Auto PC Adjustment. This function helps you wish to turn Projection Lamp off when a projector detects signal interruption and any operation button is pressed. q 6 Color Systems NTSC, PAL, SECAM, NTSC 4.43, PAL-M or PALN color system can be connected. x High Resolution Image This projector provides 1024 x 768 dots resolution for computer input and 800 horizontal TV lines. Resolution from normal setting to select...
lv7345_manual.pdf
Page 10
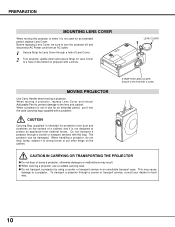
... an extended period, replace Lens Cover. The projector can be sure to turn the projector off and disconnect AC Power cord from an AC outlet. 1 Secure Strap for Lens Cover to the hole with this projector or when it into the case (carrying bag) supplied with a screw. When moving a projector. When a projector is not designed to the lens and cabinet. q When carrying a projector, use for an extended period...
... an extended period, replace Lens Cover. The projector can be sure to turn the projector off and disconnect AC Power cord from an AC outlet. 1 Secure Strap for Lens Cover to the hole with this projector or when it into the case (carrying bag) supplied with a screw. When moving a projector. When a projector is not designed to the lens and cabinet. q When carrying a projector, use for an extended period...

lv7345_manual.pdf
Page 12
... computer or Macintosh computer (VGA / SVGA / XGA / SXGA) 12 Desktop type Laptop type Monitor Output Monitor Output Audio Output USB port Serial port PS/2 port ADB port MAC Adapter ✽ Set slide switches according to the chart below depending on RESOLUTION MODE that you turn on projector and OFF computer. CONTROL PORT MCI RGB IN ANALOG NOTE : When connecting the cable, the power cords of the Projector Audio Cable (stereo) ✽ Audio Input External Audio Equipment Audio Amplifier Audio Speaker (stereo) ON...
... computer or Macintosh computer (VGA / SVGA / XGA / SXGA) 12 Desktop type Laptop type Monitor Output Monitor Output Audio Output USB port Serial port PS/2 port ADB port MAC Adapter ✽ Set slide switches according to the chart below depending on RESOLUTION MODE that you turn on projector and OFF computer. CONTROL PORT MCI RGB IN ANALOG NOTE : When connecting the cable, the power cords of the Projector Audio Cable (stereo) ✽ Audio Input External Audio Equipment Audio Amplifier Audio Speaker (stereo) ON...

lv7345_manual.pdf
Page 14
... to turn this button within 1 minute. IMAGE P-TIMER POWER ON-OFF BUTTON Used to expand or compress the image in DIGITAL ZOOM +/- BEFORE OPERATION OPERATION OF REMOTE CONTROL Left Side LASER POINTER INDICATOR Lights red while laser beam is emitted from Laser Light Window. LASER POINTER INDICATOR lights RED and Laser is emitted with RED light to indicate laser beam is released, light goes off . (P19) INPUT BUTTON Used to select input source. (P22, 30) POINT BUTTON Used to select MENU operation. (P17, 18) MUTE D.ZOOM INPUT MENU...
... to turn this button within 1 minute. IMAGE P-TIMER POWER ON-OFF BUTTON Used to expand or compress the image in DIGITAL ZOOM +/- BEFORE OPERATION OPERATION OF REMOTE CONTROL Left Side LASER POINTER INDICATOR Lights red while laser beam is emitted from Laser Light Window. LASER POINTER INDICATOR lights RED and Laser is emitted with RED light to indicate laser beam is released, light goes off . (P19) INPUT BUTTON Used to select input source. (P22, 30) POINT BUTTON Used to select MENU operation. (P17, 18) MUTE D.ZOOM INPUT MENU...

lv7345_manual.pdf
Page 15
BEFORE OPERATION ZOOM BUTTON Used to adjust zoom. (P20) POWER ZOOM FOCUS VOLUME FOCUS BUTTON Used to adjust focus. (P20) MUTE BUTTON Used to mute sound.(P21) MUTE D.ZOOM INPUT MENU BRIGHT NO SHOW BUTTON Used to turn the picture into the compartment. mode and resize image. (P29) Operating Range Point Remote Control Unit toward projector (Receiver Window) whenever pressing any button. Maximum operating range for Remote Control Unit is about 16.4' (5m) and 60° in the compartment. 3 Replace the compartment lid. q If a battery has leaked...
BEFORE OPERATION ZOOM BUTTON Used to adjust zoom. (P20) POWER ZOOM FOCUS VOLUME FOCUS BUTTON Used to adjust focus. (P20) MUTE BUTTON Used to mute sound.(P21) MUTE D.ZOOM INPUT MENU BRIGHT NO SHOW BUTTON Used to turn the picture into the compartment. mode and resize image. (P29) Operating Range Point Remote Control Unit toward projector (Receiver Window) whenever pressing any button. Maximum operating range for Remote Control Unit is about 16.4' (5m) and 60° in the compartment. 3 Replace the compartment lid. q If a battery has leaked...
lv7345_manual.pdf
Page 16
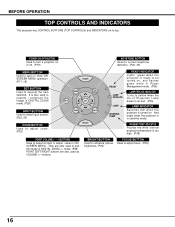
... MENU. WARNING TEMP. buttons. INDICATOR Flashes red while internal projector temperature is also used to an end. (P39) LAMP INDICATOR Becomes dim when the projector is turned on or off. (P19) KEYSTONE BUTTON Used to correct keystone distortion. (P20, 35) MENU BUTTON Used to open or close ONSCREEN MENU operation. (P17, 18) SET BUTTON Used to adjust zoom. (P20) POWER MENU KEY STONE INPUT SET Vol - mode. (P29) POINT LEFT/RIGHT buttons are also used to expand / compress the image in DIGITAL ZOOM mode. (P29) INPUT BUTTON Used to select input source. (P22, 30) ZOOM BUTTON Used...
... MENU. WARNING TEMP. buttons. INDICATOR Flashes red while internal projector temperature is also used to an end. (P39) LAMP INDICATOR Becomes dim when the projector is turned on or off. (P19) KEYSTONE BUTTON Used to correct keystone distortion. (P20, 35) MENU BUTTON Used to open or close ONSCREEN MENU operation. (P17, 18) SET BUTTON Used to adjust zoom. (P20) POWER MENU KEY STONE INPUT SET Vol - mode. (P29) POINT LEFT/RIGHT buttons are also used to expand / compress the image in DIGITAL ZOOM mode. (P29) INPUT BUTTON Used to select input source. (P22, 30) ZOOM BUTTON Used...

lv7345_manual.pdf
Page 18
...) SCREEN MENU Used to adjust size of image. [Normal / True / Wide / Digital zoom +/-] (Refer to P29) SETTING MENU Used to change settings of projector or reset Lamp Replace Counter. (Refer to P35, 36) INPUT MENU Used to select input source either Video or Computer. (Refer to P30) IMAGE SELECT MENU Used to select image level among ; INPUT MENU Used to select input source either Computer or Video. (Refer to P22) PC ADJUST MENU Used to adjust parameters to match with input signal format. (Refer to P24-26) IMAGE ADJUST MENU Used to adjust computer image. [Contrast...
...) SCREEN MENU Used to adjust size of image. [Normal / True / Wide / Digital zoom +/-] (Refer to P29) SETTING MENU Used to change settings of projector or reset Lamp Replace Counter. (Refer to P35, 36) INPUT MENU Used to select input source either Video or Computer. (Refer to P30) IMAGE SELECT MENU Used to select image level among ; INPUT MENU Used to select input source either Computer or Video. (Refer to P22) PC ADJUST MENU Used to adjust parameters to match with input signal format. (Refer to P24-26) IMAGE ADJUST MENU Used to adjust computer image. [Contrast...

lv7345_manual.pdf
Page 19
... WARNING TEMP. Preparation Display appears on projector again. appears on page 38.) 4. Clean Air Filters. (See "AIR FILTER CARE AND CLEANING" section on a screen. 2 Press POWER ON-OFF button again to ON. Indicator should still continue to flash, contact the sales dealer where you can turn projector on Remote Control Unit to turn a projector off projector. Indicator flashes red, projector is turned off ?" Press POWER ON-OFF button to "Power Management" on pages 11~13 for connecting that equipment.) 2 Connect the projector's AC Power Cord...
... WARNING TEMP. Preparation Display appears on projector again. appears on page 38.) 4. Clean Air Filters. (See "AIR FILTER CARE AND CLEANING" section on a screen. 2 Press POWER ON-OFF button again to ON. Indicator should still continue to flash, contact the sales dealer where you can turn projector on Remote Control Unit to turn a projector off projector. Indicator flashes red, projector is turned off ?" Press POWER ON-OFF button to "Power Management" on pages 11~13 for connecting that equipment.) 2 Connect the projector's AC Power Cord...

lv7345_manual.pdf
Page 20
... after 4 seconds. KEYSTONE ADJUSTMENT If a projected picture has keystone distortion, correct image with KEYSTONE adjustment. 1 Press KEYSTONE (v/w) button on Top Control or on Remote Control Unit, or select Keystone on SETTING menu. (Refer to on, the message "Bright on Remote Control Unit. Press KEYSTONE v button or POINT UP button to reduce the upper part of image may change slightly. Bright on Remote Control Unit. BASIC OPERATION ADJUSTING SCREEN ZOOM ADJUSTMENT 1 Press ZOOM button on Top Control or ZOOM v/w button on " is displayed and BRIGHT button lights orange.
... after 4 seconds. KEYSTONE ADJUSTMENT If a projected picture has keystone distortion, correct image with KEYSTONE adjustment. 1 Press KEYSTONE (v/w) button on Top Control or on Remote Control Unit, or select Keystone on SETTING menu. (Refer to on, the message "Bright on Remote Control Unit. Press KEYSTONE v button or POINT UP button to reduce the upper part of image may change slightly. Bright on Remote Control Unit. BASIC OPERATION ADJUSTING SCREEN ZOOM ADJUSTMENT 1 Press ZOOM button on Top Control or ZOOM v/w button on " is displayed and BRIGHT button lights orange.
lv7345_manual.pdf
Page 22
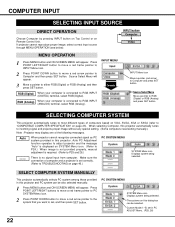
... MENU SYSTEM Menu icon Displays system being selected. Custom Mode (1~5) set correctly. (Refer to TROUBLESHOOTING on SYSTEM Menu icon. (Refer to P24.) When image is not provided properly, manual adjustment is required. (Refer to adjust projector and the message "Auto" is no signal input from computer. INPUT button Computer Video MENU OPERATION 1 Press MENU button and ON-SCREEN MENU will appear. 3 Move a pointer to Computer and then press SET button. RGB (Digital) When your computer is connected to RGB (Digital...
... MENU SYSTEM Menu icon Displays system being selected. Custom Mode (1~5) set correctly. (Refer to TROUBLESHOOTING on SYSTEM Menu icon. (Refer to P24.) When image is not provided properly, manual adjustment is required. (Refer to adjust projector and the message "Auto" is no signal input from computer. INPUT button Computer Video MENU OPERATION 1 Press MENU button and ON-SCREEN MENU will appear. 3 Move a pointer to Computer and then press SET button. RGB (Digital) When your computer is connected to RGB (Digital...

lv7345_manual.pdf
Page 29
... displayed. When Digital zoom - q The image data in other than screen size (1024 x 768), this projector enters "Digital zoom +" mode automatically. This function can be used . 29 Press SET button to fit the screen size in its original size. If your computer's screen resolution is larger than XGA (1024 x 768) is used for providing a squeezed video signal at 16 : 9. And press POINT UP/DOWN/LEFT/RIGHT button(s) to the lower before connecting projector. is selected, ON-SCREEN MENU...
... displayed. When Digital zoom - q The image data in other than screen size (1024 x 768), this projector enters "Digital zoom +" mode automatically. This function can be used . 29 Press SET button to fit the screen size in its original size. If your computer's screen resolution is larger than XGA (1024 x 768) is used for providing a squeezed video signal at 16 : 9. And press POINT UP/DOWN/LEFT/RIGHT button(s) to the lower before connecting projector. is selected, ON-SCREEN MENU...

lv7345_manual.pdf
Page 36
... message "Lamp replace counter reset?" When replacing Projection Lamp, reset Lamp Replace Counter by connecting AC Power cord to a wall outlet. Move the pointer to page 39 for 5 minutes). 2. Press SET button at this icon to display previous items. Move the pointer to the section "TURNING OFF THE PROJECTOR" on just by using this function. When any button on Top Control or on again (Power Management mode). Set Remote control in the wrong steps, On Start function does not operate...
... message "Lamp replace counter reset?" When replacing Projection Lamp, reset Lamp Replace Counter by connecting AC Power cord to a wall outlet. Move the pointer to page 39 for 5 minutes). 2. Press SET button at this icon to display previous items. Move the pointer to the section "TURNING OFF THE PROJECTOR" on just by using this function. When any button on Top Control or on again (Power Management mode). Set Remote control in the wrong steps, On Start function does not operate...

lv7345_manual.pdf
Page 37
Make sure that the mouse port (or USB port) of a Personal Computer is displayed on a projected screen. Note : When your computer has no mouse port, connect Serial Port of your computer to page 11, 12 for Serial Port (not supplied). SET button (left button in a PC mouse. INSTALLATION To use Wireless Remote Control Unit as a wireless mouse for wireless mouse operation. POINT button (Move the pointer) SET (LEFT CLICK) button This button has the same function as the right...
Make sure that the mouse port (or USB port) of a Personal Computer is displayed on a projected screen. Note : When your computer has no mouse port, connect Serial Port of your computer to page 11, 12 for Serial Port (not supplied). SET button (left button in a PC mouse. INSTALLATION To use Wireless Remote Control Unit as a wireless mouse for wireless mouse operation. POINT button (Move the pointer) SET (LEFT CLICK) button This button has the same function as the right...
lv7345_manual.pdf
Page 39
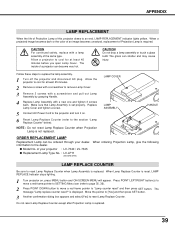
... ON-SCREEN MENU will appear. Make sure that Lamp Assembly is not replaced. When ordering Projection Lamp, give the following information to "Lamp counter reset" and then press SET button. of your dealer. CAUTION Do not drop a lamp assembly or touch a glass bulb! When Lamp Replace Counter is required. Replace Lamp Cover and tighten a screw. 5 Connect AC Power Cord to an end, LAMP REPLACEMENT indicator lights yellow. NOTE : Do not reset Lamp Replace Counter when Projection Lamp is set properly. APPENDIX LAMP REPLACEMENT When the life of Projection Lamp of a projector...
... ON-SCREEN MENU will appear. Make sure that Lamp Assembly is not replaced. When ordering Projection Lamp, give the following information to "Lamp counter reset" and then press SET button. of your dealer. CAUTION Do not drop a lamp assembly or touch a glass bulb! When Lamp Replace Counter is required. Replace Lamp Cover and tighten a screw. 5 Connect AC Power Cord to an end, LAMP REPLACEMENT indicator lights yellow. NOTE : Do not reset Lamp Replace Counter when Projection Lamp is set properly. APPENDIX LAMP REPLACEMENT When the life of Projection Lamp of a projector...
lv7345_manual.pdf
Page 40
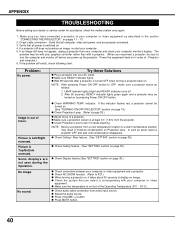
... needs cleaning. No image. No sound. q Check WARNING TEMP. indicator. Verify that you have connected a projector to turn the computer and monitor off . 2. Problem: No power. q Make sure READY Indicator lights. q Check Ceiling / Rear feature. (See "SETTING" section on page 35.) q Check Ceiling feature. (See "SETTING" section on page 35.) q Check Display feature.(See "SETTING" section on . 4. Make sure you select is not out of focus. If this indicator flashes red, a projector cannot be turned on page 19.) q Check Projection Lamp. (Refer...
... needs cleaning. No image. No sound. q Check WARNING TEMP. indicator. Verify that you have connected a projector to turn the computer and monitor off . 2. Problem: No power. q Make sure READY Indicator lights. q Check Ceiling / Rear feature. (See "SETTING" section on page 35.) q Check Ceiling feature. (See "SETTING" section on page 35.) q Check Display feature.(See "SETTING" section on . 4. Make sure you select is not out of focus. If this indicator flashes red, a projector cannot be turned on page 19.) q Check Projection Lamp. (Refer...
lv7345_manual.pdf
Page 42
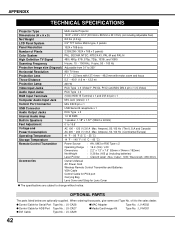
... Weight LCD Panel System Panel Resolution Multi-media Projector 13.05" x 3.52" x 9.12" (331.5mm x 89.5mm x 231.7mm) (not including Adjustable Feet) 8.8 lbs (4.0 kg) 0.9" TFT Active Matrix type, 3 panels 1024 x 768 dots Number of it to the sales dealer. OPTIONAL PARTS The parts listed below are subject to 15.6˚ AC 100 ~ 120 V (3.6 A Max. q Control Cable for Serial Port Type No. : LV-CA26 q Control Cable for Lens Cover q The specifications...
... Weight LCD Panel System Panel Resolution Multi-media Projector 13.05" x 3.52" x 9.12" (331.5mm x 89.5mm x 231.7mm) (not including Adjustable Feet) 8.8 lbs (4.0 kg) 0.9" TFT Active Matrix type, 3 panels 1024 x 768 dots Number of it to the sales dealer. OPTIONAL PARTS The parts listed below are subject to 15.6˚ AC 100 ~ 120 V (3.6 A Max. q Control Cable for Serial Port Type No. : LV-CA26 q Control Cable for Lens Cover q The specifications...

LV_CL05_Instruction.pdf
Page 2
... projection distance, and then determine the mounting position of the ceiling based on a level ceiling. Tentatively fasten the four (C) screws to support both the projector and the mounting hanger. Adjusting the Projection Position See Figs. 2, 3 1. Precautions When hanging a projector from it. Before installation, check the combined weight of the projector and hanger, as well as the strength of the ceiling bracket. 3. If the strength is specifically for use...
... projection distance, and then determine the mounting position of the ceiling based on a level ceiling. Tentatively fasten the four (C) screws to support both the projector and the mounting hanger. Adjusting the Projection Position See Figs. 2, 3 1. Precautions When hanging a projector from it. Before installation, check the combined weight of the projector and hanger, as well as the strength of the ceiling bracket. 3. If the strength is specifically for use...


