Optura Instruction Manual
Page 3
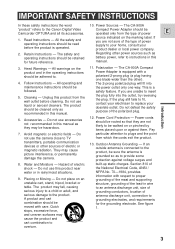
... this product near water or in this product from which the cords exit the product. 13. Do not use the camera close to the Canon Digital Video Camcorder OPTURA and all its accessories. Placing or Moving - Polarization - If you are not likely to proper grounding of the mast...provide some protection against them. Cleaning - The product should be hazardous. 7. The product may cause picture interference, or permanently damage the camera. 8. A product and cart combination should be sure the antenna is equipped with care. The CA-900A Compact Power Adapter is grounded so...
... this product near water or in this product from which the cords exit the product. 13. Do not use the camera close to the Canon Digital Video Camcorder OPTURA and all its accessories. Placing or Moving - Polarization - If you are not likely to proper grounding of the mast...provide some protection against them. Cleaning - The product should be hazardous. 7. The product may cause picture interference, or permanently damage the camera. 8. A product and cart combination should be sure the antenna is equipped with care. The CA-900A Compact Power Adapter is grounded so...

Optura Instruction Manual
Page 5
... Important Safety Instructions 3 Recording 34 Thank you for Choosing a Canon ..........6 Using the Various Recording Programs Introducing the OPTURA 7 35 Fading In and Out Between Scenes......40 Mastering the Basics Audio Recording 43 Setting the Self-Timer 44 Powering Your Camcorder 8 Using a Canon Speedlite for Flash Loading a Cassette 10 Photography (optional accessory) ... Displaying Data Code 30 Taking Still Pictures (Photo Mode) ......31 Searching Through Your Recorded "Photos" (Photo Search 32 Additional Information Preparing the Camera 54 Notes on the bottom of the...
... Important Safety Instructions 3 Recording 34 Thank you for Choosing a Canon ..........6 Using the Various Recording Programs Introducing the OPTURA 7 35 Fading In and Out Between Scenes......40 Mastering the Basics Audio Recording 43 Setting the Self-Timer 44 Powering Your Camcorder 8 Using a Canon Speedlite for Flash Loading a Cassette 10 Photography (optional accessory) ... Displaying Data Code 30 Taking Still Pictures (Photo Mode) ......31 Searching Through Your Recorded "Photos" (Photo Search 32 Additional Information Preparing the Camera 54 Notes on the bottom of the...
Optura Instruction Manual
Page 7
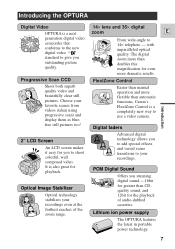
.... The digital zoom more than CDquality sound, and 12bit for even more flexible than automatic functions, Canon's FlexiZone Control is also great for you stunning digital sound -16bit for greater than doubles this magnification...camera. FlexiZone Control Easier than manual operation and more dramatic results. Lithium ion power supply The OPTURA features the latest in portable power technology. 7 Introduction Digital faders Advanced digital technology allows you outstanding picture quality. Introducing the OPTURA Digital Video OPTURA is a next generation digital video camcorder...
.... The digital zoom more than CDquality sound, and 12bit for even more flexible than automatic functions, Canon's FlexiZone Control is also great for you stunning digital sound -16bit for greater than doubles this magnification...camera. FlexiZone Control Easier than manual operation and more dramatic results. Lithium ion power supply The OPTURA features the latest in portable power technology. 7 Introduction Digital faders Advanced digital technology allows you outstanding picture quality. Introducing the OPTURA Digital Video OPTURA is a next generation digital video camcorder...
Optura Instruction Manual
Page 8
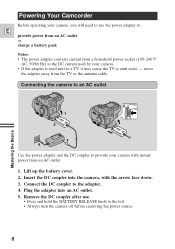
...an AC outlet. 5. Plug the adapter into the camera, with instant power from a household power socket (100-240 V AC, 50/60 Hz) to the DC current used next to a TV, it may cause the TV to emit noise - Powering Your Camcorder Before operating your camera. • If the adapter is used by your... camera, you will need to use . • Press and hold the BATTERY RELEASE knob to the adapter. 4. Connecting the...
...an AC outlet. 5. Plug the adapter into the camera, with instant power from a household power socket (100-240 V AC, 50/60 Hz) to the DC current used next to a TV, it may cause the TV to emit noise - Powering Your Camcorder Before operating your camera. • If the adapter is used by your... camera, you will need to use . • Press and hold the BATTERY RELEASE knob to the adapter. 4. Connecting the...
Optura Instruction Manual
Page 9
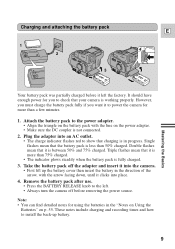
... can find detailed notes for using the batteries in progress. It should have enough power for more than 50% charged. Triple flashes mean that your camera is more than a few minutes. 1. Attach the battery pack to check that the battery pack is less than 75% charged. • The ... when the battery pack is between 50% and 75% charged. Remove the battery pack after use. • Press the BATTERY RELEASE knob to power the camera for you want it to the left the factory. Single flashes mean that charging is not connected. 2. Charging and attaching the battery pack 1 2 3 E 4...
... can find detailed notes for using the batteries in progress. It should have enough power for more than 50% charged. Triple flashes mean that your camera is more than a few minutes. 1. Attach the battery pack to check that the battery pack is less than 75% charged. • The ... when the battery pack is between 50% and 75% charged. Remove the battery pack after use. • Press the BATTERY RELEASE knob to power the camera for you want it to the left the factory. Single flashes mean that charging is not connected. 2. Charging and attaching the battery pack 1 2 3 E 4...

Optura Instruction Manual
Page 10
Slide the EJECT 5 button upwards to release the cover (the camera's grip). • Pull the cover fully open (while holding the button upwards) and wait a couple of the cassette are used for the cassette compartment to ... source. 2. Press the PUSH mark on the compartment until it clicks, and wait for it in a cool, clean, dry place. • The holes in the camera after use record search (p. 34) to open automatically. 3. Click the cover back into place. * Mini is opening or closing automatically, or attempt to start recording...
Slide the EJECT 5 button upwards to release the cover (the camera's grip). • Pull the cover fully open (while holding the button upwards) and wait a couple of the cassette are used for the cassette compartment to ... source. 2. Press the PUSH mark on the compartment until it clicks, and wait for it in a cool, clean, dry place. • The holes in the camera after use record search (p. 34) to open automatically. 3. Click the cover back into place. * Mini is opening or closing automatically, or attempt to start recording...

Optura Instruction Manual
Page 11
Cassette Memory You are unable to use the cassette memory function with the camera switched to record on the cassette so that it exposes the hole and the red mark. (This switch position is displayed for approx. 4 seconds and ... from accidental erasure, slide the tab on the cassette again, slide the tab back so the hole is closed, and the red mark covered. The camera also shows the above phrase if you want to VCR mode. If you accidentally press the 2 (record) button with this cassette and put the...
Cassette Memory You are unable to use the cassette memory function with the camera switched to record on the cassette so that it exposes the hole and the red mark. (This switch position is displayed for approx. 4 seconds and ... from accidental erasure, slide the tab on the cassette again, slide the tab back so the hole is closed, and the red mark covered. The camera also shows the above phrase if you want to VCR mode. If you accidentally press the 2 (record) button with this cassette and put the...
Optura Instruction Manual
Page 12
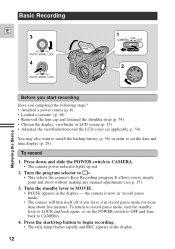
...screen (p. 15) • Adjusted the viewfinder/removed the LCD cover (as applicable, p. 54). Turn the program selector to CAMERA. • The camera power indicator lights up red. 2. To return to CAMERA. 4. Turn the standby lever to LOCK and back again, or set the date and time display (p. 29). You may also... want to install the backup battery (p. 56) in "record pause mode." • The camera will turn the standby lever to MOVIE. • PAUSE appears in the display. 12 Press the start recording Have you leave it in record pause...
...screen (p. 15) • Adjusted the viewfinder/removed the LCD cover (as applicable, p. 54). Turn the program selector to CAMERA. • The camera power indicator lights up red. 2. To return to CAMERA. 4. Turn the standby lever to LOCK and back again, or set the date and time display (p. 29). You may also... want to install the backup battery (p. 56) in "record pause mode." • The camera will turn the standby lever to MOVIE. • PAUSE appears in the display. 12 Press the start recording Have you leave it in record pause...
Optura Instruction Manual
Page 13
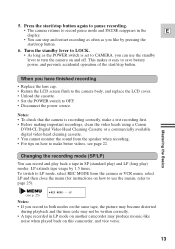
... the POWER switch is recording correctly, make a test recording first. • Before making important recordings, clean the video heads using a Canon DVM-CL Digital Video Head Cleaning Cassette or a commercially available digital video head cleaning cassette. • You cannot monitor the sound from the.... • As long as you can record and play back a tape in LP mode on another camcorder may produce mosaic-like by 1.5 times. 5. Notes: • To check that the camera is set to save battery power, and prevents accidental operation of the start /stop button. LP extends tape...
... the POWER switch is recording correctly, make a test recording first. • Before making important recordings, clean the video heads using a Canon DVM-CL Digital Video Head Cleaning Cassette or a commercially available digital video head cleaning cassette. • You cannot monitor the sound from the.... • As long as you can record and play back a tape in LP mode on another camcorder may produce mosaic-like by 1.5 times. 5. Notes: • To check that the camera is set to save battery power, and prevents accidental operation of the start /stop button. LP extends tape...

Optura Instruction Manual
Page 14
... zoom on a subject as close as possible to your subject, keep the zoom at the camera menu, to more than double the camera's zoom range. (see p. 25) D.ZOOM ON (For an explanation of how to use the camera menu see page 25) Mastering the Basics The zoom control continues to work as 3/8 in...; to 35×). ZOOM at the wide-angle position. You can focus on from choosing D. Zooming E W Zoom out T W Zoom in T 14× optical zoom The camera's 14× zoom lens allows you to choose the best picture angle for each scene: • Turn the zoom control towards T to zoom in to...
... zoom on a subject as close as possible to your subject, keep the zoom at the camera menu, to more than double the camera's zoom range. (see p. 25) D.ZOOM ON (For an explanation of how to use the camera menu see page 25) Mastering the Basics The zoom control continues to work as 3/8 in...; to 35×). ZOOM at the wide-angle position. You can focus on from choosing D. Zooming E W Zoom out T W Zoom in T 14× optical zoom The camera's 14× zoom lens allows you to choose the best picture angle for each scene: • Turn the zoom control towards T to zoom in to...
Optura Instruction Manual
Page 15
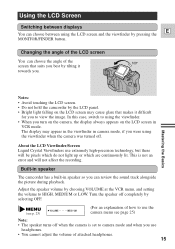
...; Do not hold the camcorder by the LCD panel. • Bright light falling on the LCD screen in VCR mode. Adjust the speaker volume by selecting OFF. (see p. 25) VOLUME MEDIUM (For an explanation of how to using the viewfinder. • When you turn on the camera, the display always appears...cannot adjust the volume of the 100° screen that suits you best by pressing the MONITOR/FINDER button. Built-in speaker The camcorder has a built-in camera mode, if you were using the LCD screen and the viewfinder by tilting it towards you can review the sound track alongside the ...
...; Do not hold the camcorder by the LCD panel. • Bright light falling on the LCD screen in VCR mode. Adjust the speaker volume by selecting OFF. (see p. 25) VOLUME MEDIUM (For an explanation of how to using the viewfinder. • When you turn on the camera, the display always appears...cannot adjust the volume of the 100° screen that suits you best by pressing the MONITOR/FINDER button. Built-in speaker The camcorder has a built-in camera mode, if you were using the LCD screen and the viewfinder by tilting it towards you can review the sound track alongside the ...

Optura Instruction Manual
Page 16
To use the LCD screen for instant, on-the-spot playback. Playing back a Cassette E CAMERA OFF VCR POWER RECORD SEARCH Mastering the Basics You can use the wireless controller, see p. 19. The camera also plays back the sound track via the built-in speaker (p. 15). Press the PLAY e ...recordings on the cassette so that it exposes the hole (the switch position is rough (mosaic-like noise), clean the video heads using a Canon DVM-CL Digital Video Head Cleaning Cassette or a commercially available digital video head cleaning cassette. 16 Note: • To avoid accidental recording,...
To use the LCD screen for instant, on-the-spot playback. Playing back a Cassette E CAMERA OFF VCR POWER RECORD SEARCH Mastering the Basics You can use the wireless controller, see p. 19. The camera also plays back the sound track via the built-in speaker (p. 15). Press the PLAY e ...recordings on the cassette so that it exposes the hole (the switch position is rough (mosaic-like noise), clean the video heads using a Canon DVM-CL Digital Video Head Cleaning Cassette or a commercially available digital video head cleaning cassette. 16 Note: • To avoid accidental recording,...

Optura Instruction Manual
Page 17
To resume normal playback, press it again, or press the PLAY e button. The camera automatically goes into stop mode after about 9.5 times normal speed, press and hold the REW ` button during normal playback or press and hold the FF 1 ...
To resume normal playback, press it again, or press the PLAY e button. The camera automatically goes into stop mode after about 9.5 times normal speed, press and hold the REW ` button during normal playback or press and hold the FF 1 ...

Optura Instruction Manual
Page 18
...play back in reverse at about 30 seconds of slow playback. Press the PLAY e button to return to normal playback. • The camera automatically returns to playback after about 1/5 normal speed, press the -/4a button and then the SLOW button during normal forward playback. Reverse ...from the wireless controller (p. 27) Frame Advance To play back continuous frame advance. Press PLAY e to return to normal playback. • The camera automatically returns to normal playback. Press the PLAY e button to return to ×1 reverse playback after about 1/5 normal speed, press the SLOW ...
...play back in reverse at about 30 seconds of slow playback. Press the PLAY e button to return to normal playback. • The camera automatically returns to playback after about 1/5 normal speed, press the -/4a button and then the SLOW button during normal forward playback. Reverse ...from the wireless controller (p. 27) Frame Advance To play back continuous frame advance. Press PLAY e to return to normal playback. • The camera automatically returns to normal playback. Press the PLAY e button to return to ×1 reverse playback after about 1/5 normal speed, press the SLOW ...

Optura Instruction Manual
Page 19
... Cable VIDEO/ AUDIO OUT REMOTE INPUT S-VIDEO VIDEO AUDIO L R • Use the S-150 S-video Cable to LINE. 19 Connect the red plug to the camera (see p. 8). Connections for further details. You will need to attach a power source to the red audio terminal 9 (right). If your TV (or VCR)... has audio/video input terminals Mastering the Basics VIDEO/ AUDIO OUT REMOTE STV-250 Stereo Video Cable INPUT VIDEO AUDIO L R • Connect the camera using the STV-250 Stereo Video Cable. Connect the white plug to the white audio terminal 7 (left ). Connect the white plug to the white ...
... Cable VIDEO/ AUDIO OUT REMOTE INPUT S-VIDEO VIDEO AUDIO L R • Use the S-150 S-video Cable to LINE. 19 Connect the red plug to the camera (see p. 8). Connections for further details. You will need to attach a power source to the red audio terminal 9 (right). If your TV (or VCR)... has audio/video input terminals Mastering the Basics VIDEO/ AUDIO OUT REMOTE STV-250 Stereo Video Cable INPUT VIDEO AUDIO L R • Connect the camera using the STV-250 Stereo Video Cable. Connect the white plug to the white audio terminal 7 (left ). Connect the white plug to the white ...

Optura Instruction Manual
Page 20
... by the microphone, an unpleasant high-pitched squeal, called feedback, may be produced. If your TV is picked up to a VCR, you can connect the camera to the VCR instead of the TV. Follow the instructions on the previous page. Note: E • If you are going to use the optional RU...-100 RF Unit 1 4CH 3CH TO TV FROM ANT 2 300-75 ohm adapter Coaxial cable with F-connection 3 VHF 75-300 ohm adapter To connect the camera directly to a TV which does not have audio/video terminals, you will need to use the TV as a monitor while you are shooting, remember to...
... by the microphone, an unpleasant high-pitched squeal, called feedback, may be produced. If your TV is picked up to a VCR, you can connect the camera to the VCR instead of the TV. Follow the instructions on the previous page. Note: E • If you are going to use the optional RU...-100 RF Unit 1 4CH 3CH TO TV FROM ANT 2 300-75 ohm adapter Coaxial cable with F-connection 3 VHF 75-300 ohm adapter To connect the camera directly to a TV which does not have audio/video terminals, you will need to use the TV as a monitor while you are shooting, remember to...

Optura Instruction Manual
Page 21
Selecting the video channel Turn the TV on, start playback on the camera (see p. 16), and set the TV and the RF unit to the video channel. 4CH 3CH ...broadcasting station in your area and can be used for cassette playback (channel 3 or 4). 4CH 3CH Note: • Turn the camera off or disconnect it from the RF unit when you will need to the FROM ANT. terminal on the RF unit to watch a... end of the cable and wind the wires around the screws. Connect the RF unit to the camera, using the RC-150 RF adapter E cables. • The RF unit and RF adapter cables are available optionally. 2.
Selecting the video channel Turn the TV on, start playback on the camera (see p. 16), and set the TV and the RF unit to the video channel. 4CH 3CH ...broadcasting station in your area and can be used for cassette playback (channel 3 or 4). 4CH 3CH Note: • Turn the camera off or disconnect it from the RF unit when you will need to the FROM ANT. terminal on the RF unit to watch a... end of the cable and wind the wires around the screws. Connect the RF unit to the camera, using the RC-150 RF adapter E cables. • The RF unit and RF adapter cables are available optionally. 2.
Optura Instruction Manual
Page 22
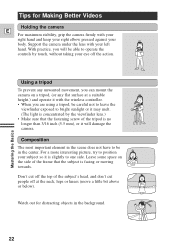
...the top of the tripod is no longer than 3/16 inch (5.5 mm), or it with the wireless controller. • When you will damage the camera. Don't cut people off at a suitable height.) and operate it will be able to bright sunlight or it is concentrated by touch, without taking... With practice, you are using a tripod, be in the background. 22 Mastering the Basics Watch out for Making Better Videos Holding the camera E For maximum stability, grip the camera firmly with your left hand. Composition The most important element in the scene does not have to one side. Support the...
...the top of the tripod is no longer than 3/16 inch (5.5 mm), or it with the wireless controller. • When you will damage the camera. Don't cut people off at a suitable height.) and operate it will be able to bright sunlight or it is concentrated by touch, without taking... With practice, you are using a tripod, be in the background. 22 Mastering the Basics Watch out for Making Better Videos Holding the camera E For maximum stability, grip the camera firmly with your left hand. Composition The most important element in the scene does not have to one side. Support the...

Optura Instruction Manual
Page 23
...-hearted movements. Without moving subject. Tilt 23 Hold the final image for a few seconds begin to turn your panning angle. Tilt the camera up Mastering the Basics Camera moves Use pans to exaggerate the height of the subject. E Long shot Medium shot Close-up to record a landscape or follow a ...subjects at the bottom. Remember to begin . A good way to tell a story with video is to change in with a long shot that any camera movement or change your picture angle before you want to cover and stand facing the end of your waist to the Pan starting position.
...-hearted movements. Without moving subject. Tilt 23 Hold the final image for a few seconds begin to turn your panning angle. Tilt the camera up Mastering the Basics Camera moves Use pans to exaggerate the height of the subject. E Long shot Medium shot Close-up to record a landscape or follow a ...subjects at the bottom. Remember to begin . A good way to tell a story with video is to change in with a long shot that any camera movement or change your picture angle before you want to cover and stand facing the end of your waist to the Pan starting position.

Optura Instruction Manual
Page 24
Before you to the [ (Easy Recording) position. However, the OPTURA's Optical Image Stabilizer allows you start recording, open the rear button cover and push the i on/off button to turn the image stabilizer on or ...× or 35× magnification. you are shooting from a moving car. Unlike electronic image stabilizers, it causes no loss of camera movement - Turning the Optical Image Stabilizer On/Off E With most camcorders, even the slightest hand movements will be turned off when the program selector is attached. 24 Using the Full Range...
Before you to the [ (Easy Recording) position. However, the OPTURA's Optical Image Stabilizer allows you start recording, open the rear button cover and push the i on/off button to turn the image stabilizer on or ...× or 35× magnification. you are shooting from a moving car. Unlike electronic image stabilizers, it causes no loss of camera movement - Turning the Optical Image Stabilizer On/Off E With most camcorders, even the slightest hand movements will be turned off when the program selector is attached. 24 Using the Full Range...


