Instruction Manual
Page 5
... United States and/or other countries. • Apple, Mac OS, Final Cut Pro are trademarks or registered trademarks of professional broadcast cameras. Save custom picture and menu settings to an SD card so that you even more freedom to control many aspects of a single ...mentioned above may be part of Avid Technology, Inc. Trademark Acknowledgements • SD and SDHC logos are trademarks or registered trademarks of any multi-camera shooting setup. and other countries. • Avid, Media Composer and NewsCutter are trademarks of SD-3C, LLC. • CompactFlash is a trademark...
... United States and/or other countries. • Apple, Mac OS, Final Cut Pro are trademarks or registered trademarks of professional broadcast cameras. Save custom picture and menu settings to an SD card so that you even more freedom to control many aspects of a single ...mentioned above may be part of Avid Technology, Inc. Trademark Acknowledgements • SD and SDHC logos are trademarks or registered trademarks of any multi-camera shooting setup. and other countries. • Avid, Media Composer and NewsCutter are trademarks of SD-3C, LLC. • CompactFlash is a trademark...
Instruction Manual
Page 8
... Custom Picture Settings 119 Customizing Functions and Onscreen Displays 126 Customizing Functions 126 Customizing Onscreen Displays 127 Saving and Loading Camera Settings 128 Saving Camera Settings to an SD Card 128 Loading Camera Settings from an Index Screen 143 Changing a Clip's Thumbnail 144 Onscreen Markers and Zebra Patterns 81 Displaying Onscreen Markers 81...
... Custom Picture Settings 119 Customizing Functions and Onscreen Displays 126 Customizing Functions 126 Customizing Onscreen Displays 127 Saving and Loading Camera Settings 128 Saving Camera Settings to an SD Card 128 Loading Camera Settings from an Index Screen 143 Changing a Clip's Thumbnail 144 Onscreen Markers and Zebra Patterns 81 Displaying Onscreen Markers 81...
Instruction Manual
Page 9
Photos 161 Taking Photos 161 Taking Photos in CAMERA Mode 161 Capturing Photos in MEDIA Mode 161 Photo Playback 163 Displaying the [Photos] Index Screen 163 Viewing Photos 163 Photo Operations 164 Using the ... HD/SD COMPONENT OUT Terminal 148 Using the AV or VIDEO 2 Terminal 149 Superimposing Onscreen Displays to a Computer 152 System Requirements 152 Installing and Uninstalling Canon XF Utility (Windows) 153 Installing and Uninstalling Canon XF Utility (Mac OS) 156 Viewing the Software Instruction Manuals 159 7.
Photos 161 Taking Photos 161 Taking Photos in CAMERA Mode 161 Capturing Photos in MEDIA Mode 161 Photo Playback 163 Displaying the [Photos] Index Screen 163 Viewing Photos 163 Photo Operations 164 Using the ... HD/SD COMPONENT OUT Terminal 148 Using the AV or VIDEO 2 Terminal 149 Superimposing Onscreen Displays to a Computer 152 System Requirements 152 Installing and Uninstalling Canon XF Utility (Windows) 153 Installing and Uninstalling Canon XF Utility (Mac OS) 156 Viewing the Software Instruction Manuals 159 7.
Instruction Manual
Page 11
...SD card" refers to Troubleshooting (0 185). Conventions Used in the icon. • The following terms are simulated pictures taken with a still camera. "Screen" refers to the model shown in this Manual • IMPORTANT: Precautions related to the camcorder's operation. • NOTES: ...this manual. 1 About this Manual Introduction Introduction 1 Introduction About this Manual Thank you use the camcorder and retain it for purchasing the Canon XF305/XF300. Some screenshots have been altered to make them easier to a CompactFlash (CF) card. "Recording media" refers to CF ...
...SD card" refers to Troubleshooting (0 185). Conventions Used in the icon. • The following terms are simulated pictures taken with a still camera. "Screen" refers to the model shown in this Manual • IMPORTANT: Precautions related to the camcorder's operation. • NOTES: ...this manual. 1 About this Manual Introduction Introduction 1 Introduction About this Manual Thank you use the camcorder and retain it for purchasing the Canon XF305/XF300. Some screenshots have been altered to make them easier to a CompactFlash (CF) card. "Recording media" refers to CF ...
Instruction Manual
Page 12
For a detailed explanation, refer to Turning the Camcorder On and Off (0 27). 3 Recording Image Stabilizer Image Stabilizer [l Camera Setup] [Image Stabilizer] [Standard] Use the image stabilizer to compensate for the menu item. Standard IS compensates for a lower degree of camcorder shake, ... button to [Dynamic IS] or [Powered IS] (0 111), you can also set to [Standard] but you can find the function by selecting the [l Camera Setup] menu and then the [Image Stabilizer] menu item. 1 Introduction About this setting when the camcorder is mounted on how to use of the menu...
For a detailed explanation, refer to Turning the Camcorder On and Off (0 27). 3 Recording Image Stabilizer Image Stabilizer [l Camera Setup] [Image Stabilizer] [Standard] Use the image stabilizer to compensate for the menu item. Standard IS compensates for a lower degree of camcorder shake, ... button to [Dynamic IS] or [Powered IS] (0 111), you can also set to [Standard] but you can find the function by selecting the [l Camera Setup] menu and then the [Image Stabilizer] menu item. 1 Introduction About this setting when the camcorder is mounted on how to use of the menu...
Instruction Manual
Page 27
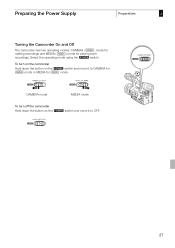
Select the operating mode using the d switch. To turn off the camcorder Hold down the button on the d switch and move it to CAMERA for mode or MEDIA for playing back recordings. CAMERA mode MEDIA mode To turn on the camcorder Hold down the button on the d switch and move it to OFF. 27 Preparing the Power Supply Preparations 2 Turning the Camcorder On and Off The camcorder has two operating modes: CAMERA ( ) mode for making recordings and MEDIA ( ) mode for mode.
Select the operating mode using the d switch. To turn off the camcorder Hold down the button on the d switch and move it to CAMERA for mode or MEDIA for playing back recordings. CAMERA mode MEDIA mode To turn on the camcorder Hold down the button on the d switch and move it to OFF. 27 Preparing the Power Supply Preparations 2 Turning the Camcorder On and Off The camcorder has two operating modes: CAMERA ( ) mode for making recordings and MEDIA ( ) mode for mode.
Instruction Manual
Page 39
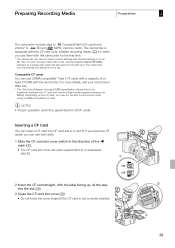
...Media Preparations 2 The camcorder records clips to CompactFlash (CF) cards and photos* to the SD card. The camcorder can record custom picture settings and camera settings on the CF card, you use both slots. 1 Slide the CF card slot cover switch in the direction of at high transfer speeds (...file and save it in MBps). The camcorder is not correctly inserted. ቤ ባ 39 Inserting a CF Card You can use the supplied Canon XF Utility software to be guaranteed for the first time. * The camcorder can read the file and embed it to SD and SDHC memory cards...
...Media Preparations 2 The camcorder records clips to CompactFlash (CF) cards and photos* to the SD card. The camcorder can record custom picture settings and camera settings on the CF card, you use both slots. 1 Slide the CF card slot cover switch in the direction of at high transfer speeds (...file and save it in MBps). The camcorder is not correctly inserted. ቤ ባ 39 Inserting a CF Card You can use the supplied Canon XF Utility software to be guaranteed for the first time. * The camcorder can read the file and embed it to SD and SDHC memory cards...
Instruction Manual
Page 45
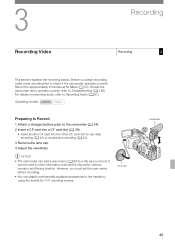
... Viewfinder 45 3 Recording Video Recording Recording 3 Recording This section explains the recording basics. For details on recording audio, refer to a clip as the clip name, camera operator and filming location. Record for 1/4" mounting screws. NOTES • The camcorder can add a user memo (0 97) to Recording Audio (0 91). Before you record...
... Viewfinder 45 3 Recording Video Recording Recording 3 Recording This section explains the recording basics. For details on recording audio, refer to a clip as the clip name, camera operator and filming location. Record for 1/4" mounting screws. NOTES • The camcorder can add a user memo (0 97) to Recording Audio (0 91). Before you record...

Instruction Manual
Page 46
IMPORTANT • Observe the following precautions while the CFj or CFl access indicator is recorded to pause the recording. Canon shall not be liable for recording illuminates in permanent data loss. - Set the lock lever to R in cases such as when you do not want a ... again to the CF card and the camcorder enters record pause mode. NOTES • The START/STOP button on the handle has a lock lever to CAMERA (0 27). • The camcorder turns on in red. 3 Recording Recording Video Recording 1 Hold down the button on the d switch and move it to prevent accidental...
IMPORTANT • Observe the following precautions while the CFj or CFl access indicator is recorded to pause the recording. Canon shall not be liable for recording illuminates in permanent data loss. - Set the lock lever to R in cases such as when you do not want a ... again to the CF card and the camcorder enters record pause mode. NOTES • The START/STOP button on the handle has a lock lever to CAMERA (0 27). • The camcorder turns on in red. 3 Recording Recording Video Recording 1 Hold down the button on the d switch and move it to prevent accidental...
Instruction Manual
Page 54
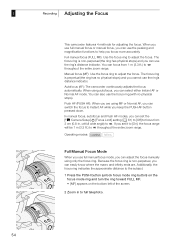
... focus (FULL MF): Use the focus ring to help you can easily know where the macro and infinity ends are using autofocus, you set the [l Camera Setup] [Focus Limit] setting (0 61) to [Off] to f throughout the entire zoom range. Because the focus ring is non-perpetual, you use the focus ring...
... focus (FULL MF): Use the focus ring to help you can easily know where the macro and infinity ends are using autofocus, you set the [l Camera Setup] [Focus Limit] setting (0 61) to [Off] to f throughout the entire zoom range. Because the focus ring is non-perpetual, you use the focus ring...
Instruction Manual
Page 58
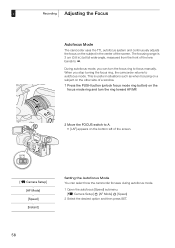
When you can select how the camcorder focuses during autofocus mode. 1 Open the autofocus [Speed] submenu. [l Camera Setup] [AF Mode] [Speed] 2 Select the desired option and then press SET. 58 The focusing range is useful in situations such as when focusing on a.... 3 Recording Adjusting the Focus Autofocus Mode The camcorder uses the TTL autofocus system and continuously adjusts the focus on the bottom left of the screen. [l Camera Setup] [AF Mode] [Speed] [Instant] Setting the Autofocus Mode You can turn the focus ring to focus manually. During autofocus mode, you stop turning ...
When you can select how the camcorder focuses during autofocus mode. 1 Open the autofocus [Speed] submenu. [l Camera Setup] [AF Mode] [Speed] 2 Select the desired option and then press SET. 58 The focusing range is useful in situations such as when focusing on a.... 3 Recording Adjusting the Focus Autofocus Mode The camcorder uses the TTL autofocus system and continuously adjusts the focus on the bottom left of the screen. [l Camera Setup] [AF Mode] [Speed] [Instant] Setting the Autofocus Mode You can turn the focus ring to focus manually. During autofocus mode, you stop turning ...
Instruction Manual
Page 60
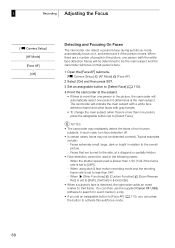
... on that frame. When [J Other Functions] [Custom Function] [Scan Reverse Rec] is set to [24P]). - You can then use the supplied Canon XF Utility software to search for event marks in the picture, the camcorder will indicate the main subject with a white face detection frame and other... main subject when there is the main subject. When the shutter speed used in relation to the overall picture. - 3 Recording Adjusting the Focus [l Camera Setup] [AF Mode] [Face AF] [Off] Detecting and Focusing On Faces The camcorder can press the button to activate this autofocus mode. 60...
... on that frame. When [J Other Functions] [Custom Function] [Scan Reverse Rec] is set to [24P]). - You can then use the supplied Canon XF Utility software to search for event marks in the picture, the camcorder will indicate the main subject with a white face detection frame and other... main subject when there is the main subject. When the shutter speed used in relation to the overall picture. - 3 Recording Adjusting the Focus [l Camera Setup] [AF Mode] [Face AF] [Off] Detecting and Focusing On Faces The camcorder can press the button to activate this autofocus mode. 60...
Instruction Manual
Page 61
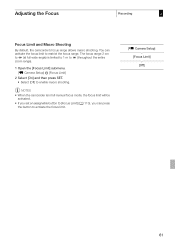
NOTES • When the camcorder is limited to 1 m to f (throughout the entire zoom range). 1 Open the [Focus Limit] submenu. [l Camera Setup] [Focus Limit] 2 Select [On] and then press SET. • Select [Off] to enable macro shooting. Adjusting the Focus Recording 3 Focus Limit and Macro Shooting ... will be activated. • If you set an assignable button to [Focus Limit] (0 113), you can activate the focus limit to activate the focus limit. [l Camera Setup] [Focus Limit] [Off] 61 You can press the button to restrict the focus range.
NOTES • When the camcorder is limited to 1 m to f (throughout the entire zoom range). 1 Open the [Focus Limit] submenu. [l Camera Setup] [Focus Limit] 2 Select [On] and then press SET. • Select [Off] to enable macro shooting. Adjusting the Focus Recording 3 Focus Limit and Macro Shooting ... will be activated. • If you set an assignable button to [Focus Limit] (0 113), you can activate the focus limit to activate the focus limit. [l Camera Setup] [Focus Limit] [Off] 61 You can press the button to restrict the focus range.
Instruction Manual
Page 62
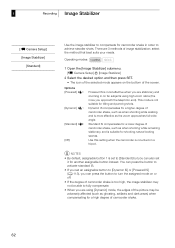
Operating modes: 1 Open the [Image Stabilizer] submenu. [l Camera Setup] [Image Stabilizer] 2 Select the desired option and then press SET. • The icon of the selected mode appears on a tripod. This mode is not ... screen. select the method that best suits your needs. There are stationary and zooming in order to achieve steadier shots. 3 Recording Image Stabilizer Image Stabilizer [l Camera Setup] [Image Stabilizer] [Standard] Use the image stabilizer to compensate for tilting and panning shots.
Operating modes: 1 Open the [Image Stabilizer] submenu. [l Camera Setup] [Image Stabilizer] 2 Select the desired option and then press SET. • The icon of the selected mode appears on a tripod. This mode is not ... screen. select the method that best suits your needs. There are stationary and zooming in order to achieve steadier shots. 3 Recording Image Stabilizer Image Stabilizer [l Camera Setup] [Image Stabilizer] [Standard] Use the image stabilizer to compensate for tilting and panning shots.
Instruction Manual
Page 63
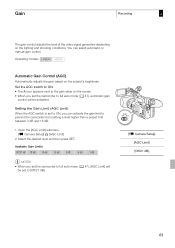
... AGC switch is set to prevent the camcorder from setting a level higher than a preset limit between 3 dB and 18 dB. 1 Open the [AGC Limit] submenu. [l Camera Setup] [AGC Limit] 2 Select the desired level and then press SET. Operating modes: Automatic Gain Control (AGC) Automatically adjusts the gain based on the lighting... 3 dB NOTES • When you set the camcorder to full auto mode (0 47), automatic gain control will be set the camcorder to [Off/21 dB]. [l Camera Setup] [AGC Limit] [Off/21 dB] 63
... AGC switch is set to prevent the camcorder from setting a level higher than a preset limit between 3 dB and 18 dB. 1 Open the [AGC Limit] submenu. [l Camera Setup] [AGC Limit] 2 Select the desired level and then press SET. Operating modes: Automatic Gain Control (AGC) Automatically adjusts the gain based on the lighting... 3 dB NOTES • When you set the camcorder to full auto mode (0 47), automatic gain control will be set the camcorder to [Off/21 dB]. [l Camera Setup] [AGC Limit] [Off/21 dB] 63
Instruction Manual
Page 64
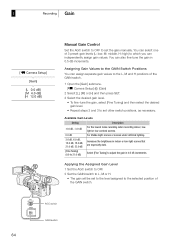
3 Recording Gain [l Camera Setup] [Gain] [L 0.0 dB] [M 6.0 dB] [H 12.0 dB] Manual Gain Control Set the AGC switch to OFF to adjust the gain in 0.5 dB increments. Available Gain Levels ... Gain Values to the GAIN Switch Positions You can assign separate gain values to the L, M and H positions of the GAIN switch. 1 Open the [Gain] submenu. [l Camera Setup] [Gain] 2 Select [L], [M] or [H] and then press SET. 3 Select the desired gain level. • To fine-tune the gain, select [Fine Tuning] and then select...
3 Recording Gain [l Camera Setup] [Gain] [L 0.0 dB] [M 6.0 dB] [H 12.0 dB] Manual Gain Control Set the AGC switch to OFF to adjust the gain in 0.5 dB increments. Available Gain Levels ... Gain Values to the GAIN Switch Positions You can assign separate gain values to the L, M and H positions of the GAIN switch. 1 Open the [Gain] submenu. [l Camera Setup] [Gain] 2 Select [L], [M] or [H] and then press SET. 3 Select the desired gain level. • To fine-tune the gain, select [Fine Tuning] and then select...
Instruction Manual
Page 68
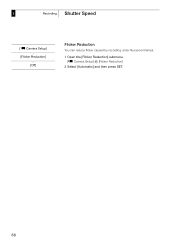
3 Recording Shutter Speed [l Camera Setup] [Flicker Reduction] [Off] Flicker Reduction You can reduce flicker caused by recording under fluorescent lamps. 1 Open the [Flicker Reduction] submenu. [l Camera Setup] [Flicker Reduction] 2 Select [Automatic] and then press SET. 68
3 Recording Shutter Speed [l Camera Setup] [Flicker Reduction] [Off] Flicker Reduction You can reduce flicker caused by recording under fluorescent lamps. 1 Open the [Flicker Reduction] submenu. [l Camera Setup] [Flicker Reduction] 2 Select [Automatic] and then press SET. 68
Instruction Manual
Page 71
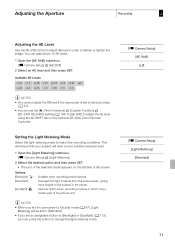
...more weight to [Standard]. • If you can select from the entire screen, giving more suitable exposure level. 1 Open the [Light Metering] submenu. [l Camera Setup] [Light Metering] 2 Select the desired option and then press SET. • The icon of the picture is set to full auto mode (0 47... set the [J Other Functions] [Custom Function] [ZR-2000 AE SHIFT] setting (0 126) to [AE Shift] to change the light metering mode. [l Camera Setup] [AE Shift] [±0] [l Camera Setup] [Light Metering] [Standard] 71 Averages the light metered from 15 AE levels. 1 Open the [AE Shift] submenu...
...more weight to [Standard]. • If you can select from the entire screen, giving more suitable exposure level. 1 Open the [Light Metering] submenu. [l Camera Setup] [Light Metering] 2 Select the desired option and then press SET. • The icon of the picture is set to full auto mode (0 47... set the [J Other Functions] [Custom Function] [ZR-2000 AE SHIFT] setting (0 126) to [AE Shift] to change the light metering mode. [l Camera Setup] [AE Shift] [±0] [l Camera Setup] [Light Metering] [Standard] 71 Averages the light metered from 15 AE levels. 1 Open the [AE Shift] submenu...
Instruction Manual
Page 74
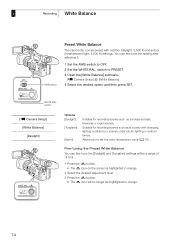
...You can fine tune the setting after selecting it. 1 Set the AWB switch to PRESET. 3 Open the [White Balance] submenu. [l Camera Setup] [White Balance] 4 Select the desired option and then press SET. 3 Recording White Balance AWB switch Preset White Balance The camcorder comes... preset with changing lighting conditions or scenes under studio lighting or sodium lamps. switch to OFF. 2 Set the WHITE BAL. switch [l Camera Setup] [White Balance] [Daylight] Options [Daylight]: [Tungsten]: [Kelvin]: Suitable for recording scenes such as sunrises/sunsets, fireworks or night scenes...
...You can fine tune the setting after selecting it. 1 Set the AWB switch to PRESET. 3 Open the [White Balance] submenu. [l Camera Setup] [White Balance] 4 Select the desired option and then press SET. 3 Recording White Balance AWB switch Preset White Balance The camcorder comes... preset with changing lighting conditions or scenes under studio lighting or sodium lamps. switch to OFF. 2 Set the WHITE BAL. switch [l Camera Setup] [White Balance] [Daylight] Options [Daylight]: [Tungsten]: [Kelvin]: Suitable for recording scenes such as sunrises/sunsets, fireworks or night scenes...
Instruction Manual
Page 75
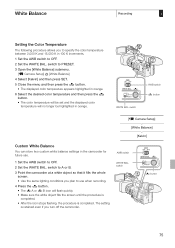
AWB switch WHITE BAL. switch S button 75 switch AWB switch S button [l Camera Setup] [White Balance] [Kelvin] Custom White Balance You can store two custom white balance settings in the camcorder for future use when recording. 4 Press the S ... stops flashing, the procedure is retained even if you turn off the camcorder. The setting is completed. switch to PRESET. 3 Open the [White Balance] submenu. [l Camera Setup] [White Balance] 4 Select [Kelvin] and then press SET. 5 Close the menu and then press the S button. • The displayed color temperature appears highlighted in...
AWB switch WHITE BAL. switch S button 75 switch AWB switch S button [l Camera Setup] [White Balance] [Kelvin] Custom White Balance You can store two custom white balance settings in the camcorder for future use when recording. 4 Press the S ... stops flashing, the procedure is retained even if you turn off the camcorder. The setting is completed. switch to PRESET. 3 Open the [White Balance] submenu. [l Camera Setup] [White Balance] 4 Select [Kelvin] and then press SET. 5 Close the menu and then press the S button. • The displayed color temperature appears highlighted in...

