Instruction Manual
Page 4
... to full telephoto by industry professionals. Recording media The camcorder records video and audio to the focus and zoom systems. The newly added full manual focus mode (0 54) sets physical stops on the focus ring and also displays a distance indicator on compatible software. Combined with major NLE software*. * Refer to Saving Clips to 1920x1080/60i at 50 Mbps. Using the supplied plugins, you can produce video from a total of 16 different...
... to full telephoto by industry professionals. Recording media The camcorder records video and audio to the focus and zoom systems. The newly added full manual focus mode (0 54) sets physical stops on the focus ring and also displays a distance indicator on compatible software. Combined with major NLE software*. * Refer to Saving Clips to 1920x1080/60i at 50 Mbps. Using the supplied plugins, you can produce video from a total of 16 different...
Instruction Manual
Page 5
... Features Pro-level connectivity (b only) An industry-standard HD/SD SDI terminal (0 148) for uncompressed HD signal output, embedded audio and SMPTE time code (LTC) give you even more freedom to control many aspects of the image using the vectorscope (0 100), or the focus using the waveform monitor (0 99), the color of the camcorder's operation. Other Functions Audio Sound is a trademark of CompactFlash Association. • Microsoft and Windows are...
... Features Pro-level connectivity (b only) An industry-standard HD/SD SDI terminal (0 148) for uncompressed HD signal output, embedded audio and SMPTE time code (LTC) give you even more freedom to control many aspects of the image using the vectorscope (0 100), or the focus using the waveform monitor (0 99), the color of the camcorder's operation. Other Functions Audio Sound is a trademark of CompactFlash Association. • Microsoft and Windows are...
Instruction Manual
Page 7
... 43 Checking the Available Recording Time 44 Recovering Data on the CF Card 44 3. Preparations 23 Preparing the Power Supply 23 Using a Battery Pack 23 Turning the Camcorder On and Off 27 Date, Time and Language Settings 28 Setting the Date and Time 28 Changing the Time Zone 28 Displaying the Date and Time while Recording 29 Changing the Language 29 Using the Menus 30 Selecting an Option from the Menu 30 Preparing the Camcorder 32 Attaching the Lens...
... 43 Checking the Available Recording Time 44 Recovering Data on the CF Card 44 3. Preparations 23 Preparing the Power Supply 23 Using a Battery Pack 23 Turning the Camcorder On and Off 27 Date, Time and Language Settings 28 Setting the Date and Time 28 Changing the Time Zone 28 Displaying the Date and Time while Recording 29 Changing the Language 29 Using the Menus 30 Selecting an Option from the Menu 30 Preparing the Camcorder 32 Attaching the Lens...
Instruction Manual
Page 8
... a Recording 118 Available Custom Picture Settings 119 Customizing Functions and Onscreen Displays 126 Customizing Functions 126 Customizing Onscreen Displays 127 Saving and Loading Camera Settings 128 Saving Camera Settings to an SD Card 128 Loading Camera Settings from an Index Screen 143 Changing a Clip's Thumbnail 144 Playback 129 Playback 129 Clip Index Screen 129 Playing Back Clips 131 Onscreen Displays 131 Playback Controls 133 Adjusting the Volume 134 Adding Shot Marks during Playback 134 Clip Operations 135 Using the Clip Menu...
... a Recording 118 Available Custom Picture Settings 119 Customizing Functions and Onscreen Displays 126 Customizing Functions 126 Customizing Onscreen Displays 127 Saving and Loading Camera Settings 128 Saving Camera Settings to an SD Card 128 Loading Camera Settings from an Index Screen 143 Changing a Clip's Thumbnail 144 Playback 129 Playback 129 Clip Index Screen 129 Playing Back Clips 131 Onscreen Displays 131 Playback Controls 133 Adjusting the Volume 134 Adding Shot Marks during Playback 134 Clip Operations 135 Using the Clip Menu...
Instruction Manual
Page 9
... Output Level of Messages 188 Handling Precautions 192 Maintenance/Others 195 Optional Accessories 197 Specifications 202 Index 206 9 Photos 161 Taking Photos 161 Taking Photos in CAMERA Mode 161 Capturing Photos in MEDIA Mode 161 Photo Playback 163 Displaying the [Photos] Index Screen 163 Viewing Photos 163 Photo Operations 164 Using the Photo Menu 164 Deleting Photos 164 Protecting Photos 165 Copying Custom Picture Files 166 Photo Numbering 167 8. External Connections 145 Video Output Configuration 145 Video Output Configuration by Terminal 145 SD Output 146 Connecting to an External...
... Output Level of Messages 188 Handling Precautions 192 Maintenance/Others 195 Optional Accessories 197 Specifications 202 Index 206 9 Photos 161 Taking Photos 161 Taking Photos in CAMERA Mode 161 Capturing Photos in MEDIA Mode 161 Photo Playback 163 Displaying the [Photos] Index Screen 163 Viewing Photos 163 Photo Operations 164 Using the Photo Menu 164 Deleting Photos 164 Protecting Photos 165 Copying Custom Picture Files 166 Photo Numbering 167 8. External Connections 145 Video Output Configuration 145 Video Output Configuration by Terminal 145 SD Output 146 Connecting to an External...
Instruction Manual
Page 25
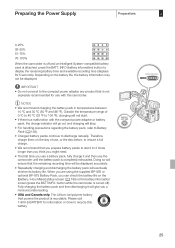
IMPORTANT • Do not connect to 3 times longer than you think you might need. • The first time you use a battery pack, fully charge it will give you a more accurate reading. • USA and Canada only: The Lithium ion/polymer battery that the remaining recording time will be displayed. Therefore, charge them on how to discharge naturally. button while the camcorder is attached, press the BATT...
IMPORTANT • Do not connect to 3 times longer than you think you might need. • The first time you use a battery pack, fully charge it will give you a more accurate reading. • USA and Canada only: The Lithium ion/polymer battery that the remaining recording time will be displayed. Therefore, charge them on how to discharge naturally. button while the camcorder is attached, press the BATT...
Instruction Manual
Page 47
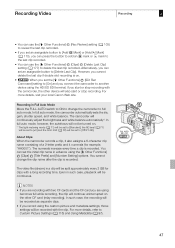
... camcorder will be set an assignable button to Custom Picture Settings (0 115) and Using Metadata (0 97). 47 However, you cannot delete the last clip if double slot recording is on . * The light metering mode (0 71) will be set to [Standard], the AE level (0 71) will be set to delete the last clip recorded. In full auto mode, the camcorder automatically sets the iris, gain, shutter speed, and white balance. You can use the [J Other Functions] [Rec Review] setting...
... camcorder will be set an assignable button to Custom Picture Settings (0 115) and Using Metadata (0 97). 47 However, you cannot delete the last clip if double slot recording is on . * The light metering mode (0 71) will be set to [Standard], the AE level (0 71) will be set to delete the last clip recorded. In full auto mode, the camcorder automatically sets the iris, gain, shutter speed, and white balance. You can use the [J Other Functions] [Rec Review] setting...
Instruction Manual
Page 49
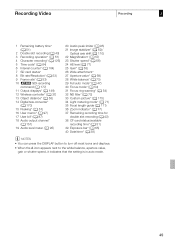
... guide (0 111) 36 Zoom indicator* (0 77) 37 Remaining recording time for double slot recording (0 43) 38 CF card status/available recording time* (0 51) 39 Exposure bar* (0 65) 40 Date/time* (0 28) NOTES • You can press the DISPLAY button to turn off most icons and displays. • When the A icon appears next to the white balance, aperture value, gain or shutter speed, it indicates that the setting is in auto mode...
... guide (0 111) 36 Zoom indicator* (0 77) 37 Remaining recording time for double slot recording (0 43) 38 CF card status/available recording time* (0 51) 39 Exposure bar* (0 65) 40 Date/time* (0 28) NOTES • You can press the DISPLAY button to turn off most icons and displays. • When the A icon appears next to the white balance, aperture value, gain or shutter speed, it indicates that the setting is in auto mode...
Instruction Manual
Page 59
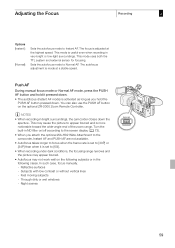
... windows - In such case, focus manually. - Turn the built-in the following subjects or in ND filter on/off according to the screen display (0 72). • When you hold it is set to appear blurred and is more noticeable toward the wide-angle end of the zoom range. This mode is adjusted at a stable speed. Push AF During manual focus mode or Normal AF mode...
... windows - In such case, focus manually. - Turn the built-in the following subjects or in ND filter on/off according to the screen display (0 72). • When you hold it is set to appear blurred and is more noticeable toward the wide-angle end of the zoom range. This mode is adjusted at a stable speed. Push AF During manual focus mode or Normal AF mode...
Instruction Manual
Page 66
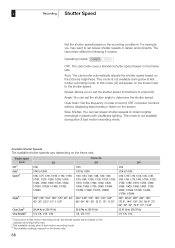
... Auto: The camcorder automatically adjusts the shutter speed based on the frame rate. Clear Scan: Set the frequency in order to obtain brighter recordings in fractions of a second). For example, you to set slower shutter speeds to record CRT computer monitors without displaying black bands or flicker on the selected shooting frame rate. 2 Not available during slow & fast motion recording mode. In this mode, [A] will be based on the screen...
... Auto: The camcorder automatically adjusts the shutter speed based on the frame rate. Clear Scan: Set the frequency in order to obtain brighter recordings in fractions of a second). For example, you to set slower shutter speeds to record CRT computer monitors without displaying black bands or flicker on the selected shooting frame rate. 2 Not available during slow & fast motion recording mode. In this mode, [A] will be based on the screen...
Instruction Manual
Page 86
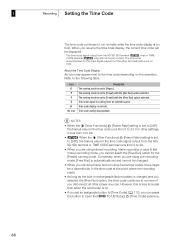
.... • When you are using interval recording, frame recording or slow & fast motion recording mode, you disconnect all other power sources. Time code display is on hold . The time code superimposed on . • If you set to [Preset] with the [Rec Run] option selected. However, this is less accurate than when the camcorder is on the video signal output from an external source. 3 Recording Setting the Time Code The time code continues to run even...
.... • When you are using interval recording, frame recording or slow & fast motion recording mode, you disconnect all other power sources. Time code display is on hold . The time code superimposed on . • If you set to [Preset] with the [Rec Run] option selected. However, this is less accurate than when the camcorder is on the video signal output from an external source. 3 Recording Setting the Time Code The time code continues to run even...
Instruction Manual
Page 97
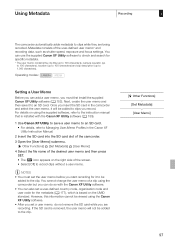
... set a user memo, do so with the Canon XF Utility software (0 159). 1 Use Canon XF Utility to save it to clips while they are recording. You cannot change the user memo of the user-defined user memo* and recording data, such as shutter speed, exposure and focus settings. Using Metadata Recording 3 The camcorder automatically adds metadata to an SD card. Metadata consists of a clip using the supplied software, refer to the instruction manual that is removed, the user...
... set a user memo, do so with the Canon XF Utility software (0 159). 1 Use Canon XF Utility to save it to clips while they are recording. You cannot change the user memo of the user-defined user memo* and recording data, such as shutter speed, exposure and focus settings. Using Metadata Recording 3 The camcorder automatically adds metadata to an SD card. Metadata consists of a clip using the supplied software, refer to the instruction manual that is removed, the user...
Instruction Manual
Page 113
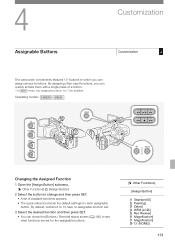
... often-used functions, you can quickly access them with a single press of available functions appears. • The quick reference shows the default settings for the assignable buttons. [J Other Functions] [Assign Button] [1 Standard IS] [2 Peaking] [3 Zebra] [4 WFM (LCD)] [5 Rec Review] [6 Magnification] [7 Magnification] [8-13 (NONE)] 113 Operating modes: Changing the Assigned Function 1 Open the [Assign Button] submenu. [J Other Functions] [Assign Button] 2 Select the button to change and then press SET. • A list of a button. * In mode, only assignable buttons...
... often-used functions, you can quickly access them with a single press of available functions appears. • The quick reference shows the default settings for the assignable buttons. [J Other Functions] [Assign Button] [1 Standard IS] [2 Peaking] [3 Zebra] [4 WFM (LCD)] [5 Rec Review] [6 Magnification] [7 Magnification] [8-13 (NONE)] 113 Operating modes: Changing the Assigned Function 1 Open the [Assign Button] submenu. [J Other Functions] [Assign Button] 2 Select the button to change and then press SET. • A list of a button. * In mode, only assignable buttons...
Instruction Manual
Page 161
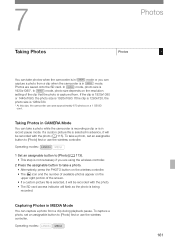
... mode. In mode, photo size is 1920x1080*. Operating modes: 1 Set an assignable button to [Photo] first or use the wireless controller. Capturing Photos in MEDIA Mode You can capture a photo from . In mode, photo size depends on the resolution setting of the screen. • If a custom picture file is selected, it will flash as the photo is being recorded. Taking Photos in record pause mode. Photos are using the wireless controller. 2 Press the assignable button to [Photo] first or use the wireless controller. To take a photo while the camcorder is recording...
... mode. In mode, photo size is 1920x1080*. Operating modes: 1 Set an assignable button to [Photo] first or use the wireless controller. Capturing Photos in MEDIA Mode You can capture a photo from . In mode, photo size depends on the resolution setting of the screen. • If a custom picture file is selected, it will flash as the photo is being recorded. Taking Photos in record pause mode. Photos are using the wireless controller. 2 Press the assignable button to [Photo] first or use the wireless controller. To take a photo while the camcorder is recording...
Instruction Manual
Page 163
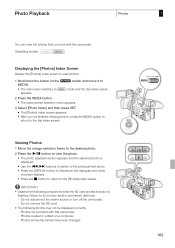
... this camcorder. - Do not disconnect the power source or turn off the camcorder. - Photos not recorded with the camcorder. Photo Playback Photos You can view the photos that you are finished viewing photos, press the INDEX button to return to the clip index screen. Photos whose file names have been changed. 7 163 Do not remove the SD card. • The following precautions while the SD card access indicator is displayed. • Use the L/K buttons to switch to...
... this camcorder. - Do not disconnect the power source or turn off the camcorder. - Photos not recorded with the camcorder. Photo Playback Photos You can view the photos that you are finished viewing photos, press the INDEX button to return to the clip index screen. Photos whose file names have been changed. 7 163 Do not remove the SD card. • The following precautions while the SD card access indicator is displayed. • Use the L/K buttons to switch to...
Instruction Manual
Page 175
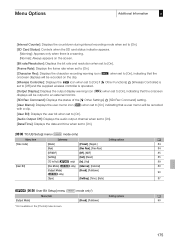
... be recorded with a clip. [User Bit]: Displays the user bit when set to [On]. [Audio Output CH]: Displays the audio output channel when set to [On]. [Date/Time]: Displays the date and time when set to [On]. [L TC/UB Setup] menu ( mode only) Menu item Submenu Setting options 0 [Time Code] [Mode] [Preset], [Regen.] 84 [Run] [Rec Run], [Free Run] 84 [DF/NDF] [DF], [NDF] 85 [Setting] [Set], [Reset] 85 [TC In/Out] (b only) [In], [Out] 89 [User Bit] [Rec Mode] (b only) [Internal], [External] 89 [Output Mode] (b only) [Fixed...
... be recorded with a clip. [User Bit]: Displays the user bit when set to [On]. [Audio Output CH]: Displays the audio output channel when set to [On]. [Date/Time]: Displays the date and time when set to [On]. [L TC/UB Setup] menu ( mode only) Menu item Submenu Setting options 0 [Time Code] [Mode] [Preset], [Regen.] 84 [Run] [Rec Run], [Free Run] 84 [DF/NDF] [DF], [NDF] 85 [Setting] [Set], [Reset] 85 [TC In/Out] (b only) [In], [Out] 89 [User Bit] [Rec Mode] (b only) [Internal], [External] 89 [Output Mode] (b only) [Fixed...
Instruction Manual
Page 188
... using the white and red plugs of Messages Refer to the external monitor. Cannot play back - CF cards or clips with corrupt file control information cannot be a problem with the battery pack. If this battery pack? - Wait until recording is connected correctly. - When using a commercially available HDMI cable, but there is no image on again. You opened the CF card slot cover while the camcorder was a decoder error. Then, remove the CF card being used...
... using the white and red plugs of Messages Refer to the external monitor. Cannot play back - CF cards or clips with corrupt file control information cannot be a problem with the battery pack. If this battery pack? - Wait until recording is connected correctly. - When using a commercially available HDMI cable, but there is no image on again. You opened the CF card slot cover while the camcorder was a decoder error. Then, remove the CF card being used...
Instruction Manual
Page 207
... 57 Phantom power (microphone 93 Photos Copying custom picture files 166 Deleting 164 Protecting 165 Viewing 163 Playback Clips 131 Photos 163 Power save mode 52 Power supply 23 POWER switch 27 Pre-recording mode 108 PUSH AF 59 PUSH AUTO IRIS 70 R Rec run (time code 84 Recording clips 45 Remaining battery 24 REMOTE terminal 80 Resetting all settings 176 Resolution (frame size 53 Reviewing a recording 103 Running mode (time code 84 S Safety zone 81 Saving clips to a computer 152 SD card 41 Shooting frame...
... 57 Phantom power (microphone 93 Photos Copying custom picture files 166 Deleting 164 Protecting 165 Viewing 163 Playback Clips 131 Photos 163 Power save mode 52 Power supply 23 POWER switch 27 Pre-recording mode 108 PUSH AF 59 PUSH AUTO IRIS 70 R Rec run (time code 84 Recording clips 45 Remaining battery 24 REMOTE terminal 80 Resetting all settings 176 Resolution (frame size 53 Reviewing a recording 103 Running mode (time code 84 S Safety zone 81 Saving clips to a computer 152 SD card 41 Shooting frame...

Instruction Manual
Page 209
... only by Canon U.S.A., Inc. ("Canon USA") with respect to follow operating instructions; This Limited Warranty does not apply to state. CANON USA SHALL NOT BE LIABLE FOR LOSS OF REVENUES OR PROFITS, EXPENSE FOR SUBSTITUTE PRODUCTS OR SERVICE, STORAGE CHARGES, LOSS OR CORRUPTION OF DATA, INCLUDING WITHOUT LIMITATION, LOSS OR CORRUPTION OF DATA STORED ON THE PRODUCTS' HARD DRIVE OR FLASH MEMORY, OR...
... only by Canon U.S.A., Inc. ("Canon USA") with respect to follow operating instructions; This Limited Warranty does not apply to state. CANON USA SHALL NOT BE LIABLE FOR LOSS OF REVENUES OR PROFITS, EXPENSE FOR SUBSTITUTE PRODUCTS OR SERVICE, STORAGE CHARGES, LOSS OR CORRUPTION OF DATA, INCLUDING WITHOUT LIMITATION, LOSS OR CORRUPTION OF DATA STORED ON THE PRODUCTS' HARD DRIVE OR FLASH MEMORY, OR...
Instruction Manual
Page 210
... data including, without limitation, data stored on that drive be presented to assume for these Products. NOTICE TO CONSUMER If you plan to take important videos or if the Products have not been used for some time, please check all functions with the instruction book before using it was purchased as follows: Internet support for English at www.canon.ca/english/cs (E-mail support also available) Internet support...
... data including, without limitation, data stored on that drive be presented to assume for these Products. NOTICE TO CONSUMER If you plan to take important videos or if the Products have not been used for some time, please check all functions with the instruction book before using it was purchased as follows: Internet support for English at www.canon.ca/english/cs (E-mail support also available) Internet support...


