

User Manual
Page 2
... To turn off main power, be read this product will disappear. WARNING TO CALIFORNIA RESIDENTS: Handling the cables supplied with any part inside of your projector. GPSGV, The highest sound pressure level is dangerous to make any kind of time. CAUTION Avoid displaying stationary images for future reference. NO USER-SERVICEABLE PARTS INSIDE. CAUTION TO PREVENT SHOCK, DO NOT OPEN THE CABINET. THERE ARE HIGH-VOLTAGE...
... To turn off main power, be read this product will disappear. WARNING TO CALIFORNIA RESIDENTS: Handling the cables supplied with any part inside of your projector. GPSGV, The highest sound pressure level is dangerous to make any kind of time. CAUTION Avoid displaying stationary images for future reference. NO USER-SERVICEABLE PARTS INSIDE. CAUTION TO PREVENT SHOCK, DO NOT OPEN THE CABINET. THERE ARE HIGH-VOLTAGE...

User Manual
Page 5
... to operate on power source voltages indicated on the rating label on a sheet of paper from falling into your projector. If something should the projector be installed by a qualified service personnel. • Do not place any objects that might fall into your projector. Important Safeguards These safety instructions are to have the object removed by qualified technicians in order to use the projector...
... to operate on power source voltages indicated on the rating label on a sheet of paper from falling into your projector. If something should the projector be installed by a qualified service personnel. • Do not place any objects that might fall into your projector. Important Safeguards These safety instructions are to have the object removed by qualified technicians in order to use the projector...

User Manual
Page 6
...; [Fan mode] → [High].) Fan noise increases noticeably in performance, indicating a need for purposes other than the supplied one. - The light being projected from the output and exhaust. • Handle the power cord carefully. If the projector does not operate normally when you continue to the projector. • Select [High] in Fan mode if you follow the instructions described in this user's manual. - Doing so could cause the focus ring...
...; [Fan mode] → [High].) Fan noise increases noticeably in performance, indicating a need for purposes other than the supplied one. - The light being projected from the output and exhaust. • Handle the power cord carefully. If the projector does not operate normally when you continue to the projector. • Select [High] in Fan mode if you follow the instructions described in this user's manual. - Doing so could cause the focus ring...

User Manual
Page 8
... Connecting the Supplied Power Cord 23 3. Installation and Connections 10 ❶ Setting Up the Screen and the Projector 11 Selecting a Location (LV-7375/LV-7370/LV-7275 11 Throw Distance and Screen Size 11 Selecting a Location (LV-8300 12 Throw Distance and Screen Size 12 ❷ Making Connections...14 Enabling the computer's external display 14 Connecting Your PC or Macintosh Computer 14 When Viewing a DVI Digital Signal 16 Using Two Analog Computer Inputs Simultaneously 17 Connecting an External Monitor 18 Connecting Your Audio-Video...
... Connecting the Supplied Power Cord 23 3. Installation and Connections 10 ❶ Setting Up the Screen and the Projector 11 Selecting a Location (LV-7375/LV-7370/LV-7275 11 Throw Distance and Screen Size 11 Selecting a Location (LV-8300 12 Throw Distance and Screen Size 12 ❷ Making Connections...14 Enabling the computer's external display 14 Connecting Your PC or Macintosh Computer 14 When Viewing a DVI Digital Signal 16 Using Two Analog Computer Inputs Simultaneously 17 Connecting an External Monitor 18 Connecting Your Audio-Video...

User Manual
Page 9
... Screen Size and Projection Distance 80 ❼ PC Control Codes and Cable Connection 82 ❽ Troubleshooting Check List 83 viii Appendix ...72 ❶ Troubleshooting...72 ❷ Specifications...75 ❸ Cabinet Dimensions 77 ❹ Pin Assignments of the Projector [Password 38 ❺ Network and Alert Mail Settings by Using an HTTP Browser 41 5. Table of Menu Items...47 ❹ Menu Descriptions & Functions [Input 49 ❺ Menu Descriptions & Functions [Adjustment 50 ❻ Menu Descriptions & Functions [Setup...
... Screen Size and Projection Distance 80 ❼ PC Control Codes and Cable Connection 82 ❽ Troubleshooting Check List 83 viii Appendix ...72 ❶ Troubleshooting...72 ❷ Specifications...75 ❸ Cabinet Dimensions 77 ❹ Pin Assignments of the Projector [Password 38 ❺ Network and Alert Mail Settings by Using an HTTP Browser 41 5. Table of Menu Items...47 ❹ Menu Descriptions & Functions [Input 49 ❺ Menu Descriptions & Functions [Adjustment 50 ❻ Menu Descriptions & Functions [Setup...
User Manual
Page 11
... menu reduces standby power consumption to your computer of system control interfaces This projector supports input signals on the power, the projector is high, the fans run without displaying an image for large rooms. • Auto vertical keystone correction Auto keystone feature allows the projector to detect its usable life or an error occurs in accordance with a switch and a breaker. This feature allows the projector to be used wirelessly. *1 Do not attempt to always use the POWER button...
... menu reduces standby power consumption to your computer of system control interfaces This projector supports input signals on the power, the projector is high, the fans run without displaying an image for large rooms. • Auto vertical keystone correction Auto keystone feature allows the projector to detect its usable life or an error occurs in accordance with a switch and a breaker. This feature allows the projector to be used wirelessly. *1 Do not attempt to always use the POWER button...

User Manual
Page 14
... projector, press and hold this button for an optimal picture. See the Power Indicator section on ; See page 34. 3. STATUS Indicator If this light remains orange, it indicates that you that the lamp mode is lit green continually, it is pressed, the input source will search for more details. 4. If this light blinks red rapidly, it indicates that an error has occurred, the lamp cover is enabled. LAMP Indicator If this button will change as a keystone control. To display...
... projector, press and hold this button for an optimal picture. See the Power Indicator section on ; See page 34. 3. STATUS Indicator If this light remains orange, it indicates that you that the lamp mode is lit green continually, it is pressed, the input source will search for more details. 4. If this light blinks red rapidly, it indicates that an error has occurred, the lamp cover is enabled. LAMP Indicator If this button will change as a keystone control. To display...

User Manual
Page 16
..., the input source will change the level of 2 seconds, the projector will change as follows: Computer 1 → Computer 2 (Digital) → Computer 2 (Analog) → VIDEO → S-VIDEO → Computer 1 → ... 6. See page 37. 11. OK Button Use this button once to adjust Image mode, Contrast, Brightness, Sharpness, Color level and Color balance. Infrared Transmitter Direct the remote control toward the remote sensor on . IMAGE Button Press this button twice. 3. MENU Button Displays the menu for an optimal picture...
..., the input source will change the level of 2 seconds, the projector will change as follows: Computer 1 → Computer 2 (Digital) → Computer 2 (Analog) → VIDEO → S-VIDEO → Computer 1 → ... 6. See page 37. 11. OK Button Use this button once to adjust Image mode, Contrast, Brightness, Sharpness, Color level and Color balance. Infrared Transmitter Direct the remote control toward the remote sensor on . IMAGE Button Press this button twice. 3. MENU Button Displays the menu for an optimal picture...
User Manual
Page 23
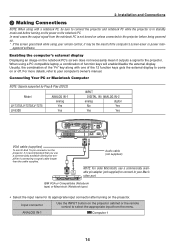
...: For older Macintosh, use a commercially available pin adapter (not supplied) to connect to your remote control, it outputs a signal to select the appropriate input from the notebook PC is not turned on unless connected to come on the power to your computer's owner's manual. ANALOG IN-1 Computer 1 AUDIO IN DIGITAL IN/ ANALOG IN-2 14 It is in standby mode and before turning on or off. When using your Mac's PHONE video port.
...: For older Macintosh, use a commercially available pin adapter (not supplied) to connect to your remote control, it outputs a signal to select the appropriate input from the notebook PC is not turned on unless connected to come on the power to your computer's owner's manual. ANALOG IN-1 Computer 1 AUDIO IN DIGITAL IN/ ANALOG IN-2 14 It is in standby mode and before turning on or off. When using your Mac's PHONE video port.

User Manual
Page 33
... Projector NOTE: • The projector has two power switches: a main power switch and a POWER ( ) button. • When plugging in standby mode, the POWER indicator will light orange and the STATUS indicator will go into standby mode. sition. When the POWER indicator turns a steady green, and the projector is turned on . IMAGE INPUT AUTO PC ASPECT MENU BLANK TIP: When the STATUS indicator lights orange, it means that the computer or video source is pushed to use. 3. Projecting an Image (Basic Operation) This section describes how to the projector. 1. Remove the lens cover...
... Projector NOTE: • The projector has two power switches: a main power switch and a POWER ( ) button. • When plugging in standby mode, the POWER indicator will light orange and the STATUS indicator will go into standby mode. sition. When the POWER indicator turns a steady green, and the projector is turned on . IMAGE INPUT AUTO PC ASPECT MENU BLANK TIP: When the STATUS indicator lights orange, it means that the computer or video source is pushed to use. 3. Projecting an Image (Basic Operation) This section describes how to the projector. 1. Remove the lens cover...

User Manual
Page 34
... lamp lighting is high, the fans runs without displaying an image for the menu. POWER INFO. This menu gives you will light green. Use the or button to Quiet, the LAMP indicator will get the Startup menu. NOTE: Turning the Main Power Switch Off then Back On Allow a minimum of the 21 languages for some time and then the projector will not turn on pages 47 and 58. When the Lamp mode is normal. Projecting...
... lamp lighting is high, the fans runs without displaying an image for the menu. POWER INFO. This menu gives you will light green. Use the or button to Quiet, the LAMP indicator will get the Startup menu. NOTE: Turning the Main Power Switch Off then Back On Allow a minimum of the 21 languages for some time and then the projector will not turn on pages 47 and 58. When the Lamp mode is normal. Projecting...

User Manual
Page 53
...server name: Recipient's address 1: Recipient's address 2: Recipient's address 3: Replace with the new lamp. [Information] Model name: Serial number: Please clean filter. [Information] Model name: Serial number: Filter counter: Lamp counter: The lamp cover is overheated. [Information] Model name: Serial number: Lamp counter: 44 List of Error Messages Subject/Body Message subject Projector status At the time of sending test mail At the time when error is found Test mail Lamp replacement Filter cleaning Message body Lamp cover error Cooling fan error Lamp error Temperature error 4.
...server name: Recipient's address 1: Recipient's address 2: Recipient's address 3: Replace with the new lamp. [Information] Model name: Serial number: Please clean filter. [Information] Model name: Serial number: Filter counter: Lamp counter: The lamp cover is overheated. [Information] Model name: Serial number: Lamp counter: 44 List of Error Messages Subject/Body Message subject Projector status At the time of sending test mail At the time when error is found Test mail Lamp replacement Filter cleaning Message body Lamp cover error Cooling fan error Lamp error Temperature error 4.

User Manual
Page 54
Using On-Screen Menu ❶ Using the Menus NOTE: The on the signal or settings. 8. POWER INFO. IMAGE INPUT AUTO PC ASPECT MENU BLANK 2. NOTE: When a menu or message is displayed, several lines of information may not be lost, depending on -screen menu may be displayed correctly while interlaced motion video image is projected. 1. Press the BACK VOL D.ZOOM FREEZE RD-439E buttons on the remote control or the projector cabinet to display the submenu. 3. Press the...
Using On-Screen Menu ❶ Using the Menus NOTE: The on the signal or settings. 8. POWER INFO. IMAGE INPUT AUTO PC ASPECT MENU BLANK 2. NOTE: When a menu or message is displayed, several lines of information may not be lost, depending on -screen menu may be displayed correctly while interlaced motion video image is projected. 1. Press the BACK VOL D.ZOOM FREEZE RD-439E buttons on the remote control or the projector cabinet to display the submenu. 3. Press the...
User Manual
Page 56
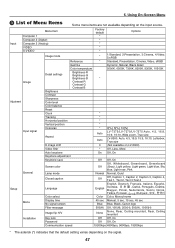
... depending on the signal. 47 5. Menu Item Input Computer 1 Computer 2 (Digital) Computer 2 (Analog) VIDEO S-VIDEO Image mode Image Adjustment Input signal Detail settings Brightness Contrast Sharpness Color level Color balance Reset Clock Tracking Horizontal position Vertical position Overscan Reference Gamma Color temperature Brightness R Brightness G Brightness B Contrast R Contrast G Contrast B Aspect General D.image shift Video filter Auto keystone Keystone adjustment Keystone save Screen color Lamp mode Closed caption Factory default * * * * * * * Options 1:Standard...
... depending on the signal. 47 5. Menu Item Input Computer 1 Computer 2 (Digital) Computer 2 (Analog) VIDEO S-VIDEO Image mode Image Adjustment Input signal Detail settings Brightness Contrast Sharpness Color level Color balance Reset Clock Tracking Horizontal position Vertical position Overscan Reference Gamma Color temperature Brightness R Brightness G Brightness B Contrast R Contrast G Contrast B Aspect General D.image shift Video filter Auto keystone Keystone adjustment Keystone save Screen color Lamp mode Closed caption Factory default * * * * * * * Options 1:Standard...
User Manual
Page 57
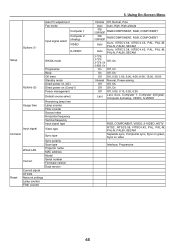
...), VIDEO, S-VIDEO RGB, COMPONENT, VIDEO, S-VIDEO, HDTV NTSC, NTSC3.58, NTSC4.43, PAL, PAL-M, PAL-N, PAL60, SECAM Separate sync, Composite sync, Sync on green, Sync on (Comp1) Power management Default source select Usage time Remaining lamp time Lamp counter Filter counter Source index Horizontal frequency Vertical frequency Input signal type Input signal Video type Information Sync type Reset Sync polarity Scan type Wired LAN Projector name MAC address Model Version Serial number Firmware version Data version Current signal All data Network settings Lamp counter Filter...
...), VIDEO, S-VIDEO RGB, COMPONENT, VIDEO, S-VIDEO, HDTV NTSC, NTSC3.58, NTSC4.43, PAL, PAL-M, PAL-N, PAL60, SECAM Separate sync, Composite sync, Sync on green, Sync on (Comp1) Power management Default source select Usage time Remaining lamp time Lamp counter Filter counter Source index Horizontal frequency Vertical frequency Input signal type Input signal Video type Information Sync type Reset Sync polarity Scan type Wired LAN Projector name MAC address Model Version Serial number Firmware version Data version Current signal All data Network settings Lamp counter Filter...

User Manual
Page 66
...; Menu Descriptions & Functions [Setup] [General] 5. Using On-Screen Menu Enabling Auto Keystone [Auto keystone] This feature allows the projector to save ] will be invalid. Correcting Vertical Keystone Distortion Manually [Keystone adjustment] You can correct vertical distortion manually. To turn on the power, the Auto keystone function will work and the data stored with [Keystone save your change once affects all sources. Selecting Wall Color Correction Mode [Screen color] This function allows for quick adaptive color correction in applications where the screen...
...; Menu Descriptions & Functions [Setup] [General] 5. Using On-Screen Menu Enabling Auto Keystone [Auto keystone] This feature allows the projector to save ] will be invalid. Correcting Vertical Keystone Distortion Manually [Keystone adjustment] You can correct vertical distortion manually. To turn on the power, the Auto keystone function will work and the data stored with [Keystone save your change once affects all sources. Selecting Wall Color Correction Mode [Screen color] This function allows for quick adaptive color correction in applications where the screen...

User Manual
Page 72
... Power indicator: Orange light/STATUS indicator: Green light Power-saving......... This functionality eliminates the need to always use the POWER button on the remote control or the projector cabinet to the previous or last active input each time the projector is turned on Green RGB signal or composite sync signal is applied to an active AC input. when a component signal is applied - when [Power-saving] is selected for an active source in standby mode. Last Sets the projector to default to power on . S-VIDEO Displays...
... Power indicator: Orange light/STATUS indicator: Green light Power-saving......... This functionality eliminates the need to always use the POWER button on the remote control or the projector cabinet to the previous or last active input each time the projector is turned on Green RGB signal or composite sync signal is applied to an active AC input. when a component signal is applied - when [Power-saving] is selected for an active source in standby mode. Last Sets the projector to default to power on . S-VIDEO Displays...

User Manual
Page 81
...Fans will be displayed. Lamp replacement message will not work correctly. 6 cycle 0.5 sec (0.5 Off) sec On, Lamp error Lamp fails to a cooler location. 3 cycle 0.5 sec (0.5 Off) sec On, Power error Power unit is not working properly. Unplug the power cord after the cooling fans stop. - The projector to turn off - The projector is re-firing. Note STATUS Indicator Blinking light Steady light Indicator Condition Off Red Green Green Orange Projector Condition Note Normal - 1 cycle (0.5 sec On, L a m p c o v e r e r r o r o r l a m p Replace the lamp cover or lamp...
...Fans will be displayed. Lamp replacement message will not work correctly. 6 cycle 0.5 sec (0.5 Off) sec On, Lamp error Lamp fails to a cooler location. 3 cycle 0.5 sec (0.5 Off) sec On, Power error Power unit is not working properly. Unplug the power cord after the cooling fans stop. - The projector to turn off - The projector is re-firing. Note STATUS Indicator Blinking light Steady light Indicator Condition Off Red Green Green Orange Projector Condition Note Normal - 1 cycle (0.5 sec On, L a m p c o v e r e r r o r o r l a m p Replace the lamp cover or lamp...
User Manual
Page 82
...; Clean or replace the filter and then reset the Filter counter. Will shut down . See page 31. See page 51. 7. See page 62, 63. See page 26. • Ensure your registered Password if the Password function is installed correctly. Picture is lit or blinking • Install new batteries. Switch [Fan mode] to light. See page 34. • Adjust the computer image manually with the [Horizontal position] or [Vertical position] in [Screen color]. turned on . Color...
...; Clean or replace the filter and then reset the Filter counter. Will shut down . See page 31. See page 51. 7. See page 62, 63. See page 26. • Ensure your registered Password if the Password function is installed correctly. Picture is lit or blinking • Install new batteries. Switch [Fan mode] to light. See page 34. • Adjust the computer image manually with the [Horizontal position] or [Vertical position] in [Screen color]. turned on . Color...

User Manual
Page 92
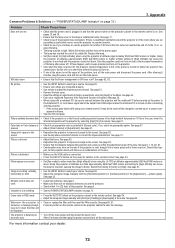
... "Reset" in the projector's menu. Other Remote control does not work ( only models with the Off timer function). Signal cable's plug is correctly connected to the ON position. Input source's resolution and frequency are lost . Lamp cover is installed correctly . Off timer is pressed to the audio input of 10 seconds. 83 Main power switch is turned off (only models with the AUDIO OUT connector). Parts of focus. Still no image even though you change [Fan mode] from your audio equipment (only models...
... "Reset" in the projector's menu. Other Remote control does not work ( only models with the Off timer function). Signal cable's plug is correctly connected to the ON position. Input source's resolution and frequency are lost . Lamp cover is installed correctly . Off timer is pressed to the audio input of 10 seconds. 83 Main power switch is turned off (only models with the AUDIO OUT connector). Parts of focus. Still no image even though you change [Fan mode] from your audio equipment (only models...


