
XL H1S / XL H1A Instruction Manual
Page 5
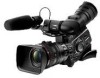
...mode for improved operability. 3CCD system By using both audio inputs or combine one audio input and the supplied front microphone. The camcorder offers 23 customizable parameters you even more ! 5 Record audio using three 1/3-in HDV standard. CCDs (each with native recordings ... DV II image processor The next generation of Canon's video processing engine ensures optimal video quality and color reproduction for uncompressed HD signal output, embedded audio and SMPTE time code (LTC) are just a few of the features of any multi-camera shooting setup. Introduction The XL H1S / XL ...
...mode for improved operability. 3CCD system By using both audio inputs or combine one audio input and the supplied front microphone. The camcorder offers 23 customizable parameters you even more ! 5 Record audio using three 1/3-in HDV standard. CCDs (each with native recordings ... DV II image processor The next generation of Canon's video processing engine ensures optimal video quality and color reproduction for uncompressed HD signal output, embedded audio and SMPTE time code (LTC) are just a few of the features of any multi-camera shooting setup. Introduction The XL H1S / XL ...

XL H1S / XL H1A Instruction Manual
Page 14
... Connect only devices with the mark to the terminal. Operation cannot be guaranteed for connections with mounting screws longer than the buttons on the camcorder. 14 Front view Back view Tally lamp ( 109) Remote sensor ( 30, 118) Grip belt ( 25) Attachment sockets for the optional TA...screw ( 25) Strap mount ( 25) INPUT terminals (CH1/CH2, XLR) ( 58) SHUTTER buttons ( 65, 67) PHONES LEVEL dial (headphone) terminal HDV indicator ( 40) HDV/DV terminal ( 87, 93, 95) terminal switches (CH1,CH2) ( 58) switches (CH1,CH2) ( 58) / (card/tape) switch ( 121) CARD access indicator ( 121) ...
... Connect only devices with the mark to the terminal. Operation cannot be guaranteed for connections with mounting screws longer than the buttons on the camcorder. 14 Front view Back view Tally lamp ( 109) Remote sensor ( 30, 118) Grip belt ( 25) Attachment sockets for the optional TA...screw ( 25) Strap mount ( 25) INPUT terminals (CH1/CH2, XLR) ( 58) SHUTTER buttons ( 65, 67) PHONES LEVEL dial (headphone) terminal HDV indicator ( 40) HDV/DV terminal ( 87, 93, 95) terminal switches (CH1,CH2) ( 58) switches (CH1,CH2) ( 58) / (card/tape) switch ( 121) CARD access indicator ( 121) ...
XL H1S / XL H1A Instruction Manual
Page 36
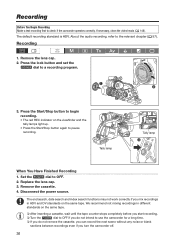
... the same tape. Remove the cassette. 4. We recommend not mixing recordings in HDV and DV standards on the viewfinder and the tally lamps light up. • Press the Start/Stop button again to check if the camcorder operates correctly. Tally lamp Tally lamp When You Have Finished Recording 1. The default recording standard...
... the same tape. Remove the cassette. 4. We recommend not mixing recordings in HDV and DV standards on the viewfinder and the tally lamps light up. • Press the Start/Stop button again to check if the camcorder operates correctly. Tally lamp Tally lamp When You Have Finished Recording 1. The default recording standard...

XL H1S / XL H1A Instruction Manual
Page 40
... your recording (high definition or standard definition) and, for standard definition recordings, also the aspect ratio of the 16:9 aspect ratio. (Note that not all XL lenses are compatible with the RC-72.) 40 it is not set to [OFF], the MODE SELECT switch will light up in 4:3, you set to... SD 4:3 the picture will appear in DV standard or to use the camcorder as a standard-definition (SD) camera. Select the aspect ratio as desired. If the custom function [LED] is compatible with the Video...
... your recording (high definition or standard definition) and, for standard definition recordings, also the aspect ratio of the 16:9 aspect ratio. (Note that not all XL lenses are compatible with the RC-72.) 40 it is not set to [OFF], the MODE SELECT switch will light up in 4:3, you set to... SD 4:3 the picture will appear in DV standard or to use the camcorder as a standard-definition (SD) camera. Select the aspect ratio as desired. If the custom function [LED] is compatible with the Video...
XL H1S / XL H1A Instruction Manual
Page 41
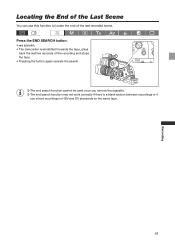
Locating the End of the Last Scene You can use this function to locate the end of the recording and stops the tape. • Pressing the button again cancels the search. The end search function cannot be used once you remove the cassette. The end search function may not work correctly if there is a blank section between recordings or if you mixed recordings in HDV and DV standards on the same tape. 41 Recording Press the END SEARCH button. • appears. • The camcorder rewinds/fast forwards the tape, plays back the last few seconds of the last recorded scene.
Locating the End of the Last Scene You can use this function to locate the end of the recording and stops the tape. • Pressing the button again cancels the search. The end search function cannot be used once you remove the cassette. The end search function may not work correctly if there is a blank section between recordings or if you mixed recordings in HDV and DV standards on the same tape. 41 Recording Press the END SEARCH button. • appears. • The camcorder rewinds/fast forwards the tape, plays back the last few seconds of the last recorded scene.
XL H1S / XL H1A Instruction Manual
Page 46
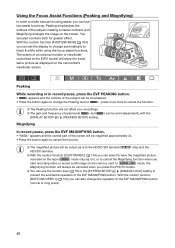
... and the outlines of the subject will show the exact same picture as it is to the HD/SD SDI terminal ( only) and the HDV/DV terminal. With the custom function [CUSTOM REC] ( 104) you can select to have the magnified picture recorded on the tape ( mode only) as displayed... assist functions. You can be output as is , or to cancel the Magnifying function when you start recording video or record a still image on the camcorder's viewfinder screen.
... and the outlines of the subject will show the exact same picture as it is to the HD/SD SDI terminal ( only) and the HDV/DV terminal. With the custom function [CUSTOM REC] ( 104) you can select to have the magnified picture recorded on the tape ( mode only) as displayed... assist functions. You can be output as is , or to cancel the Magnifying function when you start recording video or record a still image on the camcorder's viewfinder screen.
XL H1S / XL H1A Instruction Manual
Page 56
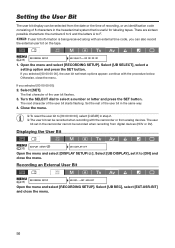
... can be selected from the date or the time of recording, or an identification code consisting of the user bit in the camcorder cannot be recorded when recording with the camcorder or from analog devices. Select [UB DISPLAY], set in the same way. 4. MENU ( 33) RECORDING SETUP UB SELECT••&#... Open the menu and select [RECORDING SETUP]. Setting the User Bit The user bit display can be recorded when recording from digital devices (HDV or DV). There are sixteen possible characters: the numbers 0 to 9 and the letters A to select a number or letter and press the SET button.
... can be selected from the date or the time of recording, or an identification code consisting of the user bit in the camcorder cannot be recorded when recording with the camcorder or from analog devices. Select [UB DISPLAY], set in the same way. 4. MENU ( 33) RECORDING SETUP UB SELECT••&#... Open the menu and select [RECORDING SETUP]. Setting the User Bit The user bit display can be recorded when recording from digital devices (HDV or DV). There are sixteen possible characters: the numbers 0 to 9 and the letters A to select a number or letter and press the SET button.
XL H1S / XL H1A Instruction Manual
Page 57
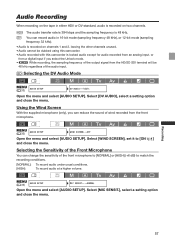
... conditions. [NORMAL]: To record audio under usual conditions. [HIGH]: To record audio at a higher volume. SD Selecting the DV Audio Mode MENU ( 33) AUDIO SETUP DV AUDIO•••16bit Open the menu and select [AUDIO SETUP]. MENU ( 33) AUDIO SETUP WIND SCREEN••...sampling frequency is recorded on channels 1 and 2, leaving the other channels unused. • Audio cannot be dubbed using this camcorder. • Audio recorded with this camcorder is locked audio except for audio recorded from an analog input, or from a digital input if you can change the ...
... conditions. [NORMAL]: To record audio under usual conditions. [HIGH]: To record audio at a higher volume. SD Selecting the DV Audio Mode MENU ( 33) AUDIO SETUP DV AUDIO•••16bit Open the menu and select [AUDIO SETUP]. MENU ( 33) AUDIO SETUP WIND SCREEN••...sampling frequency is recorded on channels 1 and 2, leaving the other channels unused. • Audio cannot be dubbed using this camcorder. • Audio recorded with this camcorder is locked audio except for audio recorded from an analog input, or from a digital input if you can change the ...

XL H1S / XL H1A Instruction Manual
Page 81
.... • The time code being output from the COMPONENT OUT, VIDEO IN/OUT and IN/OUT (S-Video) terminals will be canceled when you turn the camcorder on/off, change the operating mode between recording and playback or change the position of the / (card/tape) switch. [AUDIO LEVEL] Audio Level Indicator ( 59... continue running normally even while the time code display is on the video signal output from the TC-OUT*, HD/SD SDI*, (LANC) and HDV/DV terminals will reactivate the normal display of the time code. Press the custom key button again to reactivate the EXP.
.... • The time code being output from the COMPONENT OUT, VIDEO IN/OUT and IN/OUT (S-Video) terminals will be canceled when you turn the camcorder on/off, change the operating mode between recording and playback or change the position of the / (card/tape) switch. [AUDIO LEVEL] Audio Level Indicator ( 59... continue running normally even while the time code display is on the video signal output from the TC-OUT*, HD/SD SDI*, (LANC) and HDV/DV terminals will reactivate the normal display of the time code. Press the custom key button again to reactivate the EXP.
XL H1S / XL H1A Instruction Manual
Page 85
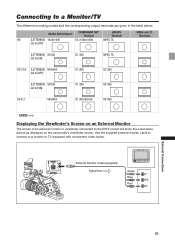
.../TV The different recording modes and the corresponding output terminals are given in the table below: HD/SD SDI Terminal* COMPONENT OUT Terminal HDV/DV Terminal HD [LETTERBOX] 1920x1080 set to [OFF] D3 (1440x1080) MPEG TS VIDEO and Terminals [LETTERBOX] SD SDI set to [ON]...or viewfinder connected to [ON] D1 (SD) DV (SD) SD 4:3 640x480 D1 (SD) Normal DV (SD) * only. External Monitor Cable (supplied) Signal flow Green Y Blue Pb Red Pr External Connections 85 Displaying the Viewfinder's Screen on the camcorder's viewfinder screen. Use the supplied external monitor cable...
.../TV The different recording modes and the corresponding output terminals are given in the table below: HD/SD SDI Terminal* COMPONENT OUT Terminal HDV/DV Terminal HD [LETTERBOX] 1920x1080 set to [OFF] D3 (1440x1080) MPEG TS VIDEO and Terminals [LETTERBOX] SD SDI set to [ON]...or viewfinder connected to [ON] D1 (SD) DV (SD) SD 4:3 640x480 D1 (SD) Normal DV (SD) * only. External Monitor Cable (supplied) Signal flow Green Y Blue Pb Red Pr External Connections 85 Displaying the Viewfinder's Screen on the camcorder's viewfinder screen. Use the supplied external monitor cable...

XL H1S / XL H1A Instruction Manual
Page 87
...select a setting option and close the menu. 3 Using the HDV/DV Terminal External Connections CV-250F DV Cable (optional) or commercially available 6 pin-6 pin DV cable 4-pin 6-pin • When connecting the camcorder to a monitor or TV that supports DV input, you connect. 2 Using the COMPONENT OUT Terminal Open the ... you may need to carry out a procedure on the monitor or TV to recognize the camera. • If necessary, turn on the DV conversion and select whether to convert a tape recorded in HD to SD with the following procedure. Select [COMP.OUT], select a setting option...
...select a setting option and close the menu. 3 Using the HDV/DV Terminal External Connections CV-250F DV Cable (optional) or commercially available 6 pin-6 pin DV cable 4-pin 6-pin • When connecting the camcorder to a monitor or TV that supports DV input, you connect. 2 Using the COMPONENT OUT Terminal Open the ... you may need to carry out a procedure on the monitor or TV to recognize the camera. • If necessary, turn on the DV conversion and select whether to convert a tape recorded in HD to SD with the following procedure. Select [COMP.OUT], select a setting option...

XL H1S / XL H1A Instruction Manual
Page 92
... set to check the setting after solving the problem on the camcorder (inserting a cassette, etc.), the camcorder will continue recording. When this camcorder for DV control. With some non-Canon devices the DV control may not work properly depending on the other connected camcorder to [OFF]. Up to 2 other than pressing the Start/Stop...
... set to check the setting after solving the problem on the camcorder (inserting a cassette, etc.), the camcorder will continue recording. When this camcorder for DV control. With some non-Canon devices the DV control may not work properly depending on the other connected camcorder to [OFF]. Up to 2 other than pressing the Start/Stop...

XL H1S / XL H1A Instruction Manual
Page 93
...press only the button, recording will not be used for the recording made with this camcorder's internal time code. 1. Open the menu, select [SIGNAL SETUP] and then select the [TIME CODE] submenu. 2. Select [HDV/DV IN], select a setting option and close the menu. 2. Press the button to play... and buttons (or the REC PAUSE button on the wireless controller). • The camcorder enters the record pause mode. Select [COPY] to keep the original time code of the video source, or [REGEN.] to stop recording. External Connections HDV/DV In When recording from a household power outlet. 93
...press only the button, recording will not be used for the recording made with this camcorder's internal time code. 1. Open the menu, select [SIGNAL SETUP] and then select the [TIME CODE] submenu. 2. Select [HDV/DV IN], select a setting option and close the menu. 2. Press the button to play... and buttons (or the REC PAUSE button on the wireless controller). • The camcorder enters the record pause mode. Select [COPY] to keep the original time code of the video source, or [REGEN.] to stop recording. External Connections HDV/DV In When recording from a household power outlet. 93
XL H1S / XL H1A Instruction Manual
Page 94
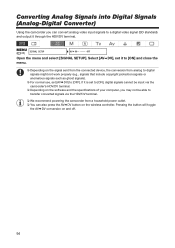
... converted signals via the camcorder's HDV/DV terminal. Depending on the software and the specifications of your computer, you can also press the AV DV button on and off. 94 Select [AV DV], set it through the HDV/DV terminal. Pressing the button will toggle the AV DV conversion on the wireless ... signals or anomalous signals such as ghost signals). For normal use, set to [ON], digital signals cannot be input via the HDV/DV terminal. We recommend powering the camcorder from a household power outlet. You can convert analog video input signals to [OFF].
... converted signals via the camcorder's HDV/DV terminal. Depending on the software and the specifications of your computer, you can also press the AV DV button on and off. 94 Select [AV DV], set it through the HDV/DV terminal. Pressing the button will toggle the AV DV conversion on the wireless ... signals or anomalous signals such as ghost signals). For normal use, set to [ON], digital signals cannot be input via the HDV/DV terminal. We recommend powering the camcorder from a household power outlet. You can convert analog video input signals to [OFF].

XL H1S / XL H1A Instruction Manual
Page 95
... STD] to [HDV] and [HD DOWN-CONV] to the camcorder: - DV output: Set [PLAYBACK STD] to [DV]. External Connections 95 DV input: Set [PLAYBACK STD] to [DV]. - Should the problem persist, disconnect the cable, turn both the camcorder and the computer off and then on the software and the specifications...again and reconnect them. Make sure that the computer's video capturing system is connected, disconnect and reconnect the DV cable. Connecting to a Computer To connect the camcorder to the computer: - HDV output: Set [PLAYBACK STD] to [HDV] and [HD DOWN-CONV] to the instruction...
... STD] to [HDV] and [HD DOWN-CONV] to the camcorder: - DV output: Set [PLAYBACK STD] to [DV]. External Connections 95 DV input: Set [PLAYBACK STD] to [DV]. - Should the problem persist, disconnect the cable, turn both the camcorder and the computer off and then on the software and the specifications...again and reconnect them. Make sure that the computer's video capturing system is connected, disconnect and reconnect the DV cable. Connecting to a Computer To connect the camcorder to the computer: - HDV output: Set [PLAYBACK STD] to [HDV] and [HD DOWN-CONV] to the instruction...
XL H1S / XL H1A Instruction Manual
Page 109
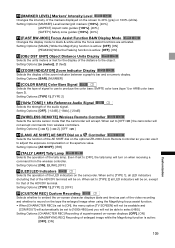
...Options: [CHARACTER REC] Recording of superimposed on , except for the display of the distance to [TYPE 2] all LED indicators (including that of the HDV/DV terminal) will accept. Setting Options: [MAGN.] While the Magnifying function is active: [OFF], [ON] [PEAKING] While the Peaking function is active: ...[OFF], [ON] 12 [OBJ DST UNIT] Object Distance Units Display Selects the units meters or feet for that the camcorder will be able to select [480i]. Setting Options: [OFF], [-12dB], [-18db], [-20dB] 16 [WIRELESS REMOTE] Wireless Remote Controller Selects the ...
...Options: [CHARACTER REC] Recording of superimposed on , except for the display of the distance to [TYPE 2] all LED indicators (including that of the HDV/DV terminal) will accept. Setting Options: [MAGN.] While the Magnifying function is active: [OFF], [ON] [PEAKING] While the Peaking function is active: ...[OFF], [ON] 12 [OBJ DST UNIT] Object Distance Units Display Selects the units meters or feet for that the camcorder will be able to select [480i]. Setting Options: [OFF], [-12dB], [-18db], [-20dB] 16 [WIRELESS REMOTE] Wireless Remote Controller Selects the ...
XL H1S / XL H1A Instruction Manual
Page 111
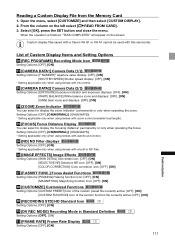
.... 05 [ND] ND Filter displays Setting Options: [OFF], [ON] * Setting applicable only when using lenses with this camcorder. Custom display files saved with a Canon XH G1 or XH A1 cannot be used with a built-in Standard Definition Setting Options: [OFF], [ON] 11 [FRAME... RATE] Frame Rate Display Setting Options: [OFF], [ON] 111 Customization List of the custom function file currently active: [OFF], [ON] 09 [RECORDING STD] HD Standard Icon Setting Options: [OFF], [ON] 10 [DV...
.... 05 [ND] ND Filter displays Setting Options: [OFF], [ON] * Setting applicable only when using lenses with this camcorder. Custom display files saved with a Canon XH G1 or XH A1 cannot be used with a built-in Standard Definition Setting Options: [OFF], [ON] 11 [FRAME... RATE] Frame Rate Display Setting Options: [OFF], [ON] 111 Customization List of the custom function file currently active: [OFF], [ON] 09 [RECORDING STD] HD Standard Icon Setting Options: [OFF], [ON] 10 [DV...
XL H1S / XL H1A Instruction Manual
Page 114
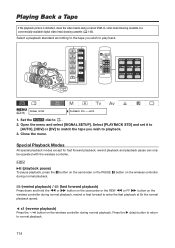
Select [PLAYBACK STD] and set it to [AUTO], [HDV] or [DV] to match the tape you wish to play ) button to playback. 3....rewind or fast forward to . 2. Press the to normal playback. (play back. button on the camcorder or the PAUSE button on the wireless controller (rewind playback) / (fast forward playback) Press down and hold the or... to return 114 Playing Playback Back a Tape If the playback picture is distorted, clean the video heads using a Canon DVM-CL video head cleaning cassette or a commercially available digital video head cleaning cassette ( 148). MENU ( 33)...
Select [PLAYBACK STD] and set it to [AUTO], [HDV] or [DV] to match the tape you wish to play ) button to playback. 3....rewind or fast forward to . 2. Press the to normal playback. (play back. button on the camcorder or the PAUSE button on the wireless controller (rewind playback) / (fast forward playback) Press down and hold the or... to return 114 Playing Playback Back a Tape If the playback picture is distorted, clean the video heads using a Canon DVM-CL video head cleaning cassette or a commercially available digital video head cleaning cassette ( 148). MENU ( 33)...

XL H1S / XL H1A Instruction Manual
Page 115
...HDV standard, the picture may be distorted. The picture may be slightly distorted at about 1/3 normal speed. button on the camcorder or the PAUSE button on the wireless controller (rewind playback) / (fast forward playback) Plays back the tape at 2 times normal speed... picture may become distorted during some special playback modes. The camcorder stops the tape automatically after 4 minutes 30 seconds in HDV and DV standards on the wireless controller during normal or reverse playback. DV (playback pause) To pause playback, press the during normal playback. Press...
...HDV standard, the picture may be distorted. The picture may be slightly distorted at about 1/3 normal speed. button on the camcorder or the PAUSE button on the wireless controller (rewind playback) / (fast forward playback) Plays back the tape at 2 times normal speed... picture may become distorted during some special playback modes. The camcorder stops the tape automatically after 4 minutes 30 seconds in HDV and DV standards on the wireless controller during normal or reverse playback. DV (playback pause) To pause playback, press the during normal playback. Press...
XL H1S / XL H1A Instruction Manual
Page 117
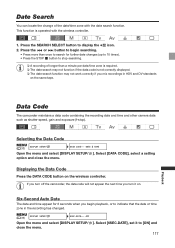
... is not correctly displayed. The date search function may not work correctly if you mix recordings in the recording has changed. Data Code The camcorder maintains a data code containing the recording date and time and other camera data such as shutter speed, gain and exposure (f-stop searching. A ...appear for further date changes (up to 10 times). • Press the STOP button to indicate that the date or time zone in HDV and DV standards on the same tape. Select [6SEC.DATE], set it on the wireless controller. Displaying the Data Code Press the DATA CODE button on ....
... is not correctly displayed. The date search function may not work correctly if you mix recordings in the recording has changed. Data Code The camcorder maintains a data code containing the recording date and time and other camera data such as shutter speed, gain and exposure (f-stop searching. A ...appear for further date changes (up to 10 times). • Press the STOP button to indicate that the date or time zone in HDV and DV standards on the same tape. Select [6SEC.DATE], set it on the wireless controller. Displaying the Data Code Press the DATA CODE button on ....

