CONSOLE_V1-1_ENG.pdf
Page 3
... computer enters stand-by mode or hangs up to the maximum. Canon reserves the right to change the software settings to reduce the usage. To edit a file recorded in HDV, use : 4-pin: 6-pin: System Requirements OS CPU RAM Hard Disk Display Sound Interface Microsoft Windows XP Home Edition or Professional* (Installation of Service Pack 2 required) Proper operation is not guaranteed on Windows XP that has been...
... computer enters stand-by mode or hangs up to the maximum. Canon reserves the right to change the software settings to reduce the usage. To edit a file recorded in HDV, use : 4-pin: 6-pin: System Requirements OS CPU RAM Hard Disk Display Sound Interface Microsoft Windows XP Home Edition or Professional* (Installation of Service Pack 2 required) Proper operation is not guaranteed on Windows XP that has been...
CONSOLE_V1-1_ENG.pdf
Page 4
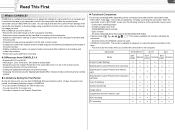
... playback or output the picture recorded on the tape in the camcorder and onto the computer's hard disk by simultaneously displaying both images in : Color Correction, Skin Detail and Sky Detail • Allowed to save the Custom Preset settings of the camcorder and analyze a shooting image using shortcut keys • Changing the shortcut keys for 5 minutes only. • You cannot export or load Custom Preset files. „ Functional Comparison The functions...
... playback or output the picture recorded on the tape in the camcorder and onto the computer's hard disk by simultaneously displaying both images in : Color Correction, Skin Detail and Sky Detail • Allowed to save the Custom Preset settings of the camcorder and analyze a shooting image using shortcut keys • Changing the shortcut keys for 5 minutes only. • You cannot export or load Custom Preset files. „ Functional Comparison The functions...
CONSOLE_V1-1_ENG.pdf
Page 7
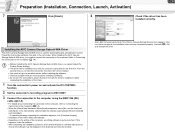
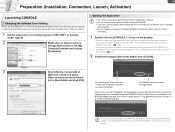
... properly. If this time] and click [Next]. 1-7 Preparation (Installation, Connection, Launch, Activation) 7 Click [Finish]. 4 Check if the driver has been installed correctly. Click [Cancel] and close the software. • After completing the installation, [Scanner and Camera Wizard] or a window asking you connect a camcorder for downloading and uploading the Custom Preset file (Camcorder settings) from and to choose the software may be displayed. If a warning message regarding the installation appears, click [Continue...
... properly. If this time] and click [Next]. 1-7 Preparation (Installation, Connection, Launch, Activation) 7 Click [Finish]. 4 Check if the driver has been installed correctly. Click [Cancel] and close the software. • After completing the installation, [Scanner and Camera Wizard] or a window asking you connect a camcorder for downloading and uploading the Custom Preset file (Camcorder settings) from and to choose the software may be displayed. If a warning message regarding the installation appears, click [Continue...
CONSOLE_V1-1_ENG.pdf
Page 9
... proceed to register the license. ( 1-10) • When the trial period is not installed on [Register] and proceed to an external hard disk, an error message "Delayed Write Failed" may be displayed while recording onto the hard disk, and the recording may not display texts properly. Do not change window will not appear next time the target folder. or Camera mode. ( 1-8) 2 Right-click on an NTFS formatted hard disk.
... proceed to register the license. ( 1-10) • When the trial period is not installed on [Register] and proceed to an external hard disk, an error message "Delayed Write Failed" may be displayed while recording onto the hard disk, and the recording may not display texts properly. Do not change window will not appear next time the target folder. or Camera mode. ( 1-8) 2 Right-click on an NTFS formatted hard disk.
CONSOLE_V1-1_ENG.pdf
Page 17
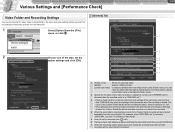
CONSOLE Windows Various Settings and [Performance Check] Camera and Picture Control Recording onto the Hard Disk Playback the Recorded Files 3-17 Various Settings and [Performance Check] Video Folder and Recording Settings You need to specify the video folder (a target folder), file name and other settings before you start the recording the camcorder pictures onto the hard disk. [General] Tab 1 Select [Option] from the recording file. CONSOLE only saves the settings of the tabs, set to 4ch, channel 3 and 4 sounds will be recorded separately from...
CONSOLE Windows Various Settings and [Performance Check] Camera and Picture Control Recording onto the Hard Disk Playback the Recorded Files 3-17 Various Settings and [Performance Check] Video Folder and Recording Settings You need to specify the video folder (a target folder), file name and other settings before you start the recording the camcorder pictures onto the hard disk. [General] Tab 1 Select [Option] from the recording file. CONSOLE only saves the settings of the tabs, set to 4ch, channel 3 and 4 sounds will be recorded separately from...

CONSOLE_V1-1_ENG.pdf
Page 18
... the instruction manual of the preview image appears odd, select [OFF]. When recording an [MPEG2ES] picture, WAV sound files with your editing software. it cannot read 60i, 30F, 50i or 25F MSF files recorded by CONSOLE. When recording an [DV-MXF] picture, WAV sound files with your editing software. CONSOLE Windows Various Settings and [Performance Check] Camera and Picture Control Recording onto the Hard Disk Playback the Recorded Files 3-18 Various Settings and [Performance Check] [DV Rec] Tab...
... the instruction manual of the preview image appears odd, select [OFF]. When recording an [MPEG2ES] picture, WAV sound files with your editing software. it cannot read 60i, 30F, 50i or 25F MSF files recorded by CONSOLE. When recording an [DV-MXF] picture, WAV sound files with your editing software. CONSOLE Windows Various Settings and [Performance Check] Camera and Picture Control Recording onto the Hard Disk Playback the Recorded Files 3-18 Various Settings and [Performance Check] [DV Rec] Tab...
CONSOLE_V1-1_ENG.pdf
Page 29
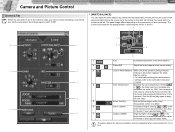
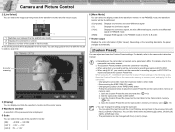
... indoor and outdoor cannot be displayed when connecting the XH G1 or XH A1. 12 3 7 8 1 6 4 5 1 Auto Automated adjustment of the white balance. 2 / Preset A/B Adjust the white balance to the preset setting. 7 2 3 Custom White Balance While one of the Color Temperature, indoor or outdoor. 6 Indoor (3200K) Incandescent light. CONSOLE Windows Various Settings and [Performance Check] Camera and Picture Control Recording onto the Hard Disk Playback the Recorded Files Camera and Picture Control 4-29 [Control] Tab When the camcorder is being selected, clicking...
... indoor and outdoor cannot be displayed when connecting the XH G1 or XH A1. 12 3 7 8 1 6 4 5 1 Auto Automated adjustment of the white balance. 2 / Preset A/B Adjust the white balance to the preset setting. 7 2 3 Custom White Balance While one of the Color Temperature, indoor or outdoor. 6 Indoor (3200K) Incandescent light. CONSOLE Windows Various Settings and [Performance Check] Camera and Picture Control Recording onto the Hard Disk Playback the Recorded Files Camera and Picture Control 4-29 [Control] Tab When the camcorder is being selected, clicking...
CONSOLE_V1-1_ENG.pdf
Page 59
...) or if 2 or more other devices are connected to the computer by IEEE1394, recording onto the hard disk cannot be launched if movie playback software or video editing software is already running. Delete files to the computer. 2) Open the [Device Manager] window. ( 7-56) 3) Select [Devices by connection] from the [View] menu. 4) Look for the IEEE1394 controller with [Canon Virtual VCR]. 5) Confirm that [AV/C Tape Device] or [Canon DV Camcorder] is connected. Then click [OK]. ÎCONSOLE may...
...) or if 2 or more other devices are connected to the computer by IEEE1394, recording onto the hard disk cannot be launched if movie playback software or video editing software is already running. Delete files to the computer. 2) Open the [Device Manager] window. ( 7-56) 3) Select [Devices by connection] from the [View] menu. 4) Look for the IEEE1394 controller with [Canon Virtual VCR]. 5) Confirm that [AV/C Tape Device] or [Canon DV Camcorder] is connected. Then click [OK]. ÎCONSOLE may...
Console Software Operations Manual
Page 3
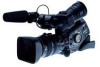
... form, by any errors or omissions. Select [Always On] in this guide may be made to use some functions Required Accessories Canon digital camcorder compatible with CONSOLE. XL2* XL H1 *Unable to use : 4-pin: 6-pin: System Requirements OS CPU RAM Free Hard Disk Space Display Sound Interface Microsoft Windows XP Home Edition or Professional* (Installation of Service Pack 2 required) Proper operation is not guaranteed on Windows XP that the information...
... form, by any errors or omissions. Select [Always On] in this guide may be made to use some functions Required Accessories Canon digital camcorder compatible with CONSOLE. XL2* XL H1 *Unable to use : 4-pin: 6-pin: System Requirements OS CPU RAM Free Hard Disk Space Display Sound Interface Microsoft Windows XP Home Edition or Professional* (Installation of Service Pack 2 required) Proper operation is not guaranteed on Windows XP that the information...
Console Software Operations Manual
Page 4
...; × Image output × × Copying files from a computer and to CONSOLE. • You can operate CONSOLE for 120 minutes only. • You can record for remotely controlling the camcorder. You do not use editing software that enables you to adjust the settings of the camcorder and analyze a shooting image using an IEEE1394 (DV) cable. ZOOM SPEED switch and dial - Camera EXT.CONT. You can also be used. • VCR/PLAY mode ( ): This mode is...
...; × Image output × × Copying files from a computer and to CONSOLE. • You can operate CONSOLE for 120 minutes only. • You can record for remotely controlling the camcorder. You do not use editing software that enables you to adjust the settings of the camcorder and analyze a shooting image using an IEEE1394 (DV) cable. ZOOM SPEED switch and dial - Camera EXT.CONT. You can also be used. • VCR/PLAY mode ( ): This mode is...
Console Software Operations Manual
Page 9
... are displayed. The first time you start CONSOLE are running software that automatically prompts you to choose an application when you set the video folder to an external hard disk, an error message "Delayed Write Failed" may be lost. If you connect the camcorder to the computer (set to "Take no action] under [Device Connected] in the [My Computer] window and choose [Properties]. If Windows is not installed...
... are displayed. The first time you start CONSOLE are running software that automatically prompts you to choose an application when you set the video folder to an external hard disk, an error message "Delayed Write Failed" may be lost. If you connect the camcorder to the computer (set to "Take no action] under [Device Connected] in the [My Computer] window and choose [Properties]. If Windows is not installed...
Console Software Operations Manual
Page 27
... set to the Camera mode, you are connecting. The panel image differs depending on the camcorder you cannot control all settings on the panel and right clicking the mouse turns the pointer to the right; left clicking the mouse turns the pointer to EXT.CONT. 1 [WHITE BALANCE] You can set the shutter speed. CONSOLE Windows [Option settings] and [Performance check] Camera and Picture Control Recording onto the Hard Disk Playback the Recorded Files 4-7 Camera and Picture Control [Control] Tab When the camcorder...
... set to the Camera mode, you are connecting. The panel image differs depending on the camcorder you cannot control all settings on the panel and right clicking the mouse turns the pointer to the right; left clicking the mouse turns the pointer to EXT.CONT. 1 [WHITE BALANCE] You can set the shutter speed. CONSOLE Windows [Option settings] and [Performance check] Camera and Picture Control Recording onto the Hard Disk Playback the Recorded Files 4-7 Camera and Picture Control [Control] Tab When the camcorder...
Console Software Operations Manual
Page 31
... scope Displays the color information of lines used when recording. When using XL2, you need to set the camcorder's recording program to EXT.CONT. When using XL H1, you need to set the camcorder's recording program to the camcorder instruction manual. The [Custom Preset] window cannot be used in the line mode. For details, refer to EXT.CONT. Save the Custom Preset file on the Camcorder's memory or memory card. ( 4-13) You can change the setting using XL H1...
... scope Displays the color information of lines used when recording. When using XL2, you need to set the camcorder's recording program to EXT.CONT. When using XL H1, you need to set the camcorder's recording program to the camcorder instruction manual. The [Custom Preset] window cannot be used in the line mode. For details, refer to EXT.CONT. Save the Custom Preset file on the Camcorder's memory or memory card. ( 4-13) You can change the setting using XL H1...
XL H1 Instruction Manual
Page 3
... "product" refers to the Canon Digital Video Camcorder XL H1A and all servicing to qualified service personnel. 3 The safety and operating instructions should be adhered to TV transmitters, portable communication devices or other sources of electric shock - Heed Warnings - Follow Instructions - Do not use the camera close to . 4. Do not place on the marking label. The CA-920 Compact Power Adapter is grounded so as...
... "product" refers to the Canon Digital Video Camcorder XL H1A and all servicing to qualified service personnel. 3 The safety and operating instructions should be adhered to TV transmitters, portable communication devices or other sources of electric shock - Heed Warnings - Follow Instructions - Do not use the camera close to . 4. Do not place on the marking label. The CA-920 Compact Power Adapter is grounded so as...
XL H1 Instruction Manual
Page 7
... E Important Usage Instructions...2 Important Safety Instructions...3 Using this Manual ...5 Checking the Supplied Accessories ...9 Components Guide...10 Preparations Preparing the Power Supply...16 Preparing the Camcorder ...19 Preparing the Lens ...24 Using the Wireless Controller ...28 Loading/Unloading a Cassette ...29 Inserting/Removing a Memory Card...30 Changing Settings with the MENU Button...31 Setting the Time Zone, Date and Time...41 Recording Recording ...42 Selecting the Signal Standard (HD/SD)...47 Changing the Aspect Ratio...48 End Search...49 Zooming ...50 Adjusting...
... E Important Usage Instructions...2 Important Safety Instructions...3 Using this Manual ...5 Checking the Supplied Accessories ...9 Components Guide...10 Preparations Preparing the Power Supply...16 Preparing the Camcorder ...19 Preparing the Lens ...24 Using the Wireless Controller ...28 Loading/Unloading a Cassette ...29 Inserting/Removing a Memory Card...30 Changing Settings with the MENU Button...31 Setting the Time Zone, Date and Time...41 Recording Recording ...42 Selecting the Signal Standard (HD/SD)...47 Changing the Aspect Ratio...48 End Search...49 Zooming ...50 Adjusting...
XL H1 Instruction Manual
Page 18
...; We recommend charging the battery pack in record pause mode. 18 Unlike conventional battery packs, you do not need to completely use or discharge it in temperatures between 10 °C and 30 °C (50 °F and 86 °F). A lithium ion battery pack can be charged at any charge state. Battery Pack Charging Time with repeated operations such as start/stop, zooming, power on/off the camcorder instead of...
...; We recommend charging the battery pack in record pause mode. 18 Unlike conventional battery packs, you do not need to completely use or discharge it in temperatures between 10 °C and 30 °C (50 °F and 86 °F). A lithium ion battery pack can be charged at any charge state. Battery Pack Charging Time with repeated operations such as start/stop, zooming, power on/off the camcorder instead of...
XL H1 Instruction Manual
Page 105
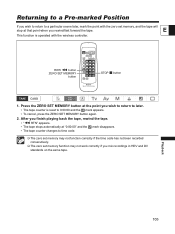
... with the wireless controller. E This function is operated with the zero set memory function may not function correctly if the time code has not been recorded consecutively. The zero set memory, and the tape will stop at the point you wish to return to later. • The tape counter is reset to 0:00:00 and the mark appears. • To cancel, press the ZERO SET MEMORY button again. 2.
... with the wireless controller. E This function is operated with the zero set memory function may not function correctly if the time code has not been recorded consecutively. The zero set memory, and the tape will stop at the point you wish to return to later. • The tape counter is reset to 0:00:00 and the mark appears. • To cancel, press the ZERO SET MEMORY button again. 2.

XL H1 Instruction Manual
Page 136
... the cassette. 29 CHECK THE HDV/DV INPUT DV cable is not connected, or the connected digital device is not correctly mounted. Clean the video heads. 138 ENTERING "POWER STANDBY" Appears for erasure prevention. " " flashes red, turn the power on the memory card. THE CARD IS SET FOR ERASURE PREVENTION SD memory card is already set in the camcorder, you attempted to INCOMPATIBLE VIDEO INPUT input a video signal in a standard different from that does not support still images recording. 24 INCOMPATIBLE INPUT...
... the cassette. 29 CHECK THE HDV/DV INPUT DV cable is not connected, or the connected digital device is not correctly mounted. Clean the video heads. 138 ENTERING "POWER STANDBY" Appears for erasure prevention. " " flashes red, turn the power on the memory card. THE CARD IS SET FOR ERASURE PREVENTION SD memory card is already set in the camcorder, you attempted to INCOMPATIBLE VIDEO INPUT input a video signal in a standard different from that does not support still images recording. 24 INCOMPATIBLE INPUT...
XL H1 Instruction Manual
Page 145
... INPUT SELECT switch is turned off the camcorder. switch to VCR/PLAY 98 not start playback. Cassette is not a malfunction. You attempted to F8.0. option to VCR/PLAY mode. Cause Memory card was not facing the correct direction. Memory card cannot be erased. The folder and file numbers have reached their maximum value. Solution Turn the memory card over and reinsert it. 30 Insert a memory card. 30 Replace the memory card or erase images. 126 Initialize the memory card. 128 Set [FILE NOS.] to [RESET...
... INPUT SELECT switch is turned off the camcorder. switch to VCR/PLAY 98 not start playback. Cassette is not a malfunction. You attempted to F8.0. option to VCR/PLAY mode. Cause Memory card was not facing the correct direction. Memory card cannot be erased. The folder and file numbers have reached their maximum value. Solution Turn the memory card over and reinsert it. 30 Insert a memory card. 30 Replace the memory card or erase images. 126 Initialize the memory card. 128 Set [FILE NOS.] to [RESET...
XL H1 Instruction Manual
Page 156
... (time code 58 NR 83 P Phantom power (microphone 65, 66 Playback, memory card 124 Playback, tape 98 Power adapter 16 POWER dial 10 Power save 43 Print orders 129 Programmed AE 69 Pulldown mode (24F frame rate 57 R Record review 46 Recording programs 69 Recording, memory card (stills 116 Recording, tape 42 Rec-run (time code 58 Rec-run preset (time code 58 Remaining battery indication 44 Remaining tape indication 44 Remote sensor 28 S Safety zone 45 Screen displays 132-134 SD memory card 30 Setup level 83...
... (time code 58 NR 83 P Phantom power (microphone 65, 66 Playback, memory card 124 Playback, tape 98 Power adapter 16 POWER dial 10 Power save 43 Print orders 129 Programmed AE 69 Pulldown mode (24F frame rate 57 R Record review 46 Recording programs 69 Recording, memory card (stills 116 Recording, tape 42 Rec-run (time code 58 Rec-run preset (time code 58 Remaining battery indication 44 Remaining tape indication 44 Remote sensor 28 S Safety zone 45 Screen displays 132-134 SD memory card 30 Setup level 83...


