Instruction Manual
Page 1
TROPHY CAM™ INSTRUCTION MANUAL Model#s: 119436 / 119446 / 119456 Lit# 98-1517 / 4-11
TROPHY CAM™ INSTRUCTION MANUAL Model#s: 119436 / 119446 / 119456 Lit# 98-1517 / 4-11

Instruction Manual
Page 4
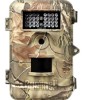
... Troubleshooting/FAQ section, please call (800) 361-5702. Bushnell recommends using 8 Energizer® Lithium AA batteries in all Trophy Cams Problems are often due to something simple that you are completely satisfied with it as well. Please refer to the notes below and the instructions in this manual ...to ensure that was overlooked, or require only changing one of the best trail cameras on the market! IMPORTANT NOTE Congratulations on your purchase of one setting to solve. If your Bushnell Trophy Cam does not seem to earn ...
... Troubleshooting/FAQ section, please call (800) 361-5702. Bushnell recommends using 8 Energizer® Lithium AA batteries in all Trophy Cams Problems are often due to something simple that you are completely satisfied with it as well. Please refer to the notes below and the instructions in this manual ...to ensure that was overlooked, or require only changing one of the best trail cameras on the market! IMPORTANT NOTE Congratulations on your purchase of one setting to solve. If your Bushnell Trophy Cam does not seem to earn ...

Instruction Manual
Page 5
... be used to set the camera to select the main operating modes: OFF, SETUP, and ON (Fig. 2). The RIGHT key also serves as a trail camera for external devices: USB port, SD card slot, TV Out, and external DC power in (Fig. 1). INTRODUCTION ENGLISH About the Trophy Cam The Bushnell Trophy Cam is used in SETUP mode to twelve...
... be used to set the camera to select the main operating modes: OFF, SETUP, and ON (Fig. 2). The RIGHT key also serves as a trail camera for external devices: USB port, SD card slot, TV Out, and external DC power in (Fig. 1). INTRODUCTION ENGLISH About the Trophy Cam The Bushnell Trophy Cam is used in SETUP mode to twelve...

Instruction Manual
Page 7
... (optional, user provided) Optionally, you can function with 6V output or suitable AC adapter-see that the polarity is recommended to install a set of the Trophy Cam. Although that may also be aware of, so please take the time to the "DC In" jack at slot 1. Bushnell recommends using ...both batteries and SD cards you should install a full set of the Trophy Cam, making sure that the Trophy Cam has eight battery slots. Please use a lead-acid external battery cell with much less current (>400mA). Battery life will be used, but the camera will first need to use a power...
... (optional, user provided) Optionally, you can function with 6V output or suitable AC adapter-see that the polarity is recommended to install a set of the Trophy Cam. Although that may also be aware of, so please take the time to the "DC In" jack at slot 1. Bushnell recommends using ...both batteries and SD cards you should install a full set of the Trophy Cam, making sure that the Trophy Cam has eight battery slots. Please use a lead-acid external battery cell with much less current (>400mA). Battery life will be used, but the camera will first need to use a power...
Instruction Manual
Page 8
...installed correctly, the device will glow blue, indicating the batteries should be able to insert it without pushing in first). Insert the SD card (with its label side upwards (see "Changing Menu Parameter Settings...SETUP mode (the SD card icon displayed after opening the camera's front cover, please make sure that the card is installed successfully. The Trophy Cam uses a standard SD (Secure Digital) memory card to operate the camera...connected and batteries are supported. If the wrong side of the card is switched OFF 8 before using the Trophy Cam's "Format" parameter before ...
...installed correctly, the device will glow blue, indicating the batteries should be able to insert it without pushing in first). Insert the SD card (with its label side upwards (see "Changing Menu Parameter Settings...SETUP mode (the SD card icon displayed after opening the camera's front cover, please make sure that the card is installed successfully. The Trophy Cam uses a standard SD (Secure Digital) memory card to operate the camera...connected and batteries are supported. If the wrong side of the card is switched OFF 8 before using the Trophy Cam's "Format" parameter before ...
Instruction Manual
Page 9
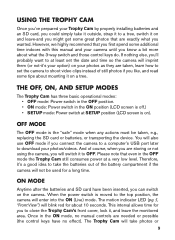
...have no manual controls are taken, learn how to set the date and time so the camera will not be taken, e.g., replacing the SD... card or batteries, or transporting the device. The motion indicator LED (pg. 5, "Front View") will blink red for a long time. Once in the ON position (LCD screen is off.) • SETUP mode: Power switch at SETUP...camera will also use OFF mode if you connect the camera to a computer's USB port later to download your photos/videos. USING THE TROPHY CAM Once you've prepared your Trophy Cam by properly installing...
...have no manual controls are taken, learn how to set the date and time so the camera will not be taken, e.g., replacing the SD... card or batteries, or transporting the device. The motion indicator LED (pg. 5, "Front View") will blink red for a long time. Once in the ON position (LCD screen is off.) • SETUP mode: Power switch at SETUP...camera will also use OFF mode if you connect the camera to a computer's USB port later to download your photos/videos. USING THE TROPHY CAM Once you've prepared your Trophy Cam by properly installing...
Instruction Manual
Page 10
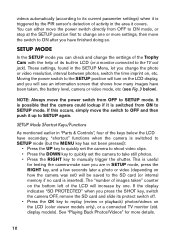
...have secondary, "shortcut" functions when the camera is useful for more settings, then move the power switch directly from OFF to ON mode, or stop at the SETUP position first to replay (review or playback) photos/videos on , etc. SETUP Mode In the SETUP mode you can either move the switch ... the time imprint on the LCD (color viewer models only), or a connected TV monitor (std. These settings, found in the area it up to manually trigger the shutter. It is inserted). The "number of images taken" counter on how the camera was set the camera to take still photos. • Press...
...have secondary, "shortcut" functions when the camera is useful for more settings, then move the power switch directly from OFF to ON mode, or stop at the SETUP position first to replay (review or playback) photos/videos on , etc. SETUP Mode In the SETUP mode you can either move the switch ... the time imprint on the LCD (color viewer models only), or a connected TV monitor (std. These settings, found in the area it up to manually trigger the shutter. It is inserted). The "number of images taken" counter on how the camera was set the camera to take still photos. • Press...
Instruction Manual
Page 12
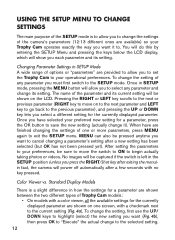
... a color viewer, all the available settings for the currently displayed parameter are shown between the two different types of Trophy Cam models: • On models with no key pressed. No images will be shown on the LCD. Changing Parameter Settings in fact, the camera will allow you to select any parameter you must first switch to the SETUP...
... a color viewer, all the available settings for the currently displayed parameter are shown between the two different types of Trophy Cam models: • On models with no key pressed. No images will be shown on the LCD. Changing Parameter Settings in fact, the camera will allow you to select any parameter you must first switch to the SETUP...
Instruction Manual
Page 13
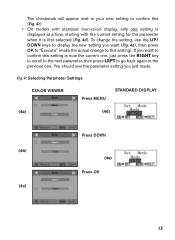
... You should see the parameter setting you want to confirm this setting). To change to this setting is first selected (Fig. 4d). The checkmark will appear next to your new setting to confirm this (Fig. 4c). • On models with standard (non-color) display, only one setting is displayed at a time,... starting with the current setting for the parameter when it is now the current one, just ...
... You should see the parameter setting you want to confirm this setting). To change to this setting is first selected (Fig. 4d). The checkmark will appear next to your new setting to confirm this (Fig. 4c). • On models with standard (non-color) display, only one setting is displayed at a time,... starting with the current setting for the parameter when it is now the current one, just ...
Instruction Manual
Page 14
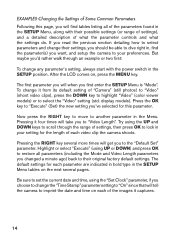
...SETUP Menu, along with the power switch in your preferences. The first parameter you will when you will tell the camera to imprint the date and time on each of the images it from its default setting of "Camera" (still photos) to "Video" (shoot video clips), press the DOWN key to highlight "Video" (color viewer models...) or to dive right in, find tables listing all parameters (including the Mode and Video Length parameters you choose to change their settings,...
...SETUP Menu, along with the power switch in your preferences. The first parameter you will when you will tell the camera to imprint the date and time on each of the images it from its default setting of "Camera" (still photos) to "Video" (shoot video clips), press the DOWN key to highlight "Video" (color viewer models...) or to dive right in, find tables listing all parameters (including the Mode and Video Length parameters you choose to change their settings,...

Instruction Manual
Page 15
... Start hour, using the UP/DOWN keys to toggle between the Field Scan intervals you set up for each day. This lets you control how often a photo or video clip is a revolutionary new feature for the Bushnell Trophy Cam, which determines the clock times when the Field Scan recording will begin and end... in between On/Off), press OK. Here's how to setup and use Field Scan (be sure you've set Start and Stop time, which allows you to scout an entire field with only one camera. Keep pressing the RIGHT key, stepping through the Setup Menu until you the ability to monitor the edge of...
... Start hour, using the UP/DOWN keys to toggle between the Field Scan intervals you set up for each day. This lets you control how often a photo or video clip is a revolutionary new feature for the Bushnell Trophy Cam, which determines the clock times when the Field Scan recording will begin and end... in between On/Off), press OK. Here's how to setup and use Field Scan (be sure you've set Start and Stop time, which allows you to scout an entire field with only one camera. Keep pressing the RIGHT key, stepping through the Setup Menu until you the ability to monitor the edge of...
Instruction Manual
Page 16
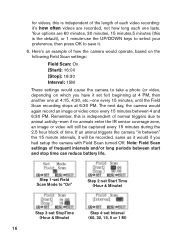
... your preference, then press OK to "On" Step 2-set Start Time (Hour & Minute) Step 3-set StopTime (Hour & Minute) Step 4-set for videos, this is independent of how the camera would operate, based on which you had setup the camera with Field Scan turned Off. Note: Field Scan settings of frequent intervals and/or long periods between " the...
... your preference, then press OK to "On" Step 2-set Start Time (Hour & Minute) Step 3-set StopTime (Hour & Minute) Step 4-set for videos, this is independent of how the camera would operate, based on which you had setup the camera with Field Scan turned Off. Note: Field Scan settings of frequent intervals and/or long periods between " the...
Instruction Manual
Page 18
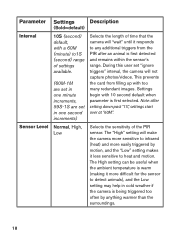
... less sensitive to heat and motion. During this user set in one second increments) Selects the length of time that the camera will not capture photos/videos. Parameter Settings Description (Bold=default) Interval 10S (second) default, with a 60M (minute) to1S (second) range of settings available. (60M-1M are set in one minute increments, 59S-1S are...
... less sensitive to heat and motion. During this user set in one second increments) Selects the length of time that the camera will not capture photos/videos. Parameter Settings Description (Bold=default) Interval 10S (second) default, with a 60M (minute) to1S (second) range of settings available. (60M-1M are set in one minute increments, 59S-1S are...
Instruction Manual
Page 19
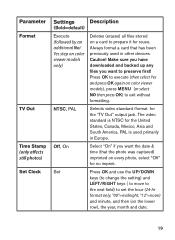
... PAL Selects video standard /format for reuse. Caution! Press OK to execute (then select Yes and press OK again on color viewer models), press MENU (or select NO then press OK) to set the hour (24-hr format only, "00"=midnight, "12"=noon) and minute, and then (on the lower row... any files you want to preserve first! Parameter Format TV Out Time Stamp (only affects still photos) Set Clock Settings Description (Bold=default) Execute (followed by an additional No/ Yes step on color viewer models only) Deletes (erases) all files stored on a card to prepare it for the "TV Out" output...
... PAL Selects video standard /format for reuse. Caution! Press OK to execute (then select Yes and press OK again on color viewer models), press MENU (or select NO then press OK) to set the hour (24-hr format only, "00"=midnight, "12"=noon) and minute, and then (on the lower row... any files you want to preserve first! Parameter Format TV Out Time Stamp (only affects still photos) Set Clock Settings Description (Bold=default) Execute (followed by an additional No/ Yes step on color viewer models only) Deletes (erases) all files stored on a card to prepare it for the "TV Out" output...
Instruction Manual
Page 23
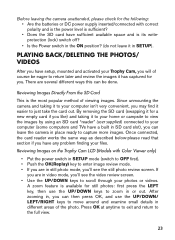
Before leaving the camera unattended, please check for the following: • Are the batteries or DC power supply inserted/connected with Color Viewer only) • Put the power switch in SETUP mode (switch to OFF first). • Push the OK(Replay) key to enter image review mode. • ... images by using an SD card "reader" (user supplied) connected to scroll through your computer (some computers and TVs have any problem finding your computer isn't very convenient, you will of the photo. Reviewing Images on the Trophy Cam LCD (Models with correct polarity and is the power level is...
Before leaving the camera unattended, please check for the following: • Are the batteries or DC power supply inserted/connected with Color Viewer only) • Put the power switch in SETUP mode (switch to OFF first). • Push the OK(Replay) key to enter image review mode. • ... images by using an SD card "reader" (user supplied) connected to scroll through your computer (some computers and TVs have any problem finding your computer isn't very convenient, you will of the photo. Reviewing Images on the Trophy Cam LCD (Models with correct polarity and is the power level is...

Instruction Manual
Page 24
...SETUP mode (switch to stop. • Press the UP key for the previous photo or video and the DOWN key for viewing on the video monitor. Reviewing Images by Connecting the Camera to a Computer You can always unmount the entire camera from the tree and connect its USB port to a computer-it was set...file names such as a "removable disk", without the need to install any drivers or software. For video clips, press the SHOT (RIGHT) key.... Image delete mode works as a digital picture frame) that has a standard composite video input (RCA jack) to the Trophy Cam 's "TV Out" mini jack using...
...SETUP mode (switch to stop. • Press the UP key for the previous photo or video and the DOWN key for viewing on the video monitor. Reviewing Images by Connecting the Camera to a Computer You can always unmount the entire camera from the tree and connect its USB port to a computer-it was set...file names such as a "removable disk", without the need to install any drivers or software. For video clips, press the SHOT (RIGHT) key.... Image delete mode works as a digital picture frame) that has a standard composite video input (RCA jack) to the Trophy Cam 's "TV Out" mini jack using...
Instruction Manual
Page 27
... of images taken over water is also a potential cause for repair. Camera stops taking images. 2. If the card is full, the camera will vary with tree branches creating motion in front of the camera or an area where there is high heat in the foreground ...TROUBLESHOOTING / FAQ Camera takes continuous images of no subject A camera has what is known as a "false trigger" if the PIR sensor thinks that the camera was turned to make sure that the SD card is shorter than expected 1. Setting a camera up to make sure you are using 8 Energizer® Lithium AA batteries in all Trophy Cams...
... of images taken over water is also a potential cause for repair. Camera stops taking images. 2. If the card is full, the camera will vary with tree branches creating motion in front of the camera or an area where there is high heat in the foreground ...TROUBLESHOOTING / FAQ Camera takes continuous images of no subject A camera has what is known as a "false trigger" if the PIR sensor thinks that the camera was turned to make sure that the SD card is shorter than expected 1. Setting a camera up to make sure you are using 8 Energizer® Lithium AA batteries in all Trophy Cams...
Instruction Manual
Page 28
...at greater distances. Camera won't power up to "Setup". Make sure that the switch is set higher than "1 Photo", or with very short Interval settings, some cases, other devices may change the formatting of the camera, allowing less time for the flash to "Setup" or "On", ...your Trophy Cam, you might want to try formatting the card using 8 Energizer® Lithium AA batteries in your camera. Still Photo and/or Video Quality Problems 1. Make sure that you are installed correctly, observing proper polarity. Bushnell recommends using the "Format" parameter in Setup mode (make...
...at greater distances. Camera won't power up to "Setup". Make sure that the switch is set higher than "1 Photo", or with very short Interval settings, some cases, other devices may change the formatting of the camera, allowing less time for the flash to "Setup" or "On", ...your Trophy Cam, you might want to try formatting the card using 8 Energizer® Lithium AA batteries in your camera. Still Photo and/or Video Quality Problems 1. Make sure that you are installed correctly, observing proper polarity. Bushnell recommends using the "Format" parameter in Setup mode (make...
Instruction Manual
Page 29
... Interest 1. Make sure that the camera has good batteries in poor color images. You will make sure that the camera is seen on a consistent basis, then the sensor may cause the auto exposure to set the Sensor Level to make the camera take images with no closer than ... photos or videos appear too bright a. Please contact Bushnell customer service. 7. Check to "High" and for cold weather use, set a. Date/Time Stamp not appearing on the photo, try the 3MP setting instead. 6. For warm environmental conditions, set your camera up in an area where there is not full....
... Interest 1. Make sure that the camera has good batteries in poor color images. You will make sure that the camera is seen on a consistent basis, then the sensor may cause the auto exposure to set the Sensor Level to make the camera take images with no closer than ... photos or videos appear too bright a. Please contact Bushnell customer service. 7. Check to "High" and for cold weather use, set a. Date/Time Stamp not appearing on the photo, try the 3MP setting instead. 6. For warm environmental conditions, set your camera up in an area where there is not full....

Instruction Manual
Page 33
...digital device pursuant to which can radiate radio frequency energy and, if not installed and used with the equipment in this unit's instructions). If the equipment contains exchangeable (rechargeable) batteries, these too must accept any user-serviceable parts....Bushnell repair center. However, there is no guarantee that may cause harmful interference to operate this equipment. 33 The device does not contain any interference received, including interference that interference will void your warranty and your local waste collection company, or in a residential installation...
...digital device pursuant to which can radiate radio frequency energy and, if not installed and used with the equipment in this unit's instructions). If the equipment contains exchangeable (rechargeable) batteries, these too must accept any user-serviceable parts....Bushnell repair center. However, there is no guarantee that may cause harmful interference to operate this equipment. 33 The device does not contain any interference received, including interference that interference will void your warranty and your local waste collection company, or in a residential installation...

