Users Manual - English
Page 11
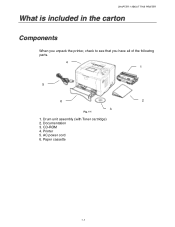
Printer 5. CD-ROM 4. Paper cassette 1-1 Drum unit assembly (with Toner cartridge) 2. AC power cord 6. Documentation 3. CHAPTER 1 ABOUT THIS PRINTER What is included in the carton Components When you unpack the printer, check to see that you have all of the following parts. 4 1 5 6 2 3 Fig. 1-1 1.
Printer 5. CD-ROM 4. Paper cassette 1-1 Drum unit assembly (with Toner cartridge) 2. AC power cord 6. Documentation 3. CHAPTER 1 ABOUT THIS PRINTER What is included in the carton Components When you unpack the printer, check to see that you have all of the following parts. 4 1 5 6 2 3 Fig. 1-1 1.

Users Manual - English
Page 58
...settings and TrueType mode options manually. ♦ Duplex This printer has a Duplex printing function as follows: 300 dpi 600 dpi HQ1200: Brother HQ1200 technology provides the best print quality while printing at full engine speed. • Toner Save You can change the resolution as standard. CHAPTER 2... DEIVER AND SOFTWARE ♦ Print Quality Select the Resolution, Toner save and Print settings. • You can save running costs by turning on the Toner Save mode, which reduces the printer density. • With the Print setting set to MANUAL, you select the...
...settings and TrueType mode options manually. ♦ Duplex This printer has a Duplex printing function as follows: 300 dpi 600 dpi HQ1200: Brother HQ1200 technology provides the best print quality while printing at full engine speed. • Toner Save You can change the resolution as standard. CHAPTER 2... DEIVER AND SOFTWARE ♦ Print Quality Select the Resolution, Toner save and Print settings. • You can save running costs by turning on the Toner Save mode, which reduces the printer density. • With the Print setting set to MANUAL, you select the...
Users Manual - English
Page 102
... / TRAY2 =OFF/ON Feed paper from the MP tray first. =OFF/ON =OFF/ON(LONG BIND)/ON(SHORT BIND) ™ QUALITY Setting Menu RESOLUTION HRC TONER SAVE DENSITY Description =300/600/HQ1200 You can choose a print resolution of 300, 600 or HQ1200. =OFF/LIGHT/MEDIUM/DARK HRC: High Resolution Control offers... improved print quality of characters and graphics that conventional laser printers cannot attain with a resolution of 300 or 600 dpi. =OFF/ON =-6:0:6 Increase or decrease the print density. 3-22
... / TRAY2 =OFF/ON Feed paper from the MP tray first. =OFF/ON =OFF/ON(LONG BIND)/ON(SHORT BIND) ™ QUALITY Setting Menu RESOLUTION HRC TONER SAVE DENSITY Description =300/600/HQ1200 You can choose a print resolution of 300, 600 or HQ1200. =OFF/LIGHT/MEDIUM/DARK HRC: High Resolution Control offers... improved print quality of characters and graphics that conventional laser printers cannot attain with a resolution of 300 or 600 dpi. =OFF/ON =-6:0:6 Increase or decrease the print density. 3-22
Users Manual - English
Page 143
...Toner cartridge A new toner cartridge contains enough toner to print approximately 6,500 A4/Letter-size single-sided pages at about 5% coverage (if the print density is set at level 0). ✒ Note • Toner... consumption varies according to the image coverage on the page and the print density setting. • The greater the image coverage, the greater the toner consumption. &#...8226; If you change the print density setting for lighter or darker printing, toner consumption varies accordingly. • Wait to unpack the toner cartridge ...
...Toner cartridge A new toner cartridge contains enough toner to print approximately 6,500 A4/Letter-size single-sided pages at about 5% coverage (if the print density is set at level 0). ✒ Note • Toner... consumption varies according to the image coverage on the page and the print density setting. • The greater the image coverage, the greater the toner consumption. &#...8226; If you change the print density setting for lighter or darker printing, toner consumption varies accordingly. • Wait to unpack the toner cartridge ...
Users Manual - English
Page 145
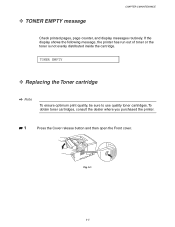
TONER EMPTY ™ Replacing the Toner cartridge ✒ Note To ensure optimum print quality, be sure to use quality toner cartridges. Fig. 5-1 5-5 To obtain toner cartridges, consult the dealer where you purchased the printer. ☛1 Press the Cover release button and then open the Front cover. If the display shows the following message, the printer has run out of toner or the toner is not evenly distributed inside the cartridge. ™ TONER EMPTY message CHAPTER 5 MAINTENANCE Check printed pages, page counter, and display messages routinely.
TONER EMPTY ™ Replacing the Toner cartridge ✒ Note To ensure optimum print quality, be sure to use quality toner cartridges. Fig. 5-1 5-5 To obtain toner cartridges, consult the dealer where you purchased the printer. ☛1 Press the Cover release button and then open the Front cover. If the display shows the following message, the printer has run out of toner or the toner is not evenly distributed inside the cartridge. ™ TONER EMPTY message CHAPTER 5 MAINTENANCE Check printed pages, page counter, and display messages routinely.

Users Manual - English
Page 146
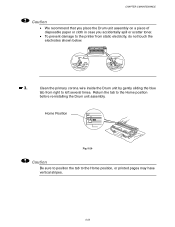
☛ 2. Caution • We recommend that you place the Drum unit assembly on a piece of disposable paper or cloth in case you accidentally spill or scatter toner. • To prevent damage to the printer from static electricity, do not touch the electrodes shown below. 5-6 Pull out the Drum unit assembly. Fig. 5-2 !
☛ 2. Caution • We recommend that you place the Drum unit assembly on a piece of disposable paper or cloth in case you accidentally spill or scatter toner. • To prevent damage to the printer from static electricity, do not touch the electrodes shown below. 5-6 Pull out the Drum unit assembly. Fig. 5-2 !
Users Manual - English
Page 148
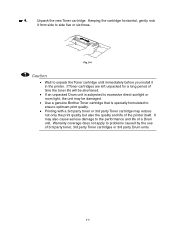
... • Printing with a 3rd party toner or 3rd party Toner cartridge may be damaged. • Use a genuine Brother Toner cartridge that is specially formulated to side five or six times. Keeping the cartridge horizontal, gently rock it in the printer. If Toner cartridges are left unpacked for a long ...period of time the toner life will be shortened. • If...
... • Printing with a 3rd party toner or 3rd party Toner cartridge may be damaged. • Use a genuine Brother Toner cartridge that is specially formulated to side five or six times. Keeping the cartridge horizontal, gently rock it in the printer. If Toner cartridges are left unpacked for a long ...period of time the toner life will be shortened. • If...

Users Manual - English
Page 151
... the primary corona wire inside the Drum unit by gently sliding the blue tab from right to the Home position (L) before you replace the Toner cartridge. Fig. 5-8 ✒ Note We recommend that you return the tab to the home position (L) before you re-install the Drum unit... assembly. ☛ 7. otherwise, printed pages may have vertical stripes. ☛ 8. See "Cleaning" in the printer; Return the tab to left several times. Re-install the Drum unit assembly into the printer. Close the Front cover. Home Position Fig. 5-7 ! Caution Make sure that you clean the...
... the primary corona wire inside the Drum unit by gently sliding the blue tab from right to the Home position (L) before you replace the Toner cartridge. Fig. 5-8 ✒ Note We recommend that you return the tab to the home position (L) before you re-install the Drum unit... assembly. ☛ 7. otherwise, printed pages may have vertical stripes. ☛ 8. See "Cleaning" in the printer; Return the tab to left several times. Re-install the Drum unit assembly into the printer. Close the Front cover. Home Position Fig. 5-7 ! Caution Make sure that you clean the...

Users Manual - English
Page 152
..., the average drum life is a noticeable deterioration in a clean, dust-free environment with adequate ventilation. 5-12 For best performance, use only genuine Brother toner. If the display shows the above message, it means the Drum unit is near the end of print job and paper. ✒ Note There ... of pages per print job, etc. ™ CHANGE DRUM SOON message CHANGE DRUM SOON The printer uses a Drum unit to create the print images on the average type of its life. The printer should be significantly less than this estimate. The actual number of printed pages may be used ,...
..., the average drum life is a noticeable deterioration in a clean, dust-free environment with adequate ventilation. 5-12 For best performance, use only genuine Brother toner. If the display shows the above message, it means the Drum unit is near the end of print job and paper. ✒ Note There ... of pages per print job, etc. ™ CHANGE DRUM SOON message CHANGE DRUM SOON The printer uses a Drum unit to create the print images on the average type of its life. The printer should be significantly less than this estimate. The actual number of printed pages may be used ,...

Users Manual - English
Page 153
Caution • We recommend that you place the Drum unit assembly on a piece of disposable paper or cloth in case you accidentally spill or scatter toner. • To prevent damage to the printer from static electricity, do not touch the electrodes shown below. 5-13 Pull out the Drum unit assembly. and then open the Front cover. Press the Cover release button; Fig. 5-10 ! Fig. 5-9 ☛ 2. CHAPTER 5 MAINTENANCE ☛ 1.
Caution • We recommend that you place the Drum unit assembly on a piece of disposable paper or cloth in case you accidentally spill or scatter toner. • To prevent damage to the printer from static electricity, do not touch the electrodes shown below. 5-13 Pull out the Drum unit assembly. and then open the Front cover. Press the Cover release button; Fig. 5-10 ! Fig. 5-9 ☛ 2. CHAPTER 5 MAINTENANCE ☛ 1.

Users Manual - English
Page 154
... ! Be sure to seal up the Drum unit tightly so that toner powder does not spill out of the Drum unit assembly. If toner scatters on your hands or clothes, immediately wipe or wash it in the printer. If an unpacked Drum unit is subjected to local regulations. Unpack the... new Drum unit. ! Caution Handle the toner cartridge carefully. Caution Wait to unpack a Drum unit until immediately before you install it off ...
... ! Be sure to seal up the Drum unit tightly so that toner powder does not spill out of the Drum unit assembly. If toner scatters on your hands or clothes, immediately wipe or wash it in the printer. If an unpacked Drum unit is subjected to local regulations. Unpack the... new Drum unit. ! Caution Handle the toner cartridge carefully. Caution Wait to unpack a Drum unit until immediately before you install it off ...
Users Manual - English
Page 155
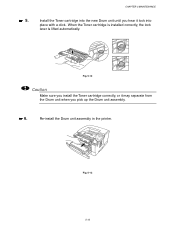
Install the Toner cartridge into place with a click. Caution Make sure you install the Toner cartridge correctly, or it may separate from the Drum unit when you hear it lock into the new Drum unit until you pick up the Drum unit assembly. ☛ 6. When the Toner cartridge is installed correctly, the lock lever is lifted automatically. Fig. 5-13 5-15 Re-install the Drum unit assembly in the printer. Fig. 5-12 ! CHAPTER 5 MAINTENANCE ☛ 5.
Install the Toner cartridge into place with a click. Caution Make sure you install the Toner cartridge correctly, or it may separate from the Drum unit when you hear it lock into the new Drum unit until you pick up the Drum unit assembly. ☛ 6. When the Toner cartridge is installed correctly, the lock lever is lifted automatically. Fig. 5-13 5-15 Re-install the Drum unit assembly in the printer. Fig. 5-12 ! CHAPTER 5 MAINTENANCE ☛ 5.

Users Manual - English
Page 156
See "How to the instructions supplied with the new Drum unit. ✒ Note Do not reset the page counter when you replace the Drum unit. Reset the page counter referring to clean the printer" in this chapter. 5-16 ☛ 7. Close the Front cover. ✒ Note We recommend that you clean the printer when you replace only the Toner cartridge. ☛ 8.
See "How to the instructions supplied with the new Drum unit. ✒ Note Do not reset the page counter when you replace the Drum unit. Reset the page counter referring to clean the printer" in this chapter. 5-16 ☛ 7. Close the Front cover. ✒ Note We recommend that you clean the printer when you replace only the Toner cartridge. ☛ 8.
Users Manual - English
Page 157
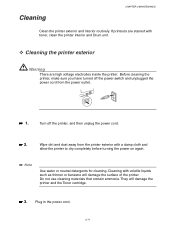
... cleaning. Plug in the power cord. 5-17 Turn off the power switch and unplugged the power cord from the printer exterior with volatile liquids such as thinner or benzene will damage the printer and the Toner cartridge. ☛ 3. Do not use cleaning materials that contain ammonia. They will damage the surface of the...
... cleaning. Plug in the power cord. 5-17 Turn off the power switch and unplugged the power cord from the printer exterior with volatile liquids such as thinner or benzene will damage the printer and the Toner cartridge. ☛ 3. Do not use cleaning materials that contain ammonia. They will damage the surface of the...

Users Manual - English
Page 159
Caution Handle the Drum unit carefully since it off with cold water. ✒ Note We recommend that you place the Drum unit on a piece of the printer. If toner scatters and your hands or cloths get dirty, immediately wipe or wash it contains toner. CHAPTER 5 MAINTENANCE Fig. 5-15 ! ☛ 3. Pull the Drum unit assembly out of disposable paper or cloth in case you accidentally spill or scatter toner. 5-19
Caution Handle the Drum unit carefully since it off with cold water. ✒ Note We recommend that you place the Drum unit on a piece of the printer. If toner scatters and your hands or cloths get dirty, immediately wipe or wash it contains toner. CHAPTER 5 MAINTENANCE Fig. 5-15 ! ☛ 3. Pull the Drum unit assembly out of disposable paper or cloth in case you accidentally spill or scatter toner. 5-19
Users Manual - English
Page 163
... assembly on a piece of disposable paper or cloth in case you accidentally spill or scatter toner. • To prevent damage to the Home position before re-installing the Drum unit assembly. Return the tab to the printer from right to the Home position, or printed pages may have vertical stripes. 5-23 Clean...
... assembly on a piece of disposable paper or cloth in case you accidentally spill or scatter toner. • To prevent damage to the Home position before re-installing the Drum unit assembly. Return the tab to the printer from right to the Home position, or printed pages may have vertical stripes. 5-23 Clean...
Users Manual - English
Page 167
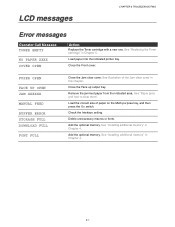
...OPEN AAccttiioonn Replace the Toner cartridge with a new one. FUSER OPEN FACE UP OPEN JAM XXXXXX MANUAL FEED BUFFER ERROR STORAGE FULL DOWNLOAD FULL FONT FULL Close the Jam clear cover. See "Installing additional memory" in this chapter. Load paper into the indicated printer tray. See illustration ...of paper on the Multi-purpose tray, and then press the Go switch. Load the correct size of the Jam clear cover in Chapter 4. See "Replacing the Toner cartridge" in Chapter 4. 6-1 See "Paper jams ...
...OPEN AAccttiioonn Replace the Toner cartridge with a new one. FUSER OPEN FACE UP OPEN JAM XXXXXX MANUAL FEED BUFFER ERROR STORAGE FULL DOWNLOAD FULL FONT FULL Close the Jam clear cover. See "Installing additional memory" in this chapter. Load paper into the indicated printer tray. See illustration ...of paper on the Multi-purpose tray, and then press the Go switch. Load the correct size of the Jam clear cover in Chapter 4. See "Replacing the Toner cartridge" in Chapter 4. 6-1 See "Paper jams ...

Users Manual - English
Page 179
Remove the paper carefully. ! Install the Drum unit assembly and Paper cassette into the printer. Immediately wash toner stains with toner. CHAPTER 6 TROUBLESHOOTING Warning The fixing roller is extremely hot during operation. Close the Front cover. Caution • After having removed the jammed ... printed page has a stain, print several pages before restarting your print job. • Remove the jammed paper carefully so you don't spread toner. • Take care not to stain your hands and clothes with cold water. • Never touch the transfer roller. ☛ 4. Fig. 6-9 6-13...
Remove the paper carefully. ! Install the Drum unit assembly and Paper cassette into the printer. Immediately wash toner stains with toner. CHAPTER 6 TROUBLESHOOTING Warning The fixing roller is extremely hot during operation. Close the Front cover. Caution • After having removed the jammed ... printed page has a stain, print several pages before restarting your print job. • Remove the jammed paper carefully so you don't spread toner. • Take care not to stain your hands and clothes with cold water. • Never touch the transfer roller. ☛ 4. Fig. 6-9 6-13...

Users Manual - English
Page 181
Pull the jammed paper out of disposable paper or cloth so you don't accidentally spill or scatter toner. • To prevent damage to Step 7. Open the Face up output tray. Fig. 6-12 If the paper jam can be cleared, go to the printer caused by static electricity, do not touch the electrodes shown below. ☛ 3. CHAPTER 6 TROUBLESHOOTING ! Fig. 6-13 6-15 Caution • We recommend that you put the Drum unit assembly on a piece of the printer. ☛ 4.
Pull the jammed paper out of disposable paper or cloth so you don't accidentally spill or scatter toner. • To prevent damage to Step 7. Open the Face up output tray. Fig. 6-12 If the paper jam can be cleared, go to the printer caused by static electricity, do not touch the electrodes shown below. ☛ 3. CHAPTER 6 TROUBLESHOOTING ! Fig. 6-13 6-15 Caution • We recommend that you put the Drum unit assembly on a piece of the printer. ☛ 4.
Users Manual - English
Page 191
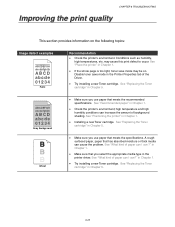
...use paper that meets the recommended specifications. See "Place the printer" in Chapter 1. • If the whole page is too light, toner save mode in the Printer Properties tab of background shading. See "Replacing the Toner cartridge" in Chapter 1. • Make sure that has ...increase the amount of the Driver. • Try installing a new Toner cartridge. in Chapter 5. • Make sure you use ?" See "Replacing the Toner cartridge" in Chapter 1. • Check the printer's environment; Disable toner save mode may cause this print defect to occur. See "What kind...
...use paper that meets the recommended specifications. See "Place the printer" in Chapter 1. • If the whole page is too light, toner save mode in the Printer Properties tab of background shading. See "Replacing the Toner cartridge" in Chapter 1. • Make sure that has ...increase the amount of the Driver. • Try installing a new Toner cartridge. in Chapter 5. • Make sure you use ?" See "Replacing the Toner cartridge" in Chapter 1. • Check the printer's environment; Disable toner save mode may cause this print defect to occur. See "What kind...


