Users Manual - English
Page 11
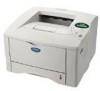
CD-ROM 4. CHAPTER 1 ABOUT THIS PRINTER What is included in the carton Components When you unpack the printer, check to see that you have all of the following parts. 4 1 5 6 2 3 Fig. 1-1 1. Printer 5. Drum unit assembly (with Toner cartridge) 2. AC power cord 6. Paper cassette 1-1 Documentation 3.
CD-ROM 4. CHAPTER 1 ABOUT THIS PRINTER What is included in the carton Components When you unpack the printer, check to see that you have all of the following parts. 4 1 5 6 2 3 Fig. 1-1 1. Printer 5. Drum unit assembly (with Toner cartridge) 2. AC power cord 6. Paper cassette 1-1 Documentation 3.
Users Manual - English
Page 101
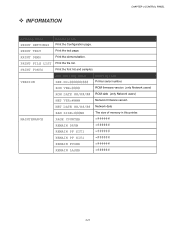
...TEST Print the test page. PRINT FILE LIST Print the file list. MAINTENANCE PAGE COUNTER =###### REMAIN DRUM =###### REMAIN PF KIT1 =###### REMAIN PF KIT2 =###### REMAIN FUSER =###### REMAIN LASER =###### 3-21 ROM VER=#### ROM firmware version (only Network users) ROM DATE ##/##/## ROM date (...NET DATE ##/##/## Network date RAM SIZE=###MB The size of memory in this printer. RRINT DEMO Print the demonstration. VERSION Sub-Setting Menu SER.NO=######### Description Printer serial number. ™ INFORMATION CHAPTER 3 CONTROL PANEL Setting Menu PRINT SETTINGS Description...
...TEST Print the test page. PRINT FILE LIST Print the file list. MAINTENANCE PAGE COUNTER =###### REMAIN DRUM =###### REMAIN PF KIT1 =###### REMAIN PF KIT2 =###### REMAIN FUSER =###### REMAIN LASER =###### 3-21 ROM VER=#### ROM firmware version (only Network users) ROM DATE ##/##/## ROM date (...NET DATE ##/##/## Network date RAM SIZE=###MB The size of memory in this printer. RRINT DEMO Print the demonstration. VERSION Sub-Setting Menu SER.NO=######### Description Printer serial number. ™ INFORMATION CHAPTER 3 CONTROL PANEL Setting Menu PRINT SETTINGS Description...

Users Manual - English
Page 141
CHAPTER 5 MAINTENANCE Replacing the consumables You need to replace consumables, the following messages will appear on the LCD panel. (appears at intervals) TONER LOW See the TONER LOW message explanation in this chapter. TONER EMPTY See the TONER EMPTY message explanation in this chapter. CHANGE DRUM SOON See the CHANGE DRUM SOON message explanation in this chapter. • Accessories Toner cartridge Drum unit See Replacing the Toner cartridge in this chapter See Replacing the Drum unit in this chapter 5-1 When the time comes to replace the consumables periodically.
CHAPTER 5 MAINTENANCE Replacing the consumables You need to replace consumables, the following messages will appear on the LCD panel. (appears at intervals) TONER LOW See the TONER LOW message explanation in this chapter. TONER EMPTY See the TONER EMPTY message explanation in this chapter. CHANGE DRUM SOON See the CHANGE DRUM SOON message explanation in this chapter. • Accessories Toner cartridge Drum unit See Replacing the Toner cartridge in this chapter See Replacing the Drum unit in this chapter 5-1 When the time comes to replace the consumables periodically.

Users Manual - English
Page 146
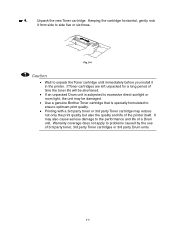
Pull out the Drum unit assembly. Caution • We recommend that you place the Drum unit assembly on a piece of disposable paper or cloth in case you accidentally spill or scatter toner. • To prevent damage to the printer from static electricity, do not touch the electrodes shown below. 5-6 Fig. 5-2 ! ☛ 2.
Pull out the Drum unit assembly. Caution • We recommend that you place the Drum unit assembly on a piece of disposable paper or cloth in case you accidentally spill or scatter toner. • To prevent damage to the printer from static electricity, do not touch the electrodes shown below. 5-6 Fig. 5-2 ! ☛ 2.

Users Manual - English
Page 147
Caution • Handle the toner cartridge carefully. Press the Lock lever down, and then pull the Toner cartridge out of the used toner cartridge in accordance with local plastic waste regulations. 5-7 Fig. 5-3 ! If toner scatters on your hands or clothes, immediately wipe or wash it off with cold water. ✒ Note • Be sure to seal the toner cartridge tightly so that toner powder does not spill out of the cartridge. • Dispose of the Drum unit assembly. CHAPTER 5 MAINTENANCE ☛ 3.
Caution • Handle the toner cartridge carefully. Press the Lock lever down, and then pull the Toner cartridge out of the used toner cartridge in accordance with local plastic waste regulations. 5-7 Fig. 5-3 ! If toner scatters on your hands or clothes, immediately wipe or wash it off with cold water. ✒ Note • Be sure to seal the toner cartridge tightly so that toner powder does not spill out of the cartridge. • Dispose of the Drum unit assembly. CHAPTER 5 MAINTENANCE ☛ 3.
Users Manual - English
Page 148
...rock it in the printer. If Toner cartridges are left unpacked for a long period of time the toner life will be shortened. • If an unpacked Drum unit is subjected to excessive direct sunlight or room light, the unit may be damaged. • Use a genuine Brother Toner cartridge that is... specially formulated to ensure optimum print quality. • Printing with a 3rd party toner or 3rd party Toner cartridge may also cause serious damage to problems caused by the use of the printer itself. Unpack the new Toner cartridge. ...
...rock it in the printer. If Toner cartridges are left unpacked for a long period of time the toner life will be shortened. • If an unpacked Drum unit is subjected to excessive direct sunlight or room light, the unit may be damaged. • Use a genuine Brother Toner cartridge that is... specially formulated to ensure optimum print quality. • Printing with a 3rd party toner or 3rd party Toner cartridge may also cause serious damage to problems caused by the use of the printer itself. Unpack the new Toner cartridge. ...

Users Manual - English
Page 150
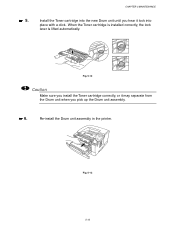
Caution Make sure you install the Toner cartridge correctly or it may separate from the Drum unit when you hear it lock into the Drum unit until you pick up the Drum unit assembly. 5-10 When the Toner cartridge is installed correctly, the Lock lever is lifted automatically. Fig. 5-6 ! ☛ 6. Install the new Toner cartridge into place.
Caution Make sure you install the Toner cartridge correctly or it may separate from the Drum unit when you hear it lock into the Drum unit until you pick up the Drum unit assembly. 5-10 When the Toner cartridge is installed correctly, the Lock lever is lifted automatically. Fig. 5-6 ! ☛ 6. Install the new Toner cartridge into place.

Users Manual - English
Page 151
... that you reinstall the Drum unit assembly in this chapter. 5-11 Home Position Fig. 5-7 ! Caution Make sure that you clean the printer when you re-install the Drum unit assembly. Re-install the Drum unit assembly into the printer. See "Cleaning" in the printer; CHAPTER 5 MAINTENANCE Clean... the primary corona wire inside the Drum unit by gently sliding the blue tab from...
... that you reinstall the Drum unit assembly in this chapter. 5-11 Home Position Fig. 5-7 ! Caution Make sure that you clean the printer when you re-install the Drum unit assembly. Re-install the Drum unit assembly into the printer. See "Cleaning" in the printer; CHAPTER 5 MAINTENANCE Clean... the primary corona wire inside the Drum unit by gently sliding the blue tab from...

Users Manual - English
Page 152
... near the end of its life. For best performance, use only genuine Brother toner. If the display shows the above message, it means the Drum unit is estimated at approximately 20,000 pages. The printer should be significantly less than this estimate. The actual number of printed pages...a new one before there is a noticeable deterioration in a clean, dust-free environment with one Drum unit. *1 At 5% coverage print (A4-Letter size). ™ CHANGE DRUM SOON message CHANGE DRUM SOON The printer uses a Drum unit to create the print images on the average type of print job and paper. ✒...
... near the end of its life. For best performance, use only genuine Brother toner. If the display shows the above message, it means the Drum unit is estimated at approximately 20,000 pages. The printer should be significantly less than this estimate. The actual number of printed pages...a new one before there is a noticeable deterioration in a clean, dust-free environment with one Drum unit. *1 At 5% coverage print (A4-Letter size). ™ CHANGE DRUM SOON message CHANGE DRUM SOON The printer uses a Drum unit to create the print images on the average type of print job and paper. ✒...

Users Manual - English
Page 153
and then open the Front cover. Caution • We recommend that you place the Drum unit assembly on a piece of disposable paper or cloth in case you accidentally spill or scatter toner. • To prevent damage to the printer from static electricity, do not touch the electrodes shown below. 5-13 CHAPTER 5 MAINTENANCE ☛ 1. Pull out the Drum unit assembly. Fig. 5-10 ! Fig. 5-9 ☛ 2. Press the Cover release button;
and then open the Front cover. Caution • We recommend that you place the Drum unit assembly on a piece of disposable paper or cloth in case you accidentally spill or scatter toner. • To prevent damage to the printer from static electricity, do not touch the electrodes shown below. 5-13 CHAPTER 5 MAINTENANCE ☛ 1. Pull out the Drum unit assembly. Fig. 5-10 ! Fig. 5-9 ☛ 2. Press the Cover release button;

Users Manual - English
Page 154
...4. Caution Wait to excessive direct sunlight or room light, the unit may be damaged. 5-14 Handle the Toner cartridge carefully. If an unpacked Drum unit is subjected to unpack a Drum unit until immediately before you install it off with cold water immediately. ✒ Note Discard the used... not spill out of the Drum unit assembly. Be sure to local regulations. Unpack the new Drum unit. ! ☛ 3. Fig. 5-11 ! While pressing the Lock lever, pull the Toner cartridge out of the unit. If toner scatters on your hands or clothes, wipe or wash it in the printer.
...4. Caution Wait to excessive direct sunlight or room light, the unit may be damaged. 5-14 Handle the Toner cartridge carefully. If an unpacked Drum unit is subjected to unpack a Drum unit until immediately before you install it off with cold water immediately. ✒ Note Discard the used... not spill out of the Drum unit assembly. Be sure to local regulations. Unpack the new Drum unit. ! ☛ 3. Fig. 5-11 ! While pressing the Lock lever, pull the Toner cartridge out of the unit. If toner scatters on your hands or clothes, wipe or wash it in the printer.
Users Manual - English
Page 155
When the Toner cartridge is installed correctly, the lock lever is lifted automatically. Caution Make sure you install the Toner cartridge correctly, or it may separate from the Drum unit when you hear it lock into the new Drum unit until you pick up the Drum unit assembly. ☛ 6. Fig. 5-13 5-15 Re-install the Drum unit assembly in the printer. Fig. 5-12 ! Install the Toner cartridge into place with a click. CHAPTER 5 MAINTENANCE ☛ 5.
When the Toner cartridge is installed correctly, the lock lever is lifted automatically. Caution Make sure you install the Toner cartridge correctly, or it may separate from the Drum unit when you hear it lock into the new Drum unit until you pick up the Drum unit assembly. ☛ 6. Fig. 5-13 5-15 Re-install the Drum unit assembly in the printer. Fig. 5-12 ! Install the Toner cartridge into place with a click. CHAPTER 5 MAINTENANCE ☛ 5.

Users Manual - English
Page 156
Reset the page counter referring to clean the printer" in this chapter. 5-16 Close the Front cover. ✒ Note We recommend that you clean the printer when you replace only the Toner cartridge. ☛ 8. See "How to the instructions supplied with the new Drum unit. ✒ Note Do not reset the page counter when you replace the Drum unit. ☛ 7.
Reset the page counter referring to clean the printer" in this chapter. 5-16 Close the Front cover. ✒ Note We recommend that you clean the printer when you replace only the Toner cartridge. ☛ 8. See "How to the instructions supplied with the new Drum unit. ✒ Note Do not reset the page counter when you replace the Drum unit. ☛ 7.
Users Manual - English
Page 157
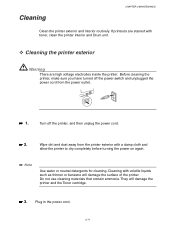
... before turning the power on again. ✒ Note Use water or neutral detergents for cleaning. Before cleaning the printer, make sure you have turned off the printer, and then unplug the power cord. ☛ 2. Plug in the power cord. 5-17 Cleaning with volatile ...5 MAINTENANCE Clean the printer exterior and interior routinely. Turn off the power switch and unplugged the power cord from the printer exterior with toner, clean the printer interior and Drum unit. ™ Cleaning the printer exterior Warning There are high voltage electrodes inside the printer. They will damage the...
... before turning the power on again. ✒ Note Use water or neutral detergents for cleaning. Before cleaning the printer, make sure you have turned off the printer, and then unplug the power cord. ☛ 2. Plug in the power cord. 5-17 Cleaning with volatile ...5 MAINTENANCE Clean the printer exterior and interior routinely. Turn off the power switch and unplugged the power cord from the printer exterior with toner, clean the printer interior and Drum unit. ™ Cleaning the printer exterior Warning There are high voltage electrodes inside the printer. They will damage the...

Users Manual - English
Page 159
Pull the Drum unit assembly out of disposable paper or cloth in case you place the Drum unit on a piece of the printer. Caution Handle the Drum unit carefully since it off with cold water. ✒ Note We recommend that you accidentally spill or scatter toner. 5-19 If toner scatters and your hands or cloths get dirty, immediately wipe or wash it contains toner. CHAPTER 5 MAINTENANCE Fig. 5-15 ! ☛ 3.
Pull the Drum unit assembly out of disposable paper or cloth in case you place the Drum unit on a piece of the printer. Caution Handle the Drum unit carefully since it off with cold water. ✒ Note We recommend that you accidentally spill or scatter toner. 5-19 If toner scatters and your hands or cloths get dirty, immediately wipe or wash it contains toner. CHAPTER 5 MAINTENANCE Fig. 5-15 ! ☛ 3.

Users Manual - English
Page 161
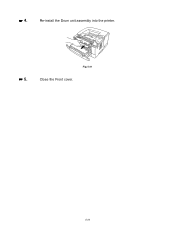
☛ 5. Plug in the power cord, and then turn on the power switch. 5-21 Close the Front cover. Fig. 5-17 ☛ 6. CHAPTER 5 MAINTENANCE Re-install the Drum unit assembly into the printer.
☛ 5. Plug in the power cord, and then turn on the power switch. 5-21 Close the Front cover. Fig. 5-17 ☛ 6. CHAPTER 5 MAINTENANCE Re-install the Drum unit assembly into the printer.
Users Manual - English
Page 162
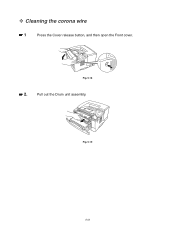
Fig. 5-19 5-22 Fig. 5-18 ☛ 2. Pull out the Drum unit assembly. ™ Cleaning the corona wire ☛1 Press the Cover release button, and then open the Front cover.
Fig. 5-19 5-22 Fig. 5-18 ☛ 2. Pull out the Drum unit assembly. ™ Cleaning the corona wire ☛1 Press the Cover release button, and then open the Front cover.
Users Manual - English
Page 163
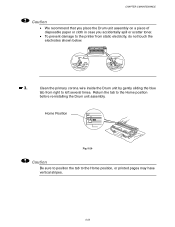
... vertical stripes. 5-23 Caution Be sure to position the tab to the Home position before re-installing the Drum unit assembly. Caution • We recommend that you place the Drum unit assembly on a piece of disposable paper or cloth in case you accidentally spill or scatter toner. &#...8226; To prevent damage to left several times. Home Position Fig. 5-20 ! Clean the primary corona wire inside the Drum unit by gently sliding the blue tab from right to the printer from static electricity, do not touch the electrodes shown below. ☛ 3. CHAPTER 5 MAINTENANCE !
... vertical stripes. 5-23 Caution Be sure to position the tab to the Home position before re-installing the Drum unit assembly. Caution • We recommend that you place the Drum unit assembly on a piece of disposable paper or cloth in case you accidentally spill or scatter toner. &#...8226; To prevent damage to left several times. Home Position Fig. 5-20 ! Clean the primary corona wire inside the Drum unit by gently sliding the blue tab from right to the printer from static electricity, do not touch the electrodes shown below. ☛ 3. CHAPTER 5 MAINTENANCE !
Users Manual - English
Page 164
Re-install the Drum unit assembly into the printer. ☛ 5. Fig. 5-21 Close the Front cover. 5-24 ☛ 4.
Re-install the Drum unit assembly into the printer. ☛ 5. Fig. 5-21 Close the Front cover. 5-24 ☛ 4.
Users Manual - English
Page 168
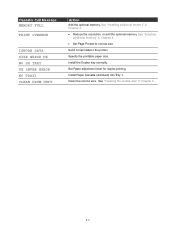
See "Installing additional memory" in Chapter 4. • Set Page Protect to the printer. Send correct data to correct size. Install Paper cassette (standard) into Tray 1. Clean the corona wire. See "Cleaning the corona wire" in Chapter 4. • Reduce ... the printable paper size. OOppeerraattoorr CCaallll MMeessssaaggee MEMORY FULL PRINT OVERRUN IGNORE DATA SIZE ERROR DX NO DX TRAY DX LEVER ERROR NO TRAY1 CLEAN DRUM UNIT AAccttiioonn Add the optional memory. Install the Duplex tray correctly.
See "Installing additional memory" in Chapter 4. • Set Page Protect to the printer. Send correct data to correct size. Install Paper cassette (standard) into Tray 1. Clean the corona wire. See "Cleaning the corona wire" in Chapter 4. • Reduce ... the printable paper size. OOppeerraattoorr CCaallll MMeessssaaggee MEMORY FULL PRINT OVERRUN IGNORE DATA SIZE ERROR DX NO DX TRAY DX LEVER ERROR NO TRAY1 CLEAN DRUM UNIT AAccttiioonn Add the optional memory. Install the Duplex tray correctly.

