

Software Users Manual - English
Page 2
... Types of Labels 12 Using the P-touch Editor Help 13 Creating Labels Efficiently 15 Creating Labels with Other Applications 26 How to Use the P-touch Address Book 33 Starting the P-touch Address Book 33 Creating a New Contact 35 Importing the Contact Data 36 Editing the Contact Data 37 Printing the Label ...38 How to Use P-touch Transfer Manager & P-touch Library 39 Starting up P-touch Transfer Manager 39 Transferring label templates from the PC to the printer 41 Backing up label templates 44 Changing printer settings...
... Types of Labels 12 Using the P-touch Editor Help 13 Creating Labels Efficiently 15 Creating Labels with Other Applications 26 How to Use the P-touch Address Book 33 Starting the P-touch Address Book 33 Creating a New Contact 35 Importing the Contact Data 36 Editing the Contact Data 37 Printing the Label ...38 How to Use P-touch Transfer Manager & P-touch Library 39 Starting up P-touch Transfer Manager 39 Transferring label templates from the PC to the printer 41 Backing up label templates 44 Changing printer settings...
Software Users Manual - English
Page 4
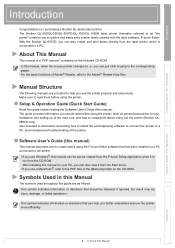
... use , installation and setting up of the printer. Manual Structure The following manuals are as general precautions for use the printer more efficiently. Setup & Operation Guide (Quick Start Guide) Read this manual) This manual describes how to create labels using the P-touch Editor software that should read them before using just the printer (Brother QL650TD only). After installing this manual can be can also create and print labels directly from the label printer which is a "PDF manual" contained on purchasing a Brother QL-series label printer. With the Brother QL...
... use , installation and setting up of the printer. Manual Structure The following manuals are as general precautions for use the printer more efficiently. Setup & Operation Guide (Quick Start Guide) Read this manual) This manual describes how to create labels using the P-touch Editor software that should read them before using just the printer (Brother QL650TD only). After installing this manual can be can also create and print labels directly from the label printer which is a "PDF manual" contained on purchasing a Brother QL-series label printer. With the Brother QL...
Software Users Manual - English
Page 6
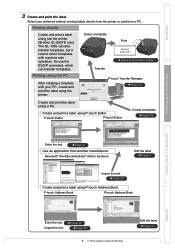
... method: printing labels directly from the printer, or print from another manufacturer. Create and print a label using a PC. P-touch Transfer Manager ÎPage 39 Create and print the label using P-touch Editor. Printing directly Create and print a label using just the printer. (Brother QL-650TD only) The QL-1050 can transfer templates. Microsoft® Word/Excel/Outlook® Add-In functions Edit the label ÎPage 7 Import the text ÎPage 26 Create and print a label using the printer. Select your PC, create and print the label using P-touch Address Book.
... method: printing labels directly from the printer, or print from another manufacturer. Create and print a label using a PC. P-touch Transfer Manager ÎPage 39 Create and print the label using P-touch Editor. Printing directly Create and print a label using just the printer. (Brother QL-650TD only) The QL-1050 can transfer templates. Microsoft® Word/Excel/Outlook® Add-In functions Edit the label ÎPage 7 Import the text ÎPage 26 Create and print a label using the printer. Select your PC, create and print the label using P-touch Address Book.

Software Users Manual - English
Page 9
... and type in the Text property box will be applied only to Î"Printing a Label" on next page. Select the address and apply the scaled-down font size ( ) setting. • When the Text property box is not shown in the Property dock, click to display the box. • The label format in the layout work area changes to Standard Address Label. • The tape length and width settings are...
... and type in the Text property box will be applied only to Î"Printing a Label" on next page. Select the address and apply the scaled-down font size ( ) setting. • When the Text property box is not shown in the Property dock, click to display the box. • The label format in the layout work area changes to Standard Address Label. • The tape length and width settings are...
Software Users Manual - English
Page 10
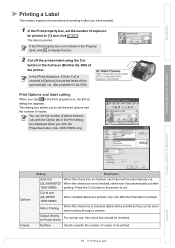
... printer to cut after the final label is printed. Cut at end (QL-650TD/ 1050/1050N) When multiple labels are printed, only cuts after 1050/1050N) printing. Output directly For normal use, this check box is checked, labels will be printed so they can set the number of labels between cuts with the Option tab in the Print dialog box displayed when you click the Properties button. (QL-1050/1050N only) Creating Labels (For Windows) Creating Labels (For Macintosh) Options Copies Setting Description Auto Cut When this check...
... printer to cut after the final label is printed. Cut at end (QL-650TD/ 1050/1050N) When multiple labels are printed, only cuts after 1050/1050N) printing. Output directly For normal use, this check box is checked, labels will be printed so they can set the number of labels between cuts with the Option tab in the Print dialog box displayed when you click the Properties button. (QL-1050/1050N only) Creating Labels (For Windows) Creating Labels (For Macintosh) Options Copies Setting Description Auto Cut When this check...
Software Users Manual - English
Page 12
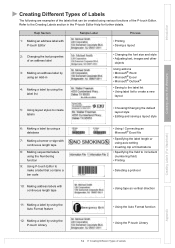
... P-touch Editor. Introduction Creating Labels (For Windows) Creating Different Types of Labels The following are examples of the labels that contains a bar code • Using / Connecting an Microsoft® Excel file • Specifying the label length or using auto setting • Inserting clip art illustrations • Specifying the field to increment (numbering field) • Printing • Selecting a protocol 10: Making address labels with continuous length tape • Using tape as vertical direction 11: Making a label by using the Auto Format feature 12: Making a label by...
... P-touch Editor. Introduction Creating Labels (For Windows) Creating Different Types of Labels The following are examples of the labels that contains a bar code • Using / Connecting an Microsoft® Excel file • Specifying the label length or using auto setting • Inserting clip art illustrations • Specifying the field to increment (numbering field) • Printing • Selecting a protocol 10: Making address labels with continuous length tape • Using tape as vertical direction 11: Making a label by using the Auto Format feature 12: Making a label by...
Software Users Manual - English
Page 18
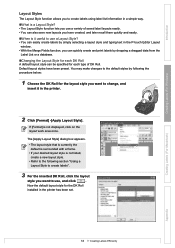
... data from the Label List or a database. „Changing the Layout Style for each DK Roll A default layout style can easily create labels by simply selecting a layout style and typing text in the printer has been set. Now the default layout style for the DK Roll installed in the P-touch Editor Layout window. • With the Merge Fields function, you can quickly create and print labels by following section "Using...
... data from the Label List or a database. „Changing the Layout Style for each DK Roll A default layout style can easily create labels by simply selecting a layout style and typing text in the printer has been set. Now the default layout style for the DK Roll installed in the P-touch Editor Layout window. • With the Merge Fields function, you can quickly create and print labels by following section "Using...
Software Users Manual - English
Page 26
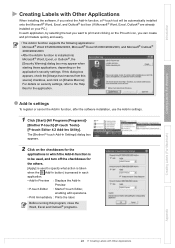
... Preview. • P-touch Editor : Starts P-touch Editor, enabling edit operations. • Print Immediately : Prints the label. For details on the checkboxes for the applications in each application, by selecting the text you want to print and clicking on the P-touch icon, you select the Add-In function, a P-touch tool will be used, and turn off the checkboxes for the others. [Apply] is used to the Help files for the...
... Preview. • P-touch Editor : Starts P-touch Editor, enabling edit operations. • Print Immediately : Prints the label. For details on the checkboxes for the applications in each application, by selecting the text you want to print and clicking on the P-touch icon, you select the Add-In function, a P-touch tool will be used, and turn off the checkboxes for the others. [Apply] is used to the Help files for the...
Software Users Manual - English
Page 28
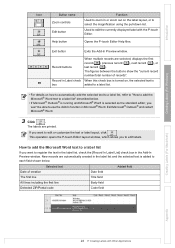
... Creating Labels (For Windows) Icon Button name Function Zoom controls Used to zoom in or zoom out on how to automatically add the selected text to a label list, refer to "How to add the Microsoft® Word text to a label list" described below : Date of records". Help button Opens the P-touch Editor Help files. The labels are selected, displays the first record ( ), previous record ( ), next record ( ), or last record ( ). This operation...
... Creating Labels (For Windows) Icon Button name Function Zoom controls Used to zoom in or zoom out on how to automatically add the selected text to a label list, refer to "How to add the Microsoft® Word text to a label list" described below : Date of records". Help button Opens the P-touch Editor Help files. The labels are selected, displays the first record ( ), previous record ( ), next record ( ), or last record ( ). This operation...
Software Users Manual - English
Page 38
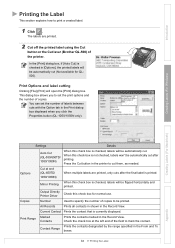
... how to set the number of labels between cuts with the Option tab in [Options], the printed labels will be automatically cut (Not available for normal use. Printer Driver Copies Number Used to specify the number of the field to cut them, as needed. Check the check box at end (QL-650TD/ 1050/1050N) When multiple labels are printed. 2 Cut off the printed label using the Cut button or the Cut lever (Brother QL-500) of copies. Options Cut at the left end of...
... how to set the number of labels between cuts with the Option tab in [Options], the printed labels will be automatically cut (Not available for normal use. Printer Driver Copies Number Used to specify the number of the field to cut them, as needed. Check the check box at end (QL-650TD/ 1050/1050N) When multiple labels are printed. 2 Cut off the printed label using the Cut button or the Cut lever (Brother QL-500) of copies. Options Cut at the left end of...

Software Users Manual - English
Page 39
... operation. So use the ESC/P command, which can print a label from the P-touch Library using the printer. Click on the PC. Introduction Creating Labels (For Windows) How to Use P-touch Transfer Manager & P-touch Library The P-touch Transfer Manager is basically for frequently used commands. Starting up . When you select a printer, only the data that can be sent to the selected printer is displayed in the list view are icons for the QL-650TD.The QL-1050...
... operation. So use the ESC/P command, which can print a label from the P-touch Library using the printer. Click on the PC. Introduction Creating Labels (For Windows) How to Use P-touch Transfer Manager & P-touch Library The P-touch Transfer Manager is basically for frequently used commands. Starting up . When you select a printer, only the data that can be sent to the selected printer is displayed in the list view are icons for the QL-650TD.The QL-1050...
Software Users Manual - English
Page 41
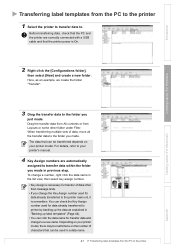
... data to a new name. Before transferring data, check that the PC and the printer are automatically assigned to the printer main unit, it is On. 2 Right click the [Configurations folder], then select [New] and create a new folder. Creating Labels (For Windows) Creating Labels (For Macintosh) 3 Drag the transfer data to the folder you change to the folder you made . For details, refer to . When transferring multiple sets of characters that the printer power...
... data to a new name. Before transferring data, check that the PC and the printer are automatically assigned to the printer main unit, it is On. 2 Right click the [Configurations folder], then select [New] and create a new folder. Creating Labels (For Windows) Creating Labels (For Macintosh) 3 Drag the transfer data to the folder you change to the folder you made . For details, refer to . When transferring multiple sets of characters that the printer power...
Quick Setup Guide - English
Page 1
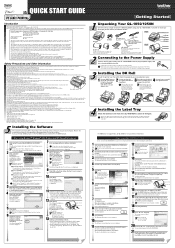
... use a soft, dry cloth. •Remove all installed. 2 Custom Installation P-touch Editor 4.2, P-touch Address Book 1.0, Printer Driver, and Software User's Guide can be installed individually. 3 Display User's Guide The Software User's Guide PDF manual can start . When continuing the installation, click [Agree]. Your Mac® will be a problem with the CD/DVD label rolls. Operation is now complete. Only use or storage. •Do not remove the power cord from the electrical outlet and wipe away the adhesive buildup on the paper guide...
... use a soft, dry cloth. •Remove all installed. 2 Custom Installation P-touch Editor 4.2, P-touch Address Book 1.0, Printer Driver, and Software User's Guide can be installed individually. 3 Display User's Guide The Software User's Guide PDF manual can start . When continuing the installation, click [Agree]. Your Mac® will be a problem with the CD/DVD label rolls. Operation is now complete. Only use or storage. •Do not remove the power cord from the electrical outlet and wipe away the adhesive buildup on the paper guide...

Quick Setup Guide - English
Page 2
... Print Property box. This label cannot be a blank space before the address. Use the and buttons to the banner. 3 Enter the text. 4 Print the label. 5 Completed label Insert the "DK Continuous Paper Tape 2-3/7" into the QL-1050/1050N. Click when finished. Separate DK Roll purchase may be created using P-touch Editor Learn the basic workflow of the dock to the desired position. Enter text directly using the Layout Style Function. Click , select the desired code...
... Print Property box. This label cannot be a blank space before the address. Use the and buttons to the banner. 3 Enter the text. 4 Print the label. 5 Completed label Insert the "DK Continuous Paper Tape 2-3/7" into the QL-1050/1050N. Click when finished. Separate DK Roll purchase may be created using P-touch Editor Learn the basic workflow of the dock to the desired position. Enter text directly using the Layout Style Function. Click , select the desired code...

Users Manual - English and Spanish
Page 19
... for Windows Vista®. 1 Start the computer and put the CD-ROM into the CD-ROM drive. When using Microsoft® Windows® This section explains how to change without notice. Install procedure is subject to install the P-touch Editor 5.0, P-touch Address Book 1.1, Printer Driver, and Software User's Guide as a whole. If it does not start up automatically, open the files on the CD-ROM and double click on -screen instructions.
... for Windows Vista®. 1 Start the computer and put the CD-ROM into the CD-ROM drive. When using Microsoft® Windows® This section explains how to change without notice. Install procedure is subject to install the P-touch Editor 5.0, P-touch Address Book 1.1, Printer Driver, and Software User's Guide as a whole. If it does not start up automatically, open the files on the CD-ROM and double click on -screen instructions.
Users Manual - English and Spanish
Page 21
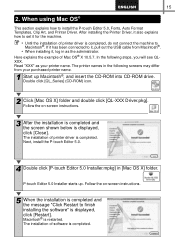
... to finish installing the software" is completed and the message "Click Restart to it , log in [Mac OS X] folder. Follow the on -screen instructions. 5 When the installation is displayed, click [Restart]. Follow the on -screen instructions. 3 After the installation is completed and the screen shown below is completed. The installation of printer driver is completed, do not connect the machine to install the P-touch Editor 5.0, Fonts, Auto Format...
... to finish installing the software" is completed and the message "Click Restart to it , log in [Mac OS X] folder. Follow the on -screen instructions. 5 When the installation is displayed, click [Restart]. Follow the on -screen instructions. 3 After the installation is completed and the screen shown below is completed. The installation of printer driver is completed, do not connect the machine to install the P-touch Editor 5.0, Fonts, Auto Format...
Users Manual - English and Spanish
Page 23
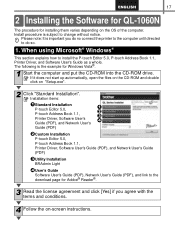
When using Microsoft® Windows® This section explains how to change without notice. Installation items: 1 Standard Installation P-touch Editor 5.0, P-touch Address Book 1.1, Printer Driver, Software User's Guide (PDF), and Network User's 1 2 3 4 Guide (PDF) 2 Custom Installation P-touch Editor 5.0, P-touch Address Book 1.1, Printer Driver, Software User's Guide (PDF), and Network User's Guide (PDF) 3 Utility Installation BRAdmin Light 4 User's Guide Software User's Guide (PDF), Network User's Guide (PDF), and link to the download page for Adobe® Reader®. 3 Read the ...
When using Microsoft® Windows® This section explains how to change without notice. Installation items: 1 Standard Installation P-touch Editor 5.0, P-touch Address Book 1.1, Printer Driver, Software User's Guide (PDF), and Network User's 1 2 3 4 Guide (PDF) 2 Custom Installation P-touch Editor 5.0, P-touch Address Book 1.1, Printer Driver, Software User's Guide (PDF), and Network User's Guide (PDF) 3 Utility Installation BRAdmin Light 4 User's Guide Software User's Guide (PDF), Network User's Guide (PDF), and link to the download page for Adobe® Reader®. 3 Read the ...
Users Manual - English and Spanish
Page 29
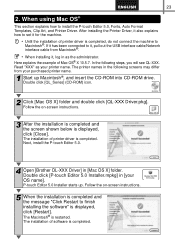
... -screen instructions. 5 When the installation is completed and the message "Click Restart to finish installing the software" is displayed, click [Close]. The installation of software is completed, do not connect the machine to set it , log in [Mac OS X] folder. P-touch Editor 5.0 Installer starts up Macintosh®, and insert the CD-ROM into CD-ROM drive. The Macintosh® is completed. The installation of printer driver is restarted. Double click...
... -screen instructions. 5 When the installation is completed and the message "Click Restart to finish installing the software" is displayed, click [Close]. The installation of software is completed, do not connect the machine to set it , log in [Mac OS X] folder. P-touch Editor 5.0 Installer starts up Macintosh®, and insert the CD-ROM into CD-ROM drive. The Macintosh® is completed. The installation of printer driver is restarted. Double click...
Users Manual - English and Spanish
Page 38
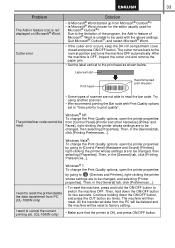
... power cord plugged in correctly? A data transmission error appears on the roller preventing it into another electrical outlet. * If the power button still does not light up, contact Brother Customer Service at 1-877BROTHER. Wait until the printing is plugged in the cutter or are not ejected correctly after printing. • Check that the ejection path of problems Problem Solution The Brother QL label printer does not print, or a printing error is poor After replacing...
... power cord plugged in correctly? A data transmission error appears on the roller preventing it into another electrical outlet. * If the power button still does not light up, contact Brother Customer Service at 1-877BROTHER. Wait until the printing is plugged in the cutter or are not ejected correctly after printing. • Check that the ejection path of problems Problem Solution The Brother QL label printer does not print, or a printing error is poor After replacing...
Users Manual - English and Spanish
Page 39
...; Word chosen for the editor usually used with Print Quality options set to "Give priority to the print head as shown below. Then, in feature of Microsoft® Word is OFF, inspect the cutter unit and remove the paper jam. • Set the label vertical to print quality". Due to the limitation of scanner are to reset the printer/delete the data transferred from the PC will...
...; Word chosen for the editor usually used with Print Quality options set to "Give priority to the print head as shown below. Then, in feature of Microsoft® Word is OFF, inspect the cutter unit and remove the paper jam. • Set the label vertical to print quality". Due to the limitation of scanner are to reset the printer/delete the data transferred from the PC will...


