
Users Manual - Multi
Page 2
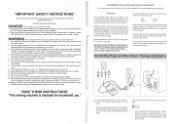
...must be left unattended when plugged in this manual. 3. Special care is hazardous if engaged in this instruction manual. Always unplug the sewing machine from the electrical outlet when removing covers, lubricating, or when making any openings. 6. Always replace the fuse cover. Connect the ...identifying the terminals in this equipment, it is intended for its intended use a bent needle. 13. "SAVE THESE INSTRUCTIONS" "This sewing machine is not working properly, if it has been dropped or damaged, or dropped into any adjustments in the needle area, such as ...
...must be left unattended when plugged in this manual. 3. Special care is hazardous if engaged in this instruction manual. Always unplug the sewing machine from the electrical outlet when removing covers, lubricating, or when making any openings. 6. Always replace the fuse cover. Connect the ...identifying the terminals in this equipment, it is intended for its intended use a bent needle. 13. "SAVE THESE INSTRUCTIONS" "This sewing machine is not working properly, if it has been dropped or damaged, or dropped into any adjustments in the needle area, such as ...
Users Manual - Multi
Page 6
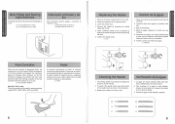
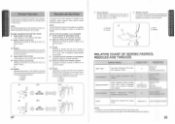
... aguja de costura siempre debe estar bien recta y afilada para una buena costura. 2. fl • Jl ONIM• KNOWING YOUR SEWING MACHINE CONOZCA SU MAQUINA DE COSER Main Power and Sewing Light Switches This switch turns the main power and sewing light on or off. 0 Turn on the foot controller is depressed lightly, the... tambien la velocidad de la maquina. ,EI3SO0 30 vmnovw ns V0ZONO0 , W ONIM3S . Remove the needle by loosening the needle clamp with its highest position. 3. The sewing needle must always be straight and sharp for sewing machine models XR31, XR33, XR35, XR37 and XR40.
... aguja de costura siempre debe estar bien recta y afilada para una buena costura. 2. fl • Jl ONIM• KNOWING YOUR SEWING MACHINE CONOZCA SU MAQUINA DE COSER Main Power and Sewing Light Switches This switch turns the main power and sewing light on or off. 0 Turn on the foot controller is depressed lightly, the... tambien la velocidad de la maquina. ,EI3SO0 30 vmnovw ns V0ZONO0 , W ONIM3S . Remove the needle by loosening the needle clamp with its highest position. 3. The sewing needle must always be straight and sharp for sewing machine models XR31, XR33, XR35, XR37 and XR40.
Users Manual - Multi
Page 11
... # 1:BUTTONHOLE (PRESS KEY) A1)SEWING PATTERN (SELECT WITH A KEY AND PRESS KEY) A2)USING MACHINE -> B1)WINDING BOBBIN 4- -> A3)TROUBLE SHOOTING A4)FABRIC•THREAD• NEEDLE B1)NEEDLE BREAKS B1)NORMAL FABRIC B 1)ATTACH BUTTONHOLE FOOT(A) A2)USING MACHINE B2)REPLACING BOBBIN A3)TROUBLE SHOOTING B2)...NEEDLE B4)KNIT FABRIC 4)PLACE FABRIC.LOWER FOOT.HOLD UPPER THREAD AND BEGIN SEWING A2)USING MACHINE B5)CHANGING FEET V 5)BUTTONHOLE SIZE WILL MATCH BUTTON SIZE EACH TIME "END" A2)USING MACHINE B6)CHANGING NEEDLE A3)TROUBLE SHOOTING B5)FABRIC PUCKERS B V A3)TROUBLE SHOOTING...
... # 1:BUTTONHOLE (PRESS KEY) A1)SEWING PATTERN (SELECT WITH A KEY AND PRESS KEY) A2)USING MACHINE -> B1)WINDING BOBBIN 4- -> A3)TROUBLE SHOOTING A4)FABRIC•THREAD• NEEDLE B1)NEEDLE BREAKS B1)NORMAL FABRIC B 1)ATTACH BUTTONHOLE FOOT(A) A2)USING MACHINE B2)REPLACING BOBBIN A3)TROUBLE SHOOTING B2)...NEEDLE B4)KNIT FABRIC 4)PLACE FABRIC.LOWER FOOT.HOLD UPPER THREAD AND BEGIN SEWING A2)USING MACHINE B5)CHANGING FEET V 5)BUTTONHOLE SIZE WILL MATCH BUTTON SIZE EACH TIME "END" A2)USING MACHINE B6)CHANGING NEEDLE A3)TROUBLE SHOOTING B5)FABRIC PUCKERS B V A3)TROUBLE SHOOTING...
Users Manual - Multi
Page 13
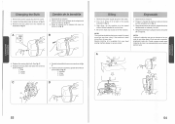
...pulsador de retrocesoymantengalo en esa posicionmientras presiona ligeramente el pedal. La costura hacia atrasseusapara rematesypara reforzarlascosturas. C) Reverse Sewing Button C) Pulsador de retroceso. THREADING THE MACHINE Winding the bobbin 1. Pase el hilo por la guia, siguiendo la linea de puntos marcada en la ...turn. Place a spool of thread onto the horizontal spool pin and firmly hold in as far as shown following the dotted line on the machine. 3. Gamble elconmutadorbobina-aguja de la marca aguje a la marca canilla. 2. C) Conmutador C) Bobinado de la canilla O 1 0 •...
...pulsador de retrocesoymantengalo en esa posicionmientras presiona ligeramente el pedal. La costura hacia atrasseusapara rematesypara reforzarlascosturas. C) Reverse Sewing Button C) Pulsador de retroceso. THREADING THE MACHINE Winding the bobbin 1. Pase el hilo por la guia, siguiendo la linea de puntos marcada en la ...turn. Place a spool of thread onto the horizontal spool pin and firmly hold in as far as shown following the dotted line on the machine. 3. Gamble elconmutadorbobina-aguja de la marca aguje a la marca canilla. 2. C) Conmutador C) Bobinado de la canilla O 1 0 •...
Users Manual - Multi
Page 17
... B Upper tension is too tight. Use the same size thread for the upper and lower threads (spool and bobbin). 28 KNOWING YOUR SEWING MACHINE CONOZCA SU MAOU1NA DE COSER or A-2 Bobbin Increase the tension in a clockwise direction. B-1 Upper Tension Control Dial Increase the tension by turning...11 14 (Supplied with the enclosed small screwdriver in the bobbin by turning the dial to be made on a fabric scrap before sewing on the surface of your machine) Cotton: 80 Synthetic Fine Mercerized Cotton Cotton: 60-80 Silk: "A" Synthetic Mercerized 50 Cotton: 50-60 Silk: "A" Synthetic ...
... B Upper tension is too tight. Use the same size thread for the upper and lower threads (spool and bobbin). 28 KNOWING YOUR SEWING MACHINE CONOZCA SU MAOU1NA DE COSER or A-2 Bobbin Increase the tension in a clockwise direction. B-1 Upper Tension Control Dial Increase the tension by turning...11 14 (Supplied with the enclosed small screwdriver in the bobbin by turning the dial to be made on a fabric scrap before sewing on the surface of your machine) Cotton: 80 Synthetic Fine Mercerized Cotton Cotton: 60-80 Silk: "A" Synthetic Mercerized 50 Cotton: 50-60 Silk: "A" Synthetic ...
Users Manual - Multi
Page 30
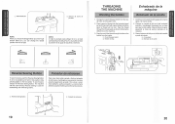
... face plate and fasten the screw as illustrated in fig. Remove the power supply plug from your local sewing machine dealer or service center. Put 2 to wipe any excess oil off the machine. Desenchufe la maquina. 2. A. 3. NOTA: Lubricar la maquina una vez por semana si se usa ...hora diaria. B. Vuelva a colocarla cubierta yapriete el tomillo tal como indica la fig. NOTE: The machine should be oiled once a week if it is used more than one hour a day. Sewing machine oil is used more often, oil every day. Puede comprar aceite para maquina de coser a su ...
... face plate and fasten the screw as illustrated in fig. Remove the power supply plug from your local sewing machine dealer or service center. Put 2 to wipe any excess oil off the machine. Desenchufe la maquina. 2. A. 3. NOTA: Lubricar la maquina una vez por semana si se usa ...hora diaria. B. Vuelva a colocarla cubierta yapriete el tomillo tal como indica la fig. NOTE: The machine should be oiled once a week if it is used more than one hour a day. Sewing machine oil is used more often, oil every day. Puede comprar aceite para maquina de coser a su ...


