
Users Manual - Multi
Page 2
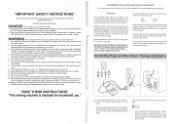
"IMPORTANT SAFETY INSTRUCTIONS" When using the sewing machine, basic safety precautions should always be followed, including the following: "Read all moving parts. Always unplug before cleaning . 2. replace the bulb in a live socket outlet. To disconnect, turn the main switch to the off or the plug must be ...
"IMPORTANT SAFETY INSTRUCTIONS" When using the sewing machine, basic safety precautions should always be followed, including the following: "Read all moving parts. Always unplug before cleaning . 2. replace the bulb in a live socket outlet. To disconnect, turn the main switch to the off or the plug must be ...
Users Manual - Multi
Page 6
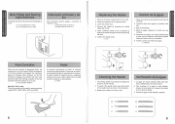
..."0") 2 Replacing the Needle 1. Lower the presser foot. 4. Levante la barra de la aguja a su posicion mas alta. 3. lntroduzca otra aguja, con la parte redonda cara a usted. Pedal Al presionar ligeramente el pedal, la maquina funcionara a baja velocidad. Para averiguar si la aguja no este utilizada. 0 Pedal Checking...used for smooth sewing. 2. Asegurese siempre de no poner ningan objeto sobre el pedal cuando la maquina no este doblada, coloque la parte plana de la aguja hacia abajo como muestra el dibujo. 3. The sewing needle must always be taken that nothing is placed on the...
..."0") 2 Replacing the Needle 1. Lower the presser foot. 4. Levante la barra de la aguja a su posicion mas alta. 3. lntroduzca otra aguja, con la parte redonda cara a usted. Pedal Al presionar ligeramente el pedal, la maquina funcionara a baja velocidad. Para averiguar si la aguja no este utilizada. 0 Pedal Checking...used for smooth sewing. 2. Asegurese siempre de no poner ningan objeto sobre el pedal cuando la maquina no este doblada, coloque la parte plana de la aguja hacia abajo como muestra el dibujo. 3. The sewing needle must always be taken that nothing is placed on the...
Users Manual - Multi
Page 11
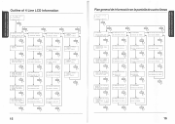
... B1)AGUJA SE ROMPE A4)TEJIDO-HILO-AGUJA B1)TEJIDO NORMAL V 1)COLOCAR EL PRENSATELAS PARA OJALES (A) A2)MAQUINA EN USO B2)CAMBIO CANILLA V 2)PETIRAR LA PARTE ATRAS DEL PRENSATELAS COLOCAR EL BOTON Y FIJAR A2)MAQUINA EN USO B3)ENHEBRA ARRIBA V 3)BAJAR LA PALANCA PARA OJALES Y APRE TAR HACIA ATRAS A2)MAQUINA...
... B1)AGUJA SE ROMPE A4)TEJIDO-HILO-AGUJA B1)TEJIDO NORMAL V 1)COLOCAR EL PRENSATELAS PARA OJALES (A) A2)MAQUINA EN USO B2)CAMBIO CANILLA V 2)PETIRAR LA PARTE ATRAS DEL PRENSATELAS COLOCAR EL BOTON Y FIJAR A2)MAQUINA EN USO B3)ENHEBRA ARRIBA V 3)BAJAR LA PALANCA PARA OJALES Y APRE TAR HACIA ATRAS A2)MAQUINA...
Users Manual - Multi
Page 35
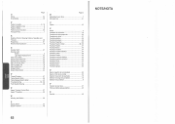
...Oiling Overedging Page 54 40 P Pattern Lengths Pattern Selection Dial Pattern Widths Performance Checklist Principal Parts 9, 18 8 9 56 1 R Relative Chart of Sewing Fabrics, Needles and Threads 28 Repacking 61 Reverse Sewing Button 19 S Scallop Stitch 37 Sewing Light Switch 5 Light Bulb Replacement 53 Shell Tuck Stitch 35 Shuttle Hook Removal 55 ... de largo de puntadas Selector de puntadas T Tension de los hilos Triple puntada zigzag elastica Z Zurcido Pagina 7 51 43 5 19 30 37 36 38 39 38, 39 37 40 34 34 39 35 40 40 40 41 30 33 55 25 18 18 8 27 42 49 63 NOTE/NOTA
...Oiling Overedging Page 54 40 P Pattern Lengths Pattern Selection Dial Pattern Widths Performance Checklist Principal Parts 9, 18 8 9 56 1 R Relative Chart of Sewing Fabrics, Needles and Threads 28 Repacking 61 Reverse Sewing Button 19 S Scallop Stitch 37 Sewing Light Switch 5 Light Bulb Replacement 53 Shell Tuck Stitch 35 Shuttle Hook Removal 55 ... de largo de puntadas Selector de puntadas T Tension de los hilos Triple puntada zigzag elastica Z Zurcido Pagina 7 51 43 5 19 30 37 36 38 39 38, 39 37 40 34 34 39 35 40 40 40 41 30 33 55 25 18 18 8 27 42 49 63 NOTE/NOTA

