
Users Manual - English
Page 2
... Do not unplug by the manufac- The wrong plate can cause the needle to the off , then remove plug from the accumulation of the sewing machine and foot controller free from outlet. 9. Young children should be supervised to ensure that they do not play with this... machine to the symbol "O" position which represents off , symbol "O" position when making any openings. 6. turer as contained in the needle area, such as threading the needle, changing the needle, threading the bobbin, or changing the presser foot. 15. To disconnect, turn the main ...
... Do not unplug by the manufac- The wrong plate can cause the needle to the off , then remove plug from the accumulation of the sewing machine and foot controller free from outlet. 9. Young children should be supervised to ensure that they do not play with this... machine to the symbol "O" position which represents off , symbol "O" position when making any openings. 6. turer as contained in the needle area, such as threading the needle, changing the needle, threading the bobbin, or changing the presser foot. 15. To disconnect, turn the main ...

Users Manual - English
Page 6
...STITCHES KNOWING YOUR SEWING MACHINE PRINCIPAL PARTS 1 ACCESSORIES 3 OPERATING YOUR SEWING MACHINE 5 Connecting Plugs 5 Main Power and Sewing Light Switches 6 Foot Controller 6 Inserting the Needle 7 Checking the Needle 7 Changing the Presser Foot 8 Converting to Free-Arm Style 9 Steadying the Machine 9 VARIOUS ...Stitching 37 Scallop Stitching 38 Universal Stitching 38 Overedge Stitching 39 Feather Stitching 40 Triple Zigzag Stretch Stitching 41 Decorative Stitching 41 BUTTONHOLE AND BUTTON SEWING Making a Buttonhole (1 Step Automatic Buttonhole 42 Making a Buttonhole (4 ...
...STITCHES KNOWING YOUR SEWING MACHINE PRINCIPAL PARTS 1 ACCESSORIES 3 OPERATING YOUR SEWING MACHINE 5 Connecting Plugs 5 Main Power and Sewing Light Switches 6 Foot Controller 6 Inserting the Needle 7 Checking the Needle 7 Changing the Presser Foot 8 Converting to Free-Arm Style 9 Steadying the Machine 9 VARIOUS ...Stitching 37 Scallop Stitching 38 Universal Stitching 38 Overedge Stitching 39 Feather Stitching 40 Triple Zigzag Stretch Stitching 41 Decorative Stitching 41 BUTTONHOLE AND BUTTON SEWING Making a Buttonhole (1 Step Automatic Buttonhole 42 Making a Buttonhole (4 ...

Users Manual - English
Page 9
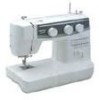
...Presser foot lever Raises and lowers the presser foot. D C E G F H BUTTONHOLE AND BUTTON SEWING USING ATTACHMENTS AND APPLICATIONS MAINTENANCE INDEX 1 H Foot controller Used to select the desired stitch. 9 Stitch length dial Controls the length of the upper thread. E Main power/sewing light switch Turns the main power and sewing...7 6 Upper tension control dial Controls the tension of the stitches. 0 Reverse sewing lever Push for operation. CONTENTS KNOWING YOUR SEWING MACHINE STRAIGHT AND ZIGZAG STITCHING BUILT-IN STITCHES PRINCIPAL PARTS 34 62 1 1 Bobbin ...
...Presser foot lever Raises and lowers the presser foot. D C E G F H BUTTONHOLE AND BUTTON SEWING USING ATTACHMENTS AND APPLICATIONS MAINTENANCE INDEX 1 H Foot controller Used to select the desired stitch. 9 Stitch length dial Controls the length of the upper thread. E Main power/sewing light switch Turns the main power and sewing...7 6 Upper tension control dial Controls the tension of the stitches. 0 Reverse sewing lever Push for operation. CONTENTS KNOWING YOUR SEWING MACHINE STRAIGHT AND ZIGZAG STITCHING BUILT-IN STITCHES PRINCIPAL PARTS 34 62 1 1 Bobbin ...

Users Manual - English
Page 28
Raise the presser foot lever and turn the balance wheel toward you (counterclockwise) to raise the thread take-up lever and around to its highest position. 2. Pull up lever 4. A.) 1 ... of the thread take -up the spool pin and place a spool of thread as shown in fig. CONTENTS KNOWING YOUR SEWING MACHINE STRAIGHT AND ZIGZAG STITCHING BUILT-IN STITCHES 1 2 4 3 BUTTONHOLE AND BUTTON SEWING USING ATTACHMENTS AND APPLICATIONS A 4 23 1 C B D 4 4 E 5 Upper (Needle) Threading Turn power switch to break, skip stitches or wrinkle the fabric. 20...
Raise the presser foot lever and turn the balance wheel toward you (counterclockwise) to raise the thread take-up lever and around to its highest position. 2. Pull up lever 4. A.) 1 ... of the thread take -up the spool pin and place a spool of thread as shown in fig. CONTENTS KNOWING YOUR SEWING MACHINE STRAIGHT AND ZIGZAG STITCHING BUILT-IN STITCHES 1 2 4 3 BUTTONHOLE AND BUTTON SEWING USING ATTACHMENTS AND APPLICATIONS A 4 23 1 C B D 4 4 E 5 Upper (Needle) Threading Turn power switch to break, skip stitches or wrinkle the fabric. 20...

Users Manual - English
Page 30
... threader with the bottom of the machine (away from you). Pull down the needle threader lever as much as possible, then rotate the lever toward you ). In addition, refer to the CHART OF SEWING FABRICS, NEEDLES AND THREAD COMBINATIONS to "O". 1. Lower the presser foot lever. 2. The hook will pull... the thread through the eye of the needle and grabs the thread. • Hold the thread in front of the machine (toward the front of the needle ...
... threader with the bottom of the machine (away from you). Pull down the needle threader lever as much as possible, then rotate the lever toward you ). In addition, refer to the CHART OF SEWING FABRICS, NEEDLES AND THREAD COMBINATIONS to "O". 1. Lower the presser foot lever. 2. The hook will pull... the thread through the eye of the needle and grabs the thread. • Hold the thread in front of the machine (toward the front of the needle ...

Users Manual - English
Page 33
...érieur doit alors former une boucle avec le fil inférieur. CONTENTS KNOWING YOUR SEWING MACHINE STRAIGHT AND ZIGZAG STITCHING BUILT-IN STITCHES 1 2 Drawing Up Lower Thread 1. Pull out about 15 cm (6") of the presser foot. 1 Upper thread 2 Lower thread loop 3 Lower thread 1 3 Para sacar el hilo de la canilla Remonté...
...érieur doit alors former une boucle avec le fil inférieur. CONTENTS KNOWING YOUR SEWING MACHINE STRAIGHT AND ZIGZAG STITCHING BUILT-IN STITCHES 1 2 Drawing Up Lower Thread 1. Pull out about 15 cm (6") of the presser foot. 1 Upper thread 2 Lower thread loop 3 Lower thread 1 3 Para sacar el hilo de la canilla Remonté...

Users Manual - English
Page 50
... dial to " ". 3. B.) 5. While gently holding the upper thread, start sewing. * Set the stitch width to match the diameter of the buttonhole on Stretch Fabrics (fig. D. 8. Stop the machine when the buttonhole is a simple process that provides reliable results. Lower the presser foot and start the machine. 7. Lower the buttonhole lever and push it on the...
... dial to " ". 3. B.) 5. While gently holding the upper thread, start sewing. * Set the stitch width to match the diameter of the buttonhole on Stretch Fabrics (fig. D. 8. Stop the machine when the buttonhole is a simple process that provides reliable results. Lower the presser foot and start the machine. 7. Lower the buttonhole lever and push it on the...

Users Manual - English
Page 59
...toward the top on the underside of the zipper, and continue sewing using the other side notch. 1 Zipper foot 2 Right pin for correct needle setting. Lower the presser foot lever and attach the presser foot holder to about "2") so that the lower thread lies on ...right or left side of the needle. CONTENTS KNOWING YOUR SEWING MACHINE STRAIGHT AND ZIGZAG STITCHING BUILT-IN STITCHES A 1 2 3 B Zipper Inserting Pattern (Straight Stitch) Stitch Length 2-3 Stitch Width 2.5 (Center needle position) Foot Zipper Foot NOTE: After selecting the pattern, set the stitch width ...
...toward the top on the underside of the zipper, and continue sewing using the other side notch. 1 Zipper foot 2 Right pin for correct needle setting. Lower the presser foot lever and attach the presser foot holder to about "2") so that the lower thread lies on ...right or left side of the needle. CONTENTS KNOWING YOUR SEWING MACHINE STRAIGHT AND ZIGZAG STITCHING BUILT-IN STITCHES A 1 2 3 B Zipper Inserting Pattern (Straight Stitch) Stitch Length 2-3 Stitch Width 2.5 (Center needle position) Foot Zipper Foot NOTE: After selecting the pattern, set the stitch width ...
Users Manual - English
Page 69
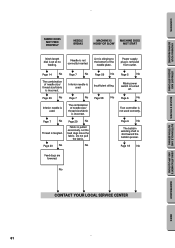
CONTENTS KNOWING YOUR SEWING MACHINE STRAIGHT AND ZIGZAG STITCHING BUILT-IN STITCHES FABRIC DOES NOT FEED PROPERLY NEEDLE BREAKS MACHINE IS NOISY OR SLOW MACHINE DOES NOT START Stitch length dial is tangled. w Page 7 No w Thread is set at no feeding. w Page 7 No w The ...the feed dogs move the fabric. w Page 6 No w The bobbin winding shaft is not used . w Page 6 No w Foot controller is slid toward the bobbin presser. w Page 18 No Feed dogs are lowered. Needle is clinging to the bottom of the needle plate. Lint is not correctly inserted...
CONTENTS KNOWING YOUR SEWING MACHINE STRAIGHT AND ZIGZAG STITCHING BUILT-IN STITCHES FABRIC DOES NOT FEED PROPERLY NEEDLE BREAKS MACHINE IS NOISY OR SLOW MACHINE DOES NOT START Stitch length dial is tangled. w Page 7 No w Thread is set at no feeding. w Page 7 No w The ...the feed dogs move the fabric. w Page 6 No w The bobbin winding shaft is not used . w Page 6 No w Foot controller is slid toward the bobbin presser. w Page 18 No Feed dogs are lowered. Needle is clinging to the bottom of the needle plate. Lint is not correctly inserted...

Users Manual - English
Page 75
... 11 Performance Checklist 60-61 Presser Foot Replacement 8 Principal Parts 1 Q Quick Thread-setting System 24 R Repacking 66 Reverse Sewing Lever 17 S Scallop Stitching 38 Sewing Direction 32 Sewing Light Bulb Replacement 57 Switch 6 Shell Tuck Stitching 36 Shuttle Hook Removal 57 Shuttle Race Cleaning 57 Spool Installing 20 Steadying the Machine 9 Stitch Length Dial 14 Straight...
... 11 Performance Checklist 60-61 Presser Foot Replacement 8 Principal Parts 1 Q Quick Thread-setting System 24 R Repacking 66 Reverse Sewing Lever 17 S Scallop Stitching 38 Sewing Direction 32 Sewing Light Bulb Replacement 57 Switch 6 Shell Tuck Stitching 36 Shuttle Hook Removal 57 Shuttle Race Cleaning 57 Spool Installing 20 Steadying the Machine 9 Stitch Length Dial 14 Straight...


