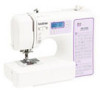
Brother International XR1300 Support Question
Brother International XR1300 Support Question
Find answers below for this question about Brother International XR1300.Need a Brother International XR1300 manual? We have 2 online manuals for this item!
Question posted by Whcollins on October 1st, 2012
Changing To Presser Foot A
I can't figure out how tochange to presser foot A . I took off J but I can't seem to get the presser foot holder to grab the metal bar onJAN
Current Answers
Related Brother International XR1300 Manual Pages
Users Manual - English - Page 6
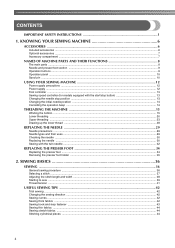
... PRESSER FOOT 34
Replacing the presser foot ...34 Removing the presser foot holder ...35
2. SEWING BASICS 36
SEWING ...36
General sewing procedure ...36 Selecting a stitch ...37 Adjusting the stitch length and width ...38 Starting to sew ...39 Thread tension ...41
USEFUL SEWING TIPS ...42
Trial sewing ...42 Changing the sewing direction ...42 Sewing curves ...42 Sewing thick fabrics ...42 Sewing...
Users Manual - English - Page 8
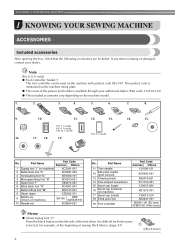
...
15 Spool cap (large)
16
Spool cap (medium) (on the machine with product code 885-V67.
only) ● Foot controller: Model T
This foot controller can be fed, for example, at the beginning of the presser foot holder is mentioned on the machine rating plate.
● The screw of sewing thick fabrics. (page 43)
aBlack button
6 No. Press the...
Users Manual - English - Page 10
... 17 and 23) Pass the thread under this to control the sewing speed, and to raise and lower the presser foot.
t Handle Carry the sewing machine by its handle when transporting the machine.
8
KNOWING YOUR SEWING MACHINE
NAMES OF MACHINE PARTS AND THEIR FUNCTIONS
The illustrations in the foot controller plug. k Air vent This vent allows the air surrounding the...
Users Manual - English - Page 11
... lever when sewing buttonholes and bar tacks. c Needle position button (for detailed sewing in place. Use this button to raise and lower the presser foot.
i Quick-set bobbin)
You can start or stop sewing.
d Presser foot holder screw Use the presser foot holder screw to "Sewing reinforcement stitches" (page 40).
■ Buttons provided on the sewing machine model.
a Reverse...
Users Manual - English - Page 12
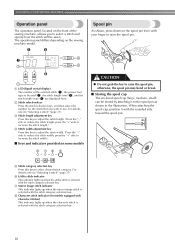
...pin
As shown, press down on some models
876 5
CAUTION
● Do not grab the bar to reduce the stitch length; For details, refer to "Selecting a stitch" (...LCD (liquid crystal display)
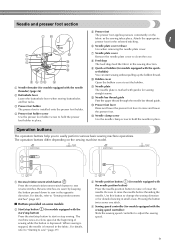
The number of the sewing machine, allows you wish to be sewn. The operation panel differs depending on the front of the selected stitch (1), the presser foot type to use. c Stitch length adjustment key ...
Users Manual - English - Page 15
... with
the start/stop button). Slide the sewing speed controller to the left and turn off the foot controller, the machine will increase. Changing the needle stop position
Normally, the sewing machine is set to leave the needle raised when sewing is plugged in the fabric when sewing is the foot controller's maximum sewing speed. CAUTION
● Do not allow...
Users Manual - English - Page 22
... to its highest position by turning a the handwheel toward you turn the power off the sewing machine. CAUTION
● Make sure you could be incorrect or break the needle.
20
c
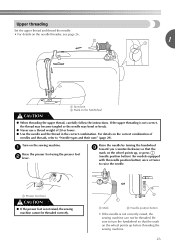
...foot controller and the machine starts to thread the machine as indicated. KNOWING YOUR SEWING MACHINE
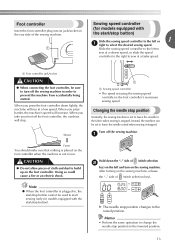
Lower threading
Install the bobbin wound with the needle position button), and raise the presser foot...
Users Manual - English - Page 23
Hold the end of the bobbin
raise the presser foot lever. press (needle position button) (for feeding the bobbin thread is ...If the thread unrolls in the right direction.
c
1
2
1
a Tension-adjusting spring
Replace the bobbin cover. Turn off the sewing machine. a Tab
CAUTION
● Make sure you (counterclockwise) or
thread through the slit.
• Replace the cover so that ...
Users Manual - English - Page 25
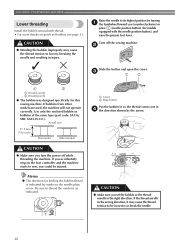
a
Raise the presser foot using the presser foot b lever. a Presser foot lever
CAUTION
● If the presser foot is not raised, the sewing machine cannot be threaded. For details on the correct ...details on the needle threader, see page 26.
1
a Spool pin b Mark on the sewing machine. Raise the needle by turning the handwheel c toward you (counterclockwise) so that the mark on the wheel...
Users Manual - English - Page 28
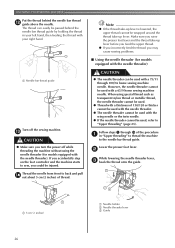
... behind the needle bar thread l guide above the needle.
CAUTION
● The needle threader can easily be used , refer to "Upper threading" (page 23). b
While lowering the needle threader lever, c hook the thread onto the guide.
Follow steps a through 100/16 home sewing machine needle. Make sure you raise the presser foot lever and the...
Users Manual - English - Page 30
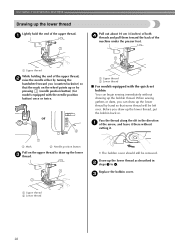
...The bobbin cover should still be left over.
a
Pull out about 10 cm (4 inches) of the
machine under the presser foot.
Before you can begin sewing immediately without
cutting it there without drawing up the lower thread
Lightly hold the end of the arrow, ... you (counterclockwise) so that some thread will be removed. KNOWING YOUR SEWING MACHINE
Drawing up the bobbin thread.
Users Manual - English - Page 33

...the needle clamp screw, otherwise certain parts of the machine, insert the needle until it
touches the needle stopper.
1
a Presser foot lever
CAUTION
● Before replacing the needle, place fabric or paper under the presser foot to insert the needle until it clockwise. Install ... same way.
c
With the flat side of the needle toward the e rear of the sewing machine may fall off.
Users Manual - English - Page 35

...foot "J", otherwise the needle may break or the machine may become bunched together, depending on changing the presser foot, refer
to sew" (page 39). If this occurs, increase the stitch length.
If the needle hits the presser foot, the needle may damage the machine. Attach zigzag foot... bar thread guide, manually thread the
right needle.
Otherwise the needle may break or the machine ...
Users Manual - English - Page 36
...or break, and may cause an accident or injury.
c
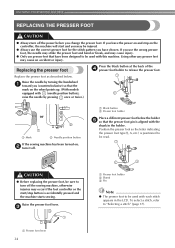
a Presser foot holder b Shank c Pin
Note
● The presser foot to be used with the
shank in the LCD. To select a stitch, refer to release the presser foot. KNOWING YOUR SEWING MACHINE
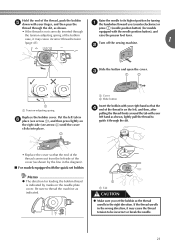
REPLACING THE PRESSER FOOT
CAUTION
● Always turn off the sewing machine, otherwise injuries may be injured. ● Always use the correct...
Users Manual - English - Page 37
... the lowera left hand.
a
• For details, refer to bend or break.
35
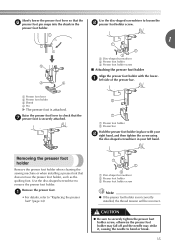
Removing the presser foot holder
Remove the presser foot holder when cleaning the sewing machine or when installing a presser foot that does not use the presser foot holder, such as the quilting foot. a Presser foot holder b Presser bar
Hold the presser foot holder in the
presser foot holder. Remove the presser foot.
Users Manual - English - Page 38
... in operation, pay special attention to "Replacing the presser foot" (page 34).
↓
4 Start sewing. For details on turning on the sewing machine.
Position the fabric, and then start sewing. SEWING BASICS
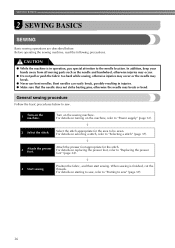
2 SEWING BASICS
SEWING
Basic sewing operations are described below to sew.
1
Turn on the machine. CAUTION
● While the machine is finished, cut the threads. In addition...
Users Manual - English - Page 39
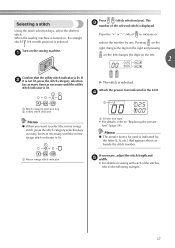
...sewing machine.
Pressing on the right changes the digit on the right and pressing
on the left changes the digit on sewing with each of the stitches, refer to select the mirror image stitch, press the stitch category selection key as many times as necessary until the utility stitch indicator is lit. a Presser foot...Memo
● The presser foot to "Replacing the presser foot" (page 34)....
Users Manual - English - Page 44
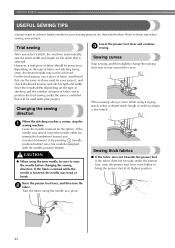
... then slightly change the sewing direction to these tips when sewing your project.
Leave the needle lowered (in order to obtain a finer stitch. If the fabric is turned while the needle is selected.
When the stitching reaches a corner, stop the a sewing machine. Sewing thick fabrics
■ If the fabric does not fit under the presser foot If the...
Users Manual - English - Page 65
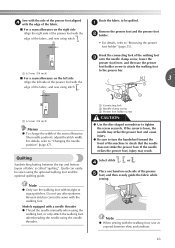
... stitches.
For details, refer to "Removing the presser foot holder" (page 35). Note
● Only use the walking foot with the walking foot, sew at a speed between the top and bottom layers of fabric is loose, the needle may result.
a
Remove the presser foot and the presser foot b holder.
• For details, refer to "Changing the needle position" (page 47).
Hook the...
Users Manual - English - Page 91
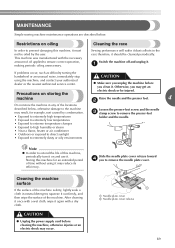
... applied to ensure correct operation, making periodic oiling unnecessary. Loosen the presser-foot screw and the needle c clamp screw to remove the presser-foot
• Exposed to extremely high temperatures • Exposed to extremely low temperatures
holder and the needle.
• Exposed to extreme temperature changes
• Exposed to high humidity or steam
• Near a flame...
Similar Questions

Where Can I Find An Instructional Manual Or Brother Xr1300 Sewing Machine To Buy
(Posted by calverts50 10 years ago)

How To Change Brother 2125i Sewing Machine Light Bulb
(Posted by avirdgorf 10 years ago)

Where Can I Find Bobbins For Brother's Sewing Machine Xr1300
(Posted by Jamjac 10 years ago)

How To Adjust Tension On Brother Sewing Machine Xr1300
(Posted by LotusALYS 10 years ago)

How To Change Needle Brother Sewing Machine Ce 5500 Prw
i lost my manual and do not know how to change the needle for a brother sewing machine CE 5500 PRW. ...
i lost my manual and do not know how to change the needle for a brother sewing machine CE 5500 PRW. ...
(Posted by giomariagina 11 years ago)