
Users Manual - English
Page 2
... needle plate. Use only accessories recommended by young children or infirm persons without supervision. 17. Switch the sewing machine to the symbol "O" position which represents off , symbol "O" position when making any adjustments in this sewing machine. This sewing machine is used by pulling on the cord. Always use by the manufac- WARNING - turer as contained in...
... needle plate. Use only accessories recommended by young children or infirm persons without supervision. 17. Switch the sewing machine to the symbol "O" position which represents off , symbol "O" position when making any adjustments in this sewing machine. This sewing machine is used by pulling on the cord. Always use by the manufac- WARNING - turer as contained in...
Users Manual - English
Page 5
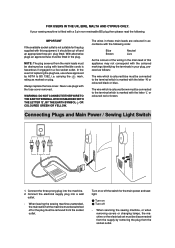
... EITHER WIRE TO THE EARTH TERMINAL WHICH IS MARKED WITH THE LETTER 'E', BY THE EARTH SYMBOL OR COLOURED GREEN OR YELLOW. When leaving the sewing machine unattended, the main switch of this equipment, it should be connected to BS 1362, i.e. IMPORTANT If the available socket outlet is not suitable ...the following code: Blue Brown Neutral Live As the colours of the wiring in the main lead of the machine must be connected to the terminal which is hazardous if engaged in your sewing machine is fitted with the letter 'N' or coloured black or blue. If your plug, proceed as a plug...
... EITHER WIRE TO THE EARTH TERMINAL WHICH IS MARKED WITH THE LETTER 'E', BY THE EARTH SYMBOL OR COLOURED GREEN OR YELLOW. When leaving the sewing machine unattended, the main switch of this equipment, it should be connected to BS 1362, i.e. IMPORTANT If the available socket outlet is not suitable ...the following code: Blue Brown Neutral Live As the colours of the wiring in the main lead of the machine must be connected to the terminal which is hazardous if engaged in your sewing machine is fitted with the letter 'N' or coloured black or blue. If your plug, proceed as a plug...

Users Manual - English
Page 6
... KNOWING YOUR SEWING MACHINE PRINCIPAL PARTS 1 ACCESSORIES 3 OPERATING YOUR SEWING MACHINE 5 Connecting Plugs 5 Main Power and Sewing Light Switches 6 Foot Controller 6 Inserting the Needle 7 Checking the Needle 7 Changing the Presser Foot 8 Converting to Free-Arm Style 9 Steadying the Machine 9 VARIOUS... Stitching 37 Scallop Stitching 38 Universal Stitching 38 Overedge Stitching 39 Feather Stitching 40 Triple Zigzag Stretch Stitching 41 Decorative Stitching 41 BUTTONHOLE AND BUTTON SEWING Making a Buttonhole (1 Step Automatic Buttonhole 42 Making a Buttonhole (4 Step ...
... KNOWING YOUR SEWING MACHINE PRINCIPAL PARTS 1 ACCESSORIES 3 OPERATING YOUR SEWING MACHINE 5 Connecting Plugs 5 Main Power and Sewing Light Switches 6 Foot Controller 6 Inserting the Needle 7 Checking the Needle 7 Changing the Presser Foot 8 Converting to Free-Arm Style 9 Steadying the Machine 9 VARIOUS... Stitching 37 Scallop Stitching 38 Universal Stitching 38 Overedge Stitching 39 Feather Stitching 40 Triple Zigzag Stretch Stitching 41 Decorative Stitching 41 BUTTONHOLE AND BUTTON SEWING Making a Buttonhole (1 Step Automatic Buttonhole 42 Making a Buttonhole (4 Step ...

Users Manual - English
Page 9
...the length of the upper thread. H Foot controller Used to raise and lower the needle. CONTENTS KNOWING YOUR SEWING MACHINE STRAIGHT AND ZIGZAG STITCHING BUILT-IN STITCHES PRINCIPAL PARTS 34 62 1 1 Bobbin winding assembly Winds the thread onto...take-up lever 8 5 Thread cutter 7 6 Upper tension control dial Controls the tension of the stitches. 0 Reverse sewing lever Push for operation. D C E G F H BUTTONHOLE AND BUTTON SEWING USING ATTACHMENTS AND APPLICATIONS MAINTENANCE INDEX 1 B 0 7 Stitch width dial Controls the stitch width. 8 Pattern selection ...
...the length of the upper thread. H Foot controller Used to raise and lower the needle. CONTENTS KNOWING YOUR SEWING MACHINE STRAIGHT AND ZIGZAG STITCHING BUILT-IN STITCHES PRINCIPAL PARTS 34 62 1 1 Bobbin winding assembly Winds the thread onto...take-up lever 8 5 Thread cutter 7 6 Upper tension control dial Controls the tension of the stitches. 0 Reverse sewing lever Push for operation. D C E G F H BUTTONHOLE AND BUTTON SEWING USING ATTACHMENTS AND APPLICATIONS MAINTENANCE INDEX 1 B 0 7 Stitch width dial Controls the stitch width. 8 Pattern selection ...

Users Manual - English
Page 13
... intended to fit in a polarized outlet only one blade wider than the other). CONTENTS KNOWING YOUR SEWING MACHINE STRAIGHT AND ZIGZAG STITCHING BUILT-IN STITCHES OPERATING YOUR SEWING MACHINE Connecting Plugs 1. Connect the power supply plug into the machine. 2. To reduce the risk of electric shock, this plug is recommended that the power supply plug...
... intended to fit in a polarized outlet only one blade wider than the other). CONTENTS KNOWING YOUR SEWING MACHINE STRAIGHT AND ZIGZAG STITCHING BUILT-IN STITCHES OPERATING YOUR SEWING MACHINE Connecting Plugs 1. Connect the power supply plug into the machine. 2. To reduce the risk of electric shock, this plug is recommended that the power supply plug...
Users Manual - English
Page 14
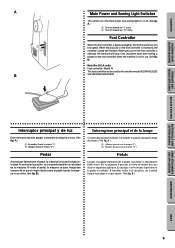
... off (toward the "I" mark) 2 Turn off . (See fig. B.) BUTTONHOLE AND BUTTON SEWING USING ATTACHMENTS AND APPLICATIONS MAINTENANCE INDEX 6 CONTENTS KNOWING YOUR SEWING MACHINE STRAIGHT AND ZIGZAG STITCHING BUILT-IN STITCHES A 1 2 B Main Power and Sewing Light Switches This switch turns the main power and sewing light on augmente la pression, la vitesse de couture de la...
... off (toward the "I" mark) 2 Turn off . (See fig. B.) BUTTONHOLE AND BUTTON SEWING USING ATTACHMENTS AND APPLICATIONS MAINTENANCE INDEX 6 CONTENTS KNOWING YOUR SEWING MACHINE STRAIGHT AND ZIGZAG STITCHING BUILT-IN STITCHES A 1 2 B Main Power and Sewing Light Switches This switch turns the main power and sewing light on augmente la pression, la vitesse de couture de la...
Users Manual - English
Page 19
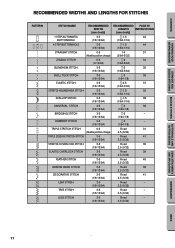
CONTENTS KNOWING YOUR SEWING MACHINE STRAIGHT AND ZIGZAG STITCHING BUILT-IN STITCHES RECOMMENDED WIDTHS AND LENGTHS FOR STITCHES PATTERN C A STITCH NAME RECOMMENDED WIDTH [mm (inch)] RECOMMENDED ... 3-5 Fixed 41 (1/8-13/64) 2.5 (3/32) STRETCH OVERLOCK STITCH 3-5 Fixed 39 (1/8-13/64) 2.5 (3/32) ELASTIC OVERLOCK STITCH 3-5 Fixed 39 (1/8-13/64) 2.5 (3/32) FEATHER STITCH 3-5 Fixed 40 (1/8-13/64) 2.5 (3/32) ARROW HEAD STITCH 3-5 Fixed 39 (1/8-13/64) 2.5 (3/32) DECORATIVE STITCH 3-5 Fixed 41 (1/8-13/64) 2.5 (3/32) LEAF STITCH 3-5 Fixed - (1/8-13/64) ...
CONTENTS KNOWING YOUR SEWING MACHINE STRAIGHT AND ZIGZAG STITCHING BUILT-IN STITCHES RECOMMENDED WIDTHS AND LENGTHS FOR STITCHES PATTERN C A STITCH NAME RECOMMENDED WIDTH [mm (inch)] RECOMMENDED ... 3-5 Fixed 41 (1/8-13/64) 2.5 (3/32) STRETCH OVERLOCK STITCH 3-5 Fixed 39 (1/8-13/64) 2.5 (3/32) ELASTIC OVERLOCK STITCH 3-5 Fixed 39 (1/8-13/64) 2.5 (3/32) FEATHER STITCH 3-5 Fixed 40 (1/8-13/64) 2.5 (3/32) ARROW HEAD STITCH 3-5 Fixed 39 (1/8-13/64) 2.5 (3/32) DECORATIVE STITCH 3-5 Fixed 41 (1/8-13/64) 2.5 (3/32) LEAF STITCH 3-5 Fixed - (1/8-13/64) ...

Users Manual - English
Page 28
... on it between the tension discs. 5. B, C, pull it . 3. NOTE: Incorrectly feeding the thread may cause it to "O". 1. CONTENTS KNOWING YOUR SEWING MACHINE STRAIGHT AND ZIGZAG STITCHING BUILT-IN STITCHES 1 2 4 3 BUTTONHOLE AND BUTTON SEWING USING ATTACHMENTS AND APPLICATIONS A 4 23 1 C B D 4 4 E 5 Upper (Needle) Threading Turn power switch to break, skip stitches or wrinkle the fabric. 20...
... on it between the tension discs. 5. B, C, pull it . 3. NOTE: Incorrectly feeding the thread may cause it to "O". 1. CONTENTS KNOWING YOUR SEWING MACHINE STRAIGHT AND ZIGZAG STITCHING BUILT-IN STITCHES 1 2 4 3 BUTTONHOLE AND BUTTON SEWING USING ATTACHMENTS AND APPLICATIONS A 4 23 1 C B D 4 4 E 5 Upper (Needle) Threading Turn power switch to break, skip stitches or wrinkle the fabric. 20...

Users Manual - English
Page 30
... that the hook passes through the needle. 6 Hook 7 Thread 6. CONTENTS KNOWING YOUR SEWING MACHINE STRAIGHT AND ZIGZAG STITCHING BUILT-IN STITCHES 1 2 3 1 2 4 5 7 6 6 Using the Needle Threader (when the machine is equipped with the bottom of the holder for the needle-threading hook before lowering the... sizes #90 to "O". 1. While lightly holding the thread, rotate the needle threader lever toward the front of the machine (toward the back of the sewing machine. • Only use needles of the needle holder with a needle threader) Turn power switch to #100. When ...
... that the hook passes through the needle. 6 Hook 7 Thread 6. CONTENTS KNOWING YOUR SEWING MACHINE STRAIGHT AND ZIGZAG STITCHING BUILT-IN STITCHES 1 2 3 1 2 4 5 7 6 6 Using the Needle Threader (when the machine is equipped with the bottom of the holder for the needle-threading hook before lowering the... sizes #90 to "O". 1. While lightly holding the thread, rotate the needle threader lever toward the front of the machine (toward the back of the sewing machine. • Only use needles of the needle holder with a needle threader) Turn power switch to #100. When ...

Users Manual - English
Page 33
...soi (dans le sens contraire aux aiguilles d'une montre) jusqu'à ce que l'aiguille descende puis remonte à nouveau complètement. 3. CONTENTS KNOWING YOUR SEWING MACHINE STRAIGHT AND ZIGZAG STITCHING BUILT-IN STITCHES 1 2 Drawing Up Lower Thread 1. With your left hand, hold the end of the presser foot. 1 Upper thread 2...ée du fil inférieur 1. Tirer environ 15 cm de chacun des deux fils et les placer vers l'arrière de la machine, juste derrière le pied-de-biche. Le fil supérieur doit passer entre les branches du pied-de-biche. 1 Fil sup...
...soi (dans le sens contraire aux aiguilles d'une montre) jusqu'à ce que l'aiguille descende puis remonte à nouveau complètement. 3. CONTENTS KNOWING YOUR SEWING MACHINE STRAIGHT AND ZIGZAG STITCHING BUILT-IN STITCHES 1 2 Drawing Up Lower Thread 1. With your left hand, hold the end of the presser foot. 1 Upper thread 2...ée du fil inférieur 1. Tirer environ 15 cm de chacun des deux fils et les placer vers l'arrière de la machine, juste derrière le pied-de-biche. Le fil supérieur doit passer entre les branches du pied-de-biche. 1 Fil sup...

Users Manual - English
Page 35
CONTENTS KNOWING YOUR SEWING MACHINE STRAIGHT AND ZIGZAG STITCHING BUILT-IN STITCHES A 2 1 2 1 B 2 1 2 1 A-1 654 B-1 654 C 2 1 2 1 Thread Tension Thread tension will weaken your seams or cause puckers in C-1. NOTE: It is important ... thread tension by turning the dial to a lower number. A-1 Upper tension control dial Decrease the tension by turning the dial to a lower number. For most sewing applications, no adjustment is too tight. D Correct tension Correct tension is recommended that a test sample be made on a fabric scrap before starting your fabric. 1 ...
CONTENTS KNOWING YOUR SEWING MACHINE STRAIGHT AND ZIGZAG STITCHING BUILT-IN STITCHES A 2 1 2 1 B 2 1 2 1 A-1 654 B-1 654 C 2 1 2 1 Thread Tension Thread tension will weaken your seams or cause puckers in C-1. NOTE: It is important ... thread tension by turning the dial to a lower number. A-1 Upper tension control dial Decrease the tension by turning the dial to a lower number. For most sewing applications, no adjustment is too tight. D Correct tension Correct tension is recommended that a test sample be made on a fabric scrap before starting your fabric. 1 ...

Users Manual - English
Page 37
...tico Mercería 50 Algodón: 50/60 Seda: "A" Sintético Mercería 50/60 n° 100/16 Algodón: 40/50 Hilo mercería gruesa PRENDAS DE PUNTO Prendas de punto simple, Prendas de punto doble, Jersey, Tricot n° 90/14 Poliester ...thread for the upper (spool) and lower (bobbin) threads. CONTENTS KNOWING YOUR SEWING MACHINE STRAIGHT AND ZIGZAG STITCHING BUILT-IN STITCHES CHART OF SEWING FABRICS, NEEDLES AND THREAD COMBINATIONS VERY THIN LIGHTWEIGHT MEDIUM WEIGHT HEAVYWEIGHT SEWING FABRICS Fine tricot, Fine lace, Thin linen, Silk, Organza, Chiffon Voile, ...
...tico Mercería 50 Algodón: 50/60 Seda: "A" Sintético Mercería 50/60 n° 100/16 Algodón: 40/50 Hilo mercería gruesa PRENDAS DE PUNTO Prendas de punto simple, Prendas de punto doble, Jersey, Tricot n° 90/14 Poliester ...thread for the upper (spool) and lower (bobbin) threads. CONTENTS KNOWING YOUR SEWING MACHINE STRAIGHT AND ZIGZAG STITCHING BUILT-IN STITCHES CHART OF SEWING FABRICS, NEEDLES AND THREAD COMBINATIONS VERY THIN LIGHTWEIGHT MEDIUM WEIGHT HEAVYWEIGHT SEWING FABRICS Fine tricot, Fine lace, Thin linen, Silk, Organza, Chiffon Voile, ...
Users Manual - English
Page 42
... el ancho de puntada entre "0" y "5". POINT DE BOURDON Lorsque la longueur du point zigzag est définie dans la plage " ", la machine effectue un point de bourdon (point zigzag très serré) qui peut servir à faire des boutonnières ou comme point fantaisie ... point sur " " et régler le sélecteur de largeur de point entre "0" et "5". 34 MAINTENANCE INDEX CONTENTS KNOWING YOUR SEWING MACHINE STRAIGHT AND ZIGZAG STITCHING BUILT-IN STITCHES Zigzag Stitching Pattern (Zigzag Stitch) Stitch Length -4 Stitch Width 0-5 ZIGZAG STITCH Select the Zigzag Stitch ...
... el ancho de puntada entre "0" y "5". POINT DE BOURDON Lorsque la longueur du point zigzag est définie dans la plage " ", la machine effectue un point de bourdon (point zigzag très serré) qui peut servir à faire des boutonnières ou comme point fantaisie ... point sur " " et régler le sélecteur de largeur de point entre "0" et "5". 34 MAINTENANCE INDEX CONTENTS KNOWING YOUR SEWING MACHINE STRAIGHT AND ZIGZAG STITCHING BUILT-IN STITCHES Zigzag Stitching Pattern (Zigzag Stitch) Stitch Length -4 Stitch Width 0-5 ZIGZAG STITCH Select the Zigzag Stitch ...
Users Manual - English
Page 43
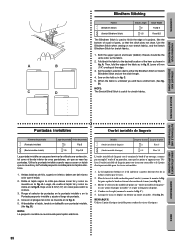
.... C.). 5. Set the pattern selection dial to the desired location of the hem as in fig. BUTTONHOLE AND BUTTON SEWING USING ATTACHMENTS AND APPLICATIONS Puntadas invisibles Ourlet invisible de lingerie Número de puntada (Puntada invisible) (Basta invisible stretch)...cuando vaya a coser un tejido que no se estire y la Puntada pespunto invisible para los tejidos elásticos. 1. CONTENTS KNOWING YOUR SEWING MACHINE STRAIGHT AND ZIGZAG STITCHING BUILT-IN STITCHES A B C D Blindhem Stitching Pattern (Blindhem Stitch) (Stretch Blindhem Stitch) Stitch Length -2 -1.5 ...
.... C.). 5. Set the pattern selection dial to the desired location of the hem as in fig. BUTTONHOLE AND BUTTON SEWING USING ATTACHMENTS AND APPLICATIONS Puntadas invisibles Ourlet invisible de lingerie Número de puntada (Puntada invisible) (Basta invisible stretch)...cuando vaya a coser un tejido que no se estire y la Puntada pespunto invisible para los tejidos elásticos. 1. CONTENTS KNOWING YOUR SEWING MACHINE STRAIGHT AND ZIGZAG STITCHING BUILT-IN STITCHES A B C D Blindhem Stitching Pattern (Blindhem Stitch) (Stretch Blindhem Stitch) Stitch Length -2 -1.5 ...

Users Manual - English
Page 50
...2. Lower the presser foot and start the machine. 7. It is done in the order shown in fig. Open the button plate and insert the button. (See fig. PUSH BUTTONHOLE AND BUTTON SEWING USING ATTACHMENTS AND APPLICATIONS MAINTENANCE INDEX 42 Making ... results. Buttonhole stitching is recommended to match the diameter of the foot, insert them into the grooves and temporarily tie them there. 3. CONTENTS KNOWING YOUR SEWING MACHINE STRAIGHT AND ZIGZAG STITCHING BUILT-IN STITCHES A B 1 2 - 3 C PUSH D 3 2 4 1 E PUSH Making a Buttonhole (1 Step Automatic Buttonhole) 4...
...2. Lower the presser foot and start the machine. 7. It is done in the order shown in fig. Open the button plate and insert the button. (See fig. PUSH BUTTONHOLE AND BUTTON SEWING USING ATTACHMENTS AND APPLICATIONS MAINTENANCE INDEX 42 Making ... results. Buttonhole stitching is recommended to match the diameter of the foot, insert them into the grooves and temporarily tie them there. 3. CONTENTS KNOWING YOUR SEWING MACHINE STRAIGHT AND ZIGZAG STITCHING BUILT-IN STITCHES A B 1 2 - 3 C PUSH D 3 2 4 1 E PUSH Making a Buttonhole (1 Step Automatic Buttonhole) 4...
Users Manual - English
Page 55
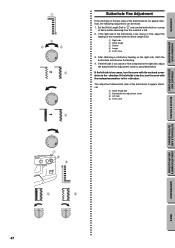
...Dial. 1 Right side 2 Stitch length 3 Shorter 4 Longer 5 In this case 9 9 BUTTONHOLE AND BUTTON SEWING USING ATTACHMENTS AND APPLICATIONS MAINTENANCE INDEX 47 If the right side of fabric while observing how the material is too ...coarse or fine compared to " " and sew the buttonhole on the right side, stitch the buttonhole and observe the feeding. 4. Set the Stitch Length... can be made. 1. SS 10 5 432 - CONTENTS KNOWING YOUR SEWING MACHINE STRAIGHT AND ZIGZAG STITCHING BUILT-IN STITCHES 1 2 4 3 10 432 -
...Dial. 1 Right side 2 Stitch length 3 Shorter 4 Longer 5 In this case 9 9 BUTTONHOLE AND BUTTON SEWING USING ATTACHMENTS AND APPLICATIONS MAINTENANCE INDEX 47 If the right side of fabric while observing how the material is too ...coarse or fine compared to " " and sew the buttonhole on the right side, stitch the buttonhole and observe the feeding. 4. Set the Stitch Length... can be made. 1. SS 10 5 432 - CONTENTS KNOWING YOUR SEWING MACHINE STRAIGHT AND ZIGZAG STITCHING BUILT-IN STITCHES 1 2 4 3 10 432 -

Users Manual - English
Page 57
...the holes is equipped with the stitch width dial. At a slow speed, sew approximately 10 stitches. 6. Attach the button sewing foot. 3. Place the darning plate on the needle plate. (When the machine is 1.5 mm (1/16"), set the appropriate stitch width with a drop ... without hitting the button. BUTTONHOLE AND BUTTON SEWING USING ATTACHMENTS AND APPLICATIONS MAINTENANCE INDEX 49 Remove the material from the machine. CONTENTS KNOWING YOUR SEWING MACHINE STRAIGHT AND ZIGZAG STITCHING BUILT-IN STITCHES Button Sewing Pattern (Zigzag Stitch) Stitch Length Stitch Width...
...the holes is equipped with the stitch width dial. At a slow speed, sew approximately 10 stitches. 6. Attach the button sewing foot. 3. Place the darning plate on the needle plate. (When the machine is 1.5 mm (1/16"), set the appropriate stitch width with a drop ... without hitting the button. BUTTONHOLE AND BUTTON SEWING USING ATTACHMENTS AND APPLICATIONS MAINTENANCE INDEX 49 Remove the material from the machine. CONTENTS KNOWING YOUR SEWING MACHINE STRAIGHT AND ZIGZAG STITCHING BUILT-IN STITCHES Button Sewing Pattern (Zigzag Stitch) Stitch Length Stitch Width...

Users Manual - English
Page 59
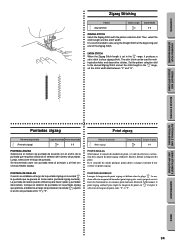
...either the left or right pin on the zipper side of the presser foot, move the zipper foot to break. To sew the opposite side of the zipper, release the foot by raising the lever located at the back of the foot for ... AND APPLICATIONS MAINTENANCE Gathering Pattern (Straight Stitch) Stitch Length 4 1. Set the pattern selection dial to select the center needle position. CONTENTS KNOWING YOUR SEWING MACHINE STRAIGHT AND ZIGZAG STITCHING BUILT-IN STITCHES A 1 2 3 B Zipper Inserting Pattern (Straight Stitch) Stitch Length 2-3 Stitch Width 2.5 (Center needle position...
...either the left or right pin on the zipper side of the presser foot, move the zipper foot to break. To sew the opposite side of the zipper, release the foot by raising the lever located at the back of the foot for ... AND APPLICATIONS MAINTENANCE Gathering Pattern (Straight Stitch) Stitch Length 4 1. Set the pattern selection dial to select the center needle position. CONTENTS KNOWING YOUR SEWING MACHINE STRAIGHT AND ZIGZAG STITCHING BUILT-IN STITCHES A 1 2 3 B Zipper Inserting Pattern (Straight Stitch) Stitch Length 2-3 Stitch Width 2.5 (Center needle position...
Users Manual - English
Page 65
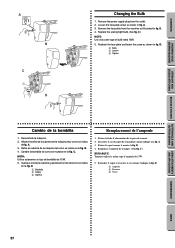
... NOTA: Utilice solamente un tipo de bombilla de 15 W. 5. C. D. 1 Ampoule 2 Desserrer 3 Visser BUTTONHOLE AND BUTTON SEWING USING ATTACHMENTS AND APPLICATIONS MAINTENANCE INDEX 57 Remove the power supply plug from the machine as illustrated in fig. Desenchufe la máquina. 2. Retirer la fiche d'alimentation de la prise de courant. 2. Loosen.... (Voir fig. Afloje el tornillo de la cubierta de la máquina tal y como se indica el fig. CONTENTS KNOWING YOUR SEWING MACHINE STRAIGHT AND ZIGZAG STITCHING BUILT-IN STITCHES A B C 1 2 3 D Changing the Bulb 1.
... NOTA: Utilice solamente un tipo de bombilla de 15 W. 5. C. D. 1 Ampoule 2 Desserrer 3 Visser BUTTONHOLE AND BUTTON SEWING USING ATTACHMENTS AND APPLICATIONS MAINTENANCE INDEX 57 Remove the power supply plug from the machine as illustrated in fig. Desenchufe la máquina. 2. Retirer la fiche d'alimentation de la prise de courant. 2. Loosen.... (Voir fig. Afloje el tornillo de la cubierta de la máquina tal y como se indica el fig. CONTENTS KNOWING YOUR SEWING MACHINE STRAIGHT AND ZIGZAG STITCHING BUILT-IN STITCHES A B C 1 2 3 D Changing the Bulb 1.

Users Manual - English
Page 68
...60 w Page 19 No w Lower thread tension is used . w Page 27 No w Lower threading is clinging to make sure you are correctly using the machine. w Page 29 No w Lint is not correct. w Page 20 No w Upper thread tension is incorrect. w Page 7 No w The combination of ... BREAKS LOWER THREAD BREAKS SKIPPED STITCHES LOOP IN SEAM FABRIC PUCKERS Upper threading is too tight. CONTENTS KNOWING YOUR SEWING MACHINE STRAIGHT AND ZIGZAG STITCHING BUILT-IN STITCHES Performance Checklist Whenever sewing difficulties are encountered, review the section in the shuttle hook.
...60 w Page 19 No w Lower thread tension is used . w Page 27 No w Lower threading is clinging to make sure you are correctly using the machine. w Page 29 No w Lint is not correct. w Page 20 No w Upper thread tension is incorrect. w Page 7 No w The combination of ... BREAKS LOWER THREAD BREAKS SKIPPED STITCHES LOOP IN SEAM FABRIC PUCKERS Upper threading is too tight. CONTENTS KNOWING YOUR SEWING MACHINE STRAIGHT AND ZIGZAG STITCHING BUILT-IN STITCHES Performance Checklist Whenever sewing difficulties are encountered, review the section in the shuttle hook.


