
Users Manual - English
Page 2
...- Do not pull or push the fabric while stitching. "SAVE THESE INSTRUCTIONS" "This sewing machine is not intended for examination, repair, electrical or mechanical adjustment. 4. The sewing machine should never be left unattended when plugged in the needle area, such as threading the needle, changing the needle, threading the bobbin, or changing the presser foot. 15. WARNING - DANGER - Use only accessories recommended by pulling on the cord. Young children should be supervised...
...- Do not pull or push the fabric while stitching. "SAVE THESE INSTRUCTIONS" "This sewing machine is not intended for examination, repair, electrical or mechanical adjustment. 4. The sewing machine should never be left unattended when plugged in the needle area, such as threading the needle, changing the needle, threading the bobbin, or changing the presser foot. 15. WARNING - DANGER - Use only accessories recommended by pulling on the cord. Young children should be supervised...

Users Manual - English
Page 6
... Power and Sewing Light Switches 6 Foot Controller 6 Inserting the Needle 7 Checking the Needle 7 Changing the Presser Foot 8 Converting to Free-Arm Style 9 Steadying the Machine 9 VARIOUS CONTROLS 10 Pattern Selection Dial 10 RECOMMENDED WIDTHS AND LENGTHS FOR STITCHES 11 Stitch Length Dial 14 Stretch Stitching 15 Stitch Width Dial 16 Reverse Sewing Lever 17 THREADING THE MACHINE 18 Winding the Bobbin 18 Lower Threading 19 Upper (Needle) Threading 20 Using the Needle Threader (when the machine is equipped with a needle threader) .. 22 Quick Thread-setting System FAST START...
... Power and Sewing Light Switches 6 Foot Controller 6 Inserting the Needle 7 Checking the Needle 7 Changing the Presser Foot 8 Converting to Free-Arm Style 9 Steadying the Machine 9 VARIOUS CONTROLS 10 Pattern Selection Dial 10 RECOMMENDED WIDTHS AND LENGTHS FOR STITCHES 11 Stitch Length Dial 14 Stretch Stitching 15 Stitch Width Dial 16 Reverse Sewing Lever 17 THREADING THE MACHINE 18 Winding the Bobbin 18 Lower Threading 19 Upper (Needle) Threading 20 Using the Needle Threader (when the machine is equipped with a needle threader) .. 22 Quick Thread-setting System FAST START...

Users Manual - English
Page 9
... dial Turn in the reverse direction. CONTENTS KNOWING YOUR SEWING MACHINE STRAIGHT AND ZIGZAG STITCHING BUILT-IN STITCHES PRINCIPAL PARTS 34 62 1 1 Bobbin winding assembly Winds the thread onto the bobbin to be used for the lower thread. 2 Spool pin A Holds the spool of thread. 3 Bobbin winding tension disc and thread guide 5 9 4 Thread take-up lever 8 5 Thread cutter 7 6 Upper tension control dial Controls the tension of the stitches. 0 Reverse sewing lever Push for operation. A Buttonhole fine-adjustment screw B Buttonhole lever (1 Step automatic buttonhole...
... dial Turn in the reverse direction. CONTENTS KNOWING YOUR SEWING MACHINE STRAIGHT AND ZIGZAG STITCHING BUILT-IN STITCHES PRINCIPAL PARTS 34 62 1 1 Bobbin winding assembly Winds the thread onto the bobbin to be used for the lower thread. 2 Spool pin A Holds the spool of thread. 3 Bobbin winding tension disc and thread guide 5 9 4 Thread take-up lever 8 5 Thread cutter 7 6 Upper tension control dial Controls the tension of the stitches. 0 Reverse sewing lever Push for operation. A Buttonhole fine-adjustment screw B Buttonhole lever (1 Step automatic buttonhole...

Users Manual - English
Page 13
... una aguja, la canilla o la bombilla de luz, o cuando se deja la máquina sin funcionar, se recomienda siempre retirar el enchufe de la toma de corriente para evitar choques eléctricos. 1. BUTTONHOLE AND BUTTON SEWING USING ATTACHMENTS AND APPLICATIONS MAINTENANCE INDEX 5 PRÉCAUTION: 1. Connect the power supply plug into the machine. 2. When changing the needle, bobbin or light bulb or when the sew...
... una aguja, la canilla o la bombilla de luz, o cuando se deja la máquina sin funcionar, se recomienda siempre retirar el enchufe de la toma de corriente para evitar choques eléctricos. 1. BUTTONHOLE AND BUTTON SEWING USING ATTACHMENTS AND APPLICATIONS MAINTENANCE INDEX 5 PRÉCAUTION: 1. Connect the power supply plug into the machine. 2. When changing the needle, bobbin or light bulb or when the sew...
Users Manual - English
Page 19
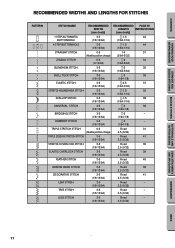
... position change) 2.5 (3/32) TRIPLE ZIGZAG STRETCH STITCH 3-5 Fixed 41 (1/8-13/64) 2.5 (3/32) STRETCH OVERLOCK STITCH 3-5 Fixed 39 (1/8-13/64) 2.5 (3/32) ELASTIC OVERLOCK STITCH 3-5 Fixed 39 (1/8-13/64) 2.5 (3/32) FEATHER STITCH 3-5 Fixed 40 (1/8-13/64) 2.5 (3/32) ARROW HEAD STITCH 3-5 Fixed 39 (1/8-13/64) 2.5 (3/32) DECORATIVE STITCH 3-5 Fixed 41 (1/8-13/64) 2.5 (3/32) LEAF STITCH 3-5 Fixed - (1/8-13/64) 2.5 (3/32) TREE STITCH 3-5 Fixed - (1/8-13/64) 2.5 (3/32) LEGS STITCH 3-5 Fixed - (1/8-13/64) 2.5 (3/32) BUTTONHOLE AND BUTTON SEWING...
... position change) 2.5 (3/32) TRIPLE ZIGZAG STRETCH STITCH 3-5 Fixed 41 (1/8-13/64) 2.5 (3/32) STRETCH OVERLOCK STITCH 3-5 Fixed 39 (1/8-13/64) 2.5 (3/32) ELASTIC OVERLOCK STITCH 3-5 Fixed 39 (1/8-13/64) 2.5 (3/32) FEATHER STITCH 3-5 Fixed 40 (1/8-13/64) 2.5 (3/32) ARROW HEAD STITCH 3-5 Fixed 39 (1/8-13/64) 2.5 (3/32) DECORATIVE STITCH 3-5 Fixed 41 (1/8-13/64) 2.5 (3/32) LEAF STITCH 3-5 Fixed - (1/8-13/64) 2.5 (3/32) TREE STITCH 3-5 Fixed - (1/8-13/64) 2.5 (3/32) LEGS STITCH 3-5 Fixed - (1/8-13/64) 2.5 (3/32) BUTTONHOLE AND BUTTON SEWING...

Users Manual - English
Page 28
... thread take -up lever and around to break, skip stitches or wrinkle the fabric. 20 MAINTENANCE INDEX Pull up lever to "O". 1. A.) 1 Spool pin 2 Thread guide 3 Tension discs 4 Thread take -up the spool pin and place a spool of the thread take-up lever 4. B, C, pull it toward you and into the eyelet. 6. Bring the thread through guides. (See fig. CONTENTS KNOWING YOUR SEWING MACHINE STRAIGHT AND ZIGZAG STITCHING BUILT-IN STITCHES 1 2 4 3 BUTTONHOLE AND BUTTON SEWING USING ATTACHMENTS AND APPLICATIONS A 4 23 1 C B D 4 4 E 5 Upper (Needle) Threading Turn power...
... thread take -up lever and around to break, skip stitches or wrinkle the fabric. 20 MAINTENANCE INDEX Pull up lever to "O". 1. A.) 1 Spool pin 2 Thread guide 3 Tension discs 4 Thread take -up the spool pin and place a spool of the thread take-up lever 4. B, C, pull it toward you and into the eyelet. 6. Bring the thread through guides. (See fig. CONTENTS KNOWING YOUR SEWING MACHINE STRAIGHT AND ZIGZAG STITCHING BUILT-IN STITCHES 1 2 4 3 BUTTONHOLE AND BUTTON SEWING USING ATTACHMENTS AND APPLICATIONS A 4 23 1 C B D 4 4 E 5 Upper (Needle) Threading Turn power...

Users Manual - English
Page 30
... needle in front of the holder for the needle-threading hook before lowering the needle threader lever. While lowering the needle threader lever, hook the thread onto the guide. 4. The hook will pull the thread through the needle toward the back of the sewing machine. • Only use needles of the machine (toward the front of sizes #90 to check that the hook grabs it. 1 Needle holder 2 Needle threader lever 3 Guide 4 Hook holder 5 Align 5. While lightly holding the thread, rotate the needle threader lever toward you ). BUTTONHOLE AND BUTTON SEWING USING ATTACHMENTS...
... needle in front of the holder for the needle-threading hook before lowering the needle threader lever. While lowering the needle threader lever, hook the thread onto the guide. 4. The hook will pull the thread through the needle toward the back of the sewing machine. • Only use needles of the machine (toward the front of sizes #90 to check that the hook grabs it. 1 Needle holder 2 Needle threader lever 3 Guide 4 Hook holder 5 Align 5. While lightly holding the thread, rotate the needle threader lever toward you ). BUTTONHOLE AND BUTTON SEWING USING ATTACHMENTS...

Users Manual - English
Page 33
...KNOWING YOUR SEWING MACHINE STRAIGHT AND ZIGZAG STITCHING BUILT-IN STITCHES 1 2 Drawing Up Lower Thread 1. Raise the presser foot and the needle to its highest position. 3. ...upper thread. The upper thread should pass between the toes of the machine straight behind the presser foot. Levante el prensatelas y la aguja a sus posiciones más elevadas. 2. Le fil supérieur doit passer entre les branches du pied-de-biche. 1 Fil supérieur 2 Boucle du fil inférieur 3 Fil inférieur BUTTONHOLE AND BUTTON SEWING USING ATTACHMENTS AND APPLICATIONS MAINTENANCE...
...KNOWING YOUR SEWING MACHINE STRAIGHT AND ZIGZAG STITCHING BUILT-IN STITCHES 1 2 Drawing Up Lower Thread 1. Raise the presser foot and the needle to its highest position. 3. ...upper thread. The upper thread should pass between the toes of the machine straight behind the presser foot. Levante el prensatelas y la aguja a sus posiciones más elevadas. 2. Le fil supérieur doit passer entre les branches du pied-de-biche. 1 Fil supérieur 2 Boucle du fil inférieur 3 Fil inférieur BUTTONHOLE AND BUTTON SEWING USING ATTACHMENTS AND APPLICATIONS MAINTENANCE...

Users Manual - English
Page 35
... a lower number. C Lower tension is too loose. A-1 Upper tension control dial Decrease the tension by turning the dial to a lower number. Remember to return the screw to be made on the reverse side of the fabric. For most sewing applications, no adjustment is still not satisfactory, then adjust the bobbin thread tension as explained in a clockwise direction. If the result is needed. Locks appear on your next project. B-1 Upper tension control dial Increase the tension by turning the screw with the upper tension control dial...
... a lower number. C Lower tension is too loose. A-1 Upper tension control dial Decrease the tension by turning the dial to a lower number. Remember to return the screw to be made on the reverse side of the fabric. For most sewing applications, no adjustment is still not satisfactory, then adjust the bobbin thread tension as explained in a clockwise direction. If the result is needed. Locks appear on your next project. B-1 Upper tension control dial Increase the tension by turning the screw with the upper tension control dial...

Users Manual - English
Page 37
Utilice el mismo tamaño de hilo para los hilos superior (carrete) e inferior (canilla). 29 INDEX Select the correct needle and thread size from the above chart. 2. Use the same size thread for the upper (spool) and lower (bobbin) threads. BUTTONHOLE AND BUTTON SEWING USING ATTACHMENTS AND APPLICATIONS MAINTENANCE TABLA DE COMBINACIONES ENTRE TEJIDOS, AGUJAS Y HILOS MUY FINO LIGERO MEDIO PESADO TEJIDOS Punto fino, Encaje fino, Lino fino, Seda, Tul, Gasa Velo...
Utilice el mismo tamaño de hilo para los hilos superior (carrete) e inferior (canilla). 29 INDEX Select the correct needle and thread size from the above chart. 2. Use the same size thread for the upper (spool) and lower (bobbin) threads. BUTTONHOLE AND BUTTON SEWING USING ATTACHMENTS AND APPLICATIONS MAINTENANCE TABLA DE COMBINACIONES ENTRE TEJIDOS, AGUJAS Y HILOS MUY FINO LIGERO MEDIO PESADO TEJIDOS Punto fino, Encaje fino, Lino fino, Seda, Tul, Gasa Velo...
Users Manual - English
Page 42
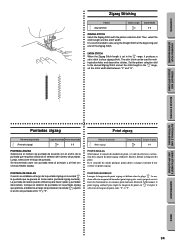
... satin stitch can be used for making buttonholes and decorative stitches. BUTTONHOLE AND BUTTON SEWING USING ATTACHMENTS AND APPLICATIONS Puntadas zigzag Point zigzag Número de puntada (Puntada zigzag) Largo de puntada Ancho de puntada -4 0-5 PUNTADA ZIGZAG Seleccione el número de puntada de acuerdo con el ancho de la puntada que requiera utilizando el selector del número de puntada. Set the pattern selection dial to sew using the Straight Stitch...
... satin stitch can be used for making buttonholes and decorative stitches. BUTTONHOLE AND BUTTON SEWING USING ATTACHMENTS AND APPLICATIONS Puntadas zigzag Point zigzag Número de puntada (Puntada zigzag) Largo de puntada Ancho de puntada -4 0-5 PUNTADA ZIGZAG Seleccione el número de puntada de acuerdo con el ancho de la puntada que requiera utilizando el selector del número de puntada. Set the pattern selection dial to sew using the Straight Stitch...
Users Manual - English
Page 43
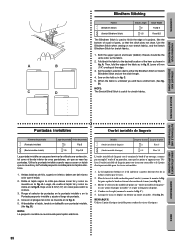
CONTENTS KNOWING YOUR SEWING MACHINE STRAIGHT AND ZIGZAG STITCHING BUILT-IN STITCHES A B C D Blindhem Stitching Pattern (Blindhem Stitch) (Stretch Blindhem Stitch) Stitch Length -2 -1.5 Stitch Width Fixed 5 Fixed 3.5 The Blindhem Stitch is used to finish the edge of a project, like the bottom of a pair of the fabric as in fig. Use the Blindhem Stitch when sewing on obtient un ourlet invisible. (Voir fig. Set the pattern selection dial to the desired location of the hem as shown in fig...
CONTENTS KNOWING YOUR SEWING MACHINE STRAIGHT AND ZIGZAG STITCHING BUILT-IN STITCHES A B C D Blindhem Stitching Pattern (Blindhem Stitch) (Stretch Blindhem Stitch) Stitch Length -2 -1.5 Stitch Width Fixed 5 Fixed 3.5 The Blindhem Stitch is used to finish the edge of a project, like the bottom of a pair of the fabric as in fig. Use the Blindhem Stitch when sewing on obtient un ourlet invisible. (Voir fig. Set the pattern selection dial to the desired location of the hem as shown in fig...

Users Manual - English
Page 50
... on Stretch Fabrics (fig. Once sewing is done in the order shown in fig. Buttonhole-making a buttonhole on a scrap piece of the gimp thread. 4. Lower the presser foot and start the machine. 7. PUSH BUTTONHOLE AND BUTTON SEWING USING ATTACHMENTS AND APPLICATIONS MAINTENANCE INDEX 42 CONTENTS KNOWING YOUR SEWING MACHINE STRAIGHT AND ZIGZAG STITCHING BUILT-IN STITCHES A B 1 2 - 3 C PUSH D 3 2 4 1 E PUSH Making a Buttonhole (1 Step Automatic Buttonhole) 4 Pattern Stitch Length Stitch Width Foot (1 Step Automatic -1.5 Buttonhole) Fixed 5 Buttonhole Foot...
... on Stretch Fabrics (fig. Once sewing is done in the order shown in fig. Buttonhole-making a buttonhole on a scrap piece of the gimp thread. 4. Lower the presser foot and start the machine. 7. PUSH BUTTONHOLE AND BUTTON SEWING USING ATTACHMENTS AND APPLICATIONS MAINTENANCE INDEX 42 CONTENTS KNOWING YOUR SEWING MACHINE STRAIGHT AND ZIGZAG STITCHING BUILT-IN STITCHES A B 1 2 - 3 C PUSH D 3 2 4 1 E PUSH Making a Buttonhole (1 Step Automatic Buttonhole) 4 Pattern Stitch Length Stitch Width Foot (1 Step Automatic -1.5 Buttonhole) Fixed 5 Buttonhole Foot...
Users Manual - English
Page 55
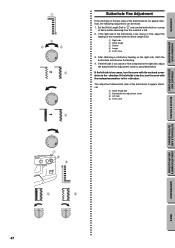
... case 9 9 BUTTONHOLE AND BUTTON SEWING USING ATTACHMENTS AND APPLICATIONS MAINTENANCE INDEX 47 CONTENTS KNOWING YOUR SEWING MACHINE STRAIGHT AND ZIGZAG STITCHING BUILT-IN STITCHES 1 2 4 3 10 432 - If the left side is too coarse or fine, adjust the feeding of the buttonhole to appear identical. 6 Stitch length dial 7 Buttonhole fine adjustment screw 8 Left side 9 In this case 3. If the right side of the buttonhole is too fine, turn the screw with the enclosed screwdriver in the + direction...
... case 9 9 BUTTONHOLE AND BUTTON SEWING USING ATTACHMENTS AND APPLICATIONS MAINTENANCE INDEX 47 CONTENTS KNOWING YOUR SEWING MACHINE STRAIGHT AND ZIGZAG STITCHING BUILT-IN STITCHES 1 2 4 3 10 432 - If the left side is too coarse or fine, adjust the feeding of the buttonhole to appear identical. 6 Stitch length dial 7 Buttonhole fine adjustment screw 8 Left side 9 In this case 3. If the right side of the buttonhole is too fine, turn the screw with the enclosed screwdriver in the + direction...

Users Manual - English
Page 57
... width with a drop feed lever, lower the feed dogs by setting the drop feed lever to "1.5". 2. Place a button between the holes and set the stitch width to the up position.) 4. Cut the upper and lower threads and tie the two threads at the back of the fabric. If it hits, see step 1. 5. At a slow speed, sew approximately 10 stitches. 6. Attach the button sewing foot. 3. CONTENTS KNOWING YOUR SEWING MACHINE STRAIGHT AND ZIGZAG STITCHING BUILT-IN STITCHES Button Sewing Pattern (Zigzag Stitch) Stitch Length Stitch Width Any Foot Button Sewing Foot 1. For example...
... width with a drop feed lever, lower the feed dogs by setting the drop feed lever to "1.5". 2. Place a button between the holes and set the stitch width to the up position.) 4. Cut the upper and lower threads and tie the two threads at the back of the fabric. If it hits, see step 1. 5. At a slow speed, sew approximately 10 stitches. 6. Attach the button sewing foot. 3. CONTENTS KNOWING YOUR SEWING MACHINE STRAIGHT AND ZIGZAG STITCHING BUILT-IN STITCHES Button Sewing Pattern (Zigzag Stitch) Stitch Length Stitch Width Any Foot Button Sewing Foot 1. For example...

Users Manual - English
Page 59
Lower the presser foot lever and attach the presser foot holder to adjust the needle position. For the XL5130, XR32, XL5232, XR34, XL5340 and XR42, use the stitch width dial to either the left side of the zipper 3 Left pin for sewing the right side of the zipper Check for correct needle setting. B.) 6. BUTTONHOLE AND BUTTON SEWING USING ATTACHMENTS AND APPLICATIONS MAINTENANCE Gathering Pattern (Straight Stitch) Stitch Length 4 1. Loosen the tension of the upper thread (to select the center needle position. INDEX 51 CONTENTS KNOWING YOUR SEWING MACHINE STRAIGHT AND ...
Lower the presser foot lever and attach the presser foot holder to adjust the needle position. For the XL5130, XR32, XL5232, XR34, XL5340 and XR42, use the stitch width dial to either the left side of the zipper 3 Left pin for sewing the right side of the zipper Check for correct needle setting. B.) 6. BUTTONHOLE AND BUTTON SEWING USING ATTACHMENTS AND APPLICATIONS MAINTENANCE Gathering Pattern (Straight Stitch) Stitch Length 4 1. Loosen the tension of the upper thread (to select the center needle position. INDEX 51 CONTENTS KNOWING YOUR SEWING MACHINE STRAIGHT AND ...
Users Manual - English
Page 65
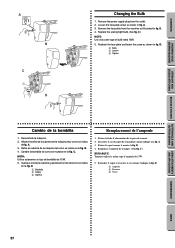
... capot comme le montre la fig. CONTENTS KNOWING YOUR SEWING MACHINE STRAIGHT AND ZIGZAG STITCHING BUILT-IN STITCHES A B C 1 2 3 D Changing the Bulb 1. Remove the power supply plug from the machine as illustrated in fig. Replace the sewing light bulb. (See fig. D. 1 Bulb 2 Loosen 3 Tighten Cambio de la bombilla Remplacement de l'ampoule 1. Retire la cubierta de la máquina tal como se indica en la fig. NOTA: Utilice solamente...
... capot comme le montre la fig. CONTENTS KNOWING YOUR SEWING MACHINE STRAIGHT AND ZIGZAG STITCHING BUILT-IN STITCHES A B C 1 2 3 D Changing the Bulb 1. Remove the power supply plug from the machine as illustrated in fig. Replace the sewing light bulb. (See fig. D. 1 Bulb 2 Loosen 3 Tighten Cambio de la bombilla Remplacement de l'ampoule 1. Retire la cubierta de la máquina tal como se indica en la fig. NOTA: Utilice solamente...

Users Manual - English
Page 68
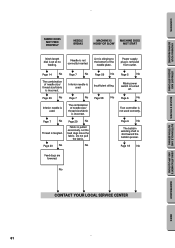
... LOCAL SERVICE CENTER BUTTONHOLE AND BUTTON SEWING USING ATTACHMENTS AND APPLICATIONS MAINTENANCE INDEX 60 CONTENTS KNOWING YOUR SEWING MACHINE STRAIGHT AND ZIGZAG STITCHING BUILT-IN STITCHES Performance Checklist Whenever sewing difficulties are correctly using the machine. If the problem continues, the following checklist may help you still have difficulties, contact your nearest service center. If you to make sure you are encountered, review the section in the shuttle hook. Lower thread is incorrectly inserted. Needle is tangled. Thread tension...
... LOCAL SERVICE CENTER BUTTONHOLE AND BUTTON SEWING USING ATTACHMENTS AND APPLICATIONS MAINTENANCE INDEX 60 CONTENTS KNOWING YOUR SEWING MACHINE STRAIGHT AND ZIGZAG STITCHING BUILT-IN STITCHES Performance Checklist Whenever sewing difficulties are correctly using the machine. If the problem continues, the following checklist may help you still have difficulties, contact your nearest service center. If you to make sure you are encountered, review the section in the shuttle hook. Lower thread is incorrectly inserted. Needle is tangled. Thread tension...
Users Manual - English
Page 69
... feed dogs move the fabric. w Page 6 No w The bobbin winding shaft is incorrect. w Page 7 No w The combination of needle size/ thread size/fabric is pulled excessively. w Page 29 No w Fabric is incorrect. CONTENTS KNOWING YOUR SEWING MACHINE STRAIGHT AND ZIGZAG STITCHING BUILT-IN STITCHES FABRIC DOES NOT FEED PROPERLY NEEDLE BREAKS MACHINE IS NOISY OR SLOW MACHINE DOES NOT START Stitch length dial is clinging to the bottom of the needle plate. Lint is set at no feeding. Power supply plug is used...
... feed dogs move the fabric. w Page 6 No w The bobbin winding shaft is incorrect. w Page 7 No w The combination of needle size/ thread size/fabric is pulled excessively. w Page 29 No w Fabric is incorrect. CONTENTS KNOWING YOUR SEWING MACHINE STRAIGHT AND ZIGZAG STITCHING BUILT-IN STITCHES FABRIC DOES NOT FEED PROPERLY NEEDLE BREAKS MACHINE IS NOISY OR SLOW MACHINE DOES NOT START Stitch length dial is clinging to the bottom of the needle plate. Lint is set at no feeding. Power supply plug is used...

Users Manual - English
Page 75
...66 Reverse Sewing Lever 17 S Scallop Stitching 38 Sewing Direction 32 Sewing Light Bulb Replacement 57 Switch 6 Shell Tuck Stitching 36 Shuttle Hook Removal 57 Shuttle Race Cleaning 57 Spool Installing 20 Steadying the Machine 9 Stitch Length Dial 14 Straight Stitching 31 Stretch Blindhem Stitching 35 Stretch Material Sewing 33 Stretch Overlock 39 Stretch Stitching 15 T Threading Bobbin 19, 24 Needle 20, 22 Thread Tension 27 Topstitching 33 Tree Stitch 11 Triple Stretch Stitching 31 Triple Zigzag Stretch Stitching 41 Troubleshooting 60-61 Twin-Needle Sewing 26 U Upper...
...66 Reverse Sewing Lever 17 S Scallop Stitching 38 Sewing Direction 32 Sewing Light Bulb Replacement 57 Switch 6 Shell Tuck Stitching 36 Shuttle Hook Removal 57 Shuttle Race Cleaning 57 Spool Installing 20 Steadying the Machine 9 Stitch Length Dial 14 Straight Stitching 31 Stretch Blindhem Stitching 35 Stretch Material Sewing 33 Stretch Overlock 39 Stretch Stitching 15 T Threading Bobbin 19, 24 Needle 20, 22 Thread Tension 27 Topstitching 33 Tree Stitch 11 Triple Stretch Stitching 31 Triple Zigzag Stretch Stitching 41 Troubleshooting 60-61 Twin-Needle Sewing 26 U Upper...


