

Users Manual - Multi
Page 2
... Do not use ." Always unplug the sewing machine from all instructions before changing the light bulb. To reduce the risk of the sewing machine and foot controller free from the electrical outlet immediately after using and before cleaning. 2. The sewing machine should be supervised to the symbol "O"... that they do not play with this sewing machine only for use as threading the needle, changing the needle, threading the bobbin, or changing the presser foot. 15. "IMPORTANT SAFETY INSTRUCTIONS" When using the sewing machine, basic safety precautions should always be followed...
... Do not use ." Always unplug the sewing machine from all instructions before changing the light bulb. To reduce the risk of the sewing machine and foot controller free from the electrical outlet immediately after using and before cleaning. 2. The sewing machine should be supervised to the symbol "O"... that they do not play with this sewing machine only for use as threading the needle, changing the needle, threading the bobbin, or changing the presser foot. 15. "IMPORTANT SAFETY INSTRUCTIONS" When using the sewing machine, basic safety precautions should always be followed...
Users Manual - Multi
Page 39
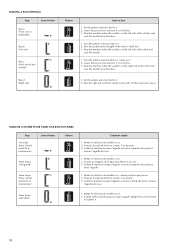
... (côté gauch) 3ème temps (côté droit) d 1. Arrêter la machine lorsque l'aiguille se trouve à gauche des points et relever l'aiguille du tissu. 1. Lower the presser foot and sew 5 to a. 2. Turn the pattern selection dial to c (same as a). 2. Turn the pattern ...selection dial to b. 2. Sew the right side until the needle reaches the stitches formed in step a. Arrêter la machine lorsque l'aiguille se trouve à...
... (côté gauch) 3ème temps (côté droit) d 1. Arrêter la machine lorsque l'aiguille se trouve à gauche des points et relever l'aiguille du tissu. 1. Lower the presser foot and sew 5 to a. 2. Turn the pattern selection dial to c (same as a). 2. Turn the pattern ...selection dial to b. 2. Sew the right side until the needle reaches the stitches formed in step a. Arrêter la machine lorsque l'aiguille se trouve à...
Users Manual - Multi
Page 55
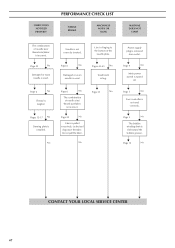
... plate is incorrect. FABRIC DOES NOT FEED PROPERLY PERFORMANCE CHECK LIST NEEDLE BREAKS MACHINE IS NOISY OR SLOW MACHINE DOES NOT START The combination of the needle plate. Page 6 No Damaged... Fabric is removed from outlet. Page 4 No Main power switch is slid toward the bobbin presser. Page 5 No The bobbin winding shaft is turned off. No Needle is tangled. Page 12 ...No CONTACT YOUR LOCAL SERVICE CENTER 47 Page 5 No Foot controller is used. Let the feed dogs move the fabric. Page 6 No Thread is not...
... plate is incorrect. FABRIC DOES NOT FEED PROPERLY PERFORMANCE CHECK LIST NEEDLE BREAKS MACHINE IS NOISY OR SLOW MACHINE DOES NOT START The combination of the needle plate. Page 6 No Damaged... Fabric is removed from outlet. Page 4 No Main power switch is slid toward the bobbin presser. Page 5 No The bobbin winding shaft is turned off. No Needle is tangled. Page 12 ...No CONTACT YOUR LOCAL SERVICE CENTER 47 Page 5 No Foot controller is used. Let the feed dogs move the fabric. Page 6 No Thread is not...
Quick Setup Guide - English
Page 1
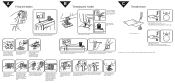
... will stop winding. Thread the needle from the right to the left. 6 7 8 ∗If these actions do not correct the problem, please rethread the machine using step A and B. A Filling the bobbin 1 B Threading the needle 1 2 3 Place the thread spool on the spool pin and pass the thread... thread guide and down the left channel, clear to the back of the opening around the bobbin winder thread guide. 2 3 4 4 Raise the presser foot lifter. 5 * Raise the thread takeup lever to its highest position and remove the bobbin case by turning the dial a higher number. Hold the ...
... will stop winding. Thread the needle from the right to the left. 6 7 8 ∗If these actions do not correct the problem, please rethread the machine using step A and B. A Filling the bobbin 1 B Threading the needle 1 2 3 Place the thread spool on the spool pin and pass the thread... thread guide and down the left channel, clear to the back of the opening around the bobbin winder thread guide. 2 3 4 4 Raise the presser foot lifter. 5 * Raise the thread takeup lever to its highest position and remove the bobbin case by turning the dial a higher number. Hold the ...


