

Users Manual - Multi
Page 2
...10. Replace bulb with any openings. 6. Never operate this sewing machine if it has a damaged cord or plug, if it has been dropped or damaged, or dropped into any of the sewing machine and foot controller free from the electrical outlet immediately after using and before cleaning. 2.... "IMPORTANT SAFETY INSTRUCTIONS" When using the sewing machine, basic safety precautions should always be supervised to ensure that they...
...10. Replace bulb with any openings. 6. Never operate this sewing machine if it has a damaged cord or plug, if it has been dropped or damaged, or dropped into any of the sewing machine and foot controller free from the electrical outlet immediately after using and before cleaning. 2.... "IMPORTANT SAFETY INSTRUCTIONS" When using the sewing machine, basic safety precautions should always be supervised to ensure that they...
Users Manual - Multi
Page 39
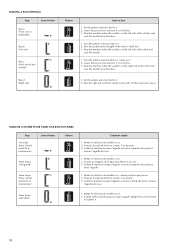
...dial to b. 2. Set the pattern selection dial to 6 stitches. 3. d 31 Mettre le sélecteur de modèle sur d. 2. Lower the presser foot and sew 5 to d. 2. MARCHE A SUIVRE POUR FAIRE UNE BOUTONNIERE Step 1er temps (barre d'arrêt avant de la boutonnière) 2ème temps (cô... le sélecteur de modèle sur b. 2. Abaisser le pied-de-biche et coudre 5 à 6 points. 3. Lower the presser foot and sew 5 to Sew 1. Stop the machine when the needle is at the left side of the stitch and raise the needle. 1. Abaisser le pied-de-biche et coudre 5 ou...
...dial to b. 2. Set the pattern selection dial to 6 stitches. 3. d 31 Mettre le sélecteur de modèle sur d. 2. Lower the presser foot and sew 5 to d. 2. MARCHE A SUIVRE POUR FAIRE UNE BOUTONNIERE Step 1er temps (barre d'arrêt avant de la boutonnière) 2ème temps (cô... le sélecteur de modèle sur b. 2. Abaisser le pied-de-biche et coudre 5 à 6 points. 3. Lower the presser foot and sew 5 to Sew 1. Stop the machine when the needle is at the left side of the stitch and raise the needle. 1. Abaisser le pied-de-biche et coudre 5 ou...
Users Manual - Multi
Page 55
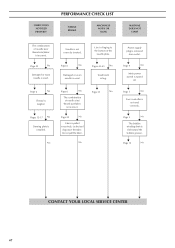
FABRIC DOES NOT FEED PROPERLY PERFORMANCE CHECK LIST NEEDLE BREAKS MACHINE IS NOISY OR SLOW MACHINE DOES NOT START The combination of needle size/ thread size/fabric is incorrect. Let the feed dogs move the fabric. Page 5 No Foot controller is used. Do not pull the fabric. Page 22 No Damaged or worn needle...
FABRIC DOES NOT FEED PROPERLY PERFORMANCE CHECK LIST NEEDLE BREAKS MACHINE IS NOISY OR SLOW MACHINE DOES NOT START The combination of needle size/ thread size/fabric is incorrect. Let the feed dogs move the fabric. Page 5 No Foot controller is used. Do not pull the fabric. Page 22 No Damaged or worn needle...
Users Manual - Multi
Page 63
... 17 E Elastic Stitching 27 Embroidering 40-41 T Thread Tension 20-21 Troubleshooting 46, 47 Twin-Needle Sewing 18 U Upper Tension Control Dial 20 Upper Threading 15-16 W Winding the Bobbin 12 F Feed Dog Cleaning 45 Foot Controller 5 Free-Arm Style 8 Z Zigzag Stitching 26 Zipper Insertion 36 G Gathering 37 L Lower Threading 14 M Main Power Switch...
... 17 E Elastic Stitching 27 Embroidering 40-41 T Thread Tension 20-21 Troubleshooting 46, 47 Twin-Needle Sewing 18 U Upper Tension Control Dial 20 Upper Threading 15-16 W Winding the Bobbin 12 F Feed Dog Cleaning 45 Foot Controller 5 Free-Arm Style 8 Z Zigzag Stitching 26 Zipper Insertion 36 G Gathering 37 L Lower Threading 14 M Main Power Switch...
Quick Setup Guide - English
Page 1
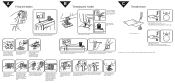
... Raise the needle to the right. The latch should hold the bobbin case in place. While holding the end of the thread, depress the foot controller. When the bobbin is full, it is too tight. (Locks appear on the surface of the fabric.) Decrease the tension by turning ...higher number. Pass the thread through the thread guide and down the left . 6 7 8 ∗If these actions do not correct the problem, please rethread the machine using step A and B. Hold the bobbin case as shown, insert the bobbin with the top opening around the bobbin winder thread guide. 2 3 4 4 Raise the...
... Raise the needle to the right. The latch should hold the bobbin case in place. While holding the end of the thread, depress the foot controller. When the bobbin is full, it is too tight. (Locks appear on the surface of the fabric.) Decrease the tension by turning ...higher number. Pass the thread through the thread guide and down the left . 6 7 8 ∗If these actions do not correct the problem, please rethread the machine using step A and B. Hold the bobbin case as shown, insert the bobbin with the top opening around the bobbin winder thread guide. 2 3 4 4 Raise the...


