

Users Manual - English
Page 3
... into the electrical outlet. To reduce the risk of the electrical outlet. Before using the machine immediately and unplug the power cord. • When transporting the sewing machine, be sure to carry it by any user servicing adjustments mentioned in use if you notice anything unusual, such as an odor,...may injure your back or knees. 4 Always keep your machine if the power is stored or in this manual, or if you have finished reading this manual, store it where it can quickly be accessed for purchasing this embroidery and sewing machine. Do not pull on the foot controller. • Do...
... into the electrical outlet. To reduce the risk of the electrical outlet. Before using the machine immediately and unplug the power cord. • When transporting the sewing machine, be sure to carry it by any user servicing adjustments mentioned in use if you notice anything unusual, such as an odor,...may injure your back or knees. 4 Always keep your machine if the power is stored or in this manual, or if you have finished reading this manual, store it where it can quickly be accessed for purchasing this embroidery and sewing machine. Do not pull on the foot controller. • Do...
Users Manual - English
Page 4
... table in the back of suffocation. • Do not use outdoors. 7 For a longer service life: • When storing this sewing machine on an unstable surface, such as described in should never be used by or near children. • The plastic bag that you do...should be replaced by the manufacturer as a stove or iron; For additional product information and updates, visit our web site at www.brother.com 2 otherwise, the machine, power cord or garment being used or where oxygen is used . • Always consult the operation manual when replacing or installing any assemblies,...
... table in the back of suffocation. • Do not use outdoors. 7 For a longer service life: • When storing this sewing machine on an unstable surface, such as described in should never be used by or near children. • The plastic bag that you do...should be replaced by the manufacturer as a stove or iron; For additional product information and updates, visit our web site at www.brother.com 2 otherwise, the machine, power cord or garment being used or where oxygen is used . • Always consult the operation manual when replacing or installing any assemblies,...

Users Manual - English
Page 13
...cable into the foot controller jack. Attach the appropriate presser foot for sewing straight seams. e Needle plate cover (page 152) Remove the needle plate cover to use your machine. 11 c Embroidery card slot (page 138) Insert the embroidery card. d Air vent The air vent allows the air surrounding ... stitch. Memo z Refer to pages 10 through 13 while you (counterclockwise) to raise and lower the needle to turn the sewing machine on the power supply cord into the bobbin case. d Needle plate (page 67) The needle plate is marked with guides for the selected stitching. b Thread guide...
...cable into the foot controller jack. Attach the appropriate presser foot for sewing straight seams. e Needle plate cover (page 152) Remove the needle plate cover to use your machine. 11 c Embroidery card slot (page 138) Insert the embroidery card. d Air vent The air vent allows the air surrounding ... stitch. Memo z Refer to pages 10 through 13 while you (counterclockwise) to raise and lower the needle to turn the sewing machine on the power supply cord into the bobbin case. d Needle plate (page 67) The needle plate is marked with guides for the selected stitching. b Thread guide...
Users Manual - English
Page 18
... heat. Electric shock may result. ● When unplugging the machine, always turn the sewing machine on the power cord into the electrical outlet and the power supply jack on the machine. ● Do not insert the plug on and off. Do not place heavy objects on the cord may result in fire, electric shock, or damage to the...
... heat. Electric shock may result. ● When unplugging the machine, always turn the sewing machine on the power cord into the electrical outlet and the power supply jack on the machine. ● Do not insert the plug on and off. Do not place heavy objects on the cord may result in fire, electric shock, or damage to the...
Users Manual - English
Page 19
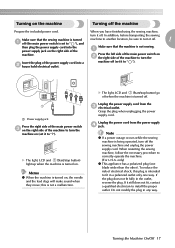
... the machine Prepare the included power cord. Grasp the plug when unplugging the power supply cord. When restarting the sewing machine, follow the necessary procedure to fit in a polarized outlet only one blade wider than the other). Turning on (set it to "|"). Note z If a power outage occurs while the sewing machine is turned off the sewing machine and unplug the power supply cord. X The...
... the machine Prepare the included power cord. Grasp the plug when unplugging the power supply cord. When restarting the sewing machine, follow the necessary procedure to fit in a polarized outlet only one blade wider than the other). Turning on (set it to "|"). Note z If a power outage occurs while the sewing machine is turned off the sewing machine and unplug the power supply cord. X The...
Users Manual - English
Page 154
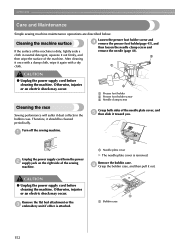
... (page 41). a Unplug the power supply cord from the power b supply jack on the right side of the needle plate cover, and e then slide it again with a dry cloth. Turn off the sewing machine. Therefore, it out. Grasp both sides of the sewing machine. f Grasp the bobbin case, ...occur. Otherwise, injuries or an electric shock may occur. Remove the flat bed attachment or the c embroidery unit if either is removed. APPENDIX Care and Maintenance Simple sewing machine maintenance operations are described below. After cleaning it once with a damp cloth, wipe it toward you....
... (page 41). a Unplug the power supply cord from the power b supply jack on the right side of the needle plate cover, and e then slide it again with a dry cloth. Turn off the sewing machine. Therefore, it out. Grasp both sides of the sewing machine. f Grasp the bobbin case, ...occur. Otherwise, injuries or an electric shock may occur. Remove the flat bed attachment or the c embroidery unit if either is removed. APPENDIX Care and Maintenance Simple sewing machine maintenance operations are described below. After cleaning it once with a damp cloth, wipe it toward you....
Users Manual - English
Page 168
...pant legs 46 parallel stitches 36 patchwork 99 166 pattern embroidery 139 pattern retrieving 150 piecing 99 piecing straight stitch 97 plug 17 positioning fabric 50 power supply cord 17 power supply jack 11, 17 power switch 11, 17 preparations for embroidering 118 presser foot...ripper 9 securing stitching 53 selecting alphabet characters 136 selecting embroidery patterns 132 selecting stitches 49 selecting the needle 39 settings key 13 sewing basics 48 sewing direction change 65 sewing machine help key 13 sewing speed controller 12 shell tuck stitch 113 side cutter 76 ...
...pant legs 46 parallel stitches 36 patchwork 99 166 pattern embroidery 139 pattern retrieving 150 piecing 99 piecing straight stitch 97 plug 17 positioning fabric 50 power supply cord 17 power supply jack 11, 17 power switch 11, 17 preparations for embroidering 118 presser foot...ripper 9 securing stitching 53 selecting alphabet characters 136 selecting embroidery patterns 132 selecting stitches 49 selecting the needle 39 settings key 13 sewing basics 48 sewing direction change 65 sewing machine help key 13 sewing speed controller 12 shell tuck stitch 113 side cutter 76 ...


